
iPad 8 ホームボタンアセンブリの交換

はじめに
手順 1 に進むこのガイドを使ってiPad 8のホームボタンアセンブリを交換してください。
この修理ガイドはWi-Fiバージョンのみ対象です。LTEモデルについてはこちらを参照してください。
ホームボタンのTouch IDセンサーはロジックボードとペアになっています。Touch ID機能を保持するには、元のホームボタンを新しいフロントパネルアセンブリに移し、接着する必要があります。
安全のため、ラップトップを解体する前にバッテリー残量を25%以下に放電してください。これにより、修理中に誤ってバッテリーを損傷した場合、熱に伴う危険な事故の発生リスクを軽減することができます。バッテリーが膨張している場合は、 適切な方法で処理を行ってください。
バッテリー・ブロッカーを使用してバッテリーを分離する際は、十分注意してください。バッテリーの接点は容易に損傷し、不可逆的な損傷につながります。バッテリーを絶縁せずにガイドを完成させる場合、バッテリーをショートさせたり、繊細な回路部品を損傷させたりしないよう、完全に必要な場合(ネジを外す場合など)を除き、金属製工具の使用は避けてください。
このガイドに掲載されている写真の一部は、別のモデルのものであり、見た目に若干の相違がある場合がありますが、ガイドの手順には影響ありません。
必要な工具と部品
パーツ

ツール


もっと見る
-
この手順で使用する道具:Clampy - Anti-Clamp$24.95
-
青いハンドルをヒンジ側に引くと、リバースクランのアームを解除します。
-
iPadの下に物を置いて、吸盤の間に水平になるようにします。
-
吸盤カップをiPhoneの下端付近に装着します。上部に一つ、下部に1つずつ取り付けます。
-
アンチクランプの底面をしっかりと持ち、上部のカップをしっかりと押して吸着させます。
-
-
-
青いハンドルを手前に引くと、アームがロックされます。
-
ハンドルを時計回りに360度回転させ、カップが両側をストレッチするまで回し続けます。
-
吸盤の位置が合っていることを確認してください。装着位置がずれ始めたら、吸盤を少し緩めてアームを装着し直してください。
-
-
-
スクリーンを触って温かくなったら、できるだけ左端に吸盤を当てます。
-
吸着ハンドルでスクリーンを持ち上げ、デジタイザとフレームの間にわずかな隙間を作ります。
-
デジタイザとフレームの隙間にオープニングピックを差し込みます。
I had a screen that was lightly cracked, and when I pulled up on the glass it cracked even further and made a mess of my removal. So, I would recommend taping cracks even if you can get suction so that you don’t induce even more cracks.
I actually had a really badly cracked digitizer. Using the suction cup did nothing but shatter the digitizer more. I intentionally drove a flat head screw driver into the digitizer to reveal the recess in the body where they are showing the opening-pick. Working around the edge, the glass shattered. You still need to be careful at all of spots noted in step 2.
Do not go under the digitizer more than the 1 mm along the sides or 3-4 mm at the corners as shown in step 29 using the flat grey ring around the edge for a reference. Direct all of your tool force into the body to prevent slipping into critical parts.
The antennas at either side of the home button were the trickiest part as they were thin and slightly attached to the digitizer. I would recommend using a plastic tool for these parts if you are having to 'scrape' the glass off of the tabs of the antenna.
-
-
-
作った隙間に2枚目のオープニングピックを差し込みます。
-
ピックを本体左下方向にスライドさせ、接着部分を切り離します。
-
接着剤の再装着を防ぐため、左下隅にピックを残してください。
-
-
-
新しいオープニングピックを挿入し、iPadの右端中央にスライドさせます。
There are sensitive display/digitizer cables no less than five inches from the bottom edge of the iPad. Insert the pick further down than this, or deeper than 1mm beyond this point and you risk irreparably damaging these cables.
Three inches is much too far down this side of the iPad to use picks.
-
-
-
-
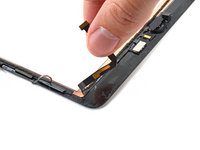
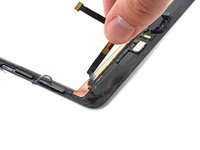
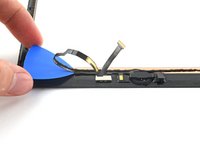
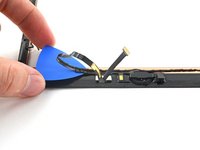
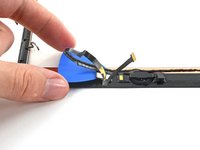
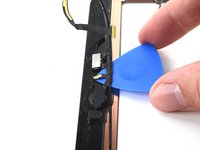
新しいオープニングピックを、先ほどiPadの下端に作った隙間に差し込みます。
-
ピックをアンテナの上にスライドさせ、ホームボタンの直前で止めます。
-
ピックをホームボタンの左側に残してから続行します。
-
-
-
接着剤がすべて分離したら、デジタイザーを本のように開き、iPadと平行になるように置いてください。
While reassembling, REALLY make sure the display cables and the home button cable won't be folded / bent while closing the digitizer. I'm not exactly sure what I did, but I broke the home button and touch ID since I bent the home button cable to the point that it broke. These ribbon cables are SUPER fragile.
-
-
この手順で使用する道具:Magnetic Project Mat$19.95
-
プラスドライバーを使い、液晶画面をフレームに固定している長さ4.3mmのネジ4本を外します。
-
液晶画面のネジを隠しているテープはすべて取り除いてください。
I found that the oils from my skin got on the LCD and were hard to get off. Care and/or gloves might be recommended when handling the LCD screen.
-
-
-
スパッジャーの平面側先端を使って、液晶を指でつかめる程度までこじ開けます。
-
LCDを本のページをめくるように、カメラの近くを持ち上げ、フレームのホームボタンの端の上で回します。
-
LCDを清潔で柔らかく、糸くずの出ない面に置き、ディスプレイケーブルにアクセスできるようにします。
The screw holes on the 4 corners of the LCD may have some adhesive under them preventing you from easily lifting the LCD up without damaging it. I advise, one you have taken the screws out drop some IPA on each corner leave it for 2 minutes, then very gently and slowly whilst moving the LCD from side to side slightly and slowly raise each corner. The secret here is patience.
-
-
-
プラスドライバーを使い、バッテリーコネクターをロジックボードに固定している長さ2.3mmのネジを外します。
does anyone know where to get replacement screws? i accidentally lost this one, and there's some missing in my iphone 8 that i had repaired years ago (had to get a new screen again, replaced it myself this time but noticed like 5 or more screws missing)
-
-
-
バッテリーブロッカーをロジックボードのバッテリーコネクターの下に35度の角度でスライドさせます。
-
作業中は、バッテリーブロッカーをそのままにしておいてください。
-
-
-
スパジャーの平面側先端を使って、LCDケーブルのプレスコネクタをこじ開けて、接続を外します。
-
-
この手順で使用する道具:Tweezers$4.99
-
ピンセットを使って、ホームボタンケーブルのZIFコネクタを覆っているテープをはがします。
-
-
この手順で使用する道具:Polyimide Tape$9.99
-
フロントパネルアセンブリを取り外します。
-
新しいディスプレイで「ゴースト」または「ファントム」タッチ入力の問題が発生した場合は、パネル背面のハイライト部分にカプトン(ポリイミド)テープなどの非常に薄い絶縁テープを追加することで解決できます。iFixitの交換用デジタイザには適切な絶縁が施されているため、テープを追加する必要はありません。
-
-
-
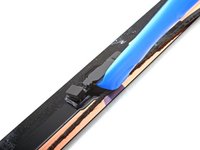
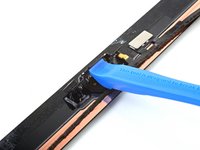
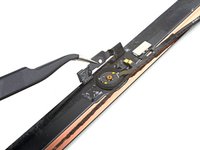
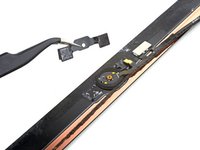
オープニングピックをホームボタンケーブルの下にスライドさせ、フロントパネルから切り離します。
-
ホームボタンのブラケットに到達するまで、オープニングピックをスライドさせ続けます。
When re-applying, there is a tiny metal pad on top of the home button cable on the left side of the bracket, it's not displayed anywhere here but belongs on top of the home button cable after the housing is re-attached. It's included in the ifixit digitizer kit but not clear where it belongs in these steps.
-
-
-
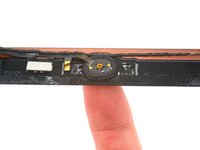
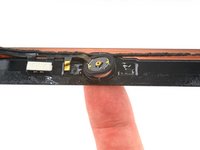
ホームボタンアセンブリを外します。
While doing this, i ended up forgetting to take off the spacer ring as my new digitizer already had one so my home button would work but pressing around it would activate it, and it wouldn't click. readjusting the button and taking that off fixed the problem for me
-


デバイスを再組み立てするには、これらのインストラクションを逆の順番に従って作業を進めてください。
e-wasteを処理する場合は、認可済みリサイクルセンターR2を通じて廃棄してください。
修理がうまく進みませんか?ベーシックなトラブルシューティングを試してみるか、iPad 8のアンサーコミュニティを参照してください。
デバイスを再組み立てするには、これらのインストラクションを逆の順番に従って作業を進めてください。
e-wasteを処理する場合は、認可済みリサイクルセンターR2を通じて廃棄してください。
修理がうまく進みませんか?ベーシックなトラブルシューティングを試してみるか、iPad 8のアンサーコミュニティを参照してください。
以下の翻訳者の皆さんにお礼を申し上げます:
100%

Midori Doiさんは世界中で修理する私たちを助けてくれています! あなたも貢献してみませんか?
翻訳を始める ›

