
ケーブルコネクタの識別と接続の外し方

はじめに
手順 1 に進む普段私たちが使用する電化製品には目もくらむほど大量の内部データケーブルや電源ケーブルコネクターが使われています。そして修理が頓挫する理由として最も多いのがコネクターを誤って破損してしまうことです。
このガイドを使って最もよく使われているコネクタータイプを知り、コネクターの切断を外し(たり接続し直したりす)るために必要なツールと技術を学びましょう。
必要な工具と部品
ツール


もっと見る
-
-
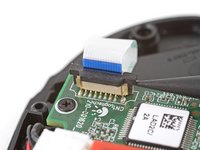
Zero Insertion Force/ゼロ挿入力 (ZIF) コネクターはFFC (Flat Flex Cables) やFPC (Flexible Printed Circuit)などのようなデリケートなリボンケーブルを結合するために使われます。しかしながら、修理初心者にトラブルをもたらすことがあります。
-
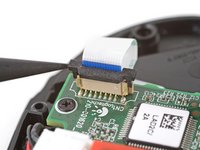
ケーブルを外すには、スパッジャー、オープニングツール、またはきれいな指の爪を使ってロッキングフラップを跳ね上げます。
-
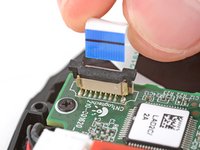
フラップがロック解除の位置に来たら、ピンセットまたは指を使って、ケーブルをソケットからゆっくりと引き抜きます。
-
-
-
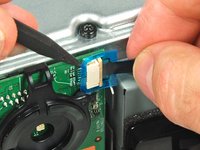
ZIFコネクタに似ているけれどロック用フラップがないソケットにリボンケーブルが接続されているのを見かけるかも知ません。通常、このケーブルはZIFコネクタに使用される通常のケーブルよりも丈夫で、先端は硬いプラスチックフィルムで補強されています。これらのコネクタは、プリンターやプロジェクター、ゲームコンソールなどの、大型の製品によく見られます。
-
このようなコネクタの接続を外すには、単純に「手間いらずの」リボンケーブルをソケットからからまっすぐ引き抜いてください。
-
-
-
スパッジャーを使って樹脂製のつまみの側面を交互に慎重に持ち上げ続けると、カチッという感触とともに開放位置におさまります。
-
つまみが開放位置になったら、ケーブルをソケットから慎重に真っ直ぐ引っ張れば接続を外せます。
-
-
-
このようなコネクタの接続を外すには、スパッジャーや清潔な爪先を使って、環状のつまみを持ち上げてコネクタから離します。
-
次に、スパッジャーの先端を使って、プラスチックのロックタブをソケットから押し出します。1mmか2mm程度しか動かないはずです。
-
これでリボンケーブルをコネクタからまっすぐ引き抜けます。
-
ケーブルをソケットのロックタブの裏側にしっかり差し込みます。
-
環状のつまみをコネクタの前面に回して掛けます。
-
スパッジャーや清潔な爪先を使って、ロックタブを押し込んでケーブルを固定します。
-
-
-
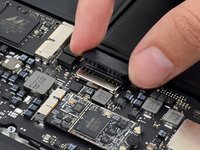
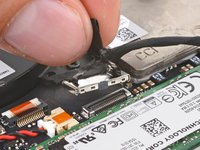
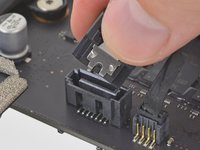
コネクタの中には、ソケットの上側を覆うように平らなプラスチック製の覆いが付いているものがあります。このようなコネクタには複数のケーブルが接続されていることもあります。フラットトップコネクタは通常広い側に取り付けられており、ノートパソコンや大型のゲーム機器でバッテリーと接続するためによく使われています。
-
このようなコネクタの接続を外すには、スパッジャーの平らな方の先端を使って両側を持ち上げて固定を外します。コネクタを完全にソケットから外すために指を使う必要があるかも知れません。
-
-
-
スパッジャーやオープニングツールをコネクタの端の下に差し込み、真っ直ぐこじり上げて接続を外します。
-
見かけることは少ないですが、大きめのプレスコネクタの中には接続を簡単に外せるようにプルタブが組み込まれているものがあります。このようなコネクタの場合は真っ直ぐ引き上げて下さい。
I have an idea,/Request that I'm sure would be worth the effort, and fit right into this subject. how about a step by step guide on fixing the mistake of fudging up the socket yes on the mother board Guilty, right now it's a 500 dollar paper weight!! ! And I'm sure there's a long line of us,right guys, since you guy's are Awesome at it! Where to source the female sockets that's go onto the board and the proper steps and tecniques , would be greatly appreciated, keep up the great work!!
Sorry to hear that! My usual advice would be to take it to a repair shop that performs board-level repairs (a.k.a. microsoldering). Replacing a damaged connector socket typically requires a lot of skill, practice, and tools that likely cost more than the full retail price of your device. So, it’s not exactly DIY-friendly! But if you’re interested, you can find a good introduction to board-level repairs on our YouTube channel.
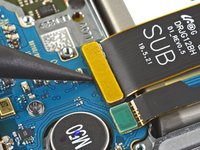
Is there a specific name for this type of connector? (brand, etc).
Stack-type Board-To-Board connector. JAE is a big manufacturer. FPC (Flexible Printed Circuit), what we commonly know as flex cables usually - is considered a board in this context.
"To reconnect, align the connector carefully over its socket and press down with your fingertip—first on one side, then the other—until it clicks into place."
This is ambiguous because it isn't clear to readers which is the 'side' of the connector referred to. For example, with a long rectangular connector, do you mean one of the short sides, or one of the long sides? I fear I may have got it wrong - after replacing my iPhone XS battery the bottom speaker no longer worked.
I disassembled the phone and disconnected and reconnected the connectors, to no avail, so reassembled the phone and ordered a replacement speaker. After fitting that, the speaker still doesn't work but unfortunately my screen now has a very bright stripe a few millimetres wide down the RHS. I didn't apply any excessive forces while lifting the screen and working on the phone - in fact it was easier to remove than the first time I opened it. The only thing I can think of is I used excessive isopropyl alcohol when cleaning the seal off.
-
-
-
この手順で使用する道具:Tweezers$3.99
-
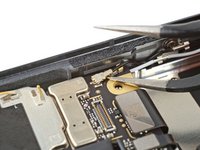
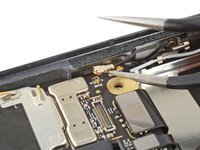
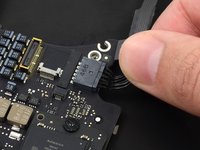
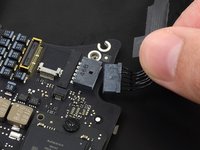
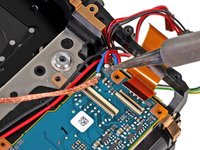
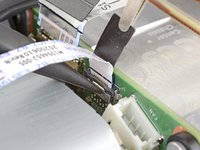
ケーブルを外すには、静電対策済みの細いプライングツールやツル首タイプのピンセットをコネクタの金属の首(のできるだけ先端に近い場所)の下に差し込んで、基板からまっすぐ持ち上げます。
Hello, I am repairing a tablet and the head to my coaxial cable fell off. What do I do?
-
-
-
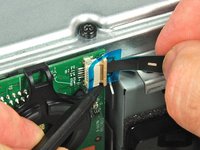
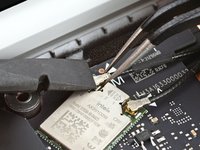
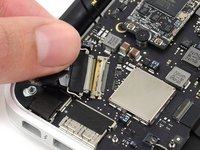
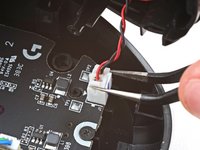
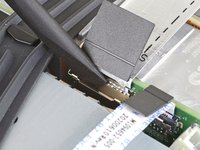
コネクタの接続を外す際は二段階の手順で行います。まず、スパッジャーの先端を金属製のバックルの下に慎重に押し込んでバックルの固定を外してから、バックルをソケットの上を越すようにめくり上げます。
-
その後、バックルとケーブルを一緒に持ち、ケーブルの方向に軽く引っ張り、コネクタをソケットから外します。
-
ケーブルとバックルを一緒に持って、コネクタを奥までソケットに差し込みます。
-
ソケットを越すようにバックルをめくり上げて、スパッジャーを使ってバックルを押し下げて、所定の位置にカチッと納めて下さい。
-
-
-
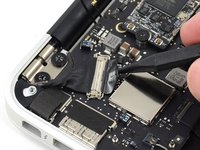
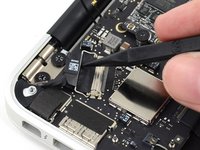
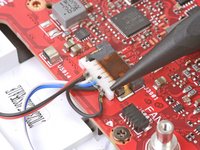
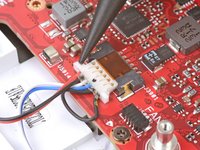
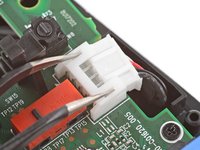
コネクタの中には、こじったり引っ張ったりするのに使いやすい場所がないものがあります。一般的には、このようなコネクタには複数のケーブルが接続されていて、小さなバッテリーやスピーカーとの接続に使われています。
-
コネクタを外すには、スパッジャーの先を使ってコネクタの両側を交互に押し、ソケットから"歩く"ように取り外します。
-
-
-
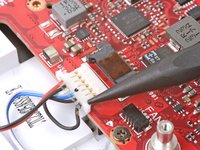
大抵の場合、このようなコネクタには上面に沿ってフチやつまみがついていて、ソケットからコネクタを押し出す際に使えるようになっています。
-
工具を当てるべき場所が明確でない場合は、結束されたケーブルコネクタの項を参照して下さい。
-
接続を外す際は、スパッジャーの平らな方の先端を使って、コネクターのタブを押してソケットから滑り出させて下さい。
-
-
-
ケーブルの接続を外す際は、最初に小型のスライド式コネクタのように左右の側面を交互に押してみて下さい。
-
上記の方法が上手くいかなかった場合は、ピンセットを使ってコネクタの側面をしっかり掴み、ソケットから真っ直ぐに引き抜いて下さい。ピンセットのコネクタにできるだけ近い場所を持つと、しっかりコネクタを掴みやすくなります。
-
ソケットに固定用の切り欠きがある場合は、先の尖ったピンセットの先端を切り欠きに差し込んでから、コネクタを慎重にソケットから押し出して下さい。
-
-
-
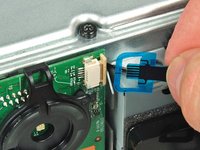
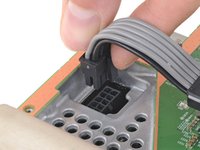
つまみをコネクター側に向けて摘み、まっすぐ引っ張り上げると接続を外すことができます。
Hallo, ich habe genau wie auf dem Bild bei meiner PS3 Slim ein ähnliches Kabel von dem Laufwerk zu trennen versucht. Beim Ziehen ist nicht das Kabel abgerissen, sondern die Anschlusstelle an der Platine hat sich auf einer Seite gelöst. Muss man hier nun das Teil wieder dran löten oder kann man es irgendwie mit Klebern fixieren?
-
-
-
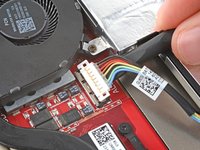
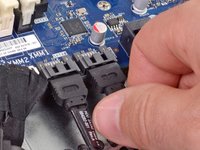
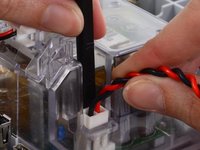
結束されたケーブル用コネクタには多くの細い電線が接続されており、電線がチューブで覆われていることもあります。このようなコネクタにはスパッジャーで押したりピンセットで掴めるような場所がないこともあります。ケーブル自体を引っ張るのが接続を外すための唯一の方法かも知れません。
-
全てのケーブルのコネクタにできるだけ近い場所を一緒に掴んで、コネクタをゆっくり確実にソケットから引き抜きます。
Lijkt me dat je hier eerst vlak over het kunststofdeel van het kabelcontact, in het midden waar hij lager is, smalle dunne schroevendraaier steek zodat het kunststof iets omhoog buigt en het borgnokje vrij komt zodat je hem eruit kan trekken!
Terug gewoon insteken.
-
-
この手順で使用する道具:FixHub | Power Series Soldering Toolkit$299.95
-
-
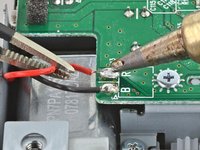
コネクタを慎重に確認し、どうやったら外せるのかを判断してください。
-
それでも問題が解決しない場合は、似たようなデバイスのガイドに手掛かりがないかを確認したり、アンサーフォーラムで尋ねてみましょう。
Hi,
I've just been wrangling with a 25ish year old Kenwood stereo. There were some connectors on it that I couldn't work out - which led me to this guide. The specific connectors aren't shown here. It turns out theybare spring-loaded, and you have to push the upper part (that I initially thought was a plug) down into the board - and this releases the ribbon cable. On the stereo, there are some shorter ones (8-pin), and some longer ones (15pin). On the longer ones, if you look close enough, they helpfully say ‘push' on them.
I've taken some photos of you'd like to add them to this guide?
-
-
-
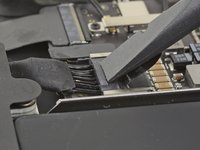
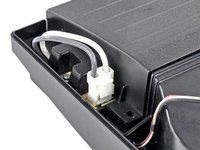
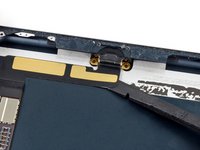
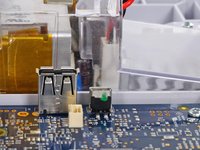
画像1枚目:大きな金属製の覆いがコネクタ全体にかかっており、所定の位置に固定する役割をしています。
-
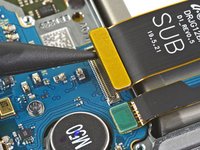
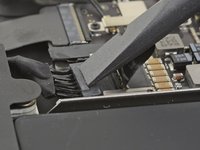
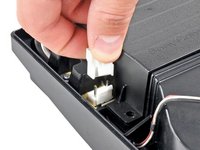
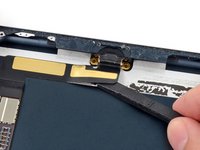
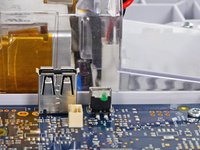
画像2枚目:金属製のつまみを(引っ張る代わりに)押し込むことで、フラットケーブルの固定を解除できます。
-


387 の人々がこのガイドを完成させました。
以下の翻訳者の皆さんにお礼を申し上げます:
100%

これらの翻訳者の方々は世界を修理する私たちのサポートをしてくれています。 あなたも貢献してみませんか?
翻訳を始める ›


25 件のコメント
Beautiful work. However, my modern LCD flat screen TV set uses the "No-Fuss Ribbon Cable Connectors" and I think they are fairly common in this application.
"Step 2 — No-Fuss Ribbon Cable Connectors
Occasionally, you'll find a ribbon cable that simply pulls out of its socket, with no retaining flap.
<snip>
These kinds of connectors are fairly rare, so check carefully for a way to release the connector before you resort to pulling on the ribbon cable."
This was great! thanks for the detailed pictures. I have a question though on a very specific port used on apple tv 1.
here's the link to my post
It's important to note that ZIF connectors often do require force to insert, for example the digitizer ribbon cable on the Nexus 6, which has a bit of negative tension from being curved. It has to be pushed in using the little raised portion with a fingernail, and held so the line on the cable matches the line on the PCB before closing the retention bracket or else it will not connect properly.
I have a visio T-con board that has two flat ribbon connectors the one to the screen as a flip open latch you can do with your finger nail the other has a thin metal strip that over hangs the end on both sides. And ideas on how this one opens up? Rowland
Great post!
Would be great if Jeff or someone could help me with my question, doesn't look as though that connector type is covered in the the post above. Its listed here - Need help with these Connector latches
TIA,
Norm
good page, but I was looking for the display connectors for ipad air 2. They seem to just push on, but the pressure is so light I am not confident that they are seating correctly. It won’t turn on at any rate though the screen briefly comes up at boot.
Those are pop connectors—see Step 4. Align them carefully, and press them down; you should feel them click into place.
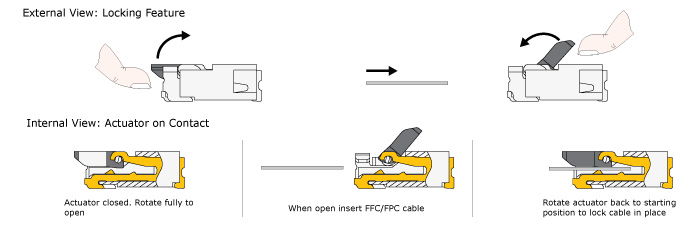
I recently ran into a FFC (Flat Flex Connector) type I didn’t know how to open exactly, and this page only refers to the flip-lock type. Turns out it was a slide-lock connector and the diagrams on the page below were very helpful. I simply used my tweezers to push on the two tabs towards the cable, the actuator moved easily once you knew which way to apply force.
Doing ifixit versions of these diagrams would be VERY helpful.
Slide Lock Diagram: ''https://gct.co/Images/products/ffc-con...
Flip Lock Diagram: ''https://gct.co/Images/products/ffc-con...
Parent Page: ''https://gct.co/ffc-connector''
Googling to find these hints was VERY difficult not knowing the terminology. But this ifixit page was at the top of the stack, update to save the next guy half an hour googling?
(Updating to say you DO mention ‘sliding’ connectors… but the mechanism of the actuator is not very clear and/or the photos didn’t quite get me there, mine was a smaller pin-pitch I think too).
@clickykbd This is a great idea! I’d love to add it to the guide. Do you mind sharing the name of the device you were working on, so we can try to get some photos of that connector in the wild? Or do you have some photos of your own? For copyright reasons, we usually can’t borrow other people’s images or graphics for our guides without permission. Thanks for sharing!
Jeff, It was a Marshsall VLCD70MD-3G on-camera/field monitor. The connector was for the LCD ribbon flexible pcb cable.. I’ve still got it apart as I am trying to source a LCD, so I can try to get some half decent photos in a day or so. I’m pretty sure I’ve run into these before and they came apart with the “just pull” method… but reseating them without mangling the flat-flex was very difficult without knowing the trick if I recall. Thought I would do my homework this time.
Bonjour
Je voudrais retirer un câble nappe écran sur la carte mêre de mon téléviseur LG 47LE5510 il y a dessus un petit levier qui se lève à l’ongle mais le câble semble collé et je n’ose pas forcer. Sur le connecteur est indiqué FS60 et le câble est un EAD60974135.
Pouvez-vous m’aider car je ne voudrais rien casser et ces 2 câbles coûtent cher en piece détachée.
Merci d’avance
Thank you, thank you, thank you. My husband really needed this.
Some ZIF ribbon connectors I’ve found, have the latch on the side of the insertion of the cable, some others on the oposite side. So be sure to pull on the correct side, or you will damage the connector. Another tip is to pull them very gently and when closing it, also with not much pressure, I have spoiled some hinges in the process, what is left to do is replace the whole connector.
Great article, but just one question… WhatWhat happens if you break one of these? Can you suggest a fix for something like the ZIF connector.
Is it pretty much a write off if you snap the latch on some of these connectors?
I have a 3D printer from China, it is an Artillery Sidewinder X1 v4 model . It uses ribbon cables from the power supply to the heated nozzle and the heated print bed. It is my understanding that power is sent along a couple (or more) of the wires to distribute the load, and I get a good deal of heat at the connector site, on the ribbon cable itself. It is enough heat that I believe the connection and/or the ribbon cable itself will fail.
It is a friction fit connection and I imagine it is difficult to keep the connections inline at the connecting point. The printer uses 20 wire and 30 ribbon wire cables as can be seen at: https://www.amazon.com/Artillery-Ribbon-...
My question, and I do understand the value of your time, is – what can I do to better align the connections? Is there some sort of heavier gauge ribbon I can use and, perhaps, do so through some sort of adapter at the connection point?
Anything you can suggest is appreciated.
Hi,
i need the connector in step 10.
Where can i buy this?
Thank Manuel
Merci : très clair et complet. Je vais pouvoir aider un ami à rebrancher le connecteur de son GPS
Where may I purchase these zif ribbon connectors?
URL disabled
Hi Robin! Which URL is disabled? Can you point me to a specific step?
URL disabled on my phone.
How to fix it now
Why can't I ADD min
What if I break the ZIF connector itself (were the ribbon goes), is my tablet ruin?
elainegb27 - 返信
Unless you are good with a soldering iron or hot air station I would suggest taking it to someone that can do it.
deswaite -
“…Be sure to pry up on the hinged flap, not the connector socket….” but we’re not going to provide any further information than this and good luck with that :-)
andyescribe - 返信
That’s what the photos are for—providing a visual example. There are a million different implementations of ZIF connector out there, so it’s not possible to provide specific instructions for each one in a single guide. For that, you need to search for the guide for your specific device. Unfortunately, looking at your post history, it appears you attempted to do that, but the guide you were following (Nexus 6) mislabeled the battery connector as a ZIF connector. I’ve corrected the guide. Sorry for the trouble!
Jeff Suovanen -
You have provide awesome tips which is very helpful. I have issue with FPC that not connecting with Cable
Ralph Vale - 返信
hola he intentado cambiar el cristal de mi apple watch 2 despues de conseguirlo me he dado cuenta que he retirado el cable sin bajar la pestaña o no se que he doblado los pines despues de intentar una y otra vez el conector zip de la derecha ha quedado inservible es posible comprar ese conector en algun lugar o sabrian que nombre de conector debo buscar ya que no viene en ninguna expecificacion gracias
Fran Ansio - 返信
Great tutorial, thanks. Had I not seen it, I would have irreparably damaged my keyboard. Perhaps it lacks a bit more guidance on how to place the cables back. I found that part to be the hardest actually.
Juan Dueñas - 返信