はじめに
この修理ガイドはiFixitのスタッフによって作成されたものであり、Googleによって承認されたものではありません。修理ガイドの詳細はこちらを参照してください。
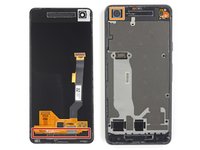
この修理ガイドを参照して、消耗したGoogle Pixel 2のバッテリーを交換します。
デバイスを再組み立てする前に、バッテリーの残量を25%以下まで放電してください。充電されたリチウムイオンバッテリー は引火の原因となったり、アクシデントで穴を開けてしまうと爆発の恐れがあります。バッテリーが膨張している場合は、 適切な方法で処理してください。
ご注意: ディスプレイを固定している強力な接着剤にため、ツールを差し込めるだめの最小限のスペースと高温を当てることが必要です。この作業中に、ディスプレイにダメージを与えてしまう可能性があります。もしこの修理で、ディスプレイを交換する予定のない方は、ディスプレイを再利用するために作業は慎重に行なってください。インストラクションをよく読んで、警告サインに注意すれば成功する確率を高めることができます。
バッテリーは強力な接着剤で固定されています。90%以上の高濃度イソプロピルアルコールでバッテリーの接着剤を溶解してください。
必要な工具と部品
-
-
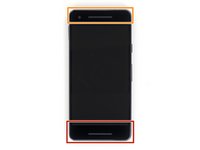
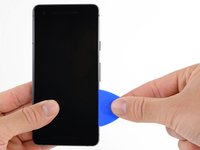
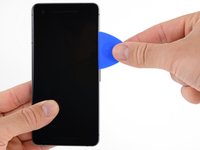
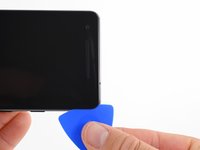
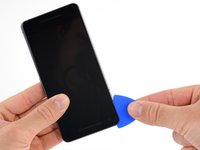
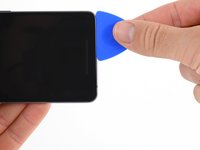
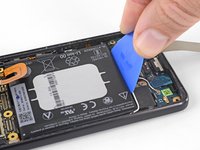
吸盤カップをしっかりと一定の圧力で引き上げて、フロントパネルとリアケースの間に開口ピックを差し込みます。
-
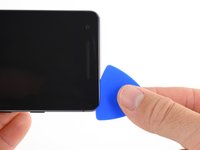
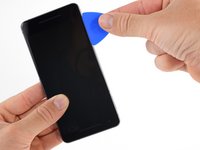
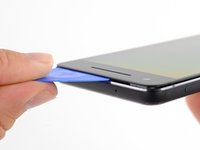
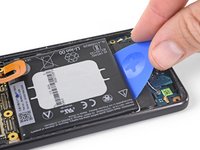
1.5mmより深くにピックを差し込まないでください。OLEDパネルを破損してしまうことがあります。
They cannot emphasize enough how careful you need to be when separating the screen. The iOpener does not work well enough to prevent breakage (opinion). I spent a majority of the hour and forty five minutes replacing my battery on removing the screen, i.e. reheating the iOpener, warming the device, slowly, with multiple passes, separating the adhesive. Use a heat gun or blow dryer.
try the alcohol as instructed instead of heat. “Do not heat your phone. If needed, you can use a dropper or syringe to inject isopropyl alcohol (90+%) around the edges of the back cover to weaken the adhesive. “
Rogerio Sa - 返信
Make sure to remove the adhesive under the top and bottom speakers to make it much easier to remove the screen.
Isopropyl alcohol works well to loosen the adhesive. However - GO SLOW. Slide the pick a bit, then apply some isopropyl alcohol into the gap where you’re sliding toward. Wait a moment, then slide a bit more. Move very slowly, particularly around the corners!
Any idea on what to do when the suction cup pops off of the screen before there’s enough clearance to slide the pick in?
I used a hairdryer to weaken the adhesive. If you place your finger in the path of the hairdryer you’ll have a good idea of when too much heat has been applied (when your skin becomes unhappy at the temperature). BE VERY GENTLE. I cracked my screen because I didn’t weaken the adhesive enough. I also chipped(dog eared) the corner of the OLED screen underneath with one of the plastic tools. Don’t stick it in too far. As the guide says, use the flat edge or the pick to help control this.
I did the 90% alcohol and the iOpener. Took a while but finally got the screen off. As others have mentioned, there is lots of adhesive around the top and bottom speaker openings. I ended up reaching in with a small brush and more alcohol to get it. I used a tooth pick to break the final adhesive.
I also had a set of dental tools and a set of magnifying goggles (I’m a model railroader) which helped greatly.
Like others have said, THIS STEP IS THE MOST DANGEROUS!!! You must be extremely gentle (no real force should be necessary to separate the screen from the glue) with the screen and take your time. (IMO if it takes you less than 30 mins to get the screen loose, your going too hard at it). Two suggestions from my successful battery replacement that I can give, use alcohol instead of heat (seems to work better with this phone) and start with a much thinner plastic tool that is also flexible (I used a metro card from the NYC MTA). This will allow you to get at the tiny gap without using any significant force and then get some alcohol into the gap by dripping it down the thin plastic tool. Honestly, IFIXIT should make a small thin rectangular card to use for this with lines around it for measurements…
The first pry to get the pick inside the edge of the screen needs A LOT OF HEAT and a very firm pull, and just as someone else mentioned, the iOpener did not work well, instead, a regular hair dryer proved more beneficial in applying a controlled amount of heat until its almost too hot to touch. Then, once the pick is inside 99% isopropyl alcohol worked wonders, use a syringe or dropper to apple some at the edge, wait for about 15 seconds and move the pick centimetre by centimetre. Make sure to not insert it more than 2mm at the sides. I took more than an hour just to get the screen off.
As an experienced (1) screen remover, I’d recommend that if you don’t plan to change your screen, change your plans. You will be less disappointed that way. I managed to get mine for just over $10 with shipping and test it first (weak Battery). Pixel 3’s (Not 3a or XL) sure look a lot better now. They have removable backs. My pixel 1st gen was a cheap lesson. Looking for another cheap one to try alcohol on.
Used a hairdryer on medium heat (very warm but not burning hot), suction cup, and applied isopropyl alcohol into crack made when applying pressure. Rinse and repeat until loosened enough to get a pick in. Took many attempts. Don't try to force the pick in, as you could chip the edge of the thin glass of screen this way. The suction cup pressure and weakened adhesive should do the work. Once the pick gets it, you can work a little faster but did the same basic steps minus needing the suction cup anymore, working around the edges. Good lighting is a must to see the crack forming.
Arthur Kay - 返信
I have to disagree with folks who said this is the longest step of the whole process...for me...the longest step was having to drive around and find a T4 Torx bit because this kit came with a T2 Torx which proved absolutely USELESS...
The screen came off very easily with the liberal application of 90% Isopropyl Alcohol. Took around 15min to get the screen off and I hardly had to use picks except for the top and bottom.
That Torx bit though... F$%^ED ME
-
-
-
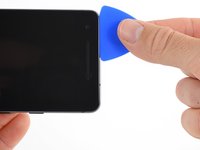
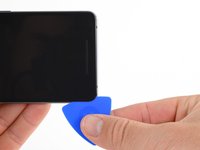
デバイス下側の端に9mm以上差し込まないでください。ピックがOLEDパネルの折りたたんである部分に接触してしまうと、ディスプレイにダメージを与えてしまいます。
-
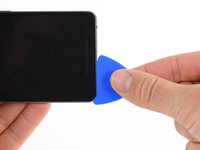
上部左側コーナーのエリアは浅く切開するだけで十分です。深くこじ開けてしまうと、フロントカメラにダメージを与えてしまいます。
This is inaccurate. The Pixel 2 phone’s back comes in two parts: a plastic main section and a glass back upper section. Only the glass section is required to be removed to replace the camera. Once the glass back is removed, the camera can easily be replaced without removing the motherboard, battery, or any other components. What is picture here looks like the original Google Pixel Phone.
Firstly, I disagree with hunter’s comment above - my Pixel 2 looked identical to this when I had it opened up.
Secondly, the whole thing about 1.5mm at the sides - literally scared the cr*p out of me when I started this as it’s such a tiny margin - but what this doesn’t say is that you can see these limits on your phone - just turn the screen on and it’s where the display ends - the digitiser starts there and is a couple of mm deep - hence the need to be careful. You can also see it (though less obviously) when you have the screen off - the jet black part at the edge is where the adhesive is - just make sure you don’t push in past there. It’s not like you can’t make very gentle contact with the digitiser when clearing the adhesive - I believe it’s just any kind of real pressure which will render the screen useless.
Dave Watts - 返信
I think it would be helpful to highlight the adhesive patches around the microphone/speaker areas and that you do need to project your pick in quite a distance to break this adhesive. I think simply creating a highlighted tracing of all of the adhesive areas would be helpful and pretty simple to do. It is shown to some extent, but in my opinion it could be more clear. In all of the prefaced concerns for digging too deep, I spent extra time and effort carefully prying upward and cracked my screen and OLED rendering my phone useless. Eventually I decided to probe more deeply toward the mic/speaker and broke things loose which allowed me to remove the screen easily.
Yes your right. I didn't e that and I disassembly the scree from it's digitiser layer. If i would know in advanced the adhesive borders it wouldn't happened.
I took my time but a few times I slipped in more than I wanted. No harm. The bottom is the more tricky. The adhesive around the bottom opening goes right up against the ribbon cable for the screen. I got the edges unglued with alcohol & iOpener. I then gently pried the screen away and reached in with a small brush and more alcohol. I then used a toothpick to break the last pieces of adhesive.
Besides the adhesive at the edges, there are 2 rectangular shaped adhesive patches at the top (around the speaker) and bottom (around the microphone). These are pretty thick, but can be easily chipped away with the pick. You start to see these as you gently lift the screen upwards with the suction cup and peer inside (use a flashlight). I did not need to use a heat gun or blow dryer. Just the pick and some isopropyl alcohol.
Use isopropyl alcohol with a syringe at the top and bottom speaker to weaken the adhesive, gently pull apart (about 2mm) and use a finer piece of plastic (like a milky file plastic sheet) to cut through the adhesive at the speakers, but still do not take the screen off completely yet! After extensively reading about failed attempts to get the screen off (instances where people damaged the OLED underneath) one thing is in common: few devices have little adhesive underneath the ribbon cable as well, which people failed to notice and while separating the screen and in turn, damaged the OLED because of the pull from the ribbon cable. Thanks to having this information beforehand I found the same issue in my phone after I separated the screen (not completely) from the frame, I used a piece of finer sheet of plastic to cut the adhesive holding the ribbon cable. You will have to be extremely patient and take your time.
i spent probably 3 hours on this step only last night, incredibly difficult. turned out that the OLED itself was glued to the midframe which made it extra hard (and ended up breaking the screen in the process. I did buy the phone refurbished so I don't think they are all glued this way but it is definitely worth knowing.
Using 91% isopropyl alcohol worked way better than applying heat. Was applying heat for 20 minutes with no luck to get the initial opening. IPA did the job in 2 minutes. I would be cautious with how much alcohol you are dropping. Do not be too generous as some have mentioned and just drop along the edges at incremental distances. The alcohol will dissolve the grey foam in the picture with X marks and flatten it. Not that big of a deal but if you are picky about not damaging anything in the process you should be careful about it.
Nope. I'll have to update this guide. The top and bottom required exactly 11mm of cutting (measured correctly from the glass's edge to the speaker glue's edge), while the guide said 9mm. Cutting 9mm didn't cut enough of the speaker adhesive to even allow forcefully prying it open with the use of a heat gun. If you only cut for 9mm, you'll break it. Also, the bottom ribbon begins at 11.5mm (better get a thin cutting tool with a measure) and the top has no ribbon, giving you 16.5mm of leeway (and you only need 11mm). I don't know who wrote this guide but it's wrong. Also, you won't damage the forward-facing camera, as it has a plastic frame all around. Furthermore, I was unlucky enough to find out that the display was glued to the midframe, making it physically impossible to safely separate it.
-
-
-
-
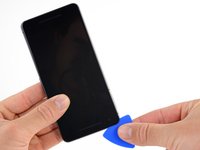
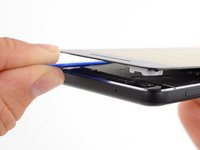
デバイス上部端にピックを再挿入して、ディスプレイを慎重にこじ開けます。
This for me was by far the hardest step. What this guide fails to say is just how much adhesive you’ll encounter - mine was heaving with the stuff - so I wouldn’t attempt this fix without the rubbing alcohol, and I would be prepared to spend 30 mins on this - the images above make it look like as soon as you can get the pick in and around the whole phone the display will come off - this wasn’t true on mine, and I put a small crack in the top of my screen as I applied a little pressure to lever the top - the edges were ok, but there was so much adhesive at the top and bottom - right down and around the speaker grills - that I used scissors to cut the remaining strands as I managed to lift the screen higher enough! Don’t be shy with the rubbing alcohol, it really helps - and you really need to feel all sides loosen properly before you attempt to lever - but if you’re patient, it’ll be ok.
Dave Watts - 返信
agree, way more adhesive at top and bottom than guide implies. go really slow on sides with thin plastic but top and bottom speaker needs a bigger dig
-
-
この手順で使用する道具:Magnetic Project Mat$19.95
-
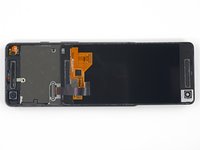
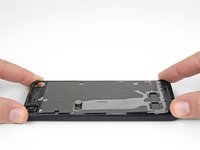
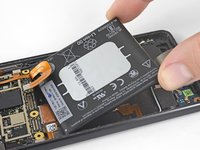
画像のように、リアケース上部上にディスプレイを慎重に載せます。ディスプレイのリボンケーブルが切断したり、折り目が入らないようにご注意ください。
-
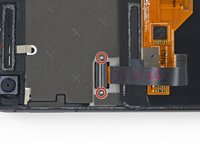
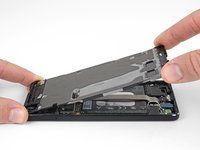
ディスプレイケーブルのブラケットを固定している4.0 mm T5トルクスネジを2本外します。
I cannot imagine how much easier this project would be if they provided the bit for this screw and the others of the same size. The torx bit included in my kit is a 2mm - entirely useless here. Only other bits are Philips...also pretty useless...
-
-
-
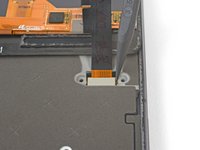
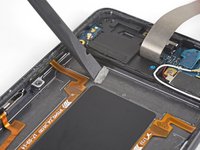
スパッジャーの先端を使って、ディスプレイケーブルコネクタを跳ね上げて、マザーボード上のソケットから外します。
Wow, I think I damaged my motherboard on this step. It would be helpful if there was a warning in this step to avoid doing that! Now my pixel 2 is reduced to a cool paperweight with a static display.
Yep, there’s a small surface mounted component below the connector that is super easy to dislodge from the circuit board. Shown in this YouTube video - https://www.youtube.com/watch?v=0BEpgqpI.... Unfortunately, the part is smaller than a grain of sand, so not really practical for the average fixer to put back on the board.
jlyonsmith - 返信
A spudger is the wrong tool to remove the video connector. You cannot see where you are poking with that tool and I wound up dislodging one of the surface mounted devices hidden by the connector and ruining the phone. I also broke a ground path near the corner of the middle frame that is not mentioned in this repair procedure. Watch this YouTube before you begin disassembly: https://www.youtube.com/watch?v=yKULr67Z...
None of the tools provided in the repair kit seemed slim enough to fit the space required to pry this up. I ended up using a thin / flimsy plastic health care card to get under and pry up. It popped up with enough pressure.
Arthur Kay - 返信
-
-
-
温めたiOpenerを、ミッドフレーム上部端の近接センサ上に約2分間載せて、接着剤を柔らかくします。
-
-
-
スパッジャーの先端を近接センサーケーブルの下に差し込んで、正面カメラに一番近い側のケーブルからスライドします。
-
慎重にセンサーがミッドフレームに対して垂直になるまで、ケーブルの端を持ち上げます。
This piece is actually glued down - heat and rubbing alcohol really helped as at first I couldn’t figure out why I couldn’t get it to move.
Dave Watts - 返信
-
-
この手順で使用する道具:Magnetic Project Mat$19.95
-
イヤホンスピーカー下のネジを覆っているテープの一部分を剥がします。他のネジを覆っているテープも同様に剥がします。
-
ミッドフレームを固定している次のネジを外します。
-
3.7 mm #00プラスネジー11本
-
4 mm T5トルクスネジー1本
On my Pixel 2, I also had to peel back a small strip of conductive tape that was directly above (and the same kind as) the “screw below the earpiece speaker” mentioned above. It appears to be a ground strap to the assembly underneath.
Me too! Please change the photo?
If you don't peel the mesh tape up, it will year. I'm not sure if it plays into the screen potentially not working, but it seems to be a ground for the midframe and the display ribbon has a ground contact to the
Many of the screws would not come out due to the original threadlocker on the threads. I found that if I just kept moving them around with a toothpick, I could get the out. I also had one of those telescoping magnetic bolt grabbers that pulled the screws out.
Would be nice if they included the correct torx bit in the tool kit... mine came with a T2 Torx...pretty useless...managed to get the display ribbon cable free as those screws were surprisingly not super tight - got them with the included Philips bit...pretty F$%^ED right here
@JensDavidsen, I'm sorry to hear that the kit came with the wrong bit. We do everything we can to make sure that our tool kits are kitted correctly. I've gone ahead and forwarded your information over to CS so they can get this fixed for you. In the future, if you have any questions or concerns, don't hesitate to reach out to us directly.
You will also need to peel up the grounding tape below the front camera from the right. Be careful about not being too aggressive else you might lose adhesion while putting it back. I used some glue to ensure it would stick again during reassembly.
What kind of glue did you use? I suspect that a) it could change the contact of the ribbon, therefore hindering conductivity and b) that the glue might change over time, e.g. break down and cause side-effects.
arne -
-
-
-
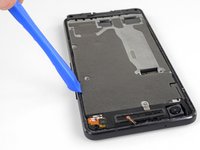
開口ツールをホールドボタン付近のミッドフレームの溝に差し込みます。
-
ミッドフレームとデバイスケースの間に隙間が生じるまで、ミッドフレームを持ち上げます。ミッドフレームをまだ完全に外さないでください。
This is to pop a securing tab out it's place
On re-assembly make sure the securing tab, near the notch you use to open it, is inserted back under the frame again - this caused me to have to re-open my phone as my screen didn’t sit back down properly after I had put everything back together.
Dave Watts - 返信
It is more effort than I anticipated. I really thought I was going to break it, but it was fine.
-
-
-
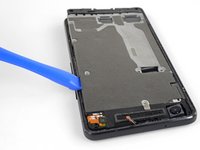
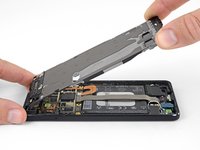
下側端からミッドフレームを持ち上げます。
-
ミッドフレームが、デバイス本体に対して45度持ち上がったら、まっすぐデバイスから引き抜きます。
-
ミッドフレームを持ち上げたら、ミッドフレームの小さなスロットから近接センサを慎重に差し抜いてください。
While not shown here in the photo, there is a short braided cable between the midframe and the motherboard near the front facing camera that prevents separating the midframe completely (ground?). Be careful not to damage this cable when completing the remaining steps or carefully remove before trying to separate the midframe completely.
ericdowens - 返信
As ericdowens says above, there’s a small silver sliver of a connector (next to the front-facing camera). The guides on youtube said it was a grounding wire. This guide doesn’t mention it. Mine broke when I removed the midframe. No big deal. I stuck it back down with some tape when I put it all back together. Phone works fine.
I had a heck of a time levering up the midframe. I had popped the side with the opening tool, but the other side was really stuck. I used some alcohol along the edge thinking there was some adhesive. Not sure. I eventually used a dental pick to pop it loose.
And when reinstalling, don’t forget to move the short braided cable back out of the way so you don’t trap it inside.
STOP! Before you lift the midframe, the ground strap mentioned by ericdowens and Alex Lawson definitely will break if you don’t remove it from the midframe before lifting. I didn’t quite know what they were talking about, so thought I’d look for it as I was lifting the midframe, as I was sure if I was careful I’d spot it before it would break. I was very gentle, and I still broke it before realising what they were talking about. Look for some silver mesh tape on the midframe, near the forward-facing camera, same kind of tape as over the screw shown in Step 14. I’m going to try and carefully tape mine back together as Alex Lawson did, but it will be very fiddly, wish I hadn’t broken it in the first place!
Jamie Lamb - 返信
I broke mine... then proceeded to pilfer about 2mm worth of the tape depicted in step 18 because it's a silvery adhesive.
-
-
-
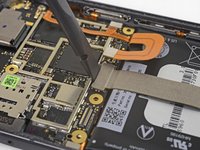
スパッジャーの平面側先端を使って、バッテリーコネクタの接続を外します。
This photo and tutorial doesn't show the shielding on the chips of the motherboard. And the glue…My pixel 2 had the volume button ribbon cable glued to the shielding. Carefully pry the cable off. Very carefully slide under it. Maybe use a little heat to soften the glue. You cannot just remove the motherboard with removing the ribbon cable for the volume buttons.
-
-
-
スパッジャーの平面側先端を使って、ドーターボードコネクタの接続を外します。
Removing the battery is not necessary to replace the motherboard, steps 19-21 can be omitted
Hi Robert,
Thanks for the input! I’ve re-ordered the guide to remove the unnecessary steps.
Thank you Robert
-
-
-
必要であれば、イソプロピルアルコールをプラスチックのスポイトに満たして、バッテリーの各コーナーに数滴注入し、数分間浸透させて接着剤が弱まるのを待ちます。
-
代用として、温めたiOpenerをデバイス裏のバッテリー上に、少なくとも2分間載せます。 バッテリーの接着剤が十分に弱まるまで、iOpenerを複数回に渡って温めて載せる作業を繰り返してください。
-
-
-
作業の邪魔にならない位置に、充電アセンブリケーブルを押さえて、バッテリー下側端に沿って開口ピックを挿入します。
-
バッテリーをこじ開けるため、一定の力で均等に力を入れてゆっくりと持ち上げ、デバイスから取り出します。
-
バッテリーの両側下に搭載されているデリケートなリボンケーブルにダメージを与えないよう、バッテリー中央部分のみからこじ開けてください。
-
作業が上手く進まない場合は、バッテリーの下にアルコールを再度注入して再試行してください。
This is another place where the amount of adhesive they’d used in the factory seemed understated - it took ages and plenty of heat and rubbing alcohol to get the battery out. Again, patience was needed - and I thought I might have messed it all up as I must have missed the “only pry from the centre” comment in the guide and went under the right and left bottom corners with a cotton bud and rubbing alcohol - I was lucky I think.
Dave Watts - 返信
With the bottom of the phone resting against the iOpener, I used leverage with one of the plastic picks from the top and bottom of the batter and blue opening tool from the left side (below the volume rocker). It gripped it perfectly where I could pull it up a bit and slide the pick further underneath. Be careful of the volume ribbon cable (thin copper color at the top right of the battery) and what I assume to be an antenna cable. - a single thin black wire leading around the bottom left of the battery itself.
I think those cables to the left and right are for the “squeeze” sensors on the case.
I used lots of alcohol as other suggested. I got it out.
-
-
この手順で使用する道具:Tesa 61395 Tape$5.99
-
バッテリーを取り出します。
-
スパッジャーを使って、デバイス本体に残っている接着剤を剥がします。糊付けされた部分はイソプロピルアルコールと糸くずの出ないリントフリーの布で拭き取ってください。
-
新しいバッテリーをプレカットした接着剤もしくは、両面テープで固定してください。正しく装着するには、新しい接着剤をバッテリーではなく、デバイス本体に取り付けてください。接着剤はバッテリー下のケーブルには装着しないでください。
-
バッテリーを約20–30秒間、しっかりと押し込んで固定させます。
Why I have to replace the battery if it doing well??!!
And is it necessary to remove the battery to reinstall the rear camera?
Lithium-ion batteries are susceptible to damage when they are bent or creased—the thin layers inside the battery may short, resulting in swelling and potential fire hazard.
You should be able to replace the rear camera without removing the battery. I will adjust the rear camera guide to reflect this.
Re-assembly note -
Getting the battery to connect to the charging cable was a challenge for me. However, once it’s connected, if there’s any juice in the battery or if you want to be brave and plug it in, you can test to see if the phone is receiving power by trying to start it up and seeing if it vibrates. The combination of gently adjusting the charging cable, testing power, testing power with the phone plugged in got me to identify when the cable was attached properly.
Using my squishy finger worked better for re-attaching that cable than using the spudger.
This is a much better place to test for power than continuing reassembly and finding out it doesn’t work. If the phone cables are connected correctly and the battery has power (mine shipped with some charge in it), the phone will vibrate when you hold power.
Like Thomas, getting the battery cable back was a pain as my positioning of the new battery made the u-shaped cable slightly askew. I finally got it. I was afraid I was going to bend a pin but all good. And I also did the “press power and check for vibrate” trick. The battery (as I would later see) was 52% out of the box.
Once you remove the battery, you may notice parallel lines of adhesives on both sides of the surface, where the battery was. No need to scrape away these lines. They should be still sticky and usable. Removing these would be a hassle. Just add a strip or two of the double sided adhesives in the middle where the battery was, before putting in your new battery.
after adding the battery, the turn on a vibrate trick does work, it vibrates, but then it never does again, and the display does not turn on:/ charging it for 10 min did nothing
Thanks to Thomas, I did the turning on to know if it vibrated or not trick, and in my case, it did not. I had to plug out the battery connection and plug it in again with a finger and it was then when I heard a little “click” sound, and then the phone vibrated. You have to ensure that the battery side connector, sits right over the battery connection, before pressing it firmly.
Pro tip, plug in the battery before laying it down. Once the battery is in, you only have so much room to bend before it damages the cable or puts too much tension on the board.
Is there a reason to replace the adhesive? The battery fits snugly in the cavity and seems to be held securely in place even without any adhesive applied. I decided to not apply new adhesive to make future repairs easier, but wondering if there will be negative consequences to this.
-


交換用のパーツとオリジナルのパーツを見比べてください。残りのコンポーネントを移植する必要があるか、パーツを装着する前に接着剤の裏張りを取る必要があります。
デバイスを再組み立てする際は、これらの手順を逆の順番に従って作業を進めてください。
この修理ガイドを完成した後は、新しくインストールしたバッテリーのキャリブレーションを行なってください。
e-wasteを処理する場合は、認可済みリサイクルセンターR2を通じて廃棄してください。
修理が上手く進みませんか?トラブルシュートのヘルプには、アンサーコミュニティを参照してください。
交換用のパーツとオリジナルのパーツを見比べてください。残りのコンポーネントを移植する必要があるか、パーツを装着する前に接着剤の裏張りを取る必要があります。
デバイスを再組み立てする際は、これらの手順を逆の順番に従って作業を進めてください。
この修理ガイドを完成した後は、新しくインストールしたバッテリーのキャリブレーションを行なってください。
e-wasteを処理する場合は、認可済みリサイクルセンターR2を通じて廃棄してください。
修理が上手く進みませんか?トラブルシュートのヘルプには、アンサーコミュニティを参照してください。
94 の人々がこのガイドを完成させました。
以下の翻訳者の皆さんにお礼を申し上げます:
100%

これらの翻訳者の方々は世界を修理する私たちのサポートをしてくれています。 あなたも貢献してみませんか?
翻訳を始める ›

38 件のコメント
The instructions say “No parts required” and yet I believe that for a battery replacement you might possibly require a new battery (and maybe a new screen in the case of a broken screen). Also you might suggest replacement adhesive and where to find that, too.
Hey. So I bought a new housing and a new screen for my Pixel 2. And I have a problem with that. After moving the parts to the new housing my vibromotor stopped working and bottom of the screen easily comes off. What should I do?
Hi Rauf, it’s hard to say exactly what’s wrong, but as a start I would disconnect and reconnect the vibrator motor to make sure it’s connected correctly. As for the screen, make sure you carefully clean any old adhesive off the screen and case (use 90% or higher isopropyl alcohol for stubborn), and apply new adhesive to the screen before you replace it. That should help the display seat in the case and stay put.
I have a quick question, if we were to replace the screen adhesive with the Tesa 61395 tape, would the phone still remain water resistant to IP67? I am only worried it would not hold it as strong as the original adhesive
Hi Tony, Tesa tape creates a strong bond and should secure your screen just as well as the old adhesive. Unfortunately, the phone won’t be waterproof since you can’t create a continuous seal using the tape.
It wasn’t super clear to me that you have to cut through the material that surrounds the speakers top and bottom. Looks like I get to replace my screen now too :-(
I did the whole process, after replacing the battery and putting eveyrthing together my screen never lit back up. I can feel the sceen being responsive to my touch but that’s it, it pitch black.
I’m having the same problem…. any thoughts?
Did you ever resolve this issue? I’ve just done my battery / screen replacement and have the same thing. I can feel the phone restart from the vibration but the screen never lights up.
Same issue here. Screen never worked again upon reassembly. Used iFixit toolkit and followed instructions closely.
Hi, how do i reassemble the phone? Your guide stops at putting in the battery.
Reassembly is the reverse of disassembly except where otherwise noted. Follow the steps in reverse. Whenever special reassembly instructions are needed, you’ll see a reminder bullet (looks like a push pin)—such as in this step.
I am thankful for the instructions, I would classify this as an “expert” level task.
While I successfully followed the instructions and did replace the battery, now I broke the screen somehow. On a side note, if somebody calls the phone it rings, so I know the battery works.
If you need to do these instructions, they are precise, but please know this is a time consuming task and frought with risk.
JJD - Back to 2 year old model phone.
JJ Donovan - 返信
Hi, what size of tesa tape do you recommend? (can only buy tape on a roll from the EU store)
I’d recommend the 4 mm width for installing the battery. If you want tape for other repairs as well, the 1 mm width is probably more versatile as it can be used to secure smaller parts and fit along the edges of displays. You can lay multiple strips of the 1 mm tape next to each other to secure larger parts if needed.
DON’T DO THIS REPAIR unless you are planning on replacing the screen. Too many people have ended up with non-functional screens after performing this repair, turning a $50 repair into a $200 repair. For a phone of this age, it’s not worth the gamble.
I’m about to head to the store to purchase a new phone after unsuccessfully performing this upgrade. I highly recommend avoiding this repair unless you’re ready to get a new phone if things go south. The phone is working but the screen is not.
Is it possible to reheat the adhesive to create a new waterproof bond or is that not recommended?
Terrible instructions. I followed them exactly and was very careful with the screen. I didn’t get the picks even .25 inches under the screen and it still broke just enough off a corner to kill the display. Screen doesn’t work at all anymore. Save your money and take the phone to a uBreakiFix place. They’ll do it for $80 with parts and labor, and if they break the screen, they’ll replace it. These instructions were horrible and a very poor description of what was required. Once I took my phone in, even with a new screen, the phone was stuck in a boot loop with the new battery. It worked again when I put the original battery back in. I have always heard good things about iFixIt, but this whole experience has changed my mind. Terrible directions and an incompatible battery. Definitely would not buy from them again.
Using these instructions, I’ve fixed two Pixel 2’s that suffered from puffed batteries — both repairs went smoothly. Excellent instructions and guide. The two phones here had very slightly different internals than pictured like an extra piece of tape here and there but nothing troubling. Getting the residual screen edge adhesive off takes the majority of time!
I highly recommend getting the matching pre-cut “Google Pixel 2 Display Adhesive” sold here. I have Tesa tape but the pre-cut adhesive sheet is not only much easier to install (you can lay it in place with the sheet still in place, so it’s nearly drop-in!) but it’s a continuous seal so will help keep things sealed up tighter than me hand-fitting long strips of Tesa.
Had the same experience you did. Changed my Pixel 2’s battery. Went smoothly. It works like new now. It took longer than expected, because I was extra careful. The tools were very useful and the adhesive sheet was a drop-in, I agree.
I would say that the guide is excellent, but the fix in it’s nature is hard because removing the screen is a delicate operation. You need to make sure you have plenty of patience. I would heavily advise against the fix if you don’t have rubbing (isopropyl) alcohol. I’d also read my comments on step 3 and 8 about how to judge the 1.5mm at the sides and the sheer amount of adhesive you may find you need to work your way through respectively. But outside of that, if you go slowly enough you should be fine. I’m not an electronics or DIY expert and my phone is back together successfully and it feels like having a new phone - once the battery was re-calibrated it’s lasting more than twice as long, maybe even 3 times as long between charges (phone was 3 yrs old).
Dave Watts - 返信
Would there be any benefit to using the iopener to pre-warm the screen, vs a heatgun/hairdryer and or alcohol for the first step of removing the screen?
Hi Michael,
The main benefit is that you cannot overheat the screen with an iOpener. If you are careful, the heatgun/hairdryer approach can be a faster alternative.
Could alcohol help with removing the screen?
Just got my new battery and a kit, now contemplating whether to try it or wait until i have nothing to lose if I break the screen…
Using plenty of alcohol (I used denatured alcohol from Home Depot, with an eye dropper) was ESSENTIAL to loosen the adhesive and get the battery out! The iOpener heating pad on the back of the phone for 3 minutes or so also helped a bunch.
amazing guid :) really helped me out - now my phone charge doesn’t last for just 5 min
I would just advise to be extra careful when taking the battery out not to hurt the squeeze wires if you hurt one of them it won’t work.
My P2’s battery died a few months ago (right before the P2 went out of Google support - I bought a P4a). The phone wouldnt’t work unless it was plugged into a charger. That actually got in the way with the upgrade as the P2 -> P4a transfer wanted me to connect the two phones via the USB-C cable. Of course, the moment I unlooked the P2 from the charger, it shut down.
Fast forward a few months, I drop my P4a and break the screen. No display and no touch. (and no insurance - never get it). So I buy yet another P4a and will wait for aftermarket screens to become available. In the meantime, I wanted to practice so I buy the P2 battery replacement and spend a whole Saturday doing the swap. The instructions were pretty good. However, I also had a set of dental picks and magnifying goggles. I’m a model railroader so I’m used to working with small tools.
It powered up just fine and is charging to 100% now. Thanks!
I’d recommend against this repair if you’re not prepared to replace the screen as well. This guide isn’t kidding when they say there’s a good chance you’ll break your screen. My screen was in perfect condition before opening the phone, it’s now black and won’t light up at all. I’m now waiting on an ebay screen as ifixit seem to be out of Pixel screens at the moment.
I am looking for a less elegant but simpler brute-force way to just cut the back and replace the battery, without getting near the screen. Most phones are carried in protective cases anyway. See this approach with CNC machine cut back of Surface Pro to replace SSD: Microsoft Surface Pro 3 SSD Replacement Dodgy Style
I see that it’s not possible in case of Pixel 2 because there are still a few ribbon cables between the battery and the back plate (see step 21). Also, the battery ribbon cable would have to be cut and patched because it plugs from the front, which would be inaccessible from the back. Sigh.
1st of all, You peeps are awesome. You've helped me replace a batter on an SP3 and now my trusty old Pixel 2. A $40 battery is far more appealing than a $1000+ new phone.
Question though: during the screen removal, the adhesive and foam around the opening for the speakers (seen in steps 3 &13) got a bit mangled. Should I just remove it completely, or can I purchase replacements?
As a phone repair novice, I successfully replaced the battery on my phone following this guide/using the ifixit replacement kit. I read all comments, and watched the newpower99 video. It took about 4 hours taking my time and working slowly. Used plenty of 90% isopropyl alcohol with the dropper included in the repair kit. Used a hairdryer at medium temp (warm enough to be uncomfortable but not burn) for many steps requiring heat, such as removing screen. Also used a thin health care card as pry tool for removing display cable on step 11 as none of the tools provided in kit seemed thin enough to fit. The hardest part is to start getting the screen removed. I heated, used the suction cup, applied force, apply alcohol into crack. Rinse repeat until you loosen enough to get a pick under it. After working around all edges, there are rubbery gluey rectangles that act as clearance gaskets around the top and bottom speakers. these I used alcohol and the dull side of a small needle to work them off the screen.
Arthur Kay - 返信
I wouldn't be intimidating if you are considering doing this repair. Just understand it will take time for a novice. For each step pause and review all guide resources available (this guide, newpower99 video, and step specific comments) to avoid any pitfalls.
Of the 36 comments here, including this one, at least 8 mention the screen not working after completing the procedure. That is a pretty high failure rate, and I have not found here, or on line, any explanation other than that the person taking the phone apart broke it in the process. As careful as anyone reading this would be, I cannot believe that is the case, especially after having seen still working displays that were severely damaged.
My theory is that it is really easy to accidentally turn the phone on while assembling it, and a power surge blows a component on the screen as soon as it is attached. You would never know the phone was powered on without a screen being attached, and wouldn't see any sparks or lights to let you know what happened. The only way I have found to force the phone to power down with the buttons only, is to hold both the power and volume up buttons for about 30 seconds until you feel the vibration. When it doubt, it is probably a good idea to check that before attaching the screen.
This was pretty easy and enjoyable even, the screen is the hardest bit and yea it is super easy to damage it. Judging by the hair line cracks it's the force applied with the suction cup that did it in my case as I was really careful with the pick tool. No worries though, ordered a new screen, after 5 years probably good to have a fresh one free of scratches etc.
First time I repaired a phone and successfully fixed it using this guide and the repair kit. It was easier than I anticipated, but it was stressfull anyway ;-)
Note that the repair kit says that it contains everything for the repair, however you’ll need to source the alcohol and double sided tape seperately.
My screen is severly cracked. I would recommend clear packaging tape as it is wide enough to accomodate the suction cup. Thinner cellophane tape won’t seal properly.
John Tippitt - 返信
Does the Google Pixel 2 have be powered off before removing the digitizer screen? Its not mentioned in this article...
Will the phone be damaged if the power is still on when disconnecting the broken screen?
Alex - 返信
Replacing the battery in my Pixel 2 was successful because I read the comments. They are invaluable in this endeavor.
David Castro - 返信
Suggest procedure revision:
Step 1: Read all steps and associated comments before proceeding.
Step 2: Ensure they supplied you with the right F$%^ING TOOLS in the kit before proceeding.
I'm F$%^ED because any store around me that might have this T4 Torx bit is already closed and my screen is already off. My kit came with a T2 Torx bit which is not used anywhere in this entire process.
Jens Davidsen - 返信
I bought one of the kits and it had everything needed to change the battery except the alcohol, including spudgers, screwdriver, torx (2 sizes), tweezer, alcohol dispenser, glue strips and die-cut glue card that fit the phone case perfectly. I followed these instructions and read the comments. Applied alcohol and patience, took my time and got the job done without any damage to the phone. Thank you ifixit!
Jeffrey Price - 返信