はじめに
この修理ガイドはiFixitテクニカルスタッフによって執筆されたものであり、Googleによって承認されたものではありません。修理ガイドの詳細はこちら。
この修理ガイドを参照して、Google Pixel 7 Proのバッテリーを交換してください。
安全のため、デバイスを分解する前にバッテリー残量を25%以下に放電してください。これにより、修理中に誤ってバッテリーを損傷した場合の火災の危険性を軽減できます。電池が膨張している場合は、 適切な方法で処分してください。
新しい交換用スクリーンには、指紋リーダーがすでに取り付けられています。そうでない場合は、元の指紋リーダーを新しい交換用スクリーンに移植し、その機能を維持するために リーダーのキャリブレーション を行う必要があります。
注意: Pixel 7 Proにはクラス 1 レーザーが搭載されています。分解すると、目に見えない赤外線レーザーにさらされる可能性があります。
修理後の防水性能の保持は、接着剤の塗布方法にもよりますが、デバイスのIP(防水防塵性能)等級が失われます。
この修理を完了するには、交換用の接着剤が必要です。
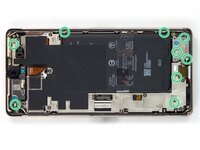
必要な工具と部品
ビデオの概要
-
-
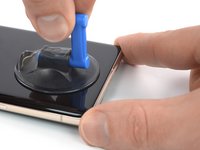
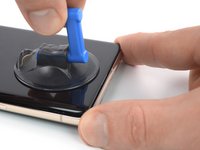
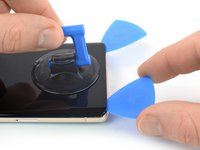
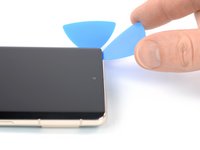
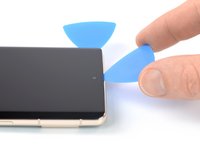
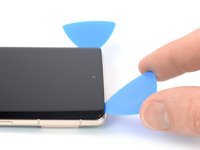
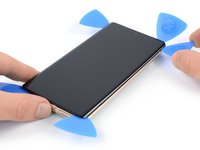
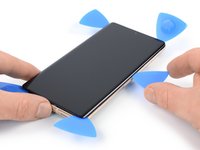
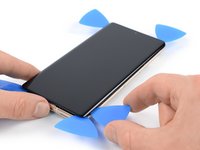
スクリーンのシーム(隙間)部分: このシームがスクリーンとデバイス本体を乖離します。このシームはこじ開けないでください。
-
ベゼルのシーム部分:スクリーンを保護するために設計されたプラスチック製のベゼルがフレームに接する部分です。ここはプラスチックのクリップで固定されています。ここをこじ開けてください。
-
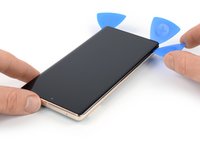
取り外し手順の間、オープニングピックを正しい位置に差し込んでいるか確認してください。セーフティフレームからスクリーンを乖離するのではなく、デバイス本体アセンブリから分離してください。
-
スクリーンの周囲には、いくつかのプラスチック製のクリップがあります。万が一、スクリーンを取り外す際にピックが差し込めない場合は、ピックをスクリーンの下に深く差し込みすぎたことを意味します。
About the paragraph:
During the removal procedure, make sure to insert your opening picks in the right position to avoid separating the screen from its safety frame.
It was not clear to me what the safety frame was until I opened the phone; I was careful but while opening the phone I slid a pick between the screen and the frame, and they became separated in one corner, I wonder if this resulted to my screen being damaged after the repair.
An image that shows what the security frame is would be helpful.It is VERY difficult to get an angle into the frame and under the plastic bezel. Since this repair is for a screen, you don't have to worry about damaging it further because you will. I've done dozens of these repairs and have gotten ONE removed without further damage. Just an FYI. I also use 91% alcohol around the edges off the frame as well as heat (I have a hot plate set at 80*c that I lay it on after adding alcohol around the edges, place on hot plate for about 10 minutes, add more alcohol around the edges and then place on hot plate for another 5 minutes).
Thank you so much for the info about the degrees, amount of time, and when to apply alcohol! I really needed this info!!! Hallelujah!!
So what do we do if we DO separate the frame? Is there a way back from this?
-
-
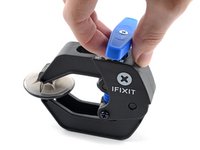
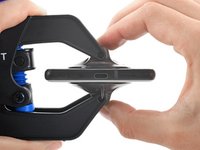
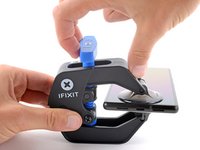
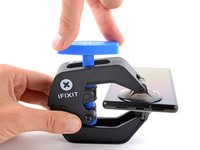
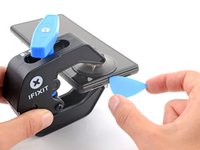
この手順で使用する道具:Clampy - Anti-Clamp$24.95
-
青いハンドルをヒンジ側(背面側)に引くと、クランプのアームが解除されます。
-
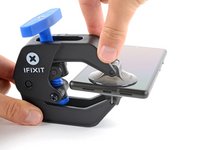
iPhoneの左/右側の端に向けてアームをスライドします。
-
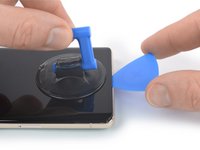
吸盤カップをiPhoneの下端付近に装着します。上部に一つ、下部に1つずつ取り付けます。
-
吸盤カップ両側をしっかりと締め合わせると、標的の場所にしっかりと装着させることができます。
The pixel 7 pro kit does not come with the clamp and may have to be purchased separately
juji juman - 返信
-
-
-
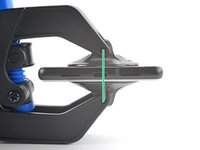
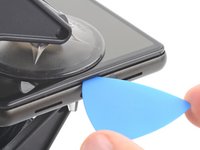
加熱したiOpenerをスクリーンに当て、下の接着剤を緩めます。iOpenerは3分以上当ててください。
-
-
-
-
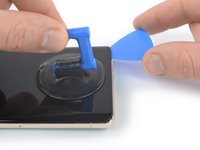
スクリーンが温まったたら、スクリーン下端に吸盤を当てます。
-
吸引ハンドルでスクリーンを安全フレームを含めて持ち上げ、スクリーンとデバイスの間に小さな隙間を作ります。
-
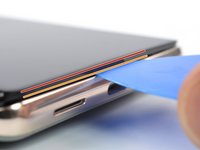
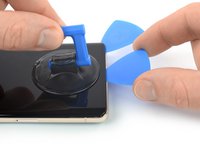
隙間にオープニングピックを差し込みます。
The crack on my screen is along the bottom, on a diagonal. I cannot get the suction cup to lift off the edge. I've tried more heat using a hair dryer, using tape, but nothing seems to work! The phone is only a few months old, could that be the issue? I'm really frustrated after trying multiple times throughout the day today.
I’m having the same issue unfortunately. I’ve superglued the suction cup and have it under weight. Going to wait 24 hours to see if it helps. Without a proper seal, there’s no way it’s going to lift. I made sure to leave about a half inch gap from the bottom of the phone to try and use the warming pad one more time
There are white line after one month only!!!
There are warranty or anything else
-
-
-
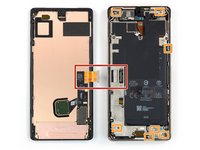
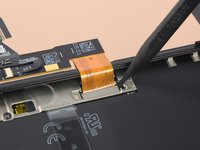
スクリーンケーブルはデバイス左端から半分弱のところにあります。ケーブルが破れないよう、ここには十分注意してください。
-
デバイス外周には多くのバネ接点があります。接点が曲がらないよう、これらの部分には十分注意してください。
I noticed some bending in the contact, particularly in the upper half right side. I believe I managed to straighten it out, but now it feels a bit loose. Despite this, I went ahead and fixed the screen over it, and everything seems to be functioning properly. However, I'm somewhat concerned about the implications of this. Should I be concerned about anything?
Same here, the upper half right side. while in the prosses of straightening it out i managed to break it! so now i want to know if my screen will work before i continue and put in, i'm afraid i'll just waste my new screen?
-
-
-
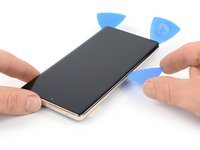
スクリーン右下コーナーにオープニングピックを差し込んで、接着剤をスライスします。
-
接着剤が再装着されないように、オープニングピックをその位置に残しておきます。
-
-
-
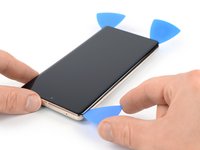
3枚目のオープニングピックをスクリーン左下の下側に差し込みます。
-
オープニングピックをデバイス本体左端にそってスライドさせ、プラスチッククリップと外して接着剤を切り取ります。
-
接着剤が再装着しないように、オープニングピックを左上コーナーに残します。
-
-
-
スクリーン左上隅に4本目のオープニングピックを挿入します。
-
オープニングピックをデバイス本体上端にそってスライドさせ、接着剤を切り取ります。
-
接着剤が再装着しないように、オープニングピックを右上隅に残します。
-
-
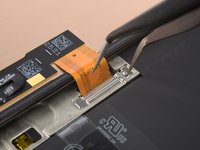
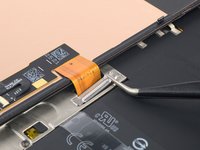
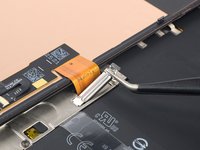
この手順で使用する道具:Tweezers$4.99
-
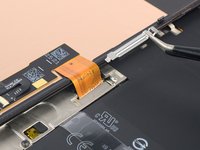
ディスプレイケーブルブラケット上端の開口部にピンセットの片方の腕を差し込みます。
-
ブラケットを内側に押し込んでから、上向きにこじ開けて外します。
This picture is a bit misleading and I ended up bending my bracket as a result. The picture shows the tweezers inserted in the bend of the bracket. If you insert it where the END of the bracket is, you'll have a much more natural way to remove it without much force! (this is just a little to the right of where it shows in the pictures...
-
-
-
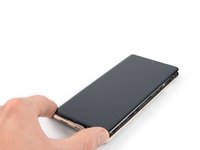
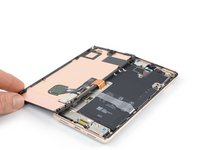
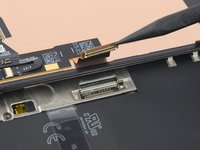
これでスクリーンが取り外せるようになりました。
-
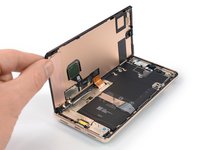
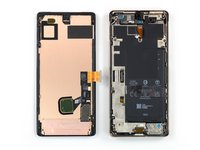
スクリーンを交換した場合は、交換したスクリーンのフロントカメラ用の穴とセンサーの切り欠きの位置があっているか確認し、残りのライナーを剥がしてください。
-
フレームにある接地バネ接点が変形して真っ直ぐ立ち上がっていないか確認して下さい。これらのバネ接点は浅い角度で立ち上がっているのが正常です。変形しているバネ接点があったら、指を使って優しく下方向に曲げて下さい。
-
スクリーンを接着する前に正しく機能するかどうか確認するなら、この時点で行いましょう。スクリーンを仮に接続して電源を入れ、正常に動作するか確認しましょう。組み立て直す前に、必ず電源を切ってスクリーンの接続を外して下さい。
-
カスタムカットされた接着剤を使う場合はこのガイドを使って装着してください。そうでない場合は、このガイドを使って、プレカットされた接着カードを使用してください。
-
スクリーンを交換した場合は、こちらのガイドに従って指紋センサーのキャリブレーションを行って下さい。
I just realized none of the screen sellers I found include the finger print flex cable. I am wondering why? If I want take the fingerprint cable out of the original one, is it difficult to do?
Two simple reasons: one is that you should be able to reverse the steps for reassembly and the second is that snapping one bracket in, putting down the retaining clip and gluing/taping your phone back together should be easy to do once you've gotten everything apart.
And they did include instructions about calibrating the new screen.
Jeremy Skrenes it's definitely not as simple as reversing the steps. There's no mention in here of the contact pins that may be pointing upwards (and shouldn't be), no direction on where adhesive covers are located and need to be removed (especially the black cover over the selfie lens), no mention of if/how long to press the screen on...and the videos on YouTube take varying approaches to several of the steps. Bottom line: if Google is going to offer a repair program through iFixIt, detailed instructions and a video should be part of that program.
it dose list a lot of what you mentioned in the tutorial for putting on custom adhesive
Don't forget to transplant your old fingerprint reader into the new screen.
this is the dumbest part of the screen replacement since it comes with one
Worked perfectly. Instructions are pretty vague though, would be good to have a video.
I 100% agree!
Don't forget to transplant your old fingerprint reader into the new screen.
so this is why my fingerprint reader doesn't work???
this instructions are absolutely garbage...(but thanks for the tip, wish I would have noticed this first)
How do you transpant your old fingerprint reader into the new screen?
My display is completely dead after restart? I cannot even restart it as I don't see anything. Does anyone has a hint how to rescue the repair?
Same here. Please help!
George -
same issue after replacing the screen. The phone vibrates but the new screen is completely dead.
Got the same problem here
Same issue. I wasn't able to power off the phone when I started the repair, but the battery was dead with the red dead battery. When I reconnected the new display cable, the screen was perfect and showed the red dead battery. I then closed the display, charged the phone and attempted to recalibrate the fingerprint. I don't get any screen display, but the phone is turning on and I can hear the screenshot tone from before. Any help?
C * -
Were you able to find a solution to this?
Add please to the last step or as a last step:
Place back the display cable bracket
I forgot to do that)
Agreed! This happened to me as well!
Edwin R -
Good day, how can someone get the schematic for pixel 7 pro…
The phone was on 20% and the owner try charging it and when he plug it and later come back to check, it noticed that it was off..
So I disassembled it and bring out the board, wen I plug it on charger to see what current enter it, it show 0.07 and later went back to 0.00 while plug on charger…
I needed to disconnect the battery and push the start button for some seconds. Otherwise the new screen did not start and stayed black. I did break my first screen since I needed to disassemble everything again.
In order to remove the fingerprint scan module without damage, you have to be VERY careful. The scanner is a very thin membrane and will crack if you bend it at all. I disengage the connector, then drop 91% alcohol around all four edges of the sensor, place it on a hot plate that's at 80*c for about five minutes, add some more alcohol around the edges and heat it again for another five minutes. Then using a very thin piece of plastic, such as an iPlastix LCD Touch Screen Separation Repair Opening Tool, and wiggle it back and forth around the edges and you can separate it. It's difficult to do, but it can be done. The odds of it working after replacement are low (as they have issues working out of the box) but this is the only way I have found that works.
Microphone isn't working at all after repair.
How did you fix this?
Hola, he podido probar y cambiar la pantalla sin problema, pero cuando iba a sellarla, la pantalla se quedó completamente negra y ahora no se ve nada, y no consigo reiniciar el teléfono ¿alguien sabe qué ha podido ser y cómo puedo solucionarlo? funcionaba antes de cerrarlo, incluso el lector de huellas. Gracias
Daura Soto - 返信
The instructions should mention removing the protective film from the back of the new screen before installing, otherwise the front facing camera will be covered
Together with the replacement screen and the adhesive sheet, there's another sheet with blue protection and some black protective foil, what's that for? Can't find it in description, on pictures or in video.
Very annoying, when there are more parts, then required in the manual - or when required steps are forgotten in the guides. Gives a massive deduction of points or stars in review!
The guide should mention to make sure that all of the connecting pins on the phone are down. Everything was fine until I tried to close it when one of the pins punctured the oleds and now there is a white light streak thorough the phone
same here. I wish I read your comment beforehand. I have a white line now on my phone.
-


オリジナルのパーツと交換用パーツをよく見比べてください。交換用パーツを取り付ける前に、オリジナルのパーツに残っている部品を交換用パーツに移植したり、交換用パーツの接着剤の剥離紙を剥がす必要があるかも知れません。
このデバイスを再組み立てするには、インストラクションを逆の順番に従って作業を進めてください。
Pixelのオンデバイス診断ツールで診断をする場合は、こちらのドキュメント(英語)を参照して下さい(注意:本項追記時点では、Pixel診断ツールは日本国内では使用できません)。
e-wasteを処理する場合は、認可済みリサイクルセンターR2を通じて廃棄してください。
修理がうまく進みませんか?ベーシックなトラブルシューティングを試してみるか、Google Pixel 7 Pro のアンサーコミュニティに尋ねてみましょう。
130 の人々がこのガイドを完成させました。
以下の翻訳者の皆さんにお礼を申し上げます:
100%

これらの翻訳者の方々は世界を修理する私たちのサポートをしてくれています。 あなたも貢献してみませんか?
翻訳を始める ›


99 件のコメント
To get the fingerprint scanner to work... Fingerprint scanner not working after replacing screen. Pixel 6 Pro
After doing a few of these, using the fingerprint calibration tool is always needed. https://pixelrepair.withgoogle.com/udfps
I think it should be included in the final steps for completeness.
Also, the plastic bracket on the back of the screen usually is more willing to separate from the screen than from the phone chassis. I think this may lead to confusion for some people who may try to install the new screen over the old plastic. Some mention of this would be helpful.
All guides say we have to recalibrate the fingerprint sensor after a screen replacement by going here https://pixelrepair.withgoogle.com/udfps
Problem is that this does not work anymore. With a Pixel 7 Pro it says software failed to install. Looking at Android and Google forums is seems a common problem that broke this year. Is there another way to install the fingerprint calibration software on the phone without that link above??
I never change any mobile phone parts.
Should I try it?
Yes. It worked like a charm. I just followed the steps, and after calibrating the fingerprint sensor, everything was working 100%.
It's technically possible, but it would be very difficult, since the fingerprint stuff is glued to the back of screen. You might be able to find a shop in China or Singapore that can do such a repair.
As mentioned by @chipneedham , I would recommend adding in a note that the plastic bracket may not have come off with the screen. This tripped me up in my repair and meant I had to reapply the adhesive.
Is it possible to just replace cracked glass and not the whole screen unit?
p38lightng - 返信
It's extremely difficult, without specialized (expensive) equipment. There is a piano-wire method of separating them, but it requires a lot of experience (many failed attempts) and is often not successful.
After the screen replacement, Finger Print Unlock does not work in Pixel 7 Pro. I tried to delete old fingerprints and when I try to save a new fingerprint, it says time out.
you have to calibrate it: Google Pixelフォンの指紋センサーをキャリブレーションする方法
Is water resistance unaffected after a successful repair?
using authentic sealant it allegedly isn't, but i wouldn't risk it. Officially they do not guarantee it either
My pixel 7 pro did not go through a calibration process during boot-up after replacing the screen. Now I just have a message on both my lock and home screens stating ‘Fingerprint setup timed out. Can’t use fingerprint sensor. Visit a repair provider or g.co/pixel/fingerprintunlock’
I originally sent mine to Google for repair. They upped the repair price after they received it. I opted to do it myself. When I got the screen replaced it had been flashed to some special firmware. I re-flashed it normally and it appeared to be fixed. Then I got this error. Finally, I re-flashed it here and it worked. https://pixelrepair.withgoogle.com/
Do not forget to remove BLACK sticker behind camera hole.
Arg. I missed this. Front camera is black and face unlock doesn't work. Did you reinstall the screen? It seems kind of flimsy and I'm afraid I'll break it.
I missed this.
Great kit and guide! I was able to replace my screen easily. I had to calibrate my fingerprint sensor via Google, but that was easy too :)
from which PC did you do the calibration I tried several times the PC recognizes my pixel when it is turned on but in fastboot it does not recognize it
jj59840 -
If your device isn't recognized while in fastboot, you don't have the proper USB drivers installed. You can get them from the Google pixel support page
After taking on this adventure as a complete newbie to this kind of repair I have a couple of suggestions:
- the phone needs to be quite hot to the touch, more like 50 degrees rather than 40 degrees Celsius. Hotter than you'd think for such a delicate device. A tiny bit warmer than your hand isn't enough to loosen the adhesive. The tape tip for my cracked screen worked perfectly!
- the screen ribbon connector is invented to agonize those in the lowest parts of hell, you need so much more force than such a tiny thing should be able to handle, all laws of physics are bypassed by it. You THINK it clicked in, but it was merely a blank and now you have to start over.
- on my pc the fingerprint calibration needed an additional android fastboot driver, then the Google link will work.
All in all a very fun, interesting, but sometimes agonizing evening was spent! Phone is so much more responsive and vibrant without the cracked screen, thank you very much!
These kits are garbage. Stuff doesn't line up. THere are plastic pieces that don't fit. Waste of money. I followed directions to a tee. The new frame does NOT line up with the screen. There are plastic pegs that have no place to fit. Screen will not fit. WASTE OF TIME
@jasonhopper I think you may have left the bracket in place, it needs to be removed with the old screen. I tried to alert people in my comment above:
"Also, the plastic bracket on the back of the screen usually is more willing to separate from the screen than from the phone chassis. I think this may lead to confusion for some people who may try to install the new screen over the old plastic. Some mention of this would be helpful."
Chip. Yes, disappear to be what has happened. Unfortunately now the adhesive is over the bracket and that part will have been destroyed trying to get the bracket off. I think I fix it should send me new adhesive, which means I will have to wait again the instructions are not clear enough here. If I had read your input I probably would have figured it out. Thank you for your response.
READ THE COMMENTS. I ran into literally every issue mentioned in the comments. Definitely the hardest repair I've done and I do this professionally.
I agree. The comments led me to my ultimate problem. The screen delaminated and left the black bracket on the frame. IFIXIT sent me another adhesive and after pulling the frame off and applying the new adhesive the screen went back on just fine. Of course I had to run the fingerprint scan fix from Google. So my screen replacement was a success but I stand by my comments that the guy needs to be more informational with regards to problems you could encounter.
Really? It seems exactly like any other screen replacement
Bon tuto mais comme précédemment conseillé, voici quelques conseils suite à l'installation d'un nouvel écran.
- pour décoller le vieil écran, bien chauffer et bien passer le médiator sous le plastic support de l'écran. Je ne l'ai pas bien fait du coup j'ai juste décollé l'écran mais pas le support plastique collé à l'écran et coller au téléphone. Celui-ci est bien emboîté au téléphone. Heureusement que l'on peut le déboîter, toujours avec le médiator ensuite car sinon impossible de mettre le nouvel écran
- ne pas oublier d'enlever le sticker noir de protection derrière la vitre selfie du nouvel écran
- pas évident de reclipser la nappe du nouvel écran je trouve ! Une fois fait, j'ai vérifié que celui-ci fonctionne bien en allumant le téléphone
- il a fallut recalibrer l'empreinte digitale car il ne fonctionnait pas. Pas de messages, rien. Comme indiqué, j'ai connecté mon telephone au PC, sur une prise USB-A. car le téléphone n'a pas été reconnu en le branchant sur une prise USB-C
Si ça peut aider ! Top Ifixit !
So I received a kit that has two different size blue film parts. One is to apply the new edge adhesive, but no clue (or docs) as to where the other one goes ... The above instructions conveniently skip over applying the adhesive ....
Bonjour .
Combien ça coûterait faire réparer la vitre interne ? L'écran ne sallume plus
La vitre extérieure ( je ne.parle pas du film collé ) est intacte c'est la vitre en dessous Qui est cassée.
Ferrandeznathalie12@gmail.com
Merci
+
Directions are missing some extremely important details and my new screen being damaged during installation. It feels like Ifixit is more focused on selling nice tools than making sure that the finer details are covered in the install process. (Admittedly the anti clamp it is an excellent tool, but it did separate the screen from the plastic frame not the phone, but it isn't part of the basic tool kit or the repair kit)
What damaged my new screen was a tiny little contact spring in the bottom right corner that must have been bent in the removal or cleaning process (I think the cleaning cloth while removing the adhesive). Either way bent contact damaged the new screen on install causing a white line to run across the screen. There are several of these small contacts and no mention of them in the instructions. (In my opinion they should be mentioned as the bent contact would have been easy to fix had I been aware of it instead I am either out $206 or stuck with a white line on my screen)
immaterial - 返信
Screen replacement went well, hardest thing for me was reseating the flex. Found this youtube vid helpful. https://www.youtube.com/watch?v=yIiRc97D...
Repair of fingerprint sensor worked fine via https://pixelrepair.withgoogle.com/
Very happy!
Please can someone explain this step to me: Be sure to remove all adhesive liners from your replacement screen. Check the selfie camera recess and make sure you've removed the liner there.
For the Google/Ifixit screen there is a black liner from the factory covering the selfie camera hole that needs to be removed.
You should be able to see through the back of the screen where the hole for the selfie camera is.
If you flip the screen around and you can't see through the hole, the camera won't be able to either.
Joe -
For me it worked like a charm- except for the fingerprint Calibration software via https://pixelrepair.withgoogle.com/udfps
My Pixel is connected in Fastboot mode, and when I try to start the procedure I get stuck at step 1 "downloading the software"
"Couldn't download the software"
Anyone else facing this issue (or haveing a fix for that?
I've the same error - Does anyone solve this?
I'm getting couldn't install the software, 2nd step on the https://pixelrepair.withgoogle.com/udfps webpage... Does anyone know if your phone device state needs to be unlocked for the software to install? Does it need to be unlocked through your cell carrier?
C * -
Agreed that the guide leaves too much ambiguity. If you're gonna sell the whole repair kit, at least describe what everything that comes in it does. I ignored the unmentioned graphite paper looking sheet. Everything was going ok until after snapping the display back on, there's a white line on the top - likely from one of those annoying metal pieces that stick up inside the device. Convenient that iFixIt will sell you a genuine part and kit but only write up half a guide just telling you to reverse the steps (what adhesive would I remove when reversing them? Pictures of replacing parts would be great too. It's just a lazily written guide.) and not give precautions to common issues. I want an anal and detailed repair guide so I can feel confident in it, not another blasé guide. Also shame on Google for putting those pins there - it all feels very anti right to repair making it harder to fix a broken display.
I agree with you and @immaterial . The pins should definitely be in the guide. The part costs 200 dollars and pushing thise pins down can avoid a whole lot of damage. Had to do this twice because of such a small issue. It should definitely be added to the guide.
Incomplete guide. I had to check youtube to learn to remove the blue stickers from the display itself. I had to check other sources multiple of times to ensure my screen replacement goes smoothly. Extremely disappointed at this guide. Could be better written.
The linked adhesive installation guide IS NOT FOR THIS PHONE. IT's for generic phones. Check youtube for proper installation guide. This guide is useless.
I think the guide was pretty helpful. A little intuition will go a long way, though.
Did you see the black sticker on the selfie (inside) remove it prior to installing the screen. Check youtube guides. This guide is useless.
Check: https://www.youtube.com/watch?v=yIiRc97D...
Followed the instructions very carefully, and it was going well, too well. The guide mentions plastic clips but my picks were doing it with almost no resistance. Well, that's because I managed to cut between the digitizer and the glass, so the glass popped off first. then I had to cut under the digitizer to get that off. I thought that was the end of it, and I started cleaning. There was a glaring lack of adhesive while cleaning and something felt off. It took me a while to get the ribbon cable on. I put the cable bracket back in, then applied the adhesive. Everything was going smoothly, until I tried to pop the screen on. It physically was incapable of fitting. Well, after ~45 minutes trying to figure out where I went wrong, I discovered that the plastic bracket attached to the back of the digitizer was still glued onto the phone. After peeling it off, it all made sense. Adhesive was unsalvagable though, now I have to wait for more to come in, ughhhhh. I wish the guide made that more clear.
To recalibrate fingerprint scanner, use the link but keep the hone in fastboot mode not rescue mode, worked a charm
My Google pixel 7 pro display was damaged and I tried changing the display 3,4 time but Everytime there will be a white line on the side from top to bottom. Can you help .
I have the same problem
Those the item include the fingerprint?
Easy repair, but remember to remove the plastic frame from the old screen, if they spit disassemble.
And then my fingerprint scanner doesn't work after replacement of screen, and the calibration tool doesn't work.
I'm getting a 'Couldn't install the software' when I try to install the calibration software. I then tried to reinstall Android but the fingerprint scanner still doesn't work. :(
Running Android 13.
For me, it was the internet security software (zscaler) on the work laptop that caused the error. The site itself worked, only the download ran into above error. Took me a while to figure it out ;)
I've seen multiple reports that you need to run the fingerpirnt calibration tool TWICE. https://pixelrepair.withgoogle.com/udfps
This was my case too. Ran once, didn't work, ran again, and then it works. Good luck!
Did anyone else end up with a proximity sensor that doesn't work after install? I think mine is defective. I also have a black round spot on the LCD near the camera. Reaching out to support for help...
I contacted Google Support, asking them why the calibration tool doesn't work, and I got this answer:
I’ve checked my resources and we do not recommend running a recalibration tool on your device as this may further complicate the issue. Recalibration tools are designed to fix specific problems, but they can also cause new problems if they are not used correctly. In your case, there is a chance that running a recalibration tool could damage your device or make the problem worse.
What they then did offer me was a warranty repair, even that I told them than I did the screen replacement myself:
You can rest assured that the repair of your device will be free of charge since you purchased the parts of your device from our authorized partner iFixit. This is because we have a partnership with iFixit, which means that they offer a warranty on all of the parts that they sell.
So this is what I'll do.
Did Google repair fix the calibration for you? Did you send it to them?
C * -
That's awesome!
I disassembled my phone and when I plug the new screen in the phone fails to boot and displays the google boot screen with messed up colors. It will then continue to boot over and over. I switched back to my damaged screen and it works like it did before. Is this a lemon part?
I had a very similar issue, the old one plugged it in works, but the new one doesn't do anything :-( keep going back and forth and I am able to reproduce that every time. Contacted support will update this comment later.
Before install make sure you received the correct screen! Pixel 6 Pro screens are being incorrectly packaged and labeled as Pixel 7 pros. I was shipped a 6 pro screen and was only able to tell after finding this video (https://www.youtube.com/watch?v=MhvvNaFK...). You will be able to tell since the proximity sensor window and alignment tabs will be slightly different (skip to 7:00 minutes in to the video above to see the differences).
finger print not working as yet. replaced screen for pixel 7 pro yesterday. Else worked fine
You should really mention how important it is to pay attention to the earpiece speaker grill, I didn't and since it's so tiny I didn't even notice until the screen was permanently glued on again that I don't have a speaker grill up there anymore
me neither :(
Works like a charm, I had worries concerning the accuracy of my sealant placement skills, but there were no issues. Fingerprint scanner doesn't work until you calibrate it using Google website, entire process takes a minute and you only have to click "confirm" twice. AFTER THAT YOU HAVE TO RESTART THE PHONE and it will work. Also remember to remove the selfie camera hole protector on the screen or you will only be able to take pitch dark selfies
I agree, the backing plastic could be cut a bit more precise by the factory, to ensure better alignment.
Not very easy but very doable as a first timer replacing a phone screen follow this link as reference https://www.youtube.com/watch?v=yIiRc97D... very helpful.
NOTE: I also encounter the plastic bracket issue where you cannot identify if its part of the old screen that's why you have to check or compare the image from the guide.
Was there really a cover on the front camera glass of the new display?
I haven't seen it and now the front camera shows only black....
Update: didn't know I can see more comments here when I'm logged in, otherwise I would have read the comments about the black front camera cover ;-(
Another important point is to do manual reboot after fingerprint calibration, otherwise it doesn't work.
I just did a test before I put adhesive on and its just a black screen. I was unable to power my phone off before repair and have been unable to tell how much battery is left. I tried my best to let it die this week but i have no control of my device since it broke and desperately need it to work again ASAP. Is it mandatory that it reboots? Please help!
Same here :(
I managed to fix my screen, back to normal, no experience here. However, right after finishing the steps, the main cameras would not run and only showed a black screen (tele, main, wide). This did not seem to affect the front-facing camera. I restarted the phone (about three times, plus the two you need to get the fingerprint sensor recalibrated), forced-stopped the camera app and erased the cache and data on the app, and these would still not work. Did my research online, did not find any previously reported issue, and after a while and recharging the phone, the cameras started to work normally. I panicked for a while, but before re-opening the phone again to see if something was wrong with the cameras, and then ruining the replaced screen in the process (and the adhesive), try everything and charge the phone and wait for it to work.
Super conseil de réparation j’ai changer mon écran en une petite heure tout en suivant bien les instructions.
Merci pour tout je suis super content
Une fois le remplacement effectué, un message "impossible d'utiliser le lecteur d'empreinte digitale" apparait et le logo de l'empreinte digitale "grésille" ou "clignote" comme s'il y a avait un faux contact. J'ai essayé de vérifier derrière l'écran que les connecteurs soient bien fixés, il ne semblait pas y avoir de problème.
Install was super easy. Best quality parts for any Google.
So glad I did this. Replacing the screen was much cheaper compared to buying a brand new phone. It was a struggle to get the screen off where it was cracked at the edge, but the repair was still completed in less than an hour. The fingerprint reader calibration is a must because it will not work unless you do it. For an amateur, this was seamless. Highly recommend if you have a broken screen.
David Hall - 返信
Hacen envios a México
don't forget to take the small cover off the front camera lens or you then have to carefully take it all back off...
The screen is replaced but no touch inputs are recognized. I can't use any touch inputs even after using the calibrating tool for the fingerprint sensor. I can't use my phone, I am stuck at the pin screen
Make sure screen connected is properly seated. Careful not to crease or damage the flat cable when installing everything.
For some reason my front facing camera wont work and the proximity sensor (screen stays lit during calls) doesn't either after I did this install. Has anyone else had this happen? I did get my fingerprint scanner to work that wasn't an issue.
I have a problem, my screen randomly stops working after replacement, the only way I can get it to work is going inside again and disconnecting and reconnecting the screeen, I dont think it is a loose cable, It has happened too many times now.
Get in touch with iFixit Customer Support to get a screen replacement, it may be faulty. That's just from the top of my head....it can be anything, unfortunately.
I had the same problem. In fact, if you're like me, you have the vibration right away but the screen remains black. In fact, you have to hold down the button for at least 30 seconds even if the phone vibrated right away. After 30 seconds, release the button and the screen should light up.
Lionel -
That's a problem on many Pixel 7 Pros, even without prior screen replacement. Probably happens if you apply pressure to the front of the screen, on the left side, about midway between top and bottom of the screen, right? That's caused by a wire shorting short somewhere around battery cable or antenna cable, if I recall correctly.
Full replacement went well. Screen was working fine. I went to press the adhesive on and now the screen will not turn on. Phone is on and I can feel it buzzing when I click the power button. Any thoughts?
Damaged screen connector or LCD ribbon cable?
Did anyone experience a defective bottom microphone after screen replacement? Thank you
No. Completely unrelated.
Hey guys, I had an issue with the fingerprint sensor. I tried everything mentioned in the posts, but nothing worked. In the end, my fix was simple: I unplugged the fingerprint sensor from the LCD and plugged it back in, and that solved the problem.
How did you "unplug the fingerprint sensor from the LCD"? The fingerprint sensor is glued onto the back of the LCD.
I used this to replace my phone screen a few months ago and everything went very well. I was able to get the finger print reader unlocked and working as well without any issue. Everything is holding together well after a few months of use and even after being dropped (it was in a case). I was pleased with how good these instructions were and how well the replacement process went for me.
This was my first smartphone screen repair. And i replaced the battery too. Everything went great! IFixedit! The only difficulty i had was removing the old battery. I wound up heating with a hair dryer and prying it out. The tool that worked best for this is an old golf ball divot tool.
I am not able to power off. Broken screen does not respond. I have the battery fully discharged but would like to know before beginning my repair if I can plug in the charger to try the screen after replacement to verify all is functioning before reassembly.
Mary - 返信
Step 2 is VERY VERY IMPORTANT!!!!!!
I had to remove the adhesive and take out the plastic from the old screen, which was still on the phone and had to reapply it. It was a nightmare.
Please DON'T TAKE IT EASY
Kevin Döring - 返信