はじめに
手順 1 に進む最近開催されたAppleの教育現場にフォーカスしたイベントで明らかとなりましたが、この新iPadは”新機能搭載のモデル”というよりも”挿絵が交換されたり、細かい修正が入れられた改訂版単行本”といった例えが合うのではないでしょうか。このiPadのスペックには2つの大きなアップグレード(プロセッサーとApple Pencil)があると公表されている一方で、他には何が変わったのでしょうか?さあ分解でその答えを探してみましょう!
FacebookやInstagram、 Twitter 、Twitter日本語版 をフォローしてリペア業界の最新ニュースを入手しましょう。定期的なリペアニュースはnewsletterを購読してください。


ビデオの概要
-
-
さて、クラスの皆さん、今日から加わる新しい生徒のiPad 6を温かく歓迎してあげましょう!<拍手>それでは簡単に自己紹介をしてください。
-
64ビットアーキテクチャ搭載A10 Fusionチップ、組み込み型M10コプロセッサ
-
9.7インチマルチタッチRetinaディスプレイ、2,048 x 1,536ピクセル解像度、264ppi、耐指紋性撥油コーティング
-
容量 32GBもしくは128GB
-
8メガピクセルカメラ、1080p HDビデオ撮影+1.2メガピクセルの写真、720p FaceTime HDビデオ撮影
-
802.11a/b/g/n/ac dual band MIMO Wi-Fi + Bluetooth 4.2
-
Touch ID指紋認証センサー+3軸ジャイロ+加速度センサー+気圧計+環境光センサー
-
Apple Pencil
-
-
-
教育現場では、Appleにとってより安価なGoogleのラップトップという手強い競争相手がいます。このiPadはHPやAsusから発売されたChromebookに対抗できるのでしょうか?
-
生徒たちからタブレットを含め電化製品が少々手洗い扱いをすることを想定して、iFixitが詳細に点検していきましょう。
-
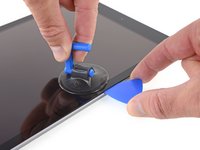
iPadの接着剤で固められたガラス製ディスプレイは、落とすと壊れてしまう可能性が高くなります。近年発売された他のiPadモデルと比べると、このモデルの見た目はそれほど素晴らしいものではありませんが、エアギャップされたデジタイザーパネルを搭載しています。ディスプレイパネル下にLOCA(光学透明接着剤)で固定されたディスプレイと比べると、修理が安価で済みます。
-
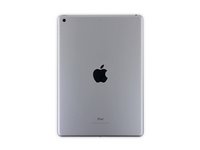
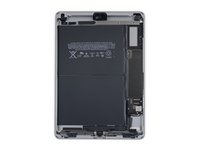
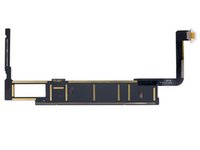
キーボードやApple Pencilは別売りのアクセサリーで、追加料金が発生する上、紛失することもありますーしかし、ダメージが入ってしまえば交換は簡単です。(私たちのHPはキーボードのキーがなくなっています:1番目画像)
-
新しいiPadには新モデル番号が付与されています!今年の番号はA1893です。
-
-
-
この手順で使用する道具:Manta Driver Kit - 112 Bit Driver Kit$69.95
-
2つの新しいものを同時に報告しましょう。この分解は素晴らしいことに一度に2つ試せるのです。新しいiPadの内部を探ることと、発売予定の iFixit特製ツールを試用してみることです!
-
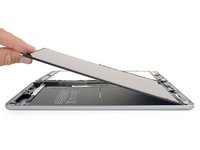
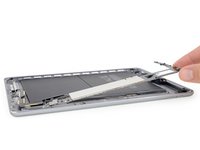
プラスネジを外した後、LCDパネルを持ち上げて、基板から接続を外します。
-
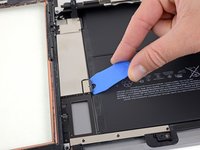
安全第一です!まず最初に電流が飛び散って分解が妨害されないように、バッテリーと基板の間にバッテリーブロッカーを差し込みます。
Where can I buy iPad 6 fpc
battery connectors? Is it interchangable with an iPad pro 2g?
Kris Payne - 返信
-
-
In this step, the photo on the far left shows the two cables that were severed on my iPad by the blue plastic triangle tools. Consequently, my digitizer is FUBAR!
The photo on the far right shows a different iPad than the one I have. Several parts are different or missing altogether. This photo should have a warning.
Hi Bradford,
As stated in the introduction, this is a teardown of the iPad 6, not a repair manual. When actual guides are written for this device, you will find them here.
-
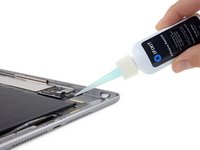
この手順で使用する道具:iFixit Adhesive Remover$19.99
-
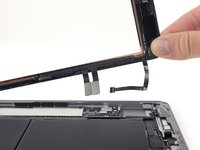
強力な接着剤によってケースと基板が留められています。ここにはリキッドのパンチで対抗しましょう!
-
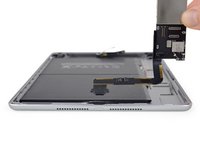
パカッ!頑固な接着剤もすぐに打ち負かされます。そして1枚の基板が外れます。
-
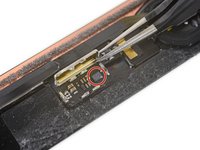
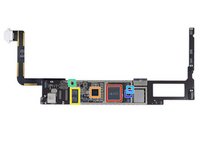
…そしてこの基板で残念なパーツはLightningコネクターです。Lightningコネクターは基板状の他のパーツに比べて使用頻度が高く、一番先に壊れやすいパーツです。マイクロソルダリングで基板を切断して、ここに端子用ポートを付け替えなければなりません。
This is disappointing. I have seen too many iPad Airs with borked charging circuits, with behaviors like battery won’t charge but unit boots or will only boot when powered by a 2.1A block, but won’t sync. Apple has to be aware of this, and it is often attributed to a bad charging controller IC. Considering that many schools are giving iPads to kids to take home, and that parents may be less than judicious about sourcing “good” iPad chargers (Five Below, anyone?) and policing good cable management, this is lamentable on Apple’s part.
-
-
-
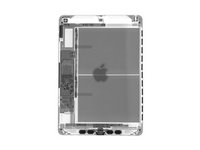
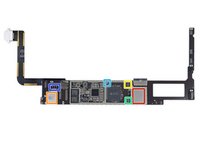
これまでのところ、大きなアップグレードを見つけることができませんが、Appleはおそらく基板の中になにか楽しいものを隠しているのでしょう。
-
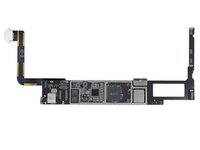
2 GB Micron LPDDR4 SDRAMが下に積層された Apple A10 Fusion APL1W24 SoC ( iPhone 7にも搭載)MT53B256M64D2TP-062 L XT:C
-
Apple 343500203-A0、PMICに類似 (おそらくiPad 5に搭載されていた343S001441-A0の改良版)
-
2x Broadcom BCM15900B0タッチスクリーンコントローラー ( 10.5インチの分解と12.9インチのiPad Proに搭載されていたもの)
-
NXP Semiconductorディスプレイポートマルチプレクサ (おそらく)
-
Bosch Sensortec 圧力センサー
-
インベンセンスの加速度計
-
-
you have scematic ipad 6 this ?
Can I upgrade the flash memory from 32 to 64 or higher
sojib paul - 返信
-
-
AppleはこのモデルでもiPad 5と同じバッテリーを使用していると判明し、喜んでいます。モデル番号はA1484で容量は32.9 Whです。
-
喜びはこれだだけでなく、iPad 5の修理ガイドが再利用できるのです。
-
Appleは以前一度だけ、簡単にiPadのバッテリーを取り出せるという希望に満ちた瞬間を与えてくれましたが、それ以来このようなものは目にしてきませんでした。
-
グッドニュースはバッテリーの交換ですーもしあなたがiPadを大量に取り扱う大組織に所属していれば、多種類のiPadモデルを所有していても1種類だけのバッテリーを確保しておけばよいのです。(まず最初にオリジナルのバッテリーを取り出せればの話ですが)
-
-
Very flawed guide - there is no way to use the pick to start the removal of the digitizer. Ridiculous to think that the suction cup and heat will do anything useful. Further, the lack of explanation and correct detail for the Cellular model resulted in the ruination of my device - karked the cellular module because they lack the documentation for it. Karked the digitizer because again, detail wasn't correct. Wasted money, wasted device. i think the guide was pretty bad at explaining where you can actually go and where you can actually not go. It was also terrible at explaining how to reassemble with the adhesive.
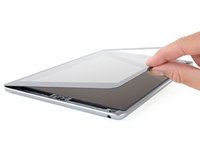
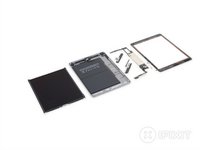
- LCDはカバーガラス/デジタイザーが外れると簡単に取り外せます。
- エアギャップされた、個別に交換できるカバーガラスとLCDによって、デバイスを落とした時のひび割れによる修理が安価で済みます。
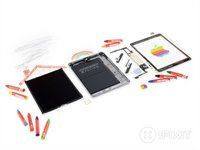
- 全てのiPadに言えることですが、大変強力な接着剤のバリアによって、どんな修理作業でも困難になります。そして粘着性に悩まされる作業になります。
- あらゆるものが接着剤で固められています。バッテリーの交換はとりわけチャレンジな作業です。
- LCDはフォーム性の粘着テープでフロントパネルに固定されています。これは解体作業の際にダメージを与えてしまうリスクが高まります。


まとめ
リペアビリティのスコア


(10点が最も修理しやすい指標です)
以下の翻訳者の皆さんにお礼を申し上げます:
100%

Midori Doiさんは世界中で修理する私たちを助けてくれています! あなたも貢献してみませんか?
翻訳を始める ›
40 件のコメント
Great tear down glad to see separate digitizer!
Same! I support several school districts, and the cost of Air 2 screens have made them unfixable at the current price point.
Hi, which toolkit is represented in step 5?
Looks like a new 112 bit tool kit with two handles! Don’t see it listed in the store yet ;-}
Dan -
I need that kit now!!!!!!!!!
The battery is the same, but will an Air 1/iPad 5 digitizer work? Will it still support pencil?
try it iFixit!?
I don’t think Air 1/iPad 5 digitizer will work on iPad 6, as the connector’s orientation is different.
Gorilla -
Why is the iFixit Adhesive Remover not for sale?
Normally it would be. Currently it’s available as part of several part + toolkit sets, but the standalone product is being updated. Check again soon ;)
oof thats $@$*!&
The LCD is the same as Air 5?
Jesus Ruiz - 返信
As ever iFixit hates Apple for designing parts that simply don’t go wrong in the first place.
Follow the money. If iFixit can’t sell parts then they give low scores.
As a consumer, not failing beats fixability every day of the week.
That’s an odd claim, the iPad 6 is patterned off of the 5, which also earned a 2, and we sell loads of parts for it. Similarly, our iPad 5 digitizer glass has over 11,000 views to date, that’s a lot of views for something that never goes wrong. Durability is great, but entropy will win eventually, and fixability is a good indicator for recyclability. Glued down batteries are dangerous and time-consuming to recycle, increasing e-waste.
Has anyone seen if digitisers are available yet? too soon I’m guessing, already had a customer in with one dropped the day after he bought it….
Tom French - 返信
So many POSITIVE descriptors for IFIXIT to do these tear downs. . . . . informative, professional, timely, waste-reducing, cost-saving, headache-minimizing and list could go on. BEST in the industry.
bob breuer - 返信
Anyone seen the digitizer yet for the 6th generation yet? ETA maybe?
I'm in need of the digitizer and the LCD Screen for the A1893 iPad 2018. Anyone know if the Air 1 LCD will be compatible or where to find a digitizer?
Thank You!
You might try Ali express. Will take forever but they can likely ship you one.
It is way too bad that Apple has used battery this small.I was intending to buy one until I see the horribly tiny battery.Come on,Apple.You are better than this.
wow very interesting
is this the ipad 2018?
yes it is the model from 2018
What kind of adhesive do you use to glue back the glass?
We would recommend pre-cut adhesive strips like these.
My ipad 6 gen does not look like this at all, on the top there is a black rectangular shaped piece where the front camera sits and there is a hole in the back metal casing to make space for it. That plastic piece is the part thats broken, What is it called and where can i buy one?
Also checked my friends ipad 6 gen as well and it has this as well. The back of these ipad 6’s look nothing like the one in this pictures.
Hi Ryan,
I think the iPad model you have is the Wi-Fi + Cellular model, while our teardown unit is the Wi-Fi only model. The black plastic rectangular piece allows for the cellular radios to penetrate through the aluminum case properly to ensure cell service. You may have to replace the entire back cover to fix the broken plastic part.
Does anybody know if the power button assembly can be replaced like the iPad 5 and some other iPads? I have a customer that has damaged their iPad to where that needs to be replaced. I didn’t want to mess with it too much unless I knew there was a part for it but I haven’t seen a power button assembly replacement unless I am not looking good enough.
@car34 Based on the X-ray, that component looks really similar to the one in the previous generation. I’m sure it’s replaceable. Whether or not it’s the same part or compatible with the iPad 5 version, I couldn’t say—my guess would be the button cover is identical, with maybe 50/50 odds the underlying flex cable is the same.
Who made the lcd? Why don’t you mention??
where to get a new display of an ipad 2017 9.7’’ please advice?
My son’s iPad screen shattered. So instead of buying a new iPad I figured I would turn it into a teaching moment for my son. I was replacing both the screen and a new home button.
Warning:
If you have a shattered screen please beware that it can be difficult to remove and leave a lot of tiny shards of glass. It was a mess.
I purchased the “iOpener” kit - which was all I needed.
Time: 4 hours
Recommended Equipment:
- Can of compressed air
- Adhesive or double sided cello tape.
- Soft anti-static and anti scratch cloths
Pro Tip:
If your screen is really shattered, I recommend leaving it in the sun for a half hour or so to really get it loose.
If you’re replacing both the screen and a new home button, don’t forget the washer ring that holds the home button in place. So if you are doing a screen and home button replacement, grab that washer and even the delicate gasket off the old home button otherwise it won’t stay snug in place. I really wish the home button kit shipped with those items intact.
genial por muestrando, quiero repararlo ahora!
I was so glad that there is separate digitizer as my warranty was finished. The screen was cracked so bad i got !#^&@@ and pull off some of it and noticed that the digitizer was separate and my god the LCD was perfectly intact. At that point I decided to get my replacement digitizer from ifixit. I was very happy that it came with the adhesive already around the edges. I followed the repair guide but still it took me almost 2 hours as I was being extra carful not to damage the LCD. For future references tape the broken screen with clear tape then proceeded to remove it as it will keep the little shards from flying over the place and most of all make sure to use protective eyewear as I said those little shards will fly as I got one in the eye.
Thank you ifixit