
MacBook Air 13インチLate 2020 スクリーンの交換

はじめに
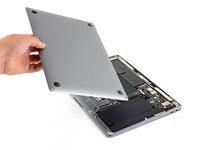
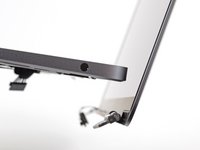
手順 1 に進むMacBook Air 13インチLate 2020 スクリーン(別名ディスプレイ)を交換するための修理ガイドです。
必要な工具と部品
修理キット
キットには、修理ガイドを完了するために必要な全ての部品とツールが含まれています。

パーツ

ツール


もっと見る
-
この手順で使用する道具:Magnetic Project Mat$19.95
-
MacBookにBig Sur v11.1以降がインストールされている場合、オートブートを無効にできないかもしれません。通常通りに作業を進めることができますが、裏蓋を開けたらすぐにバッテリーを外すようにしてください。
-
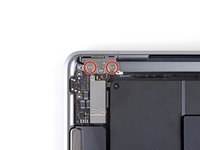
P5ドライバーを使って、次のネジを外します。
-
7.9mmネジー2本
-
7.3 mmネジー2本
-
2.6 mmネジー6本
-
-
-
指先をディスプレイと下部ケースの間に挟んで、下部ケースから上向きに引き上げます。
-
下部ケースを取り出します。
-
本体を正しい位置に揃えてしっかりと押し込み、下にある2つの隠しクリップをはめ込みます。カチッと装着音がして固定されます。
-
-
-
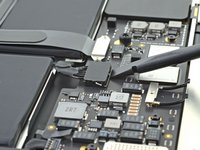
バッテリーコネクタ上のメタル製ロッキングアームを、スパッジャーの平面側先端でこじ上げてラッチを外します。
-
メタル製のロッキングアームを真上に持ち上げて、バッテリーコネクタをロジックボードのソケットから外します。
-
上手く接続できない場合は、コネクタの後ろ側、ケーブルがついている方を先に所定の位置に押し込んでから、コネクタの先端をコネクタが平らになるように押し込んで所定の位置に収めて下さい。
If having difficulty in flipping the bar up, place the machine vertical and not that there is a small “locking nib” that the bar has to clear. You may have to give the bar honest persuasion to clear the nib.
The bar can lock backwards making it very hard to even see let alone move. Great care is needed to shift it. I had to use two thumbnails, one on each side, then once flipped forward it takes more push than I expected to clip it in place. Ensure the plug is fully seated first !
As others commented, it can be hard to click the battery connector back into place. First make sure the bar is not underneath the connector. Then, turning the computer so the connector pins are facing you (LCD hinge end closer to you) can also make it easier to position the connector on top and then click it into place.
Some replacement batteries have a retainer bar that differs from OEM batteries. I had to swap the retainer bar to properly secure it under the "locking nib" to ensure it didn't release on its own (before it could freely swing).
-
-
-
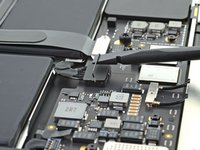
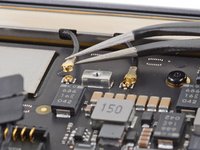
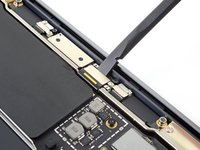
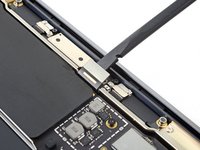
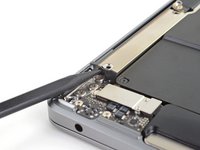
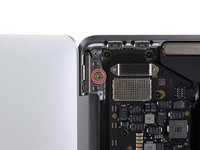
T3トルクスドライバーを使って、アンテナケーブルカバーを固定している1.4mmネジを1本外します。
-
もしT3ビットが少し緩く感じる場合は、代わりにT4ビットを使用することもできます。
I needed a T4 for this
I found this screw difficult to reinstall. Very small and fiddly. 15-20 minutes on this step.
The T3/T4 screws are tiny!!!
To reinstall a tiny screw first turn it counterclockwise until you feel it engage the tread, then turn them clockwise to tighten it.
-
-
この手順で使用する道具:Tweezers$4.99
These are tiny, and hard to reconnect. The key was to position the cables so their ends are very close to the posts on the board.
Yep. Good call. Me too folks.
So anyone that’s had experience with keyboard and antenna, connectors, or previous Apple iPhone products, knows that these antenna connectors go on from front to back so you kind of have to position the noncable end of the antenna cable first and then push it towards the back I’m not sure if that makes sense, but try from the front to the back connecting Put pressure on the front first and then put pressure towards the cable in if you do it wrong and put too much pressure in it, you can ruin the cables. Be careful with it.
This was the hardest part of the reassembly for me. One side connected easily, the other took 10 minutes of fanagling. Using the flashlight from my phone up close helped me see better what was going on and then pushing the connector slightly towards the hinge to create more bend on the cable so that it would line up correctly.
-
-
-
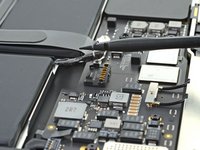
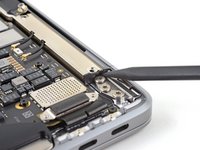
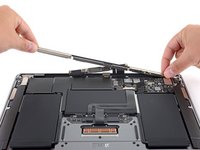
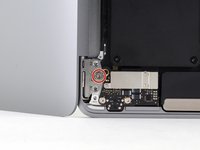
T3トルクスドライバーを使って、ディスプレイケーブルのコネクタカバーを固定している1.5 mmネジを2本外します。
I dropped one of these - can they be purchased? Or is there a matching screw in an older MacBook Air? I have a ton of those for parts... :-)
weird, for my model A2337 it is even T2 screws. tested it two times and I have the ifixit mako precision bit set.
On my MacBook Air M1 Early 2020, I had to use a T4 bit on one of the screws. The other one came out with a T3. I am using a HyperTough 77-piece precision repair set.
Raj Venkat - 返信
T3 worked on mine, but getting this cover to line up with the holes was tricky due to the slope, it kept sliding out of place. I finally held it in place with one finger while carefully inserting the screw on one side. Once I had that in, then it was easy to line up the other side.
-
-
-
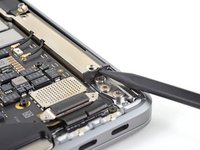
ディスプレイケーブルのコネクタカバーを外します。
Wth my new assembly, there were no covers for the connectors either side of this cover. I had to transfer them from my original display assembly
Also note that all these covers have one precision hole (ie round) and one 'loose' (ie trapezoid). Fit the round one first, not super tight. Then the second and tighten all
-
-
-
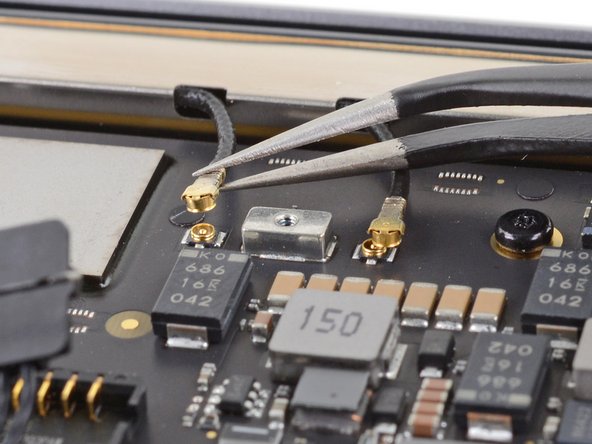
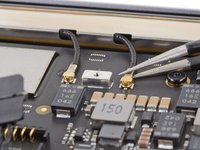
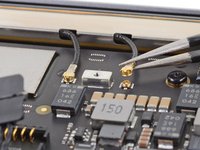
スパッジャーの平面側先端を使って、ディスプレイケーブルのコネクターをアンテナボードからまっすぐにこじ開けて外します。
Since this step is the most crucial in the reassembly process I suggest connecting the flat cable to the board BEFORE placing the board in to its cavity in the antenna bar. MUCH easier and SAFER to do.
When putting back together, be sure to not trap the display cable underneath the antenna bar as I did!
-
-
-
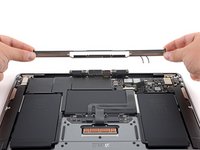
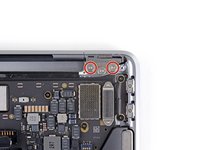
T5トルクスドライバーを使って、アンテナバーを固定している6本のネジを外します。
-
7.4mmシルバーネジー4本
-
4.7 mmブラックネジー2本
Mine here is T6 Torx not T5.
When putting it back together, make sure to get the display cable connector out from under the antenna board before screwing the antenna bar back down. The connector has to go behind the bar in the little notch as the board goes through the opening in the bar.
Mine here were Torx T4. Came with the kit.
B S,
Darn, sorry that happened! Here's a guide with five different methods you can try to get it loose: ネジ山が潰れたネジを取り出す方法
Best of luck!These are T5. A T4 might work but you might strip it.
A T6 shouldn't fit at all; if it does, your driver is either worn or just poor quality.
maccentric - 返信
-
-
-
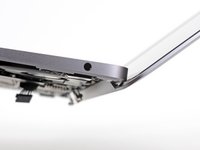
スパッジャーの先端を、アンテナバーとディスプレイヒンジの間の隙間に差し込みます。
-
スパッジャーをヒンジに当てて、アンテナバーの端をこじ開けます。
-
アンテナバーの片側も同じ作業を繰り返します。
This step can’t be accomplished without first loosening the adhesive beneath both right and left metal sides of the bar. I used a heat gun set at 150 degrees with a narrower airflow attachment to carefully heat up just on the metal parts of the bar while slowly applying pressure until the adhesives gives. The first comment on step 12 is also helpful.
I didn't have a heat gun and the instructions didn't mention it; managed to pry it off with a bit of force. Though I'd have used a heat gun if it were available.
-
-
-
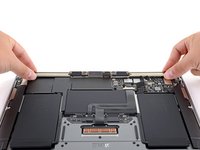
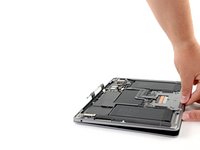
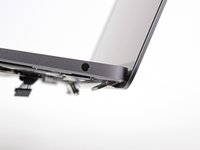
指でアンテナバーをまっすぐ持ち上げて、ケースから外します。
-
アンテナボードをアンテナバーの中央の開口部に通します。
-
アンテナバーを外します。
Separating antennae bar from case after removing screws is challenging. Author’s directions are good but what needs to be addressed is a thin strip of adhesive on both sides of the bar that needs to be separated. the strips are located on the hinge edge of the logic board mount area. I used a metal, razor thin, wide, blade type spudger to gently “wedge” underneath the bar along both adhesive strips to loosen the bar and lift it up. Careful!
Thanks for this hint!!
Before removing the antenna bar see if the right side is slightly elevated than the left. Upon replacement I could not get the right side to sit as flush as the left. However it may be intentional to protect the wifi wires.
I was stuck on this step (removing the antenna bar) but this video helped me: https://www.youtube.com/watch?v=tHhHNjzO...
-
-
-
T8トルクスドライバーを使って、各ヒンジから5.0 mmネジ2本外します。(合計4本)
The Easiest Mac screen repair I've ever done! it was a pleasant surprise
I found a T9 to be a better fit
Nothing is making these screws come out. Any advice on what to do
Increase the diameter of the handle. That gives more torque to break the screww loose. You could wrap it with some material and then cover it with duct tape.
TR9 Screw in my Mako Precision Bit set from ifixit.
-
-
-
MacBookを持ち上げて、サイドを下に配置します。ディスプレイが反対側を向くようにします。
I find it easier to place the macbook on a table with keyboard down and the screen hanging over the side. Much less cumbersome, especially when putting the new screen in place.
maccentric - 返信
-
-
-
T8トルクスドライバーを使って、ディスプレイを固定している残りの2本の5.0mmネジを、各ヒンジから1本ずつ取り外します。
My first attempt at reassembly had the hinge making a terrible snapping sound due to pushing some plastic parts out of the way at full extension. After screwing in these first two screws, I suggest opening and closing the hinge a few times to confirm it's smooth and quiet. If not, you have a fraction of a millimeter of play to get it into just the right position.
On disassembly and reassembly, keep in mind that the edge of the leaf of the hinge (the part with the 3 holes in it--red circle in picture above) sits slightly under a metal edge, and the barrel or pivoting part of the hinge is tucked under the forward-sloping edge of the case. This means the hinge doesn't just loosen and come out. It helps to lift the leaf free of the metal edge in front of it. Yes, this takes more force than you think it might. This will allow the entire hinge to be lifted up and forward (toward the front of the computer) out of its place under the edge of the case.
-
-
-
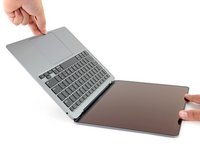
MacBookを持ち上げ、ディスプレイが上部ケースに対して最大90度になるまで慎重にディスプレイを閉じ始めます。
-
ディスプレイがケースに対して90度の角度を保ったまま、ケースを固定してディスプレイを真下に移動させ、ヒンジをケースの底面から滑り出します。
-
ディスプレイを外します。
-
交換用のスクリーンをインストールする際に、電源を入れるまでMacBookが起動しないことがあります。
I managed to try to fit the screen back to the body backwards, and wondered why the hinges didn't fit! Yes, stupid. I lost situational awareness. But just make the sure the correct side of the screen is facing the right way, to avoid my (temporary, but stressful) goofup.
Me too until I read your comment. Remember that the screen was facing away from you in step 16. Then it fits easily.
Like Dexter and Matthew I also initially tried to fit the display on backwards. I'm sure a lot of people are laughing at this mistake but if you're not paying attention it can happen. After 10 minutes having no success mounting the display I looked at the comments and had a DUH moment myself. In the correct orientation the mounting process is straightforward. Thanks Dexter for breaking the ice on this embarrassing situation!
When you're all done with reassembly you have to plug the charger into the laptop in order for it to boot. It doesnt matter if the battery is charged it will not boot until the charger is reconnected. Took me a while to figure out why mine wasnt booting after the screen replacement
Nelson Pun - 返信
Yep me too. Use the charger folks.
The true tone function will be lost even if you replace the display with a 100% compatible display.
Even the display that is purchased through the Apple Parts store? I have one coming and will report back once I install it.
Confirmed that all features function as new when using a display from Apple Parts - True Tone, Camera, Nightshift, etc.
Perfect guide. I didn't encounter any issues and just worked carefully and gingerly.
Great guide - excellent photos and description. Very accurate. Thanks for creating!
**************************** IMPORTANT SAFETY TIP************************
I pulled another common mistake probably. Make sure that the screen cable is snaked through to the bottom when reattaching the new screen assembly. I didn't. I got all 6 screws on and closed the screen. I was up to step 12 when I realized there was no antenna board. Luckily it didn't break the screen again when I closed the cover on it!
Excellent instructions. Did not take long at all. Every step is on point.
Hey, great instructions - thanks! I'm pretty clumsy, and these screens are pretty fragile, which means I'm currently on my 4th screen! I have replaced them all myself following these instructions, and I've bought genuine parts AFAIK. However, for each replacement, I can never get the camera to work. It shows in System Information like so:
------
Model ID: FaceTime HD Camera
Unique ID: EAB7A68F-EC2B-4487-AADF-D8A91C1CB782
------
But it just isn't recognised by any app, and whatever I try (killing all apps that might be using it, updating software etc) doesn't work, and hasn't worked with the two previous replacements either. I'm sure the connectors have been done properly on all of them. I read somewhere that running some system config software is necessary, but is that true? And if so where can I find it please?
Thanks!
Same problem, the camera does not work. Have you found the solution ??
Laurent -
Excellent instructions! 5 stars for the author. Take your time, lay out the screws you remove in a pattern to facilitate reinstallation. From a novice here, think twice before screwing anything back in place. I installed the screen only later to see the antenna rack facing the outside of the computer and not the motherboard. Problem resolved, everything works!
I would add an extra warning to the last instruction here...
On my first attempt, the old screen hinges slipped out of the frame quite easily, which fooled me into thinking the new one would slip into place easily. It did not.
The new screen got stuck, and in the process of trying to get it unstuck, the whole assembly slipped sideways by about an inch, and one of the display ribbon cables got sliced in half. 💀
My advice: Practice getting the hinges back into place with the old screen. Only attempt the new screen once you've got the hang of what to expect when rotating it into place.
Awesome guide! Thank you. My removal and replacement went smoothly!
Patrick's Plan to attach new screen:
1. Lay Mac - keyboard DOWN - hinge side toward U on the table.
2. Pull it toward U till about an inch off the hinge end extends over the table edge.
3. Using needle nose pliers open the hinges of the screen to just a bit MORE than 90º.
4. Turn the screen hinge-side UP screen facing AWAY from your belly.
5. Extend the video connector assembly fully on to the computer.
5. Fit the hinges - 1 side at a time - into their notches on the computer.
6. Press them in firmly with your thumbs
7. Insert and tighten the CENTER screw on BOTH sides.
8. PIck up the Mac & close it, S L O W L Y.
VOILA! It's in there. Right...? ;-}
Now open it up and finish re-assembly.
以下供参考:
更换屏幕总成后如果开机无反应,可以拔掉天线板小排线(紧挨着屏幕排线的那根),然后连接充电器后再尝试一下开机,如果能开机就稍微擦拭(吹)一下排线及排线扣,再接好排线开机即可(当拔掉这根排线开机时可能电量显示不足,不用担心)
Justin Tan - 返信
FYI, Apple's Instructions: https://support.apple.com/en-us/100599
amiller770 - 返信
Until I read amiller770's comment about, regarding Apple's instructions for reassembly - https://support.apple.com/en-us/100599, I couldn't quite figure out how to get the hinges into the case. As soon as I saw it, it made sense. Thanks.
Fantastic manual, really appreciate all the work you guys do.
Lee Mac Mechanic UK
Amazing guide! You guys are always my go-to for repair guides. Replacing the display assembly on the Macbook Air M1 was surprisingly easy. It took me about 30-45 minutes.
-


オリジナルのパーツと交換用パーツをよく見比べてください。交換用パーツに付いていない残りのコンポーネントや接着シールなどは、インストールする前に新パーツに移植する必要があります。
デバイスを再組み立てする際は、これらの手順を逆の順番に従って作業を進めてください。
修理が完了しても、電源に接続するまでノートパソコンの電源が入らないことがあります。
e-wasteを処理する場合は、認可済みリサイクルセンターR2を通じて廃棄してください。
修理が上手く進みませんか?まずはベーシックなトラブルシューティングを試してみるか、このモデルのアンサーコミュニティに尋ねてみましょう。
オリジナルのパーツと交換用パーツをよく見比べてください。交換用パーツに付いていない残りのコンポーネントや接着シールなどは、インストールする前に新パーツに移植する必要があります。
デバイスを再組み立てする際は、これらの手順を逆の順番に従って作業を進めてください。
修理が完了しても、電源に接続するまでノートパソコンの電源が入らないことがあります。
e-wasteを処理する場合は、認可済みリサイクルセンターR2を通じて廃棄してください。
修理が上手く進みませんか?まずはベーシックなトラブルシューティングを試してみるか、このモデルのアンサーコミュニティに尋ねてみましょう。
156 の人々がこのガイドを完成させました。
以下の翻訳者の皆さんにお礼を申し上げます:
100%

Midori Doiさんは世界中で修理する私たちを助けてくれています! あなたも貢献してみませんか?
翻訳を始める ›


67 件のコメント
How to make the True Tone working on the screen from another air?
The screen that your replacing should have true tone built in, it is a part of the display.
h_man08 -
Like iPhones does the display need to be programed to allow true tone to work?
Just did the replacement! Was a breeze, just be careful not to over tighten any of the screws past a firm twist. Accident broke the head off a 1.5mm screw using a T3 bit. Didn’t affect the plates ability to cover or apply a firm press downwards, but a unfortunate thing nonetheless.
After Replacing the display, the new display is dim and the F2 does not brighten the screen. Any resolution to this issue?
Already reset NVRAM and PRAM.
same issue here. it looks more dim
Step 4 and 7 were T4 Torx screws for me.
I successfully installed the replacement screen, but now my 2.4 Ghz wifi / bluetooth antenna is not working. Any idea which connector cable connects to 2.4 Ghz antenna?
I had the same problem. The reason was that I didn't connect the antenna back completely. Redo the step n. 6 in reverse and connect the antenna right (it must click).
Done. Works . Biggest chalange was with plugging in back the display cabel connector . Be sure to pre alling the Screen bar with cabel conector , becouse it cannot bend on sides.
I tried the replacement. Everything works except True Tone as expected. Probably special tool is needed for the True Tone.
I’ve got the display from an Intel 2018 Air. Can I test it with an M1 Mac? The process and connectors look the same.
Did you try this? If so, was it successful?
Lee -
Just tried this - it doesn’t work. M1 MacBook refuses to power on when connected to a display from a 2018 MacBook Air a1932.
Your instructions were amazing and to the T. Thank you so much for everything
Hi.
Would the display of a MacBook Air early (intel) 2020 work on this MacBook Air late 2020. Seems to be the same specifications.
I change my screen but the camera doesn’t work, I checked the hardware’s but MacBook doesn’t have any camera, I tried 3 different screens , all are same. i tried all resets but still not working, any ideas?
hi i have the same Issue do you have a solution?
same problem here!
Same problem here, it seems we need the « system configuration tool » from Apple to make it works.
Laurent -
Hey, I have this same issue. It seems we need some software provided by apple(Only if you buy from their self service website) which i didnt..... Has anyone found a fix?
I have the same issue, I've tried two OEM screen replacements and now I purchased a genuine Apple M1 2020 screen in perfect working condition. Camera still does not work, but it is recognized in the system report. I've tried all the software fixes, resetting Pram and Nvram, terminal etc. Seems to be a hardware issue. Can I replace the cable for the insight camera?
Does this repair cause any feature issues? so, would the webcam not work or truetone not work? Even if i use genuine, donated apple parts?
Thank you!
I did encounter these issues with a genuine donated apple part...
Certain parts like displays, cameras, and ambient light sensors have calibration values that are customized to each individual part during manufacturing. Transferring these values ensures maximum performance and quality after a repair.
A System Configuration step may be required at the end of your repair. System Configuration is a postrepair software tool that completes the repair for genuine Apple parts. Running System Configuration has a number of purposes that vary based on the part replaced.
Where do I get this software? System Configuration ? After three displays, including one Genuine Apple Display taken from a working MBA, with no defects, I can't get the camera to work. It is recognized by the system report
I'd replaced replaced the display on a MBP 2012 before, so I didn't anticipate any problems replacing the display on my A2337. Everything seemed to go smoothly, but when I booted up (with power cord attached), I didn't get more than a faint glow from the screen. I tried all the usual, but still no luck. I went back and made sure everything was seated properly but I got the same results. So, I reinstalled my cracked screen, which worked perfectly, outside of the cracks. You think I can assume the part was defective? I bought it from eBay, and it at least claimed to be OEM.
Did you find a solution?
Is there a way to tighten the hinge? I would like to have my display tighter. It always flips back when I pick up my MacBook. That's not the case for my girlfriends MacBook which is the exact same model.
All went great, very detailled manual. Unfortunately the new display doesn't work. The backlight is on but it shows no graphics. I managed to get the mac working with an external display. MacOS shows the display but nothing happens. Connectors are all doublechecked of course. Any ideas?
Additional info: It is a M1-Macbook Air A2337.
Where did you buy the display module, please?
Apple only sells the display itself with our the clamshell. That makes the repair so much more complicated and I am sure they know it. Any ideas how to get the entire display module including the clamshell?
Sebastian,
The display part Apple sells through Self Service Repair is the entire assembly/module, including the panel, aluminum shell, camera, hinges, etc. The display we sell is also the entire display assembly. Hope this helps—happy fixing!
PLEASE HELP:
I followed this guide and although the antenna bar was kind of tough to remove, everything seemed to work fine. I replaced the screen and reassembled my MacBook Air. Everything works fine. BUT for the wifi. It works but signal is ridiculously low. Unless my M1 is within 3m and in direct sight of my router, wifi signal is gone or at 1 bar (out of 3). I have reopened the M1 and checked all the connectors: they all seem fine. Any suggestions?
The steps were clear and to the point. Great job on write up. Had no issues with the screen replacement and the unit fired right up after. The reconnect of the antenna was the scariest part just did not feel that the reconnect went well. You might do a follow up and just focus on that step on the reassemble.
Mike, that step was missing reassembly information. I added it in. Thanks for the callout, and I'm glad your repair went well!
does anybody knows if a 2021/2022 MacBook air M1 display is compatible? apparently Intel ones arent as they refuse to boot
Leo, the Intel variant Air would be the early 2020 model. The late 2020 M1 model is different. And 2022 M2 displays are not compatible. Hope this helps!
Guide worked well, took about an hour. Thought I lost one of the tiny plate screws and searched forever then realized the WiFi cable cover is only one screw.
Because the antenna is difficult to start to pry up, suggest you do what I did and unscrew the hinge screw that is just under the antenna as this works to break the seal on the adhesive. Then of course screw it back in and pry/insert with your plastic tool to detach the rest of the adhesive.
Take your time and if you are old like me get a bright light and a magnifying glass/headset. Helped getting the little screws in and making sure the connectors for the antenna, display and power were in properly.
Remember to put the inner screen screws before screwing the antenna in....
Bonjour quand l’écran est complètement exploser vaut-il mieux changer que l’écran ou l’ensemble capot et écran compris , dans ce exemple vous changer capot et écran , es ce qu’il y a un tutoriel avec l’ensemble de la procédure
Par avance merci
tout est collé ensemble et n'est pas recommandé
Thilobi -
This guide worked great. I first tried an Ebay-sourced part that claimed to be genuine, but it didn't even turn on. I had better success with a non-OEM part from Amazon that works really well. The only things that don't work are True-Tone and the brightness defaults to 50% when I open the lid. Everything else is pretty good!
How much for a new screen?
looks like it's a little bit of a lottery, some made it, some not. In this iFixit-Thread they say you definitely need a screen from Apple's Self Service Repair to make it work, but some users here seem to made it with parts e.g. from Amazon.
Does anybody have details to this issue?
how to dry water spots in the screen?
There’s a small clicking noise now when I close the lid that is there when the lid is about 90% closed - is that from the antenna bar being bent a bit perhaps?
Could be, but may also be from another minor misalignment. I recommend loosening the six hinge screws a bit, see if you can find a place where it doesn't click, then re-tighten them. While you're in there, make sure everything's seated and flush. Best of luck!
I could kiss you (no tongues). Thank you so much. Didn't take as long as I thought it would, my god some of those screws are tiny, I only managed due to a magnetiser.
Again. thank you so much.
This Guide has a high chance of not working if an aftermarket display is used as MAC serialization was introduced post ~2023. Likely you will need an original MAC screen replacement and to serialize the display for it to work.
How do I find a screen that fits my machine?
How am I supposed to disable my Mac's "Auto Boot" feature if my screen is broken?
ESD safe mat, plugged into ground, with a wrist strap, also grounded, are the best best to protect the logic board.
Robin Ray - 返信
Re-Assembly Tip: Before putting the screws back in, snap the lower case on and test to make sure the MacBook powers up. When I first re-assembled, I became very nervous I did something wrong because it would not power on. It turns out I just needed to plug the laptop into a power source for it to power up (despite having a good charge before disassembly). It was the perfect way to test the new USB-C ports!
Austin - 返信
Big points to this one, especially for mentioning needing to plug the laptop in. The bottom case needs to be screwed in and laptop needs to be plugged in before it will boot.
Bayden Yazalina -
Wiha 4PL driver for these screws.
Greg Worrel - 返信
Printing out all the images from this Ifixit guide prior to starting and using duct tape help me keep track of screws.
raju midjdeya - 返信
This Guide has a high chance of not working if an aftermarket display is used as MAC serialization was introduced post ~2023. Likely you will need an original MAC screen replacement and to serialize the display for it to work.
Tron Computers - 返信