


-
この手順で使用する道具:P5 Pentalobe Screwdriver Retina MacBook Pro and Air$5.99
-
P5ペンタローブドライバーを使って、下部ケースをはずしてください。ネジは次の長さに分かれます。
-
9mm ネジー 2本
-
2.6mm ネジー 8本
-
-
-
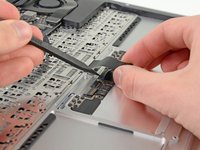
ディスプレイと下部ケースの間に指を入れ、上に引っ張って下部ケースを本体から外します。
-
下部ケースを取り外して脇に置きます。
There is a nub on the inside of the case which is attached to the battery. When you try to pull it open, it appears to be attached to the plastic casing of the battery, which sometimes splits. I gently unhooked the nub from the battery before removing the case fully. This seems to happen if the battery has suffered some drop damage (plastic parts broken around screws and parts of plastic frame split). Just an FYI in case your lower case doesn't pull away easily.
To add - the slim 1cm tab “nub” is on the centre of the back cover & fits into a hole in the battery frame. I ran my fingers around the whole of the cover to eventually here it click out.
nijafe -
So this is a legit back cover for MacBook Air?
I bought the part and tools from iFixit and followed the directions. The mechanical part went smoothly - maybe 10 minutes to disassemble/replace/reassemble.
Getting Catalina (the current MacOS) to install was not working until I used Cmd-Opt-R (as noted in the OWC paper sheet that came in the box) which brought up the proper installer - I believe from a pre-prepared bootable SD card but it’s hard to say. From there the install succeeded taking ~1.5 hours.
Beware that (a) the install requires a working internet connection for verification and updates, and (b) the system must have been running at least macOs 10.13 (High Sierra) before the install in order to have an EFI BIOS that recognizes the SSD.
Lance Berc - 返信
Thanks for the detailed photos. When repairing equipment, I don’t really like to disassemble plastic parts, they can be damaged, but your screenshots help a lot. For my studies, I am writing an essay comparing the reliability of laptops from various manufacturers and the complexity of their repair, maybe it will be useful for someone to check the essay for plagiarism here essay checker, when comparing different manufacturers, I understood why people love Apple so much. The minimum number of failures. Of course, repairing it in an official service is not cheap, but with the help of such detailed instructions, you can do it yourself and save a lot.
The screwdriver bit to use on these case screws is not named, but I found that my "CR-V 1.2" did the job nicely.
The driver for the screws inside the case are named, as "T5".
-
-
-
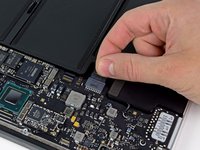
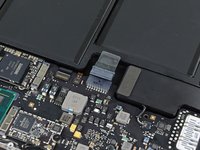
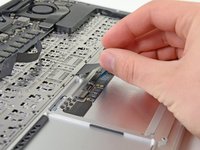
バッテリーコネクターに付けられている透明なプラスチックのプルタブを掴みAir本体の前側に向かって引き基盤からバッテリーを切り離します。
-
新しいバッテリーを再装着する際、バッテリーをフレームに入れる前に一時的に接続し直すと便利な場合があります。コネクターが基板に対して平らになっていることを確認してください。
The guide says: "Grab the clear plastic pull tab attached to the battery connector and pull it toward the front edge of the Air to disconnect the battery from the logic board", but the battery model that I was replacing did not have a clear plastic pull tab at all...
The battery model shown in this guide is: A1405
I was installing battery model: A1406
A1406 has the following connector:
Top:
http://www.directupload.net/file/d/4122/...
Bottom:
http://www.directupload.net/file/d/4122/...
By looking at the bottom of the new battery I saw how it could be removed. Simply by a gentle upward movement. I very, very carefully nudged it a bit upwards using a screwdriver on the left and right side, as shown here:
http://www.directupload.net/file/d/4122/...
It came out fairly easy, luckily!
(And yes, I also cleaned up this MacBook before closing it again. It was a bit hairy in a literal way. Electronics and pets is not the best combination. ;-) )
This was a great guide!
I think you may have been reading the wrong guide by mistake.
Looking at the various MacBook Air battery replacement guides, all of the 13" models show the connector depicted in this guide. All of the 11" models (e.g. MacBook Air 11インチ Mid 2012バッテリー交換) show a connector like the one in your photos.
shamino -
The 13 inch's tab is a bit more difficult to reinstall than uninstall. Delicate care is needed.
I agree with Andrew and Joes. I also found that the trickiest part was to pull the tap back when reinstalling the new battery. A special hint at this point in the guide would be nice.
This is the tricky part if there is one. Just pull back towards the battery and not up.
Joe Wasser - 返信
hello there, My macbook air does not recognize a battery connected, anymore.
It looks like I damaged the connectors while trying to connect the battery back, although it does not look damaged. I must say, I tried a little force to squeeze the connector in the middle instead of the edge. May have damaged the connector ?
Once, after this, the MBA recognized my battery when pressed the connectors edge to the pins on the board. However, this did not last long and my MBA does not recognize the battery anymore. Any solutions on how I can fix this ? Please help.
Had the same issue where my Macbook did not recognize the battery on the first try. I opened it back up and re-seated the connector and that fixed the problem. That particular connector does not seem to have a positive engagement. It does not appear to seat all the way down. It’s charging now and I hope it will remain stable and connected as I travel.
When we were putting the new battery in, it was easier to fit the tab back on and then fit the battery in place. I had someone helping me and they held the new battery up whilst I pushed the tab in. It was quite tight, and I ended up easing it in with the tip of a screwdriver on each edge in turn.
The plastic pull tab broke off with the tiny tug I gave it (Mid-2011 Air). I just unscrewed the battery and carefully pulled out the connector when I had the extra room.
Sam Kernot - 返信
for my 11inch mac air [mid 2011] the connecter is connected vertically and not horizontally - so you need to pull up, not back. thanks to Will for the links to the illustrations that made that clear. Getting the connecter to release was the hardest part of the job - otherwise, it was just removing screws.
Jim Kemper - 返信
I had same as above you have to be very sure on your screen size as the battery disconnect looks a little different and I used the 11 inch steps on the link provided which worked perfectly! thanks
Jim Lukens - 返信
Successful battery change on Macbook Air 13 mid-2012.
After screwing in the new battery, I couldn't connect it to the motherboard. I was afraid of damaging the connection and the rest of the components.
So it seemed easier to me to unscrew the new battery, then plug it in and finally screw it back in one last time. I think that this step lacks a point of precision in terms of reassembly.
Otherwise, it's a good tutorial, thank you very much!
**Note during this step how the cable flexes. With the new battery you will need to carefully bend your new connector to be able to flex in the same way, which is easier to do before you install the battery. in fact, i agree with other comments that for re-install it is easier carefully hold the battery up a bit (to keep it off the trackpad components), and install the plug as you are moving the battery up into place. This will limit the amount the cable needs to flex and take that pressure off the connector to the logic board.
In line with some other comments, I found it helpful to connect the cable before putting the new battery into place. That way I could aim the cable straight into the receptacle, and the wires folded appropriately into their small space when I put the battery in position and screwed it down.
-
-
-
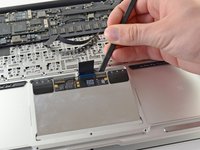
バッテリを上部ケースに固定している以下の5本のネジを外します:
-
6.3 mm T5トルクスねじ 3本
-
2.4 mm T5トルクスねじ 2本
The screw heads are made of a soft butter like chinese metal and will easily get f*cked up. take care when reinstalling to not mess them up.
Ich habe ein Problem die Schrauben von dem Akku mit dem gelieferten Schraubenzieher-Set rauszudrehen. Nur die Schraube in der Mitte konnte ich rausdrehen. Brauche ich einen anderen Schraubenzieher? Sollen die beiden Schraubenzieher aus dem mitgelieferten Set zu den Akku-Schrauben passen? Danke für eure Hilfe im Voraus! Alex
6.3mm T5 x 1
2.4mm T5 x 4
My Air is
6.3 mm T5 x 1
2.4 mm T5 x 4
-
-
-
-
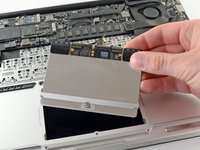
バッテリーをロジックボードに近い上端から持ち上げ、上部ケースから取り外します。
-
100%になるまで充電します。充電後も最低2時間はプラグを繋げたままにします。それからプラグを外して、通常通り使用しながら、自然に放電させます。バッテリー残量小のサインが表示されたら、これまでの作業を保存して、スリープ状態になるまで放置してください。スリープ状態に入ったら、少なくとも5時間置きます。それから一気に100%まで充電します。
-
新しいバッテリーを装着後、通常通り作動しない場合は、MacBook ProのSMCをリセットしなければならない可能性があります。
Quick note about the replacement battery, if you bought from iFixit and the battery sections have a thin film over them, peel them off. They're to protect the battery during transit, and if you leave them on they might cause heating issues.
Here is a link to my question about it: Replacement battery has thin film on each section do I need to remove? plus, I just got an email from iFixit customer support that it needs to be removed.
thank you for the help! I installed the proper batt properly following the advice from here;-) Mahalo from Hawaii-
Does replacement battery for Macbook Air 13" Mid 2012 works with Mac OS Sierra 10.12.3 and up?
Replaced it in no time! Thank you and cheers from Slovenia (that’s the one who beat you in hockey few days ago
Mark Ogner - 返信
iFixit should really clarify whether the film covering each of the battery packs should or should not be removed. Based on dpchoung’s comment I removed this film. It was not obvious or easy to remove and as I was doing it I realized that maybe this was not a good idea as I was concerned the packs might be damaged in the removal process. I suspect most people don’t bother with this film. Later, clicking on the forum exchange I see conflicting advice. My guess is that the film provides added protection and has minimal impact on thermal issues. I am sorry I went through the bother of removing the film and hope no damage was done.
Mark Young - 返信
Ich hab’ gelesen, dass neu eingebaute Batterien kalibriert werden müssen: https://www.newertech.com/batteries/powe...
Great here. Replacement was a breeze. Thanks guys.
It’s part of the calibration process—leaving it dead for awhile ensures that the battery drains low enough to reset the full discharge flag in the battery management system. If you skip that part, your battery may not calibrate properly. (It’ll still work fine, but the battery’s % charge status in macOS may be unreliable and/or behave in odd ways.) If you had to skip it for some reason, you can recalibrate at any time.
After I replaced the battery, I plugged the charger in to start calibration and the computer started by itself. As soon as this happened I turned it off. Can this be an issue?
How do I know the battery is 100% charged?
Thank you
tobias.a94 - 返信
It might be obvious to most people, but no mention of plugging in the battery connector when installing the new battery. I missed that part at first. Overall great instructions and finished quickly.
It went well, thank you. One comment though, I prefer to put the connector back before installing the new battery since the cable is not flexible enough.
Replaced my new battery for a mid 2011 MacBook Air but now the battery icon says it’s not charging
how do i dispose of the old battery responsibly?
+1 curious about this. Should be added to the guide
Why shouldn’t I touch the lithium polymer cells? Is that on removal, too? Is it dangerous for me or just the battery (like getting finger oils on a halogen bulb)? Would it be beneficial to wear thin latex gloves?
After Installation my MacBook does not start, but there are peep tones 3x in a row and this repeats until I press power for few seconds. Any clue what this could be?
Installation was very easy. Works perfect for me and battery is now fully charged and running.
Installation was a breeze thanks to your tips.
When placing the new battery in, reconnect it first before screwing into place.
The battery film issue. The film pictured in the guide covers each individual battery. The guide also states it is glued on. My iFixit replacement battery had a different kind of film that covered the whole battery module. It was not precise fit and was loosely stuck on rather than permanently glued. It was obviously the kind that is used to protect from scratches in packaging/shipping. It peeled off easily with no residue. My conclusion is the warning is meant for film on individual batteries. For the iFixit one I received, the film was meant to be peeled.
I have installed the battery replacement for a MBA Mid 2012 and it’s working, but the battery temperature is somehow stuck at around 26 degree Celsius. Even if you do a stresstest with 27 Watt the temperature is falling from 26.25 to 26,15. So it ssems to me that the temperature measurement isn’t correct. In other MBA Mid 2012 with original Battery the temperature range is from ambient to 41 degree.
Don’t know if the wrong temperature has an impact on the lifetime of the battery, as the battery controller should limit currents according to temperature.
very easy - was gifted MBA but battery life was 'r/s' - vacuumed out fluff etc from machine & fan while back was off (was a technician in a previous life) .. now performing calibration. I'll write down the settings, then set energy saver to 'never' for both battery & power adaptor when it comes time to discharge the battery, then reset to original values after final charge. Fingers crossed (it's a helluva lot easier than 'Blackberry trackballs')
-
-
-
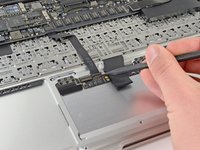
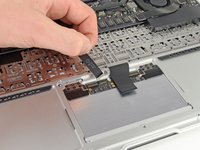
スパッジャーの先端や指の爪を使って、トラックパッドリボンケーブルのZIFソケット上の固定フラップを跳ね上げます。
-
Airの背面端に向けて、ソケットからトラックパッドのリボンケーブルをまっすぐ引き抜きます。
Thanks for this fantastic guide!!! Got an old Macbook Air working again. Only difficult spot was the ZIF cables. Man, I hate ZIF cables....
lyleberman - 返信
I found it easyer to first connect the cables to the touchpad during reassabling. I could handel the tiny connectors better. After connecting the cabels I could easiely install the touchpad it self.
-
-
-
次の12本のネジを外します。
-
上部ケースにトラックバッドを固定している1.6 mmプラスネジを6本外します。
-
トラックパッドにトラックパッドブラケットを固定している1.6 mmプラスネジを6本外します。
-
#000プラスネジで対応できますが、JIS #000も使用することができます。
I stripped one of the six 1.6mm screws securing the trackpad to the upper case. Where could I get a replacement and what are the exact dimensions (I assume that 1.6mm is the length not the head size). Not sure whether this is the right place to post this, but I would be very thankful for some help.
The 00 phillips screw driver does not do the job for step 8!!!!!!!!! FRUSTRATING!
Worst part was the philips screws on the brackets, step 8. One screw wouldn't unscrew for the longest time. I stripped it so bad, that I finally got it undone with a Torx 5 that I wedged into the stripped screw hole! Fortunately the replacement trackpad came with it's own brackets and screws anyway, so I didn't need to re-use the messed up screw.
In the end, success...phew!
Agreed on the error in the guide. J00 seems to be the best fit.
I stripped one of the 12 screws. Of course one of the ones attached to the unibody frame not the trackpad. I thought I could weasel the trackpad out without taking the right bracket off but no dice. I had to bend the bracket and turn it around to get the trackpad out.
After I got the trackpad out I took out the replacement (purchased from here) and lo and behold it had the two brackets attached! So great, I'm good on screw count! But crap, now I REALLY need to get that stripped screw back out.
Thankfully I was able to dig it out with a tiny flat head bit from the 54 bit driver kit.
I even reattached the two brackets to the old trackpad and put it back in the ESD bag. I wonder if I can send it back to iFixIt to be refurbished. Don't want to toss it and have it wind up in a landfill unnecessarily!
My new trackpad came with the brackets installed. It wasn’t necessary for me to remove the screws circled in orange (they hold the bracket to the trackpad). Check to see if your new trackpad has the brackets installed before removing the orange screws.
After purchasing multiple sets of drivers to get these out, I recommend anyone who finds they don’t have an adaquet PH00 driver to skip any dollar store or RadioShack driver sets. Head down to your local tool shop or auto repair store and buy yourself a $5-$10 set of precision drivers with only a few bits. Don’t go buying yourself a 20 piece set and think you’re getting a deal, these screws require a good quality PH00 to be removed without stripping.
-
-
-
上部ケースの正面端付近の穴から1.4 mm T5トルクスセットネジを外します。
Sorry, seems more like a T6
Joe -
This was a T6 on mine as well. Sadly I figured that out after threading the screw with the T5 included in the iFixit kit, so now my trackpad won't click at all.
IMPORTANT NOTE: Buy a T6 screwdriver if the T5 in the kit is just a bit too small for the screw in step 10.
Jon -
Hi, I just want to ask what it means that it will stop clicking eventually, I had my macbook air trackpad replaced after some water fell on it and now around 9 months later the trackpad click gets stuck and it's driving me crazy, I went back to the service center myself and the technician actually admitted that he overtightened the screws but since the parts warranty is only 90 days he has to charge me again. So my question actually is can overtightening it cause permanent damage? Is there anything I can do? There's no apple store here (Cyprus) but the service center is one of the official service and registered distributor for Mac products and specifically for the more professional clientele.
I, too, have a question about the set screw. I replaced a MacBook Air 2011 keyboard because of water damage and that process involves also taking out the trackpad and putting it back in. After reassembly, I now get phantom clicks (the "click" sound happens as expected, but the Air frequently thinks I'm clicking when I'm not). Could this be a result of over/under tightening the set screw, or is it more likely the trackpad also needs replacement?
The set screw on my macbook barely turns 1/8 of a rotation before it hits a blockage. I do not want to try to turn harder for fear of stripping the screen and/or the threads in the case. I assumed that the screw should be able to be completely unscrewed from the case, correct? Any idea what's causing the blockage?
johnkowtko - 返信
There is no need or benefit to removing this screw completely. Maybe back it out a little bit just to make it easier to install the new trackpad, and then adjust it once the new trackpad is mounted in the case. Agreed, this was a T6 on my MacBook Air 13" Mid 2012.
It was a T6 in MacBook Air Mid 2011 as well.
-


デバイスを再度組み立てるには、この説明書の逆の順番で組み立ててください。
デバイスを再度組み立てるには、この説明書の逆の順番で組み立ててください。
56 の人々がこのガイドを完成させました。


9 件のコメント
The Apple tech repair guide for this model of Macbook Air states that the flexures use Phillips #000 screws, but I didn't have good luck using #000 drivers on them. A high quality precision Phillips #00 driver worked a little better, but I'm wondering if this is actually a JIS cross point phillips #00 or #000 screwdriver? The screws look more like JIS (Japanese Industry Standard) instead of Phillips, anyone try a JIS with better luck on these?
Great guide, all worked as described. Thanks!
Yes, the screws don't seem to quite match expectations; I used three different #00/#000 drivers before I got a good fit.
Step 7: Could use just a bit more detailed explanation and/or picture. The retainer is on the "back" edge of the connector (facing off the long edge of the trackpad, opposite of Step 6), and takes a mix of delicate firmness to raise. Practice on your replacement (if available).
Step 8: My replacement trackpad came with the trackpad bracket attached, so no need to remove the 6 (orange-circled) screws attaching bracket to trackpad, which can be removed and installed with the bracket attached.
Step 10, reinstalling: Getting the set-screw correctly adjusted was a bit hit-n-miss. My assumption was in far enough to just stop movement, then back off a turn or so. That ended up too loose. YMMV.
I have just finished, there was a scary moment when I managed to somehow cause the retainer clip for keyboard ribbon to fall off the new track pad while I was fitting the cable. I put it together anyway but - of course the keyboard did not work!!! I then took it apart and somehow with the use of an illuminated magnifier, I managed to push the retainer clip back on to the prongs and it works!!
Michael S
Hi,
friend mine did replacement of complete top case with keyboard and trackpad. Seller claimed it is ok but we face one problem. when I touch case (palm rest) trackpad stops responding. Both cases were from A1369 model but on mine was black plastic foil over part of keyboard whiel on other not. So I am not sure there could be some other differences that could cause this.
Would anybody has any suggestion.
Thanks
Frank
Guide is spot on. I only ran into some difficulty on Step 8. (More details below) Was eventually able to replace trackpad with replacement purchased from here. No more phantom clicks! Although examining the old trackpad and the click "button" makes me wonder if I could have fixed the old one by tweaking the set screw... Regardless, MBA now fully functional again! Wasn't easy but this guide made it not hard to do!
Very helpfull, thanks.
My maus was driving me crazy. Apple Store wanted to replace the trackpad for 160€ claiming that there was some wetness. I decided to open it myself and clean it with Alcohol(Isopropanol). It was nothing but just dust causing the trigger to behave funny. I bought the 64 Bit Driver Kit from ifixit(Mako Driver Kit - 64 Precision Bits) . A very proffesional Kit.
NB: Be carefull at stage 8. I spoiled 2 crews here, dont use a lot of energy!!!! If you want to clean the pad then you ONLY remove the RED marked crews.
A solution to those suffering from phantom clicks, but otherwise have a working trackpad - there is a solution.
In Step 11 (2nd photo) you can see the little metal cap at the bottom of the trackpad, covered with clear tape. When depressed, this cap should trigger the 'click', but I think with excessive use, I suspect the cap may flatten and make contact with the terminals underneath before you get the 'click' feeling.
I peeled this tape off (with the metal cap) and punched the underside of the metal cap with a screwdriver. This meant that the cap needed a little more force and movement before it made contact with the terminals underneath, and the phantom clicks were no more.
I was probably a bit heavy-handed when I did it, so my trackpad button is quite a bit firmer than before but still quite usable. Be gentle.
Hope this helps someone else - before they spend big on a new trackpad.
I have been annoyed by this issue for years.
I just did what you suggest, and it seems that the phantom clicks are gone for now. Yet to see if it stays like this for longer period. But I’m extremely happy with the result right now, and just want to thank you for your suggestion.
Benny -
Pulling the fan cable out was terrifying but you actually just pull on the cable itself. No way to get any leverage at the connector to dislodge it. Did come out easily but like I said, scared me!
allison - 返信
Draai de schroefjes voorzichtig los en leg ze op een stabiele plek neer en let erop dat de schroefje een verschillende lengte hebben.
bwgvanderveer - 返信
I thought I could replace my 256 Gb SSD with 512? regards
ola m - 返信
Do you have good Test Point Voltages? It appears there are silver colored Test points on the I/O Board. I am working on a water spill and trying to troubleshoot if both the I/O board and the Logic need replaced.
andrew - 返信
It's probably not necessary but may be a little safer to completely discharge the old battery before replacing it.
Larry Smith - 返信
tell a model that was not inferior to the speed of the one in the laptop.
Thank you
ilyabuhov - 返信
Do i need to order tools separately to replace the battery i just ordered?
anne uhlir - 返信
im looking for a Logic Board for a
Apple - MacBook Air® - 13.3" Display - Intel Core i5 - 8GB Memory - 128GB Flash Storage (Latest Model) - Silver Model: MQD32LL/A
Any help is appreciated.
Jamie Comstock - 返信
P5 pentalobe screwdrivers are too big! The correct size for these screws are p4 pentalobe. P5 pentalobe was just able, with difficulty, to turn some of the screws. If the screws were at all tight, my p5 was unable to get them out, and started to strip the screws. A p4 screwdriver fit better and removed the screws with ease. (I was using high quality Wiha brand screwdrivers.)
William Skinner - 返信
I had same experience (with MacBook Air 13-inch Mid-2012) … had to get P4, which worked swimmingly
eric -
Very simple installation. The screwdriver heads were exactly what we’re needed, one head for the outside case screws, the other for the screws holding the battery in place. The computer started right up. Now to see how the battery holds up, but I have a good feeling about this!
Dennis Eaton - 返信
My P5 and the T5 worked perfectly with my early 2015 Air 13”! And it is super fast! Thank you iFixit!
Pennny Beach - 返信
The supplied kit and instructions worked perfectly!
Nikolay Andreev - 返信
Comments that the P5 pentalobe are too large are absolutely spot-on. There is no way the P5 pentalobe bit I have will work with the MacBook Air without destroying the screws. Hard target search for P4 pentalobe bit in progress…..
joemoog - 返信
Bonjour j’aimerais changer mon SSD de 128 Go pour en mettre un de 512 Go. Je ne sais pas ce qu’il faut prendre car il faut qu’il soit compatible avec le macbook air A1466. J’aurais vu un Samsung Evo 970 500 Go mais si je ne me trompe pas, il faut un adaptateur.
Merci pour votre aide.
chicco33 - 返信
oui, vous aurez besoin d’un adaptateur, pour completez le changement.
Dan -
The tool kit should include tweezers for re-inserting the battery connector.
Andre Clement - 返信
P5 pentalobe worked perfectly for me. Instructions were spot-on. Antenna connections were a bit fiddly to refit but got them in ok.
michaelquinnell - 返信
Maybe the problem some are experiencing is that the designations are confusing (blame Apple rather than iFixit). the P2 is also known as PL1. The P5 is also known as PL4. The P6 is also known as PL5. So it is possible to mistake the P6 (PL5) for the P5 (PL4), meaning it (P6-PL5) will be too big, while the P5 (PL4) will be just right. Sort of a 3 Bears explanation, but it is very confusing.
Thomas Lewis - 返信
To add to this. In searching for the P5 screwdriver to buy in UK, as far as I can tell, it is also known as
Pentalobe 1.2(mm)
also
P4 = 0.8
P6 = 1.5
Just unscrewed the back case of MacBook Air 13” mid 2011, with no problems using Pentalobe 1.2
nijafe -
I have not replaced a display on the A1369 but have done many A1466 which is a newer 13” model. They seem really similar and its not clear why one needs to remove the logic board to remove the display. The antenna cables on the A1466 dont have to rest under the logic board but can be tucked in the hinge crevice. Cant this same thing be done with the A1369?
Sean Love - 返信
Did mine today - but new battery wasnt charging. Went back in and noticed the battery connector cable was not quite 100% “seated. It was sticking out by less than a millimetre! - you need to give it quite a firm push in to get it seated properly. Otherwise - all ok .
John Brennand - 返信
Just installed on a MacBookAir6,2 (13-inch, Early 2014).
Was very easy.
New iFixit battery looks great so far:
Jonathan Cross - 返信
can you tell me which size of screwdrivers you’ve used to crack it up, please? I have the same model and size,
hawk_lpc -
Screw P5 Pentalobe 1.2
Mario Verlent - 返信
Install went flawlessly. Only challange was reattaching blue tooth antennas. Those sockets are so tiny.
Joel Sebastian - 返信
Installation was a little challenging at first because the instructions on this site did not perfectly match my model (late 2013 to early 2015).
Found this video on YouTube which described the procedure perfectly https://www.youtube.com/watch?v=Lue6lVWh...
Also the Ifixit kit I received was well put together with everything I needed and more. The calibration went perfectly and I am very pleased. Will buy again!!
Donald Niamath - 返信
Gently pulled out connector of old battery, then pressed and held the power switch for 1 minute. Unscrewed and removed the old battery. Pressed and held power switch for 1 minute again. I know from previous work that this helps drain charge from spontaneous recharging as the dielectric recovers. Gently “fine tuned” leads from new battery to connector till connector stuck out at right angle to the edge of battery. Held the battery by the edges and let the connector slide into the socket. Set the battery down and put the screws in all the way. Then checked that the connector was completely seated before tightening the screws. The laptop come on immediately and showed 98% charge and registered normal (checked in “About this Mac”. Very happy to this point. Now for calibration.
Amir Zaidi - 返信
Thank you very much for the guilde. My MBA2011 had reborn !
Billy Wong - 返信
Allow for electrostatics, otherwise you may cook components on the logicboard /motherboard (like I did with one of these!)
See great advice: Electrostatic Discharge
Fletcher Cole - 返信
… und wenn du eines von diesen wirklich kleinen Schräubchen vermisst: bevor du den Boden aufkehrst oder mit einem starken Magneten absuchst, schau mal am seitlichen (magnetischen) Ladekabelanschluss nach … ?
... and if you miss one of these really small screws: before you sweep the floor or search it with a strong magnet, take a look at the (magnetic) charging cable connection on the side … ?
Blatt - 返信
Fot All People ha ing trouble finding their SSD
DONT PRESS CMD +R + POWER
instead press
OPTION+CMD+R +POWER
I just installed Monterrey with WD black sn 770 SSD in m'y macbook air 2015
Albert - 返信
IFixit just had me submit "my story" re. fixing my MacBook Air 2013.
This repair was NOT difficult. The battery is enclosed in a plastic frame. It is NOT glued in like the newer models of Apple laptops. And unlike older laptops, the battery is not totally enclosed in a plastic housing. So once you remove the screws holding the batterie's frame, you can remove the battery.
Follow the instructions. Read the comments. Also read the comments re. installing a new battery.
Good luck. - Eric J.
ECJohansen - 返信
On the back of the laptop, notice that each screw is angled a little bit inward, aiming toward the middle of the laptop. Keep your screwdriver lined up with the screw (angled a bit outward as seen at 01:23 in the video: https://youtu.be/tToAwO6f-SY&t=83). This will help you get a good bite on the screw to get it out and avoid stripping the head of the screw.
Use the same angle when putting each screw back in. If the screw is in line with its hole it should not feel like you are fighting to screw it in. If it does, check your angle and back up a little; you should feel the screw fall into line.
Rich Garella - 返信
IFixit just had me submit "my story" re. fixing my MacBook Air 2013.
This repair was NOT difficult. The battery is enclosed in a plastic frame.
shrhh - 返信
Is it possible to change an upper case with a german keyboard for an english one?
Rogerio Pefi - 返信
if you are intending to change it to British layout you don't need to change the keyboard at all, just the keys, buy either a set of a1466 key caps ( I assume you have a 2017 MacBook Air?) or a cheap a1466 keyboard (can even be a broken one), remove the keys that are different and replace them with the other keycaps, and then set the macbook's language to British and you are set
Kai Mcpherson -