はじめに
この修理ガイドはiFixitのテックライティングスタッフによって執筆されたもので、Googleによって承認されたものではありません。iFixitの修理ガイドのクオリティーについては、 こちらを参照してしてください。
このガイドを使ってGoogle Pixelのバッテリーを交換します。毎日使用すると、通常バッテリーは18~24ヶ月で、大部分のバッテリー容量を失います。もしお持ちのスマホの充電を頻繁に行い、突然シャットダウンする事態にあっている場合は、バッテリーを交換することで解決できるかもしれません。
ご注意:ディスプレイを固定している強靭な接着剤と、ツールを差し込めるスペースが最小限であるため、この作業中、アクシデントでディスプレイにダメージを与えてしまう可能性が高い頻度であります。''' 作業を成功させるには、インストラクションに従い、全ての注意書きの指示に従ってください。
デバイスを再組み立てする前に、バッテリーの残量を25%以下まで放電してください。充電されたリチウムイオンバッテリー は引火の原因となったり、アクシデントで穴を開けてしまうと爆発の恐れがあります。バッテリーが膨張している場合は、
適切な処理方法に従ってください。バッテリーは大変強力な接着剤で固定されています。デバイスのバッテリーを緩めるには、90%以上の高濃度のイソプロピルアルコールが必要です。
必要な工具と部品
-
-
デバイスの電源を切ります。
-
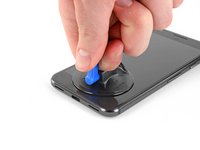
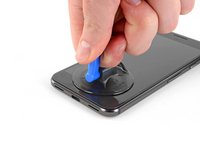
iOpenerを使ってディスプレイの端に載せて温めます。ディスプレイ下の接着剤が柔らかくなります。もしくは、ヒートガンやドライヤーを代用することができます。
 FixBotに聞いてみる
-
-
-
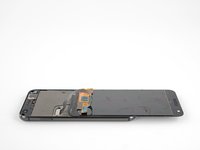
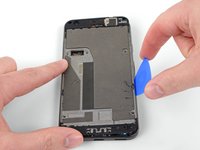
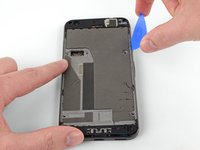
参考のために、ディスプレイパネル裏側の様子が左側の画像で確認できます。ディスプレイユニット端とOLEDパネルの間の狭い隙間にご注意ください。(ベゼルは前面側にこの間隔で表示しています)。
-
-
この手順で使用する道具:Suction Handle$2.95
-
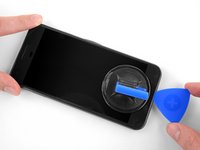
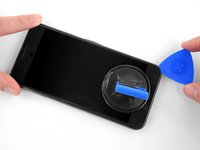
吸盤カップを使って、ディスプレイを上に引き上げ、ディスプレイと筐体の間にわずかな隙間を作ります。
-
上手く隙間が出きない場合は、さらに熱を加えて温める必要があるかもしれません。作業には時間がかかります。隙間にゆっくりとツールの先端を差し込めるようになったら、次の手順に進みます。
-
-
-
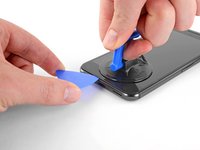
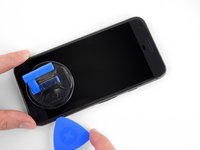
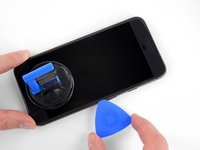
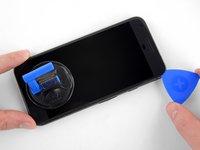
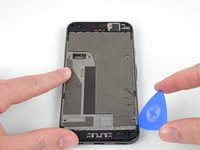
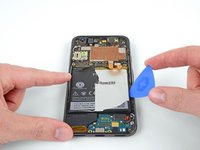
開口ピックもしくはプラスチックカードをカシスとディスプレイアセンブリの間の隙間に差し込みます。
-
開口ピックをディスプレイ端周辺にスライドして、留められた接着剤を切り込んでいきます。
-
-
この手順で使用する道具:iFixit Opening Picks (Set of 6)$4.95
-
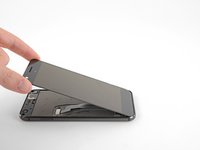
接着剤を切断できたら、ゆっくりとディスプレイ上部(スピーカーグリルの切り欠きがある側)から持ち上げます。ゆっくりとデバイスの下側に向けて垂直に持ち上げて裏返します。画像のように配置してください。
-
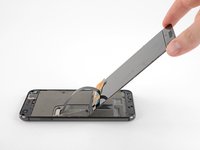
粘着力がいたるところに残っていることを忘れないでください。スクリーンとディスプレイの間にオープニングピックを挟んで、接着剤が再装着しないようにしましょう。
-
-
この手順で使用する道具:Magnetic Project Mat$16.96
-
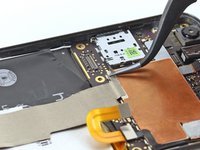
T5トルクスドライバーを使って、ディスプレイケーブルコネクタブラケットを固定している黒の3.5mm T5ネジを2本外します。
-
この修理の間、各ネジの装着位置を 記録し、元の場所に正確に戻してください。
-
-
-
この手順で使用する道具:Tweezers$4.99
-
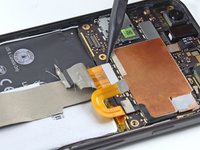
ピンセットを使って、ディスプレイコネクタを固定しているブラケットを取り外します。
-
これは単なる金属板なので、簡単に外れるはずです。(ケーブルについては次の手順で外します)。
-
-
-
ディスプレイを取り出します。
-
再組み立て後の起動中に、スクリーンはキャリブレーション画面に移行します。この間、スクリーンに触れないでください。不適切なタッチキャリブレーションが行われ、タッチの問題が発生する可能性があります。
-
-
-
スパッジャーを使って、イヤホンスピーカーケーブルのコネクタをまっすぐ上に引き上げ、マザーボードから接続を外します。
-
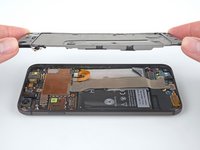
デバイスからミッドフレームを取り出します。
-
-
この手順で使用する道具:Tweezers$4.99
-
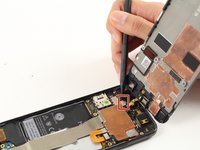
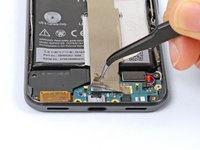
ピンセットを使って、マザーボードをドーターボードに接続しているケーブルを覆っている銀色のテープを剥がします。下にあるコネクタが見えるようになるまで剥がします。
-
スパッジャーを使って、コネクタをまっすぐ持ち上げ、マザーボードからコネクタの接続を外します。
-
-
-
バッテリーには、バッテリー取外用のタブを兼ねるジャケットが付いており、それを引っ張るとバッテリーが外れます。 それでもうまくいかない場合は、以下の手順に従ってください。
-
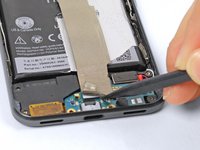
開口ピックの先端をバッテリーの底にゆっくりと差し込み、接着剤を剥がします。
-
バッテリーが簡単に外れない場合は、力を入れてアグレッシブにこじ開けないでください。iOpenerもしくはヒートガンでデバイスの裏側に熱を当てて、接着剤を柔らかくします。
-
-
この手順で使用する道具:Tesa 61395 Tape$8.95


交換用のパーツとオリジナルのパーツを見比べてください。残りのコンポーネントを移植する必要があるか、パーツを装着する前に接着剤の裏張りを取る必要があります。
デバイスを再組み立てする際は、これらのインストラクションを逆の順番に従って作業を進めてください。
この修理ガイドを完成したら、新しく装着したバッテリーのキャリブレーションを行なってください。
不要になった電子廃棄物は 認証済みリサイクルセンターで処分してください。
修理が上手く進みませんか?トラブルシュートのヘルプには、アンサーコミュニティを参照してください。
136 の人々がこのガイドを完成させました。
以下の翻訳者の皆さんにお礼を申し上げます:
100%

これらの翻訳者の方々は世界を修理する私たちのサポートをしてくれています。 あなたも貢献してみませんか?
翻訳を始める ›

74件のガイドコメント
I doubt many people can get past step 1 without it being game over. Take special care, read the comments, and other guides as well.
I broke mine too. Not the glass but the display panel underneath.
For those who are going to try opening theirs: pay extreme attention to the fact that the display panel extends somewhat beyond the bottom edge of the visible part of the display where the cable connects and, if that wasn’t bad enough, the bottom bezel has a !&&* of a lot adhesive on it. Don’t insert plastic opening tools on the bottom corners - if you do that, you will damage one of the unprotected corners of the panel like I did. If I had to do that again, I’d probably start from the top edge instead.
The new screen ended up costing me the equivalent of $80, and I was surprised I was able to walk into a store and buy one at all in a country where Pixel was never officially available in the first place. They didn’t have white ones in stock so I went with a black one.
Same. Even when being warned and trying to be super careful.
+1. Don’t bother trying to save the screen. Just save yourself the stress and buy a new screen on ebay for $35 before you begin. I have never botched a repair and I still managed to break my display on this. Yes, I was super careful, it took me like 45 minutes to finally get the display loose, and when I put it all back together, the display was totally dead.
Kael Lumen - 返信 共有