はじめに
iPhoneバッテリーは最大500回の充電サイクルまで、容量の約80%まで充電できるとされています。これは、多くのユーザーにとって約18−24ヶ月で500回のサイクルを迎えることになります。iPhoneの充電を頻繁に行っていたり、パフォーマンスの低下をiOSが警告している場合(言い換えるとスマートフォンの速度が遅い場合)はバッテリーを交換する時期に差し掛かっています。このガイドを使って、新品の頃のようなiPhoneを取り戻しましょう。
バッテリーが膨張している場合は特別に注意しながら、適切に処理をしてください。
ご注意:iOS 17.6以前を使用している場合、修理完了後にiPhoneのディスプレイ上に、”正規品”バッテリーの使用に関する警告が表示されます。 これはオリジナルのAppleパーツを使用しても同じです。iPhoneが通常通り機能する場合は、この表示は無視してください。特に問題ありません。iOS 18以降を使っている場合は、Appleの修理アシスタントを使って新しいバッテリーを認証させて下さい。
この修理ガイドを完成したら、新しく装着したバッテリーのキャリブレーションを行なってください。まず100%まで充電し、そのままプラグに繋いだまま2時間充電状態にします。それからiPhoneがローバッテリーでシャットダウンするまで放電させ、中断なく一気に100%まで充電してください。
必要な工具と部品
-
-
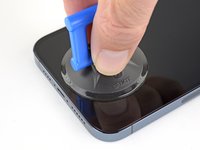
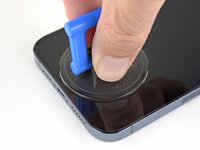
油性ペンでオープニングピックの先端から3mmの位置にマークを入れます。
Got to step 2 and realized the fix kit doesn't include an opening pick! Looks like a guitar pick, and I have those lying around. Is that expected? Looks like the pick is used in many steps below. There's a little blue crowbar that isn't mentioned in the instructions. Perhaps that replaces the opening pick?
Hi! I can't see which guide you were using when writing this comment. Can you reply here with which guide and fix kit you used?
I see you posted this in Meta. I hope it's resolved soon! In the meantime, a guitar pick may work well enough for your repair.
what fix kit?
My fix kit didn't include an opening pick either
My AliExpress refurbished screen came with a pick that has a coin-like circle that pops out, so no modification was necessary
It's not an Ifixit KIT if it doesn't include everything. You'll need to order the opening pic separately. Or head to Walmart like myself and look for guitar pics. Hopefully, this will work just as well.
No pick in mine as well. It’s really not clear that you have to order this separately when ordering an IPhone SE 202/2022 screen repair kit. Is this the case?
Frustrated, I ordered a compact package where everything was encapsulated. Useless suction tools could not separate the screen. If it is unable to decouple the screen, then why sucking suction tools you have provided.
For my kit the triangle pick was stuck inside the box with the screen not with the other tools maybe it's also there for you
Y’all are getting far, FAR too detailed with some of this stuff…. Measuring and marking the pick that you won’t actually use to open the device?!? lol that’s kinda funny. Just heat it up, grab a spudger, and the back just pops right off! The iFixit tech need to stick to the KISS method more often, you know KEEP IT SIMPLE STUPID!!! Like l, for reals, I’ve been doing this stuff for YEARS and using iFixit guides regularly and this is just ridiculous at this point!
Will the phone still work if the sensor assembly on the back of the screen is damaged?
-
-
-
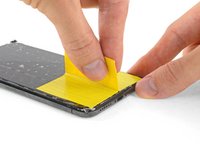
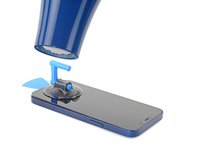
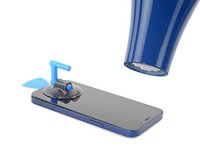
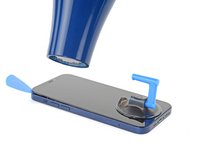
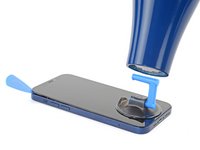
iPhoneの画面の上に、透明な梱包用テープを重ね合わせます。
-
次の数ステップで吸盤がくっつかない場合は、強力なテープ(ガムテープなど)を持ち手に折って、代わりにそれでスクリーンを持ち上げてみてください。
-
-
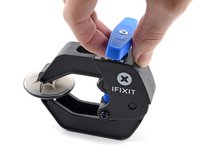
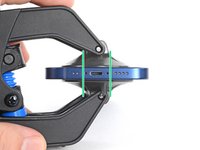
この手順で使用する道具:Clampy - Anti-Clamp$24.95
-
青いハンドルをヒンジ側に引くと、リバースクランプのアームを解除します。
-
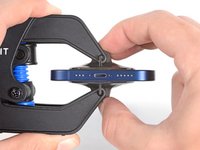
iPhoneの左/右側の端に向けてアームをスライドします。
-
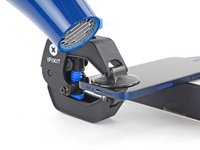
吸盤カップをiPhoneの下端付近に装着します。前面と背面に1つずつ取り付けます。
-
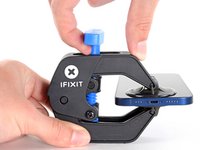
吸盤カップ両側をギュッと締め合わせると、標的の場所にしっかりと装着させることができます。
-
-
wenn man die Frontkamera nicht tauscht sondern nur anhebt und reinigt, funktioniert Face ID dann noch?
Wenn du beim Aus- und Einbau alles richtig machst, dürfte dabei nichts passieren.
-
-
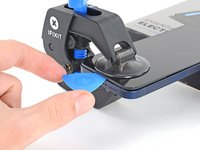
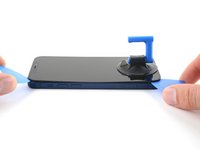
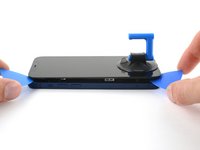
吸盤カップをしっかりと引き上げます。スクリーンとフレームの間に僅かな隙間が生じるまで一定の力で引っ張ります。
-
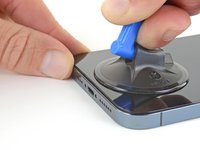
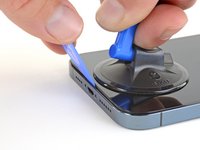
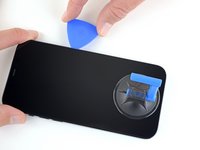
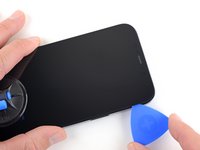
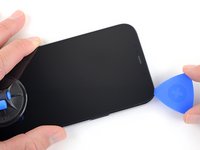
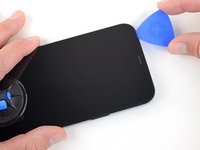
スクリーンのプラスチックベゼルの下にできた隙間にオープニングピックを差し込みます。
Be very careful on this step to insert the pick as vertically as possible!!! I ended up separating the glass from the outer frame on this step and destroying the screen. Not a cheap mistake to make!
I just destroyed the screen as well. I try to read these comments for each step but missed this comment section due to skipping down a few steps for not having the opening tool. Really frustrated.
Anthony -
The glue as of the 12 series is incredibly strong. I'm definitely not new to the game and working only with a suction cup, I damaged the screen too, because I couldn't lift it far enough. Therefore, I too had to buy a new screen. 130€ poorer, I would opt for borrowing the display removal kit Apple sells at selfservicerepairs.com. It's around 50 or 60 Euros and worth it.
It must be emphasized that there's a sandwich here with the phone body, plastic bezel, and screen. The plastic bezel isn't visible as it's hidden by the phone's frame until you raise it with the suction cup -- and if the screen lifts off the bezel when you do this you won't see the bezel and you'll insert the pick between the screen and the bezel, destroying the screen. The instructions need to be much more detailed in this area as the consequences are not only expensive but result in long downtime for the phone (my current situation!). iFixit needs to do a much better job of anticipating what could go wrong and providing ways to avoid it!
-
-
-
-
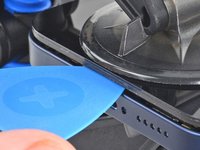
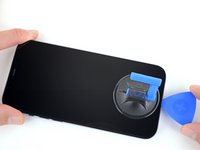
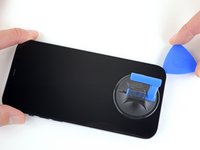
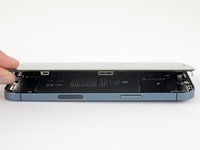
iPhoneを回転させて、右側端が手前に来るように配置します。
-
iPhoneのディスプレイを左側から右側に向けて(本のページをめくるように)開きます。
-
ディスプレイの背中に何かボックスを衝立てて、作業をしやすくします。
-
-
-
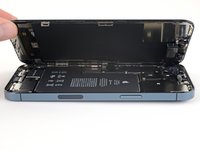
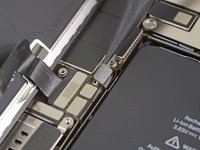
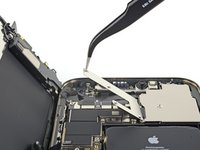
スパッジャーの先端もしくは清潔な爪先を使って、ロジックボード上のソケットからバッテリーコネクタをこじ開けます。
-
コネクタをロジックボードから少し曲げながら離します。修理中にアクシデントでソケットと接触してデバイスの電源が入らないように予防します。
-
-
-
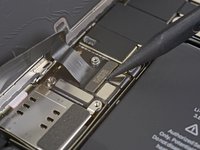
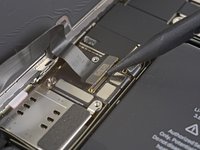
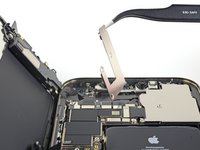
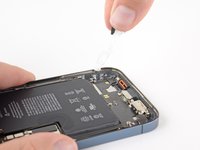
スパッジャーもしくは爪先を使って、フロントセンサーアセンブリのケーブルコネクタの接続を外します。
when lifting up the front sensor assembly cable connector, you should use the flat end of the spudger. Using the pointed end as shown in the picture runs the risk of damaging components on the board and/or the cable connector itself.
-
-
-
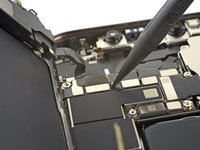
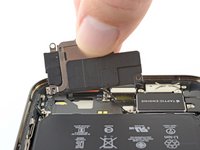
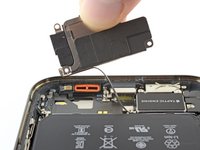
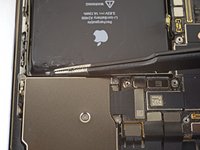
ラウドスピーカーを角からゆっくりと持ち上げながら、接着剤ストリップをゆっくりと剥がします。このストリップを新しいラウドスピーカーに移植して装着します。
-
ラウドスピーカーを取り出します。
-
-
-
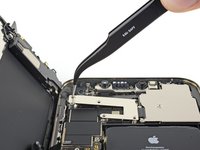
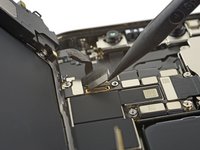
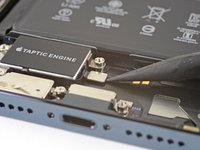
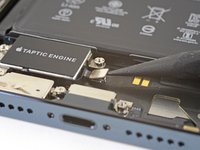
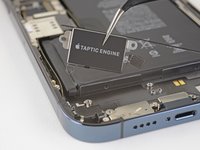
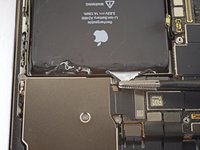
Taptic Engineを取り出します。
-
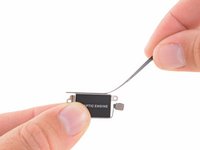
Taptic Engineを交換する場合、接着ストリップを剥がして再組み立ての前に、交換用のTaptic Engineに移植してください。
-
-
この手順で使用する道具:Tweezers$4.99
-
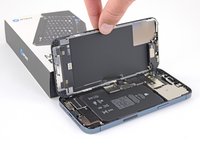
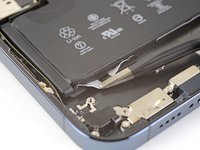
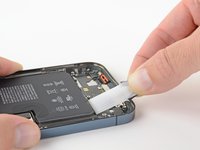
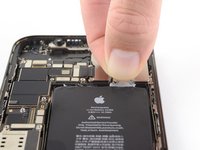
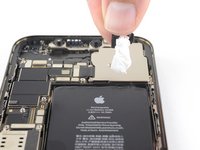
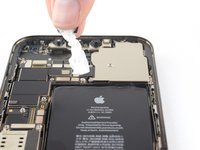
指で最初のプルタブを摘んで、バッテリー iPhoneの下側に向けてゆっくりと引き抜きます。
-
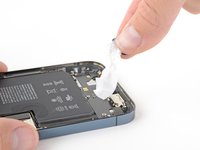
ストリップを一定の張りに保ちながらしっかりと引きます。しかし力を入れないでください。時間をかけてゆっくりとストレッチをして、バッテリー から接着ストリップを剥がします。
-
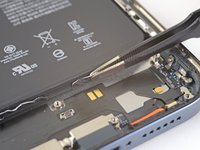
iPhoneの両側をしっかりと持ちます。バッテリーを押さえないでください。
-
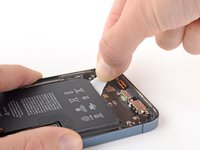
片側や中央部分を持つのではなく、ストリップ全体を均等に引っ張ります。そして水平に、シワが寄らないように引っ張ってください。
-
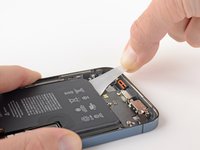
低い角度でストリップを引っ張ります。バッテリー下部端に引っかかって切断するのを防ぐことができます。
-
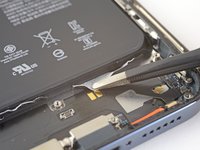
ストリップが切断してしまっても、慌てないでください!切断してしまったストリップを取り出すには指や鋭利でないピンセットを使ってください。バッテリーの下をこじ開けないでください。
-
ストリップがバッテリーの下で切断してしまい取り出せない場合は、他のストリップに作業の手を移してから、下の追加手順に従ってください。
-
-
-
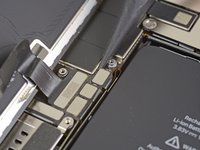
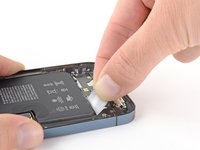
接着ストリップが途中で切断したり、バッテリーがリアケースに固定されている場合は、イソプロピルアルコール(濃度90%以上)を取り出せなかったストリップの付近に数滴注入します。
-
アルコール溶剤を注入した後、1分間待機して接着剤を弱めます。
-
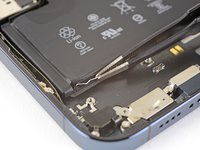
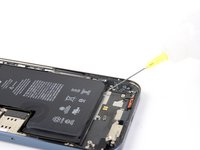
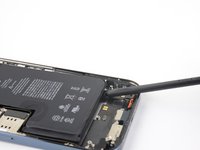
開口ピックもしくはスパッジャーの平面側先端を使って、バッテリーをゆっくりと持ち上げます。
-


交換用のパーツとオリジナルのパーツを見比べてください。残りのコンポーネントを移植する必要があるか、パーツを装着する前に接着剤の裏張りを取る必要があります。
デバイスを再組み立てする際は、これらのインストラクションを逆の順番に従って作業を進めてください。
修理が完了した後、使用した部品によっては、iOS 18以降で利用可能になったAppleの修理アシスタントを使ってキャリブレーションを行うことができます。最新バージョンのOSにアップデートした後、「設定」→「一般」→「情報」→「部品とサービスの履歴」の順に選択し、「再起動して修理を完了」をタップし、画面の指示に従って操作して下さい。
不要になった電子廃棄物は 認証済みリサイクルセンターで処分してください。
修理が上手くいきませんか?基本的なトラブルシューティング手順を試してみましょう。もしくはiPhone 12 Pro Maxの アンサーコミュニティに助けを求めましょう。
52 の人々がこのガイドを完成させました。
以下の翻訳者の皆さんにお礼を申し上げます:
100%

これらの翻訳者の方々は世界を修理する私たちのサポートをしてくれています。 あなたも貢献してみませんか?
翻訳を始める ›

11 件のコメント
Will you ship to England from your us store I am after the battery
Just an FYI. Seems like there's a solid chance that if you swap out the battery, your iPhone will not recognize the battery as an Apple certified one and will cease to receive any updates.
100% chance, you can't make the message go away unless you have a BMS board reprogrammer
How to solve that problem?
A mi hijo le partieron la pantalla y la parte de atrás de su teléfono. El mismo fue reparado, se cambiaron ambas partes la trasera y la pantalla frontal. A los días la batería se infló. Esto que lo pudo haber ocasionado? Es daño consecuencia de la reparación?
Inés Esber - 返信
The guide is excellent - detailed and thorough. However, I managed to pull my display apart, separating the glass from the OLED part, rather than pulling the whole display out. It wasn’t obvious until it was in pieces. Not really a fault of this guide. But beware and don’t make the same mistake.
I ordered a 13,000 mah upgraded battery replacement and I have my fingers crossed everything goes according to plan, but this guide has greatly increased my confidence in being able to do this repair on my own. It will officially be my first attempt at repairing any electronic device. Thank you so much!
This worked for me! I could not pull free any of the battery adhesives despite my best efforts and care -consistent pull but not too hard - the adhesive stretched but would not budge and in each case it eventually tore. However, using the workaround was fine - some pure alcohol drops and gentle lifting from the speaker end worked it free. Thinking back, it was cold where I was working this, and I wonder if the adhesives could have moved easier if I had applied heat to the back of the phone underneath the battery for a while, sat it on an iOpener for a while...maybe?