この修理ガイドは変更されています。最新の未承認バージョンに切り替えます。
はじめに
iPhone 7 Plusのスクリーンを交換する方法が学べます。このパーツにはフロントカメラ、センサアセンブリとEMIシールドが既に搭載されています。これで修理がより簡単に済みます。
必要な作業は、Touch ID(指紋認証スキャン用)を保つ為、古いスクリーンを取り出して、ホームボタンを新しいスクリーンに取り付けることです。
必要な工具と部品
ビデオの概要
-
-
ディスプレイのガラスが割れている場合、作業中さらにダメージが広がったり、作業中、怪我をしないようガラスの表面にテープを貼ります。
-
透明な粘着テープをiPhoneディスプレイ表面上に二重に装着します。
-
次のひび割れたガラスのため、次の手順で吸盤カップを引き上げれない場合は、ダクトテープのような強力な粘着テープを使ってハンドルを作り引き上げてください。
-
-
-
次の3つの手順では、デバイスの開講作業を簡単にするために開発されたツール、 アンチクランプの使い方を紹介します。リバースクランプを使用しない場合は、この3つの手順をスキップして別の方法をご覧ください。
-
青いハンドルをヒンジ側に引くと、クランプのアームを解除します。
-
iPhoneの左/右側の端に向けてアームをスライドします。
-
吸盤カップをiPhoneの下端付近に装着します。前面と背面に1つずつ取り付けます。
-
吸盤カップ両側をギュッと締め合わせると、標的の場所にしっかりと装着させることができます。
-
-
-
Heat an iOpenerを温めて、リバースクランプのアームの間にこれを通してください。
-
iOpenerを折り曲げて、iPhoneの下側端に当たるようにします。
-
1分ほど待機すると、接着剤が剥がれ始め、デバイスの間に隙間ができます。
-
プラスチックベゼルとスクリーンの間の隙間にオープニングピックを差し込みます。スクリーン自体には差し込まないでください。
-
次の3つの手順はスキップしてください。
-
-
-
iPhoneの下端を加熱すると、ディスプレイを固定している接着剤が柔らかくなり、開きやすくなります。
-
ヘアドライヤーを使用するか、iOpenerを準備し、ディスプレイ裏側の接着剤を柔らかくするために、iPhone下部端に約90秒間あてます。
-
-
-
-
ロジックボードに留められたディスプレイケーブルブラケットの下部から次の4本のトライウイングY000ネジを取り外します。
-
1.2 mmネジー3本
-
2.6 mmネジー1本
-
-
-
この手順で、ケーブルの接続を外す、もしくは接続する前に、バッテリーの接続を外しているか必ず確認してください。
-
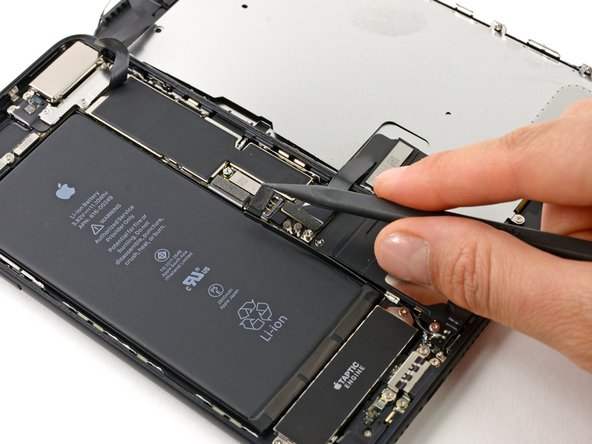
スパッジャーの平面側先端や指の先を使って、ロジックボード上のソケットから2つのディスプレイコネクタをまっすぐ引き上げて接続を外します。
-
オリジナルのパーツと交換用パーツをよく見比べてください。交換用パーツに付いていない残りのコンポーネントや接着シールなどは、インストールする前に新パーツに移植する必要があります。
デバイスを再組み立てする際は、これらのインストラクションを逆の順番に従って作業を進めてください。
e-wasteを処理する場合は、認可済みリサイクルセンターR2を通じて廃棄してください。
修理が上手く進みませんか?まずはベーシックなトラブルシューティングを試してみるか、このモデルのアンサーコミュニティに尋ねてみましょう。
オリジナルのパーツと交換用パーツをよく見比べてください。交換用パーツに付いていない残りのコンポーネントや接着シールなどは、インストールする前に新パーツに移植する必要があります。
デバイスを再組み立てする際は、これらのインストラクションを逆の順番に従って作業を進めてください。
e-wasteを処理する場合は、認可済みリサイクルセンターR2を通じて廃棄してください。
修理が上手く進みませんか?まずはベーシックなトラブルシューティングを試してみるか、このモデルのアンサーコミュニティに尋ねてみましょう。
617 の人々がこのガイドを完成させました。
以下の翻訳者の皆さんにお礼を申し上げます:
100%
Midori Doiさんは世界中で修理する私たちを助けてくれています! あなたも貢献してみませんか?
翻訳を始める ›
60 件のコメント
Only the glass is broken on my screen. I don't need a new digitizer. Is there a way to just replace the glass? Seems like that would be much cheaper. Thanks!
Unfortunately, by the nature of the technology, cracked glass likely means your digitizer is out of commission (does touch still register on the cracked screen?). Below that is the LCD, and that might not be broken (if the image is fine, then the LCD is likely fine). The problem is that these components are VERY VERY difficult to separate. This makes the individual replacements a nightmare. I hate to say anything is impossible, but separating these components will feel impossible without expensive tools and extensive knowledge. It will also likely end in a mess of broken components. When there is a will, there is a way. But the separation project will demand a lot of will.
Our store is having trouble with the earpiece speaker working after screen repair on just the 7 Plus, not with the 7. We have tried different techniques and still get figure what we are doing wrong. Has anyone else had this problem and know the solution?
My earpiece speaker also won't work with new screen... this is frustrating. Any solution
Ben -
There are some connections for the earpiece speaker that can be a little tricky to get properly connected during reassembly. If you look at the third photo in step 22 of the iPhone 7 Plus teardown you can see four copper pads on the cable, and four protruding copper connections on the speaker. For starters, make sure that these are all clean. When reassembling, make sure that the metal pads on the cable firmly touch the metal pins on the speaker. These are actually electrical connections, and are a little tougher to seat properly because they don't snap in like press or ZIF connectors. If the metal is all lined up and pressed against each other, then electricity should be flowing and sound should result! If the earpiece speaker was not removed and this guide was followed as is, it is most likely an issue with the connectors in step 19 of this guide.


