はじめに
パワーボタンのクリーニングや、すり減ったボタンカバーを交換するためのパワーボタンの取り出し作業はこのガイドをご利用ください。このガイドはアルミニウム製のボタンカバーを扱っており、メタル製ボタンカバーは対象外ですのでご注意ください。メタル製スイッチを交換するには パワーボタンケーブルガイドをご覧ください。
また、このガイドを使って上部ケーブルブラケットの交換もできます。
必要な工具と部品
-
-
青いハンドルをヒンジ側に引くと、リバースクランのアームを解除します。
-
iPhoneの左もしくは右側端に向けてアームをスライドします。
-
吸盤カップをiPhoneの下端付近に装着します。前面と背面に1つずつ取り付けます。
-
吸盤カップ両側をしっかりと締め合わせると、標的の場所にしっかりと装着させることができます。
I found that the single suction cup from the kit worked very well. It didn’t take that much force to separate the front panel from the phone. I think any suction cup that you are able to get a firm grip on will probably work as well. There isn’t any adhesive holding the front panel in. It just snaps in and out. If you have a cracked screen and no screen protector, it may be hard to get a good suction seal. If that’s the case, someone else here suggested applying clear tape to the front glass to get a good surface for applying the suction cup. In my case, I already had a screen protector that was still intact so the suction cup sealed easily.
WORKED PERFECTLY… easy, no harm at all…. thanks a lot
-
-
-
リバースクランプをお持ちでない場合は、シングルタイプの吸盤カップを利用してフロントパネルを持ち上げます。
-
ホームボタンの真上のスクリーン上に吸盤カップを押し当てます。
This is nearly impossible on a screen that is shattered
You can put clear tape over it. it works.
Owen -
-
-
-
片手で iPhoneを押さえながら、吸盤カップを持ち上げて、背面ケースからフロントパネルを離します。
-
プラスチック製開口ツールを使って差し込み、リアケースからアセンブリを丁寧にこじ開けます。同時に吸盤カップで引き上げます。
Pulling up on the suction cup helped get me started, but what worked for me was pulling up gently while sliding the plastic prybar gently along the seam towards the top of the phone (on both sides), and it came open without having to put excess pressure on the suction.
Along with the suction cup I used some Command adhesive strips to hold the bottom of the phone to a workbench as they easily pull/stretch away when you need to remove them!
That’s a very clever idea, thank you!
I did this too and left it throughout the repair. Super easy, and prevented phone from slipping and damaging the display cables.
Suction cup pictured here is the older version (with ring). I have one from my previous battery replacement on iPhone 5 and used that instead. The new one (gray with blue handle) kept on popping off. Overall, popping out screen was not as hard as it seems with these instructions, but do proceed with caution.
Dion's idea to use removable adhesive strips was great, even better, use it to attach the iPhone to a clipboard. This will allow for a sort of Lazy Susan function while you work. I also used adhesive strips to attach my iPhone box to the clipboard as well and used that as a back rest (with rubber band) for the screen as pictured in steps below. This allowed me to very comfortably skip steps 13-19 as others have commented.
The new suction cup (plastic handle) is not so suctiony. Prepare for this thing to pop off a couple of times when opening the case.
Be very careful because it feels that it holds very tight but with the last pull it can fly away.
I did all the suggestions here and it just wasn’t moving until I repositioned the suction cup up over the home button for more leverage. It finally came up enough to slip the plastic opening tool under the edge.
Well, my glass immediately and easily shattered. The only reason I’m attempting this is because Apple didn’t have time and the kids at Best Buy, while they accepted my appointment, admitted they had no idea how to actually do it. So… I’m off to Apple to spend a gazillion dollars I don’t have on a new iPhone.
dont have a panel so idk know cant buy one help please !!!!!!!!!!!!!
The MORE iFixit plastic tools you have available for this step the merrier. It was effortless with two.
-
-
-
本体上部先端を蝶番にして、リアケースからフロントパネルアセンブリのホームボタンの先端を持ち上げて、iPhoneを開口します。
It's not clear from the instructions but it is shown correctly in the pictures: when the front panel assembly is just open (at a small angle with the rear case) pull the top edge clips out of the rear case to slightly separate the two components, then swing the front panel assembly away from the rear case. I assume not doing so would potentially damage the connecting ribbon and/or the alignment clips. Just a guess...
Yes! I wish I had read this before working on my phone. I read the instructions as they are and slowly started to open the case. This is when I heard my screen crack. So in the future, slowly open and when you are about 40% of the way, pull the screen forward so that the top clips pull away (we are talking a cm at most). Sigh just ordered a new screen
Albert -
This entire process went smooth. Final step of re-assembly , the assembly does not seat into the framing. The white gasket seats on one side not the the volume button side. Alignment looks good. How much pressure does one apply on the reassembly?
My problem is the front panel does not want to joint together with the rear panel… it feel like the front is too big but it look perfect but does not clip in place… Help…
same problem, in the final step, the screen does not fit entirely. it looks like the size is not 100% correct, but 99%… one side of the case stays open…
Some people have noted that the screen doesn’t seat properly on the case. Here’s how I solved it:
The issue is that rectangular brackets on the back of the display aren’t latching with the corresponding clips in the base. I think the brackets are missing the gap between the spring plate and bracket with the latching bumps on it on the base. Here’s my solution:
Position the top of the display slightly below the top of the case so the clips on the back top of the display start to engage with the phone case. Important: don’t push it all the way up!
Now press both sides of the top part of the display until the display seats on the back. Make sure both sides are flush with the case.
Repeat for the middle of the display. The bottom of the display will remain bent up because it will interfere with the bottom edge of the case.
Now push/slide the display up so the top of the display lines up with the top of the case. The bottom should then snap into the base, and the display should be flush with the case all round.
Yes - important to get those two rectangular brackets in place first but not all the way as you say.
Hola soy de Guatemala Me pueden ayudar a saber si puedo cambiar las partes de un A1589 a un A1549 iPhone 6
Good thing am reading this prior to beginning any disassembly or re assembly. Thanks guys for the great tips
-
-
-
作業をスムーズに進めるため、ディスプレイを約90度まで開いて衝立などを使用して固定します。
-
衝立にディスプレイを固定する際は、輪ゴムを使用して留めてください。ディスプレイケーブルに不要な圧力がかかるのを防いでくれます。
A picture is worth a thousand words! This idea at Step 9 is perfect and you can definitely do the entire rest of the battery replacement WITHOUT having to disconnect the display from the rear case. Just leave it secured exactly as shown in this picture and you're good to go. I just completed the repair and the most difficult part was just lining up the new battery connector! Excellent instructions and generally EASY repair because this step was so helpful!
I do NOT recommend leaving the display and the rear case connected during this repair. If you run into any resistance removing the battery, or slip in the least removing it, you risk tearing the ribbon cables that attach the two pieces. I did and now I've got to replace the Front Camera and Sensor Cable. Sadness.
This procedure does not require the removal of the battery, so your comment is not applicable unless the batter is being replaced.
I'm going to try it this way, because the odds of damaging the connector during removal seem greater than the risk of ripping the cable, however, I plan to cradle the phone in the "L" of simple, sheet metal bookend, and secure it using blue painter's tape. Seems more stable.
If you do this step carefully- (rubber band the front panel, and carefully peel away the battery adhesive) you can SKIP 13 THRU 19!
Rubber band and a large can of soup held the front in place. Go slow, steady firm pressure. Take the vibrator out though. Makes pulling the adhesive tape out much easier. Great video and written instructions!
I do NOT recommend leaving the display and the rear case connected during this repair. If you run into any resistance removing the battery, or slip in the least removing it, you WILL tear the ribbon cables that attach the two pieces. I did and now I've got to replace the Front Camera and Sensor Cable. MUCH Sadness.
Exactly!!!!!
Bunny -
I decided to do the repair on my iPhone 6 without detaching the screen. I ended up screwing two pieces of 3/4” x 3” x 6” wood together at right angles. I used 2 rubber bands to secure the screen to the vertical piece and 1 rubber band to secure the base to the horizontal piece. One of the two adhesive strips broke and I had to really work to get the battery out. The rubber bands held everything together nicely. The wood pieces were slightly wider than the phone which made it easy to hold everything together while I was working the adhesive strip out.
Mine worked great install went perfect. Was like a new phone… for a couple months. Phone may be failing for other reasons, but there’s a ghost image in the shape of the battery in the display now. Very strange. The ifixit kit did give life to it for a while though.
Hey Smahar! If you still have your tools, I’d recommend opening your phone up to make sure the battery isn’t swollen. If it’s pressing against the screen, it’s possible that is the case. If it is swollen, I highly recommend you replace it, it can be dangerous to leave it in place.
I feel like I just pulled off a minor miracle, successfully detaching and reattaching those four connectors. In the past I have also used the lean-against-a-box variant. Now I carefully apply several short pieces of painter’s tape to create a temporary “hinge,” in combo with the lean-against-a-box variant. If the bottom piece could be SUCCESSFULLY SECURED [painter’s tape loops?] to my work surface this should avoid needing to deal with the four connectors. IMPORTANT NOTE: At the end of the day this repair will ALWAYS be about pulling the white stretchy adhesive tape out from under the battery. And again the painter’s tape comes into play. This last battery replacement when I started to pull out the two adhesive strips I also, several times, applied enough tape to combine the strips and form a single grab point. Also, removing the “vibration” block allowed the the pull angle to be insanely shallow. Slowly-but-surely, both strips successfully emerged and battery was totally released.
-
-
-
次のプラスネジをバッテリーコネクターブラケットから取り外します。
-
2.2 mm ネジー1本
-
3.2 mmネジー1本
ok well what exactly does 2.2 mm and 3.2 mm mean if a #000 is needed? why even mention those numbers?
Those are the screw lengths. They’re important to mention so that you don’t put the longer screw in the wrong place. If you start mixing up screws, you can end up with permanent logic board damage.
I replace the antenna in the upper left-hand corner an in the bottom middle with the lightning connector because After disassemble it completely i lose my ability to have Cellular. After i replace both antennas i can find i nevertheless have cellular. anybody an idea ?
kupies2011 - 返信
With the phillips screwdriver included in the repair kit I cannot unscrew any of the interior screws because it is not the right size even though according to these comments all of the screws are #000 and on the product listing it says that the screwdriver I got is #000. Any suggestions?
Sounds like you need to adjust your technique. The included PH000 driver works fine; I’ve done many many phones with it.
Upon reassembly I found the Red 2.2 mm screw won't seat. Is it possible it sheared off? The Orange 3.2 is solid in both holes but 2.2 doesn't securely fit in either.. Should I just leave off the 2.2?
My phone was missing this screw also!
When I insert the 3.2 mm screw... The phone shuts down, very weird because am not seeing what could cause this short...
Juan Monge - 返信
I’m having the same issue. Thinking about just leaving that screw out. Did you ever get your’s working?
Using the Phillips 000 screwdriver included in the kit, I am able to remove the 3.2 mm screw, but not the 2.2 mm one.
None of the screwdriver heads in this kit are big enough for these screws!!! I now have an open iphone and i have to go to the store to buy a different screwdriver..I do not recommend this
I was unable to unscrew the 2.2mm screw with the provided screwdriver. I was able to unscrew the 3.2mm screw but not the 2.2mm
what did you do, i have the same problem i don’t know what to do. I should have read the comments at first now I am left with an open phone
I'm stuck in the same boat here. The one screw came out no problem but the second isn't catching at all.
Stuck with Jameison and Brian here... 2.2mm won't catch with all three provided screwdrivers.
Agreed, the screwheads included in this kit didn’t work for me either. Fortunately my own toolbox has an appropriate screwdriver…. Seeing as how we are paying for this kit so we don’t need to purchase extra tools, iFixit should really include screwheads that actually work!
why do i buy a kit from you guys but you don’t provide the necessary tools for unscrewing
i dont have any screwdrivers at home the 2.2mm simply wont come off its ridiculous now i just have an open phone
I had to use Phillips #00 for the 3.2mm (orange) and #0 for the 2.2mm (red). The #000 screw driver came in the toolkit is useless on both screws so I had to go out and buy new ones from a hardware store…
My two screws are the same diameter - 1.1mm, taking a Philips PH000 driver. However the one toward the middle is 3.3mm long, the one nearer the side is 2.2mm long.
So my kit didn’t come with the right screw driver, I should have read the comments first before buying.
My iPhone 6 battery connector bracket has 3.2mm which the PH000 works. But the 2.2mm didn’t work with included Y000.
What screw driver do I need for the 2.2 mm screw??
The heads on both of those screws are identical. The included PH000 is the correct driver. There are no Y000 screws anywhere in the iPhone 6.
The Phillips in the repair kit worked fine. I did 2 phones with it.
Just a followup to all the comments above for anyone who is confused: the drivers included in the repair kit work fine, assuming you know how to use a screwdriver correctly in the first place. There are quite a few folks who never learned, and that’s nothing to be ashamed of—in fact it’s common enough that we made a guide for it. Those bits were designed first and foremost to work with iPhone screws and have been extensively, extensively tested. You may come across stubborn screws or strip the heads if you’re not careful, and maybe that’s why some folks here are having trouble. In the very rare event that you actually received a malformed bit of some kind due to a manufacturing defect (which should be clear just from looking at it up close), reach out to customer service and they’ll get you squared away.
I just completed the battery replacement and I too found that the PH000 did not sit properly in either the 3.2 or 2.2 mm screws. Using a magnifying glass it seemed that the PH000 driver bit did not sufficiently fill the space of the screw. I happen to have the iFixit Pro Kit and used the PH00 driver bit instead, and this seemed to fill the space of both screws much better leading to successful extraction and replacement. My lack of experience with phone repair may have been a factor, but it seemed at least for my particular phone the PH00 was the proper driver bit for these two screws.
The PH000 screwdriver I received cannot remove the smaller screw…
So I spend 34 bucks on a kit of tools to repair my phone and they send the wrong sized screwdriver to get the battery cover off. Awesome. I can get the larger screw out but not the smaller one. What a waste of time and money.
@michael_pesenti Those screw heads are the same; the screws are just different lengths. If you have the right driver for one, you have the right driver for both, unless someone put your iPhone together with the wrong screws.
Nope. Actually turns out that ifixit just sent me a defective screwdriver that only was poorly sized and only managed to catch one of the screws. I had to order a new PH000 Screwdriver on Amazon and it got the screws out instantly and I was able to repair my phone.
Screws in mine required different size drivers also - maybe because refurbished? But have had the same probs on mbps also. Felt silly but followed Jeff’s suggestion to look at the screwdriver best practice guide and realised I was stripping screws by using too small a driver - have a couple either side of the suggested size and use the largest one that catches - I mainly used PH#0 & 00, though some screws needed #000, and there wasn’t any consistency to which screws needed which driver.
You’ll want to secure each screw as you remove it - if you sneeze they will fly away and you’ll never find them. I recommend having a small bowl or container for each screw you remove and label them for reassembly.
I was worried about getting the screws mixed up, so I used Sharpies to color-code each screw before I removed it (red, orange, or yellow - corresponding to the iFixit illustrations) When I marked the screw, the bracket got some color on it too, so when I was replacing the screw, I was confident that I was putting the right screw into the right position.
I also made a template-board by tracing an outline of the phone in the center of a piece of cardboard, and then gluing pieces of masking tape onto the cardboard, sticky-side up, one piece of tape for each bracket I removed. I drew an outline of the part on the tape, and made a red or orange or yellow dot for each screw that came from the bracket. It made it super-easy to keep track of the disassembly and reassembly. Took a little longer, but I didn't damage the logic board by using the wrong screw, and I was relaxed throughout the repair.
GPS and WiFi now work perfectly!!!
Thank you iFixit and commentators
Funny my one screwdriver fit all the screws with no problem!
Are you just out of luck if you start to strip a screw? The first, 3.2 mm came out easily but the 2.2 mm is a little worse for wear. I’d be grateful for any tips you might have.
Turns out the included PH000 head does work with both screws. They are both the same size gauge; only difference is the length. I had the same kind of trouble as most others trying to unscrew them. But if you carefully apply consistent direct downward pressure as you turn, the screw does disengage and unscrew. It helps to stand up over the work for more leverage. And it aids in keeping the screw driver head in full contact with screw head, so it doesn’t slip and strip the head.
I bought the Ifixit tool kit on amazon for $70 and i don't see any 3.2 mm or 2.2 mm in the black box. does anyone know what screw i am supposed to use because i have no idea what i'm doing wrong. I opened the bottom screws on the Iphone 6 just fine but for the inside screws i dont see 3.2 or 2.2. can anyone help me? i hope I didnt waste $70 on the wrong thing.
YuhBoiiJay - 返信
-
-
-
iPhoneからメタル製のバッテリーコネクターブラケットを取り出します。
Why in the YouTube video do you skip removing the battery connector
The YouTube video could use an update, but unfortunately YouTube does not allow that. Always disconnect the battery before disassembling anything else.
One of the screws is longer than the other, use it for the higher inside hole.
-
-
-
プラスチック製の開口ツールを使って、ロジックボード上のソケットからバッテリーコネクターの接続を外します。
I skipped steps 13-19 and just left the front panel rubber banded while I removed the battery. I just made sure to be careful while removing the adhesive strips so as not to move around the body of the phone too much. Skipping the steps made the whole process much faster and easier.
I wish I had done that.
Thanks for this awesome tip. Made the replacement go much smoother - saved me from removing all those other screws. I also recommend watching the ifixit battery adhesive strip video before proceeding with step 21.
Me too, no need to detach the screen (when you take care),
Tom Long -
In trying to replace my antenna flex cable, I attempted to skip steps 13-19 but eventually gave up around step 31/32 as I simply didn’t have the access I needed - the space was just too cramped with the screen still attached and I was afraid I would break something. If you’re a novice, don’t have good lighting and a magnifying glass, etc. you may just want to go ahead and perform 13-19. (Yes it will take extra time of course.)
I skipped those steps too and was successful. Thanks for this tip!
Can disconnecting the battery connector while power is on ruin the backlight? Or can disconnecting the power connector at a different stage ruin the back light?
You should power down the phone before disconnecting the battery. That said, the backlight should be fine. A blown backlight circuit is most commonly caused by disconnecting the display when the battery is still connected.
I did open the lcd without disconnecting the battery and my lcd wouldn't working
Thanks for that tip Tonima! This is another confirmation that skipping steps 13-19 worked out great!
As an extra measure, in addition to leaving the front panel rubber banded in it's open, vertical position (I secured mine to a can of beans) and being very careful and controlled when removing the adhesive strips; before using the suction cup to separate the front panel from the rear case, I had secured the back side of the rear case to my working surface (kitchen table) with a strip of folded over duct tape (creating double sided tape). Such might not have been necessary as I held the rear case with one hand while removing the adhesive strips with the other, though it just felt safer having the rear case (as well as the front panel) well secured in place to help assure that I didn't accidentally cause any damage to those very fragile looking cables that were left connected, by any possible movements of either of the iPhone's halfs during the pulling to remove the adhesive strips.
Russ Levey - 返信
It happened to me, by prying the battery connector with another tool I broke part of the socket off the board. However, by placing it exactly back in place the connector could be placed correctly and it works. Lucky.
I'd like a little more explanation on how to re-attach the battery connector. But in the end I lined it up and pressed gently down till it snapped into place.
I skipped the steps removing the screen only because I didn't feel confident at all doing this. For someone who is used to electronics I would really suggest removing it because I imagine the whole process would've been easier. If there's a next time, perhaps I'll do that.
The suggestions that recommend skipping step 13-19 apply to some other repair. We replaced the display, and to do so, steps 13-19 are, of course, necessary.
When replacing the battery you should prepare the cable to sit in exactly as you see it in the picture. I had mine all the way back in (with sticky strips) and had to find a way to fit the cable in with the weird way it bends. Dry fit the battery with cable in place - lesson learned.
Good idea. All the instructions were great until I got to the last thing- reattaching the battery connector! I like your recommendation to dry fit the connector so you can get the right bend to the connector ribbon first.
I wish I had seen this also, I feel like this should be in the guide. Mine seems to be working out but I had to force the connector into place a little bit.
I wish I had seen this first! I also had the issue, now I have a permanent discoloration of the screen where the connector is pushing against the back. Hoping that it doesnt lead to other problems. This site is really lacking on the reassembly steps… shame..
It appears that I haven’t properly connected the battery back up, since the hard reset didn’t work. I did my best to connect the battery before adhering it to the battery spot, but the connector doesn’t seem to “click” or otherwise confirm that it is properly positioned. The left side of the connector (closest to the battery) seemed slightly raised, which made me wonder if I had done it correctly. So I’m probably going to have to try using my last adhesive strips to lay it in better to allow for a better connection. I’m also worried that I may have damaged the connection spot. Is there anywhere on here where this is discussed? This is my second battery replacement, but first on this particular phone, which is apparently a refurbished one (and which has a slightly different looking connector cover).
Ah, it helps to discover that it’s actually a 6S rather than a 6.
For those of you replacing the Digitizer you to need follow steps 13 - 19.
Doing a lightning connector replacement - skipped steps 13-19 as well. No problems.
I can’t seem to get the battery connector to connect to the logic board. Is there some reason it doesn’t click or do something to hold it in place before the battery connector bracket?
@lrambjor No special technique; just line it up and press down, and it should snap into place. Make sure there’s no dirt/debris in the socket; give it a blast with some compressed air if needed. And make sure you’re not trying to jam an iPhone 6s battery into an iPhone 6 (or vice versa)—they aren’t compatible.
So her guys I skipped 13 but when attaching the ribbons( which is the LCD,camera etc ) I got a little smoke while trying to attach the ribbons and now i am not seeing anything but the phone is vibrating and coming on but i cant see anything
What is the reason
Who are you kidding? Plastic tool” is cute, but totally useless for lifting that battery connector off the logic board. But the smaller of the four long-handles Metal tools iFixit sells as a set worked perfectly well.
Reattaching the battery connector was one of the more difficult parts of this repair. Once you place the battery on the rear cover and the adhesive sticks you cannot make any adjustments to position (even though I tried to just place it as lightly as possible at first). I did a dry run attaching the connector and placing the battery before removing the adhesive cover but I did not get it to sit the quite the same after removing the cover. I had to fiddle with the battery connector quite a bit to get it in place.
-
-
-
フロントパネルアセンブリーのケーブルブラケットから次のプラスネジを5本取り外します。
-
1.2 mmネジー3本
-
1.7 mmネジー1本
-
3.1 mm ネジー1本
Be careful when replacing the screws, not to accidentally put the 1.7mm screw into the center hole, where the 1.2 screw belongs. This can cause "Long Screw" damage, and render your phone unusable.
I don't have the magnetic pad but use duct tape face up in a tray. I write the step number and color of the screw on the sticky surface and let the screw stand heads up on the goo. The screw is presented for the driver when reassembling.
I seriously draw a picture of the part, and mark where the screws belong, then place the screw on its location on the drawing! I so don’t want to screw it up(no pun intended)
Can't stress enough how important it is not to mix up these screws! Using the 1.7mm screw for the lower left fixing will cause "long screw damage" and kill the backlight on the phone. I believe @damianodessgillett made the same point. Wish we could display a small warning message here to be extra careful for future fixers!
i am trying but only could open 2 screws and cannot open the rest of them, can you help me??
@girlsrock742 - I'm new here, but from what I've seen, questions like yours don't get answered. I have 2 suggestions:
# Be more specific about what your issue is.
# Make sure you're using the right screwdriver. (Get a magnifying glass & make sure the screwdriver fits nicely in the screwhead.) This guide is included in a guide I'm looking at, and my guide has a comment that #000 phillips is required for the battery connector bracket above, not #00 as documented. (That comment did not convey to this guide....)
Good luck!
Nate, you are my hero at the moment! Phillips head screw driver PH000 resolved my issue. Greatly appreciative of your chiming in on this comment! Appreciatively, C.
Carol N -
Thanks to @griffn & @adlerpe! I've updated the tools list to include the magnetic pad, and -- for us infrequent fixers -- I made a note in the intro text to describe the sort of thing you two noted here in place of the mag pad.
Also, to @damianodessgillett & @kev - I've submitted an update to the instructions to add the caution you recommend to the step. Hopefully others will avoid the pain of the Long Screw damage.
It's possible to damage only a slot of flex cable ? I've opened my iPhone 6 but now front camera, speaker and the proximity sensor are not working. I've bought a new flex cabe to test it, but I have to be sure about that.
I'm so worried I'm going insert the wrong screw. Does anyone have any suggestions to knowing how to properly tell the size of each screw? I bought a screw set and a magnetic pad but still have the same issue. Not knowing the correct placement of each screw. I'd definitely appreciate any help.
Hi Patric! We use a set of calipers to measure our screws, failing that you could use a very fine ruler. If you don't have any kind of measuring equipment, line the screws up on the magnetic mat and sort them by size there. Ideally you only have screws from this step! If you are trying to determine the size of all the screws in this guide, it's probably best to get a real ruler/caliper for the fine distinctions.
Do you have to remove the display to replace the battery?
It's not absolutely necessary to remove the display, I kept my display propped up throughout the operation. Removal of the display doesn't seem to offer any particular benefit, unless you have problems with the adhesive strips.
I agree that it is not necessary to perform steps 13-19. I just successfully replaced my battery and skipped steps 13-19. I kept the screen assembly out of the way be securing it with a rubber band to a heavy candle jar. Note that even Gwendolyn, in the video for this batter replacement, does not mention disconnecting the screen.
Hi. I messed up with the screws in the cover guard sheet for the display ribbon and my iPhone 6 plus isn't turning on. Does that mean the logic board is dead or the battery ? Should I throw the phone in the garbage can ?
Did anyone even answer your question? I'm having the same issue
Sare -
I can confirm it's not necessary to remove anything other than battery bracket. If you support the screen against something as in the picture, just make sure you hold the iPhone absolutely still with one hand while pulling out the adhesive strips with the other. I also used a small piece of tape to hold the screen in place against the box while I worked.
I am now a very happy customer and am looking forward to another few years life from my awesome iPhone 6!
There is no need to do this step. No need to remove these 5 screws. Just make sure the screen is propped up against something strong and this step is unnecessary for the proper removal and re-insertion of battery.
100% agree. Step 13-19 are totally unnecessary and just adds the risk of breaking the display connector. “Don’t disassemble stuff that doesn’t need disassembling.” Just ensure there’s no strain on the display cable when removing the battery, i.e. by placing the phone on a non-slippery rubbery surface and fix the display to something sturdy with rubber bands.
Dormouse -
I left the front panel connected and it was much quicker. But, if you have to wrestle with the battery, it is much safer with the front panel removed. If you have worked on a few phone before, I'd try removing the battery with the front panel connected. If the battery is giving you problems(like if you tear the strips and have to heat the backside), you can always come back to this step.
Joel Horie - 返信
I strongly recommend you leave the display connectors alone if you can. My battery came out without a fight, but I found the display connectors to be almost tragically delicate, and I had white lines in the display when I booted it. During the subsequent attempts to remedy that situation, things went down hill and now I'm waiting for an entirely new display to try to rescue the phone from repair oblivion.
I also skipped all of the screen-removal steps and had nary a problem. Just rubber band the screen around whatever it is propped against and I believe you'll be fine.
Hello! I put the screws on in the wrong order and I believe my backlight is dead, iTunes still recognizes my phone when I plug it in, but the screen is blank. Is it possible to replace the logic board or is the phone useless forever?
You probably connected the cables wrong, try doing this step again and carefully correct your cables.
Remove each screw, tape it to a piece of letter paper, mark what spot it came out of. red, yellow, orange and the 3 reds. This way you can not possibly put them back in the wrong spots.
smahar -
I totally recommend doing this step first before removing the battery connector bracket, it will be much easier and comfortable with the screen out of the way.
Also I recommend drawing the bracket on a piece of paper and place the screws on top of the respective position on the drawing, this way you won't be confused when putting them back.
I accidentally lost a 1.2mm screw while doing a screen replacement. Will this make the phone malfunction in anyway after I close it back up or its fine?
DO NOT DO THIS STEP. It is totally unnecessary to remove the connectors, and they are a really big pain to put back in, and there is risk of damaging them, and it adds a lot of time to the process of replacing the battery. Just securely prop up the front panel, and then if you gently heat the back of the phone when removing the adhesive strips, the battery comes off easily. I could have saved myself about 2 hours and a lot of frustration if I had just left these connectors in. I wish the instructions here would just include this step (connector removal) ONLY IF the battery doesn't come out easily.
Exactly, just like J, Marr indicates, this step is not necessary. Just make sure you're careful to not move the phone too much, otherwise you can damage the film connectors. Other than that I even heated my phone to remove the adhesive, and thank God, nothing bad happened to it.
Mc Floyd -
It’s only necessary if you’re like me an need to fix the screen or water damage (mine fell in water…)
I do NOT recommend leaving the display and the rear case connected during this repair. If you run into any resistance removing the battery, or slip in the least removing it, you risk tearing the ribbon cables that attach the two pieces. I did and now I've got to replace the Front Camera and Sensor Cable. Sadness.
How can't you do step 33 if you don't do 13-19? iPhone 6.
This procedure is for replacing the iPhone 6 battery and there is no Step 33. You may have been referred to this page from another procedure. Keep that in mind while reading the comments here that may or may not apply to your original procedure.
I'm missing something here, I want to swap out the screen. How does one skip steps 13-19 if wanting to remove the screen?
This procedure is for replacing the iPhone 6 battery. You may have been referred to this page from another procedure. Keep that in mind while reading the comments here that may or may not apply to your original procedure.
I had to use the larger bit for ALL of the screws as the small one was too narrow at the tip to actually grab anything. It worked but made it a bit more difficult.
I also skipped steps 13 - 19. Just be very careful not to apply to much stress to the connectors in between the screen and the base. For me I also used another box to keep the base from sliding around while removing the battery.
You cannot skip these steps, of course, when you want to replace the display (which was the kind of repair we did).
When putting the little connectors in place again afterwards, I can recommend to hold the connectors to the display using a little rubber band. That way, they don’t get in the way when you put them in place one by one.
You SHOULD do the steps of removing the display. I have done battery replacements on several dozen phones. Of the ones I did NOT remove the cables, 2 of them had issues directly related to components related to these cables (front facing camera, earpiece speaker, etc.). Although tedious, I recommend removing these connectors to prevent any short circuit when reconnecting the new battery.
ACMT - 4 years.
I skipped this step and just affixed the screen to the Iphone box with a rubber band during replacement. I decided to take this risk to prevent some of the other issues that have been discussed when removing the screen. I understand it is risky because if you slip or need to use any significant force to remove the battery, disaster awaits. On my repair, it worked out fine and I ensured that I took my time and kept the bottom of the phone held to the worksurface.
There are only 2 screws when i opened mine.The centre one and the left top corner one..Is it okay to use it like that..Please help
If you can try to leave your display how it is. I removed it and it ended with white stripes and touchscreen not working. After a while it touch started to work and stripes went away. I think it was static electricity.
If you decide to go ahead with this step… I did it prior to removing the battery bracket and found it to be easier. Having the screen off made things a lot easier during the battery removal process.
Stay organized with the screws with just a piece of paper. Lay them out, mark ‘em up. Go slow, take your time.
I'm noticing some questions I have that others are asking yet no one is answering. You're all talking about the same problem that I find completely pointless. If you skip steps and it works, good for you move on. There are real questions being asked. Someone asked about losing a screw, would that effect anything? You all talk about the importance of having the screws organized, yet don't explain if someone either loses the screws or have them put into the wrong places. Since no one talks about it, I figured it wasn't as important as you all claim it is. Now my phone seems to not want to do anything anymore. Stop arguing with each other about something so miniscule like skipping steps. 40 comments on this part and 5 people actually have real problems but no answers. So, if anyone actually took the time to read this, my questions are; what happens if the screws are put in the wrong order?(other than the obvious long screw damage) and what happens if we put the phone back together without some screws?
@sarery I’m a little puzzled by your question. If you’re not willing to put the screws back in the right place as instructed, despite all the warnings in both the guide and the comments, why would you want to attempt this repair in the first place? But nevertheless I will try to answer. Some screws, if left out, have no noticeable effect. That’s the best you can hope for. Other screws perform a vital function such as providing a path to ground. Some screws are made of nonferrous materials—getting those mixed up can interfere with things like compass functionality. And putting a wrong screw pretty much anywhere can result in cross-threading or component damage. The reason we go to the trouble of providing all these screw markings and measurements is to help you put your phone back together in perfect working order. Which you may still be able to do, if you are careful, and patient. Good luck.
For those who are removing the digitizer, you do need to remove the bracket to get access to cable.
Definitely do NOT disconnect the screen for the battery replacement!
The battery replacement worked like a charm but now I am left with whit e stripes in the screen and touch screen functionality is lost despite many tries to get the screen reconnected.
i have replaced my iphone 6’s screen twice now, first the phones fingerprint sensor wouldn’t work ( the original one ), so i replaced the entire screen ( new fingerprint sensor), but still doesn’t work and now the phones brightness is extremely dim on both screens. So now both screens now are dim and finger print sensors dont work.
Bottom left 1.2 screw assembly broke off from the mother board and now my phone will not power up . Can there be another reason for the phone not switching on . How important to the function of the phone is the broken screw assembly ?
The phone will power on and work just fine without any of the screws in this particular step—the screws are for securing the bracket and keeping the connectors from popping out. I’m not sure what your issue could be, but a missing screw isn’t it! I’d probably start by reseating all the connections and giving it another try. Check the board carefully for damage. Try posting your question in our Answers forum with all the details and you may be able to get some troubleshooting help there. Good luck!
Thanks for your reply
even though the screw assembly has broken away from the mother board, this screw assembly was soldered in would not damage the back light or power to the phone ?
Initially thought I would skip these steps, as many people said to skip steps 13-19, but I tried proceeding without removing the front panel, and my adhesive strips simply would not remove, even with heating….so off the front panel came. Putting it back (connecting the cables back) was definitely a little panic-inducing, but managed to do it without damage - definitely watch some youtube videos!
I have to use PH000 right?
Aman Singh - 返信
Xmas day here 2020 and i decided to skip separation of the screen from the base. got the battery out no problem. did remove the vibrator plate and felt that really helped to remove the adhesive strips. just keep the screen nicely propped up and you should have no problems. not seeing any reason at all to remove the cables and screen.
Are there any other alternative i can use to unscrew the 1.7 mm screw?
-
-
-
基板からフロントパネルアセンブリのケーブルブラケットを取り出します。
I can’t get the top left screw back in if the cable bracket. Any reason why. My phone has power and back light is coming on. But screen is blank
In my case the top left screw - the orange screw - stayed in the front panel assembly cable bracket and would not come out. Later on I realized that the standoff screw which is underneath stayed fixed in the 1.7 mm screw. In fact this was no problem and I didn’t need to figure out how to remove the standoff screw at step 36. I just put it back in altogether and it worked fine. I actually removed both screws at once.
-
-
-
スパッジャーもしくは爪先を使って、正面カメラとセンサーケーブルコネクターの接続を外します。
I can not get these electrical connections to reconnect. If there is some secret to this it should be noted. I now have a phone all taken apart and can not get it back together. It makes no sense to only give directions to take a phone apart and not to put it back together.
I'm having the same problem as above...really upset and frustrated at this point. :( 2/4 connectors (top and right) will 'click' just fine...the other two (bottom two) for the life of me wont connect!!!! :( any suggestions? i feel like i have tried everything. Sucks that is only thing stopping me screen from being repaired....
Hi alyssa. Were you able to connect the cables? I am having the same problem
regarding cable connects - if two of the ribbon cables are not properly overlapped around each other, then it will appear as if cable #2 will need to plug into the closest jack, which is actually for cable#3. Look at the two connectors carefully - they are opposite gender and can't be interchanged.
This is good advice, and usually the problem people experience here. There is a very specific way the ribbon cables are layered, and if not correct when reassembled, the reach of the cables will cause you to assume which cable goes where and to try to insert the wrong plugs into the wrong sockets. Please do not try to force them. If they don't snap in easily, examine them closely, and you'll see the plugs and sockets are slightly different sizes, with one wider than the other. Better to take care to note how the cables layer during disassembly, or perhaps mark them to avoid this frustration on reassembly.
gybeho -
omg…. thank you!!!!!!!!!!!!!!!!!
my problem is that the connectors are different the screen i replaced it with the connectors were longer than the broken screen even though there the exact same type of screen
"gybeho" Ok, but it's impossible to install flex cables out of order. Each one has diferent sizes of docking...
it is very possible to install flex cables out of order. to most people working on their first screen replacement they do not have the experience to notice that their flex cable connection is different than the dock connection. this causes them to press harder and force the connection into the dock, ruining the connections, if they do not think the they have the cables out of order
I'm with Andrew Midgett. The connectors are just plain different in size and orientation. My phone matches what's shown in the picture above. You can see an example of the replacement part if you search Amazon for "Sanka LCD Touch Screen Digitizer Frame Assembly Full Set Screen Replacement for iPhone 6". And Sanka isn't the only iPhone 6 replacement that looks like that, so no hating on that manufacturer here.
Does this mean that some iPhone 6 phones have one set of connectors and some have a different set? FWIW, the model on the back of my phone says A1549.
Update: Searching for iPhone 6S instead of 6 on Amazon, I see lots of replacement screens with connectors that look a lot more like what I have and what's shown in the picture above. (One connector has a horizontal orientation, the other is vertical. I can't be sure whether the pins or dimensions match otherwise.) Any wisdom here?
Had the same problem with the correct layering of cable harnesses. Perhaps an additional photo showing the correct layering would be helpful for 1st timers?
+1 for a photo showing the correct layering and routing of cables. I accidentally routed the home button ribbon above the digitizer ribbon and beneath the power and backlight ribbons. The uneven pressure it put on the digitizer connector after tightening the plate caused my digitizer to not recognize touching the display or made touches appear off center.
drpotter -
For everybody who thinks they can skip these steps I commend you. No way I would have been able to get my battery out - two broken strips - without removing the screen. Re-inserting these cables was not really difficult - once the first one is back in place the rest follow quickly.
I tried to reconnect these for ages until I watched a video of someone else doing it.
Don’t try to line up the connectors by looking at them with the screen leaning on a soda can, just hold the two halves in each hand and line the first one up by feel. Really. After that it’s plain sailing.
Even with great lighting I couldn’t make this work with the bits on the bench - yet when I picked them up it was really easy to feel them line up. I had all four popped back on in about 60 seconds.
1 Ghanaian Cedi equals $0.19 United States Dollar. Therefore, the $30 USD iPhone battery kit equals 161.04 Ghanaian Cedi.
Got it all connected properly but front facing camera won’t work. I heard that connector snap into place but it just doesn’t work anymore. I even took it all apart again and redid that connection but nothing. Bummer, but I’m not a selfie person, I only used it when I was holding my dog on my lap. Everything else works fine after the battery re-install so…whatever.
-
-
-
スパッジャーもしくは爪先を使って、ホームボタンケーブルコネクターの接続を外します。
Muy buenas....una pregunta tecnica...si el botón falla o no está bien conectado...al conectar este conector ¿ se apagaría el teléfono?. Repare mi iphone y al conectarlo se me apaga el movil, sin embargo si no lo enchufo el movil enciende perfectamente.
Gracias.
I have the same problem. The phone turns on when I disconnect the home button cable, but turns off some seconds after I reconnect it. Does anybody have a solution?
If you look in the prior steps , it clearly says to disconnect the battery when disassembling and reassembling.
-
-
-
この手順でケーブルの接続を切ったり、再接続する前に、バッテリーの接続が切れていることを確認してください。
-
スパッジャーもしくは爪先を使って、ディスプレイデータのケーブルコネクタの接続を外します。
My screen is completely black and i can see the lights turning on when i press the home or lock button. Maybe this cable got damaged ?
Perhaps you bought a faulty screen. Often this is the case when it shows completely black.
When I was preforming this step, while reassembling, I had to connect the digitizer cable four times. On the last time, before screwing the Front Panel Assembly Cable Bracket on, I reconnected the battery connector and turned my phone on (ensuring that I was careful not to damage any cables!) to ensure that all cables were connected correctly and that the screen was fully functional.
NO NO NO ! i am a professional iphone repairman and i strongly recommend against using ANY tool to disconnect the flex connectors if u slip or use to much force you will damage the connector and may cause permanent damage to the phones logic board rendering it completely UNrepairable! Instead gently use the edge of your fingernail and pry up and the connectors will usually come off with very little effort .
Fingernails work great as well! However, there's nothing wrong with using a tool, as long as you exercise a little caution. If you've ever seen one of Apple's iPhone service manuals, you'll note that they use the exact same tool as iFixit (Apple calls it a "black stick" and iFixit dubs it a "spudger.")
If my screen is giving me white lines and occasional ghost clicks on the right side does anyone know if it’s possibly only a faulty cable vs needing a full screen swap? I’d rather not waste a perfectly good screen.
what if my phone wont turn back on even after following all these steps carefully . i even put the old screen back on and it wont turn on still???
what if the batery was not disconnected?
Re-connecting display data cable was trickiest part for me - my eyes are old! I had to do it a couple of times as the cable had indeed popped off its connector, resulting in a black screen when turned on. Needs lots of patience and good lighting, also helped to have a really good look at plug and socket under magnifying glass to see how they fit together, and to reconnect using finger rather than tool - this helped me feel when I had eventually connected properly.
Followed steps to a “T” - got phone up and running successfully! However, there is a vertical line in the center of the screen that changes color with whatever button is being displayed in the center screen. For example, a dead battery icon shows a red vertical line, acknowledging a blue “OK” button when setting up the phone shows a blue vertical line, etc. Essentially it’s not a black screen or white lines. Could it be that the display data connector is not correctly attached or perhaps a faulty connector?
i went through all the steps, except i forgot to disconnect my battery, now my phone has lines and i can see horizontal pixels (as in the images are not smooth anymore). when i performed power cycle, the screen is still the same. What can i Do
During the reassembly, the ordering of the ribbons on the iFixit part at the top of the phone were mis-layered. The display data cable connector and the digitizer cable connector (steps 18 and 19 in the guide) were swapped in there ordering. This was fixed by my disassembly of the camera bracket following the guide 'iPhone 6 Front-Facing Camera and Sensor Cable Replacement'. This allowed me to fix the layered ordering of the connectors.
-
-
-
スパッジャーの平面側先端を使って、デジタイザーケーブルのコネクターの接続を外します。
Reassembly was harder than other i devices I have worked on. A bench light from the side helped a lot with the first cable, the digitizer. The others went a bit better in this crowded space. I had screen lines when testing it out before closing the top, so reinstalled all four connectors here with the aid of a side light and happily, that worked!
How many times can i peel these connections without braking the connection between screen and logic borad
falken1337 - 返信
Is this the breaking down process for the Verizon version of the iPhone 6s? I know the flex cables were different for other versions and with my last iPhone I made the mistake of ordering one that had completely different cable places. Someone please send me a link to one that fits the Verizon 4.7 display!!!
This break down isn't for a 6S. It is for a plain 6 (no S). Yes there is some differences because of the 3D touch feature.
So what is the fix if there is digitizer damage? Replacing the screen?
After reinstallation, I am encountering issues with an area of the screen that is not responding to touch. Everything else works fine.
Anyone have any ideas how I should proceed?
I had the exact same problem. I tried 10-20 times and the screen had vertical lines in the middle and the touch function didn't properly work. Then I discovered the issue. I had damaged the first connector (lcd connector) when reassembling the screen.
What I did was to carefully with a tweezer press the damaged ones in to the correct position. Than I heard a solid "click" when I attached it and I got really hopeful.
I finished with the rest of the connectors and put the bracket and screws back to Place and hit the powerbutton. IT WORKED!
So, look at the first connector with a magnifying glass, the shortest one, closest to the camera. Maybe I got a little lucky when I managed to fix the connector without replacing it. Good luck. I feel your frustration all the way to Sweden.
// Simon
I mean digitizer Cable= the first connector (lcd connector).
I had the most issues when reassembling with this step. The plastic tool is a fail in my experience since not enough pressure could be applied using it. I just ended up using my finger and that worked 10Xs better. My advice, watch a few YouTube videos of people reconnecting the connectors and you'll be fine.
I have dis-connected and reconnected several times with the white line appearing each time. The screen however seems to be responsive. I did lose a 1.2 mm screw. Is it the missing screw or did I damage the digitizer connection?
I had the exact same problem. I tried 10-20 times and the screen had vertical lines in the middle and the touch function didn't properly work. Then I discovered the issue. I had damaged the first connector (lcd connector) when reassembling the screen.
What I did was to carefully with a tweezer press the damaged ones in to the correct position. Than I heard a solid "click" when I attached it and I got really hopeful.
I finished with the rest of the connectors and put the bracket and screws back to place and hit the powerbutton. IT WORKED!
So, look at the first connector with a magnifying glass, the shortest one, closest to the camera. Maybe I got a little lucky when I managed to fix the connector without replacing it. Good luck. I feel your frustration all the way to Sweden.
I had three screws left when I did some repairs on my iphone 4 and that didn't matter. It worked like a charm :)
// Simon
I mean digitizer Cable= the first connector (lcd connector)
Be especially careful in this step or your iPhone won’t respond to your touch after reassembling.
My home screen button is not working after reassembly, not only the Touch ID but the actual button doesn't work. I have iPhone 6S . How can I fix this? Thanks
Sissy -
I noticed that I had bent this connector. Barely. After about a dozen connect/reconnect attempts, bent it back and everything works as intended. Prior to bending it, was getting white lines and touchscreen was unresponsive. After bending and reconnecting, fired up exactly as it had prior to disassembly.
I had the exact same problem. I tried 10-20 times and the screen had vertical lines in the middle and the touch function didn't properly work. Then I discovered the issue. I had damaged the first connector (lcd connector) when reassembling the screen.
What I did was to carefully with a tweezer press the damaged ones in to the correct position. Than I heard a solid "click" when I attached it and I got really hopeful.
I finished with the rest of the connectors and put the bracket and screws back to place and hit the powerbutton. IT WORKED!
Thank you Simon - this was really helpful. I too suspected I had broken the digitizer connector also. Tried reconnecting 5 times before I saw your comment with resulting white lines and no touch screen. Applied moderate gentle force using long nose tweezer across width of connection and clicked and worked. Glad I read the comments as was looking at new digitizer purchase prior to reading your comment.
I Had two repairs on separate phones, and got sloppy on the second one and pressed the middle of this connector with my finger. It bent the right side ever so slightly. I thought I’d read the comments before ordering a new screen and I’m glad I did. I then took a closer look and saw on the right side the two rows of points at the end weren’t running parallel anymore. Using the tweezers from the kit I squeezed the misaligned rows back true and tried one more time to install, focusing on the right (previously damaged) side first to ensure it snapped into place. Voila! All is well.
Excellent instructions, great products, and REALLY HELPFUL COMMENTS! Thanks!
I’ll strongly agree that this is the most difficult and time consuming step of reassembly. As Pau has stated it is vital that the cables are layered in the correct order before you begin attempting the connections.
Check back to Step 21. It’s not clear from the photos, but the ribbons can be run under each other. The display connection and the home button connection can become transposed at Step 21.
If in doubt, check the size of the connections and re-order accordingly.
Dom Gernon - 返信
After reassembling I have 3 letters on the virtual keyboard that don’t do anything anymore. It is the B, H and U. Could this be related to this (another) connector. (the screen is also broken but this time I only replaced the battery an it worked before this
Bonsoir je voudrais savoir si c'est possible que l'a ou l'on coche la nape de l'écran tactile peut se de fixé
Et comment faire si c'est le cad
My first attempt resulted in loss of touch response to a vertical column of app icons on the screen. From the Safari app at the bottom to the top of the screen, every app icon in that column was unresponsive to touch. Couldn’t open them. And this was true for every screen, including a corresponding bundle of letters and numbers in the same screen location when trying to use the keyboard. I did a hard reset any number of times without success until I finally realized the pattern: the vertical column of unresponsiveness.
I remembered the caveat about connecting the digitizer cable — don’t press the center, do each side — and figured I must have made a bad connection. So I opened up the case again and went all the way down to the digitizer connection and did it more carefully, as advised. Sure enough, problem solved. Take the precaution.
Replacing the digitizer cable was accomplished by moving the base to line up with the flexible connection then using a finger to press into place feeling that the connection was correct worked, then pressing into place with a click of confirmation. the rest of the cables fell into place afterword.
-
-
-
リアケースからフロントパネルアセンブリを取り外します。
Is it not possible to start here? Just leave the screen assembly attached and only replace the home button?
Please don’t do that. You will break your cables almost assuredly if you leave it attached to your phone trust me
Is front camera supposed to be attached to the digitizer?
I successfully left the screen assembly attached while replacing my battery. I even had my adhesive strips break off and had to spray isopropyl underneath the battery and then grab the strips with tweezers, but I was still ok. I can see why it’s recommended to detach the screen assembly, but if you rubberband it to a stable support and are careful not to jerk the lower case, it’s possible to accomplish the repair while skipping several steps.
-
-
-
本体側面のSIMカードトレイの小さな穴に、SIMカード取り出しツールかペーパークリップを挿入します。
-
奥までぐっと押し込み、SIMトレイを開いて取り出します。
Why isn’t this the first step in the process? Seems unnecessarily risky to fumble with popping the SIM in and out when you’ve already opened up the phone.
If you don’t have something small enough to open it, you can use the lever when the screen is off.
-
-
-
-
iPhoneからSIMカードトレイのアセンブリを取り出します。
After reassembly phone would not detect SIM Card.
During repair while components were out of phone I used that opportunity to straighten the back case that was bent. While straightening the back case I bent the thin edge of the back case by the SIM Card slot. SIM Card would click into place and seemed to make a good connection but the phone would not detect the SIM Card. After really straightening the back case by the SIM Card slot almost back to cherry the phone would now detect the SIM Card. The tray has to fit really flush with the case.
My flashlight has stopped working altogether. It was intermittent for a while. I believe them to be original. When I try to use the flash on my camera app, it flashes weakly but not enough do really help. Any chance the flex went bad or is there a logic board issue? My other two iphones with the same apps and the same updates are not having any problems.
Bonjour j'ai un iphone 6 problème réseau
-
-
-
スパッジャーの平面側先端を使って、Lightningコネクターケーブルの接続を外し、スピーカーの邪魔にならない位置に折り曲げます。
How vital is that foam looking piece on top of the antenna cable connector? It popped off when I was lifting.
Same thing happened to me. I hope it's not too vital!
If the foam piece on top comes off (which it probably will), replace with a tiny piece of electrical tape to maintain electrical isolation.
-
-
-
スパッジャーの先端を使って、ロジックボードのソケットからアンテナケーブルを持ち上げます。
ripped off the foam on top while trying to pry it out. Also careful not to pull the entire logic board while doing this
Ah, isn't that a bugger to get back in place after finished repairs! Be patient! Position and gently press. If no click, reposition and try again... time an time again. Did I say, be patient?
Yes to this. Listen for that satisfying click…
Christa -
I found that this is not the best tool for removing this component.. The connector is round and the the pointed tip of the tool makes it very easy to slip off the connector and do damage to other components. As I was trying to disconnect the connector, the tool slipped and tore the wire out of the connector. The flat end of the spudger seems like it would work better.
Yes, the flat end of the spudger works definitely better.
(I had to do this step to replace the antenna flex cable)
I couldn’t pull this connector at all. Tried tip of spudger, flat end of spudger, my nail (which even got a dent in the process ^^) and finally the tweezers (I know, risky) but the little bastard wouldn’t come off…
I managed to pull out the logic board very carefully and twisted it in the least straining way for the cable to access the flex cable on the back.
In the end everything was fine and the repair worked ok.
Switching this step for this repair can be ok if you are extra carefull with twisting the cable
Found it easiest to go beneath the cable (on the opposite side from what’s shown on the photos) and leverage from there, using tip of spudger.
Seconded. After a while of trying, I decided to do this and it came off instantly.
YESSS thank you so much! this worked great!
What antenna does this cable attach to? I’m trying to determine if this would be the cellular antenna.
I second this… What antenna is this? Main celular radio? BT? so what is the flex antenna for then???
If you just need to look under the logic board to check for corrosion you can skip this step and just maneuver the logic board afterwords (I accidentally did this and it worked just fine and I didnt’ have to worry about putting the wire back in.
I lost the little black foam on top of this connector :(
It was not very well glued, I think I lost it while removing the whole logic board. I put some little piece of insulating tape. It seems everything works after reassembling, so…
i broke this cable. Lol.
until now “no service”. haha
Ripped off the little black foam on top of it.
On reassembly i simply put the foam on top of the connector. The process was working smoothly at first, but the day after tomorrow i have to open my iPhone 6 again because found it in “No Service” state and cannot find wifi :( !!!
I tried to once again assemble signal connector, yet with a full step from assembly to reassembly while cleaned the dust inside.
Thank goodness it worked after all the process. Whew
This morning I woke up with the same issues. No Service and couldn’t find any wifi signal.
And the unwanted thing happened, when trying to pry that small gold cable …… It’s plugged out together with it’s coupling on hte logic board LOL
Now that old iPhone 6 can’t come back to life. Sad
%#*@! I left the antenna cable under the logic board!!! Well, down I go again.. LOL
Did the same. DONT FORGET when the loci board back in to the phone to lift all cable including especially this little antenna one!!
(I got 10 steps further along before I realised I came to this step in the reassemble and realised my mistake).
I totally lucked out reconnecting this. It clicked in immediately lol
math_blows - 返信
Re-assemble: agree most difficult process. Patience required. Used magnifying glass and wore my generic reading glasses. Found that the connector went further up to the right than was required. For what it’s worth: used 2 spudgers - one to push it back towards its cable and the other to push down.
-
-
-
次のプラスネジをケーブルブラケット上部から取り外します。
-
2.9 mm プラスネジー1本
-
2.2 mm プラスネジー1本
I reached till this step to replace the antenna cable using the toolkit I ordered with the cable from ifixit shop. But I could not open the orange marked screw in this step and had to roll back the whole thing as I did not want to destroy the screw by applying force. It seems to me the #000 philips screw driver bit I got is poor quality as I had trouble opening the small red screws as well.
Any recommendation for better quality #000 Phillips screw driver?
Put the phone on a solid surface (table or countertop), hold the screwdriver exactly vertical, press it down hard on the screw head, and turn. That’s all it takes! You’re not going to hurt anything by pressing down firmly. Some screws just require a little more force, and using a different screwdriver won’t change anything.
-
-
-
スパッジャーの平面側先端を使って、パワーボタンとフラッシュアセンブリケーブルコネクターをソケットから持ち上げて外します。
-
ボリュームコントロールケーブルコネクターをロジックボード上にあるソケットから持ち上げて外します。
I found that when reconnecting the smaller connector, sliding it from the top of the phone towards the battery was the easiest way to get it aligned.
Agree with Colin Lacey above - slide the small connector from the top of the phone towards the battery ( yes, counter-intuitive) and I felt a click and was able to push down and make the connection.
if permenant damaged is caused what should one do next?
what did you do? I think i mess up
The small connector corresponds to the side button that activates or deactivates the sound. In case of not connecting it well, this button will be disabled.
davidlluch - 返信
I have an iPhone 6 model model A 1549
it doesn’t turn on because it got wet
Do you repair this for me?
-
-
-
次のプラスネジをWi-Fi アンテナから4本取り外します。
-
1.5 mm ネジー1本
-
1.4 mmネジー1本
-
2.1 mmネジー2本
unable to get 1.4mm screw out with included 000 ph driver. Any ideas?
I´m unable to remove all 4 screws with the tools provided
The 1.5 mm screw got stripped. Any ideas?
I can’t get the 1.4 and 1.5 screws out even after reading how to unscrew properly. Worried I am stripping screws.
Try a #0 driver and be patient. Had to push down a bit to ensure connection with the screw but worked for me.
Weil ich sehr schlechten WLAN- und Bluetoothempfang habe, wollte ich die Antenne tauschen. Nachdem ich alles wieder zusammengebaut hatte, wurde der Empfang noch schlechter.
Mir fiel auf, dass sich die Scheibe unter der 1.4 Schraube gelöst hat. Deshalb vermute ich den schlechten Empfang. Kann man diese Verbindungsstelle zur WLAN-Antenne löten?
Para que serve esta peça fixa na placa?
-
-
-
iPhone本体からWi-Fi アンテナを取り外します。
This isn’t the WiFi antenna - I suspect its for GPS reception. Removing this antenna makes no difference to wiFi or Blue tooth signal strength
Jon Harris - 返信
-
-
-
基盤ブラケットから1.6 mmのプラスネジを2本取り外します。
I have assembled an iPhone 6 and it seems that everything goes fine except the NFC. The phone does not respond to the POS when using Apple Pay. I think there should be some poor connection between the logic board and NFC antenna. If so, which screws should I scrutinise to fix this problem? Thank you.
These two little screws are in pretty tight.
I could not for the life of me get the screw on the left side out! But with the right hand screw out I was able to proceed and lift the logic board out without removing the bracket.
From my experience - coffee was a great idea the morning I started working on this project, but if caffeine in any way makes your hands shake, reassembly will be difficult! I had to put this part back in place using the tweezers, and then keep the tweezer points in the top right screwhole while I screwed in the left screw, because my screw slipping kept making the part fly off. This helps get the part in place for the 2nd screw to be put in easier.
Aaaaaaand this is where I gave up. These won’t budge no matter what I do :P
-
-
-
直角型のロジックボードブラケットに留められた次のプラスネジを外します。
-
2.6 mm ネジー1本
-
1.3 mmネジー1本(iPhoneのサイドフレーム上部に水平に留めれています)
Is there an easy way to remove the 1.3MM screw in here I can't eem to remove it by hand.
I'm having the same problem, did you manage to remove it?
Came off easily enough with the flat side of the spudger
Adam Gal -
I faced it today, You can use a 1.5mm flat head screw driver to remove it. The guide mentions this in step 36 for stand-off screw. Hope iFIX changes the guide to indicate the flat screw driver or remove the step here.
Not sure we're talking about the same screw—this is definitely a Phillips (as shown in the photo), not a standoff. It's usually easiest with a dedicated Phillips driver, as opposed to the interchangeable bit drivers, which are fatter and a little tougher to angle in correctly.
Jeff, you are right, The instructions indicate a flat head screw driver. Since I ordered the kit with the part, it is easy to assume this will be part of it. My revised comment would be to highlight that the kit would not include it if pairing with the antenna cable replacement part order. Regarding the screw, big picture did not show the screw in orange, I mistook it as the one in later step. You are right it seems to be Phillips as shown in second small picture.
I wasn't able to remove horizontal screw, but was able to continue on with the remaining steps with no problems. The logic board slid from below the angled logic board bracket.
I wasn't able to remove the horizontal screw either and moved on with no problems as well. Thanks for the tip!
Also unable to remove the horizontal 1.3mm phillips screw, but it was OK as it didn’t prevent me from proceeding with later steps.
Same for me. Couldn’t get it out, left it in - worked perfectly.
And by the way - thanks sooooo much for the comments guys - helped me a lot through this repair!
Wusels -
Thanks for your comment! I also did what you suggested and it worked perfectly well.
Anja S -
I’m struggling to remove 2.6 mm screw. The head seems to be very worn. It’s the only screw left, holding the board to the case. I tried to unscrew it at different angles, applying pressure. Nothing is working. Any ideas how to remove it?
Stripped screws are a nightmare and there are no guarantees. If it’s only mildly stripped, you can try going up one size on your screwdriver and using a good amount of downward pressure. But if it starts to strip again, stop before you do any more damage. Try some of the additional techniques in the stripped screw guide. Good luck!
This is not just a mechanical bracket, but the upper cellular antenna tuning connection to the top bezel antenna. Thus it needs a good electrical connection, or your cell coverage will be bad.
To elaborate; When reassembling, the 2.6mm screw needs to go in quite tight, since it squeezes a small rise in the “angled logic board bracket” (really a connector between antenna tuner and the top bezel antenna) against a small gold pad on the main logic board.
This electrical connection needs to work, else the dynamic antenna tuning won’t work - which will cause problems in radio band switching (for instance between 3G and 4G, or different 4G bands). A typical indication that you have a problem here is that it can temporarily be “fixed” by squeezing the top of the phone. It’s really a crappy design choice by Apple.
Dormouse -
I also proceeded without removing the 1.3mm screw and continued on with the remaining steps with no problems. Gar Galen (above) was correct - “The logic board slid from below the angled logic board bracket.”
Couldn’t get the 1.3mm screw out but it didn’t stop me
i broke this part, under which name can i find it online?
bowoo king - 返信
Omg that 1.3 mm screw was the bane of my existence upon reassembly
math_blows - 返信
-
-
-
直角型ロジックボードブラケットを取り外します。
The right side of the bracket may be under some black tape that may need to be removed to allow you to remove the bracket.
Doug Whyte - 返信
Yes, further, It never came out for me. But, I lifted slightly and that was enough for board to slide out. Did not want to force the palstic/rubber part to avoid breaking it.
I discovered this bracket was broken in the middle when i removed it. I continued the tear down and replace the antena. It seens that it did not solve my GPS issue… could this angle bracket be the reason that GPS stopped working? Is this part available to sell?
Tuoa lafay - 返信
-
-
-
アンテナインターコネクトケーブルをロジックボードに留めている1.2 mm プラスネジを1本外します。
Make sure to tighten these screws well when reassembling so you don't have issues with cellular reception. Had a phone that wouldn't connect to cellular connection after a screen replacement. I tightened the screw and it started working again.
This screw was missing from my phone. Could this be what is causing the bluetooth/GPS/wifi issues?
The Screw and Step´s 34 “antenna interconnect cable” are missing in my phone. Could this be what is causing the bluetooth/GPS/wifi issues?
-
-
-
スパッジャーの先端を使ってアンテナ用インターコネクトケーブルを持ち上げ、ロジックボードの邪魔にならないように折り曲げます。
Argh — easy to forget on the reassemble and even easier to break! A “do the reverse” of these instructions really isn’t sufficient.
Soo easy to forget, and I still don’t know how to put this back on. I’ve done several housing swaps on newer phones and this is so confusing!
-
-
-
スパッジャーの平面側先端を使って、ロジックボードに付いているソケットからカメラ用ケーブルコネクターをまっすぐ持ち上げます。
-
ロジックボードの邪魔にならない位置にカメラ用ケーブルを折り曲げて固定します。
I found using the pointy end of the spudger was better to use here.
I found the hooked end of a hooked spudger was the only thing that worked for me.
Prying on the side with the pointy end of a pair of tweezers works fine too.
-
-
-
背面ケースにロジックボードを留めてている次のネジを取り外します。
-
1.9 mmプラスネジー2本
-
2.3 mmスタンドオフネジー1本
The standoff screw was difficult to remove because a normal phillips head screwdriver is the wrong shape. I had to use a small flat head screwdriver carefully to get it off.
I absolutely can not get this standoff screw off. Searching the web now for "iphone standoff screw" I see that there are specialized screwdrivers for getting this screw off. I wish I had one right at this moment! Anyway, an improvement to these instructions would be to mention this standoff screw upfront, so that one can be prepared with the right screwdriver before starting this job. I'm stuck at this step right now. A small flathead screwdriver just isn't cutting it.
Hello. I used a 1.5 mm flat screwdriver from iFixit Pro Tech Toolkit. It worked easily for me.
Never use the pointy end of the spuger to put back the standoff screw in place. It can break off some plastic in the hole since it’s threaded inside and you will have major problem to remove it. If the standoff scew isn’t tight enough when you put it back on, it’s not a big deal since you will put another screw in its center at the end of the rebuild and you will be able to tighten both screws at that point. Just don’t use the spudger to put it back on. That standoff screw is a poor concept.
Just a side note; I understand the list of tools required for this job includes a “Flathead 3/32” or 2.5 mm Screwdriver,” but wanted to mention that a Wera 2.5 mm diver is too thick (0.4 mm) to do a good job of removing the standoff. With a fair amount of pressure I was able to make it work, but as others have pointed out, I would expect a 1.5 mm flathead driver to have a thinner head (0.23 mm from Wera) and be more suited to the task, barring having an actual standoff driver.
Genius right here. The short, flat part slides right in!
The tool to remove this part does not come in the ifixIt New part Toolkit for this tutorial. That was an issue.
Sorry, it actually does. But it comes inside the new part package, apart from the other tools. I only opened it in the last step.
I used a pair of tweezers, A bit risky, just be careful. Line it up with the grooves and turn slowly
I used screw driver for eyeglasses….
I used screw driver for eyeglasses….
I used the flat side of the Spudger for this and it worked completely fine
-
-
-
スパッジャーの平面側先端を使ってロジックボードの端にあるバッテリーコネクターをゆっくりと押し上げます。指で十分掴めるほど持ち上がったら止めます。
Where is a safe place to put the logic board one removed?
Where can i buy a motherboard for my iphone 6
Thankyou ifixit..
-
-
-
ロジックボード端にあるバッテリーコネクターを持ち上げて、背面ケースから外します。
I've been told that the problem with my phone is the logic board. Can any standard logic board be swapped in for a defective one, or are there any additional steps needed to get the phone operational?
If you are following these instructions for the purpose of replacing the commonly failing wifi antenna cable, you will find it on the back of the logic board when you lift it out. You will need to fiddle around a bit to find the right position for the 4 connectors - they are microscopic - and you will hear tiny little clicks when they go in the right places. Check by looking at the board and antenna sideways, to see that they are all in place, before starting reassembly.
good tip, to look at it sideways to confirm seating of connectors.
Christa -
5-6 days from salt water damaged so this process will work so or not and this is my first time so i m afraid…i will go ahead or not?
When re-assembling make sure all the connectors remain above the logic board. Especially the power button and flash assembly connectors shown on Step 26.
When re-assembling make sure all the connectors remain above the logic board. Especially power button and flash connectors shown in Step 26 are tricky.
6 cables to keep above the board when re-inserting: two on top left, one top right, three at the bottom.
Don’t forget the the antenna interconnect cable, also in the top right, should be above the board.
What happened to the 00095-A part? Did it just disappear?
Ryan Scott - 返信
My phone is Iphone6, issues no sound at earpiece, new earpiece same issues, does replacing logic board solve this problem? Do i need to do anything i change my logic board? Like my data.
Hello we need full information of board if we seems some problems like memory problems and wifi problem we need all names of board every accessories
-
-
-
バッテリーの右端下から第1のバッテリー粘着タブを剥がします。
-
-
-
粘着タブからの抵抗感が増したと感じたら、バッテリーの左端下あたりでゆっくりと引いていきます。
-
粘着タブをバッテリー左端の上方に向けて回すように引っ張っていきます。バッテリーと背面ケースの間からゆっくりとタブが出てきます。タブがiPhoneから完全に出たところで作業を終えます。
-
2つの粘着タブを無事に取り出すことができたら次の2つの手順をスキップして手順46から作業を始めてください。
-
粘着タブがバッテリーの下で切れてしまい、取り出すことができない場合は、この下に表示されている次のステップをご覧ください。
im so confused, with the whole battery thing, do you use the same battery? or a new on? because the tabs i saw how u had to pull them off. will the battery will work without the glue tabs?
The glue strips are a separate component and can be replaced independently of the battery. Yes, the battery will work without them. However, it’s a good idea to replace your battery anyway. In particular, if the battery is even slightly deformed during removal, it may not be safe to re-use.
-
-
-
背面ケースからアンテナインターコネクトケーブルを丁寧に取り外します。
Anyone know what the Antenna Interconnect does? I replaced my rear housing with a clear plastic one I ordered from someone off DHGate, and they didn't have the screw mount for that interconnect, so I wasn't able to re-attach it. I couldn't figure out what it does, and the phone seems to work without putting that screw back in. I'm suspicious that bracket must do SOMETHING, right?
Just conjecturing but it has a capacitor on it and must connect a transmitter chip to an antenna. Your phone would work without it but I would expect its range would be reduced.
Doug Whyte - 返信
-
-
-
パワーボタンブラケットから2.2 mm プラス#00ネジを2本取り外します。
When reassembling, do not make these screws too tight. Check power button for proper movement and clicking before continuing to reassemble the whole %#*@ phone like I did.
-
-
-
メタル製バーの電源ボタンを掴んで背面ケースから引き抜き、取り外します。
-
電源ボタンは接着性ガスケットが付いたケースに留められているので、薄膜を裂かないように注意して引っ張ります。
-


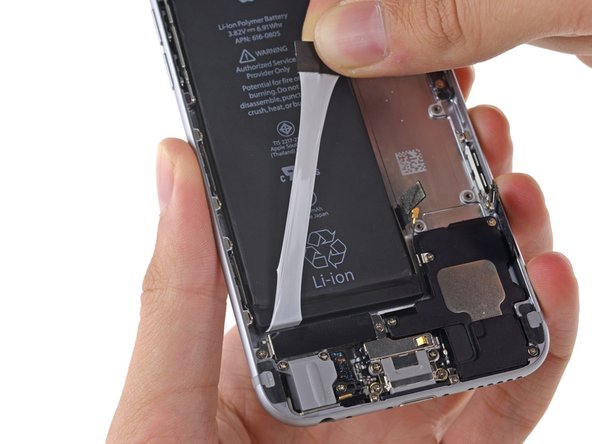


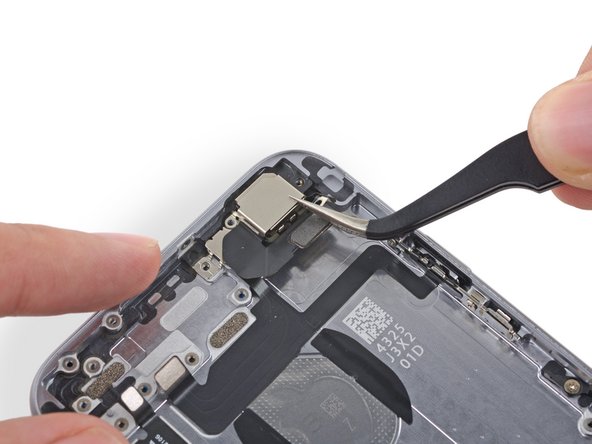


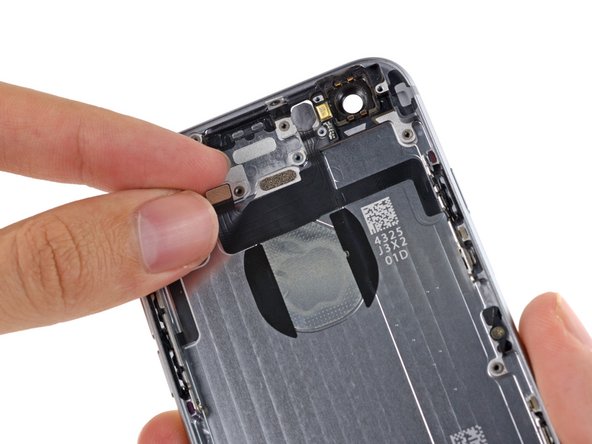


デバイスを再組み立てする際は、このインストラクションを逆の順番に従って作業を進めてください。
デバイスを再組み立てする際は、このインストラクションを逆の順番に従って作業を進めてください。
90 の人々がこのガイドを完成させました。
以下の翻訳者の皆さんにお礼を申し上げます:
100%

Midori Doiさんは世界中で修理する私たちを助けてくれています! あなたも貢献してみませんか?
翻訳を始める ›


13 件のコメント
Ive recently done a full housing change on my iphone 6 plus to a black one since doing it the power button doesnt work its rock solid i used original power button (space gray) and original flex cable once istalled it just wont press
The only way it works is if i leave the power button screws slightly loose which is a pain becasue the button loosens itself anyone had anything similar or is it the way its been installed ?? All other buttons work correctly mute switch and volume buttons
Hello marcusdean2009 this problem occurs because the new carcass have the power button screw hole a little bit long than the original one. And yes, you will have to let the power button screws slightly loose to make the power button work
My power button is a little bit loose. There's still clicking sound but not same as the other normal button,the button also seems 'into' or 'concave ' compare to normal button.while the power button with long shape also seems just have a clicking sound when I press the middle part of button but not the upper and lower part of button.when I press the upper and lower part,it is soft and without clicking sound and springing feel. I used to replace the flex cable, but it still loose,is it the matter of the quality for the flex cable or the improperly attach of rubber gasket or the scuffed of little metal tip of the power button? Please reply me.
Great job on this guide. What could have been a pain in the butt has been an easy fix/replacement thanks to this guide. Thank you for taking the time to do this. Just plain awesome.
Another great guide. definitely one of the more difficult repairs that I've done but if yours careful, follow the guide, and isolate your screws and parts, it's simple.
I use a deviled egg travel tray to keep my things divided. it's wide and has a lid if you need to stop in the middle of a repair. keep the animal hair and dust out at least.
Hi. Excellent guide!!
Since opening my phone to replace the battery, everything works fine except the power button... it still click, but doesn't do anything. Won't be able to power off or reset the phone, or take screenshots! Is there anything I should check? What could I possibly have broken?
hello guys, i have a problem with the installation of the new circuit of the power button, the power button must have the clip facing up or down? more to me and seemed to have to pay off the frets to its support because even the original had been settled, I hope you can help me.
Best regards
Great guide I was able to fix mi iPhone 6 power button and also I change the housing for a red one
ROSNEY2005 - 返信
thanks a lot realy good job i have non more words thank
@lucisxcaelum No, but there’s a separate guide for the 6s power button.
When reconnecting be VERY careful not to over tighten. The connectors on the screen that these 3.6mm Pentalobe screws lock with are notorious for breaking off
Blair Tryba - 返信
what do i do if ive managed to tighten them too hard and now they wont come off?
kristian686 -
Before opening the phone, I gently warmed it using a buckwheat heating pad. This made removal of the adhesive strips (steps 20 to 24) easy.
Howard Bales - 返信
Exactly what I did as well, the gently warming made the adhesive removal work like a charm. The heat as well help to lift the screen easily, no need for the prying tools for me to open te phone.
For the adhesive removal just pull it slowly to the bottom of the phone and keep in under tension.
On reassembly, turn on the phone after getting all connectors back in place to verify all is working fine before putting all screws back in their spot.
Maarten Vergauwen -
Thanks for the suggestion! I heated up a hot/cold pack, and it worked great.
Linda Chandler -
I put mine back together but mine looks very different than this one. Why is it that when I make a call I cannot hear through the ear piece and have to put it on speaker. Also my screen doesn't go black when my face touches it
Bailey Wilson - 返信
Hey Bailey, which repair were you attempting? Is it possible you have a 6s, or maybe a 6 Plus? You may have better luck with faster troubleshooting if you post in our Answer Forum!
Sam Goldheart -
See its a long time ago you had this issue. You can try to remove the cable from front camera/sensor/earpiece from the motherboard port and gently push it back on. All the problems you relate to is thru the same cable. If this dont solve your problem, check if the earpiece is correctly placed onto the polarity poles, and that the proximity sensor is lying right down into the corresponding socket. If something is blocking the sensor, yeah then the screen wont turn on/off when you put it onto your ear.
Kenneth Hilstan -
I see in the preamble that when you replace your logic board, you would lose touch id functionality, so my question is what if you have the homebutton and thus the fingerprint reader for the logic board replacement, would touch id work?
socratesmens - 返信
The guide for the iPhone6 battery replacement needs to be revised. There are a couple of issues.
1) While the battery cover has two screws, they are different lengths. Since they are very small, it can be hard to see the difference (until one tries to screw the smaller one into the longer hole). The video needs to mention this.
2) The application of the adhesive strip if very different from what is mentioned. Also, there is a “one piece plastic” applique, and it is very unforgiving. The video should show this process in more detail.
I believe the attention to this detail would help folks correctly install their iPhone 6 batteries, and with the recent Apple disclosed battery problem, would continue to show that iFixit is very committed to the end-user.
Gary Long - 返信
I felt a bit silly getting stuck at the end of a long repair, unable to screw one of these last screws back in. What worked was gently pinching the phone above and below the screw, to make sure the screen and back were perfectly aligned.
Matt D - 返信
Apple edits posts on their Communities website that link to this fix page justifying as follows:
“We’ve edited your post because following the procedures at the site you provided may lead to damage to the user’s device.”
What is certain is that following Apple Support’s advice of resetting our phones again and again never works whereas this fix works. Apparently Apple does not want people to know that their hardware fails and can be fixed, because then they would need to explain why they don’t offer neither the fixing service nor the fixing advice by directing us to this website.
Brice - 返信
Before you get started, I suggest you confirm you are replacing the correct camera. If you are thinking of a camera, the front is the side of the device with the main lens. On an iPhone this is actually known as the rear facing camera. Once the phone is disassembled your orientation can be distorted and it is not that hard to fail to realize your are replacing the wrong camera. Doh!
William Miller - 返信
I found it very useful to use a magnet sheet when doing these repairs. I use electrical tape or a sharpie to make a grid, and place each micro screw in a separate box on the grid.
I work directly over the magnet sheet, so that if something drops I have a better chance at not losing it.
If you do lose a screw, go over the work area with a fridge magnet. It will pick it up if it hasn’t popped too far away.
Megan Telliano - 返信
I agree. The Magnetic Project Mat makes your project incredibly easier and keeps your screws/parts organized. Here is the link for anyone interested:
Magnetic Project Mat
Cooper -
or some masking tape with sticky side up and the ends folded underneath on a piece of paper, then you can write notes like
“1.4mm for FOO bracket →”
“7x2.3mm for EMI cover, different one by camera →”
The arrows point as appropriate.
If you drop something, put a flashlight on the floor & shine it across the floor — Turn off ceiling & other lights off to maximize the shadow from the flashlight.
Bass Clef -
These screws are tiny, and the first two are the biggest of the lot. Get a magnifying glass or good reader glasses.
Jennifer Porter - 返信
Which torx is this T?
klemenecanze - 返信
The screws are no torx screws they are Apple Pentalobe screws. You need to buy a Pentalobe screwdriver seen above.
Claes -
I have to use the P2 right?
Aman Singh - 返信
The best advice I can give is not to perform this operation over carpet.
Bruce codding - 返信
I'm an amateur, but I was able to replace the parts almost perfectly while looking at this explanation, thank you very much.
irichin.3.26 - 返信
was fairly easy more nerves than anything, one thing one should have on hand is alcohol just in case its needed. also if one doesn’t get the entire tape strips out, use the alcohol like suggested and lift the battery up. Then can grab the remaining tape strips with tweezers and pull it out. Easy to put back together just make sure the connectors are in. The screws are tiny so take your time. I plugged it in and it started charging and it worked. Great to have my 6 back for a trip as I wanted to use it for the camera, also my game phone so nice to have a battery that lasts. Yes having a flat place to put the parts and put them in separate area so they don’t get mixed up. It took about a hour with hunting for a spare bottle of alcohol.
Greg Wischmeyer - 返信
The first step should always to be to backup your phone as there is always a slim chance that even a simple battery replacement may render the phone inoperable and data on it lost.
Jim - 返信
Please do not forget to remove the SIM-Card tray!!
Steffen Albrecht - 返信
I didn’t need to remove my sim card tray when I did my iPhone 6 battery replacement. Why do you suggest to remove it?
Jim -
You dont need to remove sim card while battery replacement
bertan - 返信
Did mine today, with iFixit battery and iFixit tool kit. Did not need suction cup, to open case, as it had partially sprung open on left, as a result of a badly swollen battery. Supported base and screen with a bookend and rubber bands. This kept these parts at a 90 degree angle, so that screen did not need to be removed. IFixit screwdriver tips were perfect fit. Somewhat difficult to remove battery adhesive strips, but slow and steady got it done, after mild heating with hair dryer. Took about 3 minutes to reposition battery connector…just a wee bit tricky, to position correctly. Was careful to place top of screen in place first, and remainder snapped into place with light pressure, and replaced the 2 pentalobe screws.
Will highly recommend iFixit for such a repair. Repair kit and battery, are first rate. I give this an 11, out of 10.?
Len Drasin - 返信