はじめに
ご存知ない方のために、Switchの新モデルNintendo Switch Liteが登場しました。お財布に優しくするために、機能も少なめです。そして、カッコいい新色もお目見えしました。早速ツールを手に取って、Switch Liteを分解しましょう。
Nintendo Switch Lite分解ビデオを日本語字幕付きでご覧いただけます。YouTubeアカウントにログインして、画面右下の設定から字幕をクリックして、”日本語”を選択してください。
最新分解ニュースや修理ビデオを入手するには、私たちのチャンネルを購読してください。
InstagramやTwitter、Twitter 日本語版もしくはFacebookをフォローするか、定期配信されるニュースレターの方がお好みなら、こちらからご登録ください。
必要な工具と部品
ビデオの概要
-
-
何ともワイルドなSwitch Liteが登場しました!Nintendexはこれに付いて何を言及するのでしょうか?
-
カスタムNVIDIA Tegraプロセッサ
-
内蔵 5.5インチ容量性タッチスクリーン"LCD、解像度 1280 × 720
-
内蔵ストーレッジ32 GB (microSDHCもしくはmicroSDXCカードを使った追加ストーレッジで最大2TB)
-
802.11 a/b/g/n/ac Wi-Fi, Bluetooth 4.1, NFC, USB Type-Cポート (充電のみ)と3.5 mmオーディオジャック
-
内蔵された加速度計とジャイロスコープ
-
充電可能なリチウムイオンバッテリー、バッテリー持続時間は3-7時間
-
取り外し不可のコントローラー
-
-
-
分解を始める前に、X線版ゲームジーニーの電源を入れます。友達のCreative Electron提供です。
-
現代スマートフォンと比べると、このデバイスのベゼルは広大です。そのため、iFixitの人気分解ウォールペーパーには適用外です。これをスキンにしたらどうでしょうか…
-
-
-
新ブライトイエローの2つのJoy-Conを外そうとして、一生懸命引っ張りましたが、どうしても取り外せません。
-
ということは、いつも通りの分解になりそうです。
-
統合されたコントロールには、正真正銘の”十字”キー(Dパッド)が付いています。
-
その他外観の変更を挙げれば、右側のJoy-ConからIRブラスターが姿を消しました。そしてスピーカーが正面から(オリジナルSwitch)、底面に移動しました。
-
Liteには、従来モデルSwitchに付いていたスタンドが付いていません。Switchラインの中で、最も空力性能が高いモデルとなります。
-
-
-
分解の道が、通行止め(トライポイント)ネジによってブロックされました。この特殊ツールを手に入れるまでは、先に進めません。
-
今日、邪魔するクエストは相手にしません。この分解は、私たちのミッションで、ゲームに勝つために、あらゆるツールを揃えています。Y00ドライバー、君に決めた!
-
バックカバーの下にあるものは…別のカバーです。進む。
-
ここで判明したことは、SDカードリーダーが永続的にメインボードに装着されています。従来モデルSwitchの分解では、この時点で既にSDカードリーダーを取り出していました。
-
一般的に、モジュールは修理にとって利便性の高いものです。ということで、私たちの観点から、これは一歩後退です。
-
メタル製シールドの下に進んで、その内側を覗いてみましょう。
-
-
-
-
ここで、2019年新モデルSwitchのカバーを外して、Liteと比較をしてみます。
-
一番重要な変更は、Liteのバッテリーが上下逆ではないことです。これだけでも、私たちの分解は役に立つものとなりました。
-
他にも変更がありますが、このうち2つが正解で1つが間違いです。(1)バッテリーは物理的に小さくなり、軽量化したヒートパイプの隣に搭載されています。(2) ヘッドフォンジャックがやっと、100%モジュラーになりました。(3)ヒートシンクに固められたバブルガムはチェリー味になりました。
-
バッテリーを取り出して見つけたものは…ウェットペーパータオル?きっと誰かが、バッテリーの接着剤を拭き取ろうとしたのでしょう。
-
任天堂によると、この13.6 Whバッテリーで3−7時間のプレイが可能です。これは、オリジナルSwitchに搭載された16 Whバッテリーでプレイ可能な時間以上です。(しかし、新モデルSwitchは最大9時間のプレイが可能です。)
You should add the dimension of the battery among other parts. I am finding it very hard to find this information.
I don’t know how you removed the battery on this thing, but I destroyed a few tools prying the bigger off. Plus the battery itself got bent beyond repair where I had to order a new one. Whether the water made the adhesive extra sticky I don’t know. (When I found the Switch, it had water damage)
The battery is definitely pretty difficult to remove. It just takes time and patience! Our guide details the process: Nintendo Switch Lite バッテリーの交換
-
-
-
効率性が上がったハードウェアが、バッテリー持続時間を延ばすだけでなく、熱の排出を抑えます。そのため、このSwitchには縮小したヒートシンクとファンが搭載されていますが、驚きはしません。
-
その他若干の違いを挙げれば、以前のLとRボタンは、PCB上のボタンに直接押し込まれていました。新ボタンは薄い膜(メンブレーン)で覆われたキーボタンです。異物侵入に役立つ上に、トリガーボタンが反応するための作動距離が改善されました。
-
スピーカードライブは、従来モデルSwitchと同じに見えますが、筐体は全て新しいデザインです。
-
Liteのスピーカーは下向きです。その上、Joy-Conに搭載されていた2つのバッテリー用スペースが不要になったため、ここまでスピーカーが拡大しました。今の所、サウンドテストをしていませんが、Liteの音質の方が良いはずです。
-
-
-
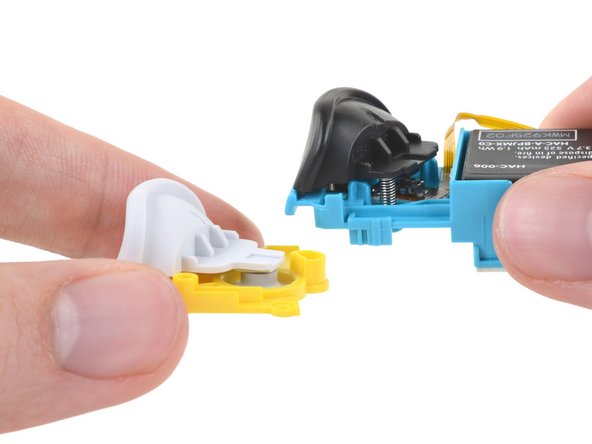
ミニJoy-con用専用ボードを取り出して、Switchを取り巻く問題の原因について詳細に調べてみましょうーそれはJoystickです。
-
まず最初に、ケースを開いて見ると、これらのLiteのJoystickは新モデルSwitchのものと大変よく似ています。ただし、Joystick周辺の留め金デザインが若干異なります。そしてケースは全体的に開けやすくなりました。
-
ドリフト問題の改善点を探すため、Switch Lite(上)と2019 Switch(下)のJoystickアセンブリの内部を開き、比較しやすいように並べてみました。
-
内部に搭載されたものに、大きな違いが無いように一瞬見えますが、いくつかの新トレースルーティングと、幅狭になったスティックのクリックボタン、そして若干幅広になったように見えるメタル製スライダーに気づきます。
Ich habe die neue Version der analog sticks genauer unter die Lupe genommen, sie mit meinem problembehafteten verglichen und dabei etwas festgestellt. Ich habe es in einem Tweet zusammengefasst
Just replaced my left joystick, I didn’t even take off the main heatshield to disconnect the battery (had been dead for awhile). The ribbon cables went back in easily with a drop of de-oxit for lubrication. This is a smart design because the left joystick gets much more abuse than the right. PROTIP: The ribbon cables are all fixed in place via a clasp that must be lifted up first. Failure to do so will damage the ribbon cables and your board. The riskiest part of this repair is losing screws. PH000 and Y00 drivers are needed. About a 30 minute repair for a first timer.
-
-
-
ボードを取り出すと、以前はモジュールだったフラッシュストレージが、ここでは半田付けされていることに気がつきます。(従来モデルSwitchのストレージ交換は上手くいきませんでした。しかし物理的には交換できます。)
-
このカピパラチップのA面です。
-
Nvidia ODNX10-A1 (Tegra X1-based SoC, presumably a custom riff on the T210B01 variant)
-
2x Samsung K4U6E3S4AM-MGCJ LPDDR4X DRAM 16 Gb (合計4 GB)
-
Samsung KLMBG2JETD-B041 32 GB eMMCフラッシュストレージ
-
ST Microelectronics ST21NFCD NFCコントローラーとFingerTipタッチスクリーンコントローラー
-
Realtek ALC5639オーディオコデック
-
Cypress CYW4356X 802.11ac Wi-Fi + Bluetooth 5.0 SoC
You mention the Cypress chip to be Bluetooth 5.0, but list in the tech specs as Bluetooth 4.1. Which is it?
skatendo16 - 返信
Nintendo’s official specs for the Switch Lite say BT 4.1. The Cypress chip is an off-the-shelf design that may have some un-utilized capabilities.
Is it possible to resolder ram chips with highrler capacity to boost a performance?
-
-
-
カピパラを裏返して、さらにチップを確認します。
-
ST Microelectronics STM32F038C6 32ビットマイクロコントローラーw/ 32 KBフラッシュ
-
B1913 GCBRG HAC STD T1056719A1 secure MCUの可能性
-
Maxim Integrated MAX77620HEWJパワーマネージメントIC
-
Rohm BM92T10MWV-Z USB-Cパワーデリバリーコントローラー
-
Texas Instruments BQ24193バッテリー充電マネージメント
-
Maxim Integrated MAX17050 バッテリー 燃料計
-
Ricoh RP602Z330C 1.5 A降圧型レギュレーター
深蓝色框框里的芯片是什么芯片?
Maxim Integrated MAX17050 Battery Charge Meter.
-
-
-
Switch Liteの運命はいかに?
-
少しの熱を当てて温めて、こじ開けると、フレームからディスプレイアセンブリが取り出せます。今の所、順調です。
-
あともう少しこじ開けると、デジタイザ/スクリーンはディスプレイから外れます。成功です!簡単に安く修理できる、Switchラインの記録は残り続けます。
I’d say IPS would made sense since in whatever posture the Switch Lite fell to ground the screen won’t be directly contacted (joysticks and buttons acts like a cushion layer), it does not appear often to encounter a fractured screen so swapping to IPS gives better visual experience and more chassis space(for batteries?)
Given that the majority of replacements are screen-related, this is a really poor explanation. What about the gasket? The adhesive? You didn’t touch on that at all - and it’s SUPER important to get right.
As stated in the banner at the top of the page, these are not instructions. Our hardware teardowns are intended to give a first look at the device and assess it for repairability, and that’s all. Step-by-step repair guides will come later! You can use this document for reference, but it’s not meant to be exhaustive.
la verdad es que en el desmontaje y separacion no os habeis esmerado pero nada de nada, una foto de un despiece que ademas no tiene ni un resto de pagamento y creo que no va aser tan facil como decis y menos el volver a montar, como se monta? que adhesivo? no queda nada nada claro nada.
I agree with the posters above - it’s the most important and dangerous step (separating the screen from the digitizer) and they choose to go with “something magic happens here”! Disappointing and frustrating.
Looking at replacing a LCD, is the LCD glued to the glass or just adhesive around the edge?
It’s just a strip of black adhesive all the way around - not glue. Just warm it up with a heat gun or hair dryer and carefully peel apart the LCD and digitizer. That said, if you’re replacing a broken LCD it might be easier just to get the complete LCD+digitizer assembly (the digitizer is cheap).
-


以下の翻訳者の皆さんにお礼を申し上げます:
93%

Midori Doiさんは世界中で修理する私たちを助けてくれています! あなたも貢献してみませんか?
翻訳を始める ›
34 件のコメント
Ethan…..first of all why is it important that you posted first? Second of all, you said, “Looks like the Switch Lite is based off of the original Switch.” Really, Ethan? You think? Sorry for the sarcasm but c’mon man, how is your comment helping?
You are getting waeker and weaker. No exact descripton or OEM of the fan. Boy that’s weak for because the bearing of the fan can be an issue over time too. Sleevebearings would be horror for a unit like this. I hope it is ball or hydrodynamic. This fan has to run high speeds becaus of its small diameter.
TheLOD2010 - 返信
So now this begs the question, can you reuse the joycons from the OG switch, remove the buttons and place them into the lite?
Say if you wanted a different color for your buttons, seems the triggers are a nono since they use a different button system but what about a,b,x,y,+,- ect?
awful teardown guide, please give better details regarding screw placement, etc
The top of the teardown explicitly says it’s not a service guide. iFixit does have separate guides on Switch repair.
You might find the repair guides more helpful, they highlight all the screws and everything :)
Probably -
Just bought a turquoise lite and it comes with standard phillips screws
The four screws on the top and bottom of the switch lite’s case are PH000, while the 4 on the back are Y00. Look again. The screws inside are all PH000 as well.
walczyk -
Would anyone know where one could source the ‘dedicated mini-joycon board’? They seem to be the one part you cannot find anywhere.
How easy would it be for a total novice to take this apart for the purposes of re-painting the switch? I was thinking about taking it apart and doing a custom paint job on it but wanted to see if anyone else has tried it before I give it a go.
I'm a total novice and did this its very straight forward just don't get the screws mixed up and be mindful of ribbon cables also have the right tools otherwise you will strip the
Does anyone know where to get a replacement fan for the lite (in the UK). Mine sounds like its grating rocks most of the time.
Can someone point me in the direction of which ribbon connectors/sockets are for which function?
I took my boys apart to replace a snapped analogue stick and now it has sound and come on but the screen is blank, not even back-lit, and I'm not sure where I need to go next to troubleshoot it.
Took mine apart today and there are three ribbon cables that come from the screen two are under the gamecard slot those are for picture and backlight the power runs to the otherside near the battery
I’m just curious in respect to future repairability of my own switch lite - if I was to theoretically crack it open and replace the right stick (since that’s the only one that’s shown any issues whatsoever with my original set of joycons, also very pleased to see that one at least looks reasonably easy to get at) - would I need to replace the thermal compound? Or would it be fine if I just put it all back together as is?
I think it might be fine/preferable to leave/reuse the purple goop between the heatpipe and the topmost shield, as that seems to be quite a bit more spreadable than usual thermal paste used on computers.
For the blue/greyish goop between the heatsink and the SoC shield, and between the SoC shield and the SoC, you might be able to scoop up some of the excess goop that seeped out that are still kinda liquid, and slap it back on to the chip die and copper part of the shield. Though decent thermal paste aren’t all that expensive.
If you were to break a corner of the game card reader (brother decided to rip instead of gently unscrew a stripped screw), where could we get a replacement card reader? My understanding is that the switch lite and switch have different game card reader parts.
I for one disagree with this repairability score. If you’re fixing any handheld electronic and you don’t have access to a tri-wing screwdriver, you are probably just new to fixing these things. Every Nintendo handheld since the original gameboy has had them and apple adopted the use of the same bit in their very popular iPhone 7 (albeit a tad smaller). Also the adhesive on the digitizer comes off like butter with a guitar pick and some heat. Getting a new digi on without taking out the MB is an exercise in futility so that is a bit annoying, but overall I think this handheld is pretty easy to work on all things considered.
agreed regarding the Y0 driver bits, your toolkit should have them and if they don’t then you are gonna be ordering replacement parts anyway…
walczyk -
Broke my power/volume flex cable trying to put it back into the connector, anyone know when i can get a replacement, if at all?
omg that sucks, how would you break it putting it back in? I don’t know if mine is fully inserted, but de-oxit helped. BTW I found them on ebay for $7 just google something “Nintendo “Switch Lite” Power Volume Button Ribbon Flex Cable” and do not buy the non switch-lite version since they are different.
walczyk -
Why are there NO videos or howtos that show the trick in separating the digitizer from the LCD? I’ve disassembled everything but I’m stuck at that point. My LCD is good - just the digitizer is scratched and I don’t want to crack the LCD separating it from the digitizer. What’s the trick? Just a heat gun and careful prying? Note the Switch is different from the Lite - in the Switch the LCD and digitizer are not glued together, so it’s simple to replace just one. Not in the Lite tho. Any suggestions?
Okay, I took the plunge and tried separating the LCD and digitizer - it worked! The trick is to use a heat gun to heat one end of the digitizer side and then very carefully and slowly bend/peel it back from the LCD. There is a thin frame (about 2 mm wide) of black adhesive that goes all the way around. Once you’ve pulled them apart you’ll need to peel off that adhesive strip and move it to the new digitizer (if that’s what you’re replacing). Reattach the digitizer to the Switch Lite frame (reuse or use new clear adhesive if necessary), and then carefully align and stick the LCD to the backside of the digitizer. Then just reassemble everything and you’re good to ho.
¿sonde podré encontrar la tarjeta del joycon, la que aparece en la imagen uno del paso 7? vivo en Guatemala, de preferencia si la puedo conseguir en Latino américa, muchas gracias por su respuesta
japanese versions have only phillips screws
I’m interested in whether or not it is possible to add some kind of rumble motors (small, slim profile, like used in mobile phones) to the Switch Lite, there seems to be space inside the casing but does anyone know if there is an output on the board that could be used? Tied into the speakers somehow perhaps?
Also, I can’t see a NFC antenna anywhere in this tear down, yet it’s on the right stick as per the joy-cons. Is it just missing from the tear down or is it physically built into the right stick this time around?
Ian Brooks - 返信
What chip can I replace to restore video? I get audio, but no video. And No, its NOT the backlight or backlight cable/connector.
Does anyone know where exactly the NFC touch point is? I couldn’t see it in any of the pictures.
E. Serrano - 返信
I would love it if there was an update to this video to replace the wifi antenna, as I can see the connections, but it glanced over on the video. Because this is essential to it's operation, that would be a great thing to inclue.
Is there a guide without all the cringe pokemon references? Preferably one where the first two steps are actually steps.
Harley Stout - 返信
This isn’t a guide, this is a teardown.
Duck -