はじめに
この修理ガイドを参照して、 iPhone 14 Pro Maxのリアカメラアセンブリを交換します。
このガイドは A2894 (国際) モデルを使用して作成されています。iPhone 14の他のモデルを修理する場合、見た目に多少の違いがあるかもしれませんが、手順は同じです。
作業を安全に進めるため、デバイスを分解する前にバッテリー残量を25%以下に放電してください。これにより、修理中に誤ってバッテリーを損傷した場合に、危険な熱を伴うアクシデントの発生リスクを軽減することができます。バッテリーが膨張している場合は、正しい方法で処理を行なってください。
デバイスを再組み立てする際に、スクリーンを再接着する交換用接着剤が必要です。デバイスは正常に機能しますが、IP (防水性能)等級が失われる可能性が高くなります。
必要な工具と部品
-
-
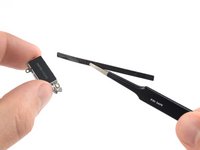
油性ペンでオープニングピックの先端から3mmの位置にマークを入れます。
Got to step 2 and realized the fix kit doesn't include an opening pick! Looks like a guitar pick, and I have those lying around. Is that expected? Looks like the pick is used in many steps below. There's a little blue crowbar that isn't mentioned in the instructions. Perhaps that replaces the opening pick?
Hi! I can't see which guide you were using when writing this comment. Can you reply here with which guide and fix kit you used?
I see you posted this in Meta. I hope it's resolved soon! In the meantime, a guitar pick may work well enough for your repair.
what fix kit?
My fix kit didn't include an opening pick either
My AliExpress refurbished screen came with a pick that has a coin-like circle that pops out, so no modification was necessary
It's not an Ifixit KIT if it doesn't include everything. You'll need to order the opening pic separately. Or head to Walmart like myself and look for guitar pics. Hopefully, this will work just as well.
No pick in mine as well. It’s really not clear that you have to order this separately when ordering an IPhone SE 202/2022 screen repair kit. Is this the case?
Frustrated, I ordered a compact package where everything was encapsulated. Useless suction tools could not separate the screen. If it is unable to decouple the screen, then why sucking suction tools you have provided.
For my kit the triangle pick was stuck inside the box with the screen not with the other tools maybe it's also there for you
Y’all are getting far, FAR too detailed with some of this stuff…. Measuring and marking the pick that you won’t actually use to open the device?!? lol that’s kinda funny. Just heat it up, grab a spudger, and the back just pops right off! The iFixit tech need to stick to the KISS method more often, you know KEEP IT SIMPLE STUPID!!! Like l, for reals, I’ve been doing this stuff for YEARS and using iFixit guides regularly and this is just ridiculous at this point!
Will the phone still work if the sensor assembly on the back of the screen is damaged?
-
-
-
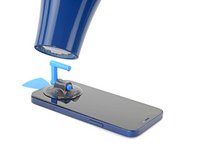
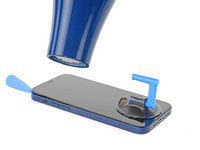
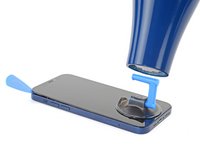
iPhoneの画面の上に、透明な梱包用テープを重ね合わせます。
-
次の数ステップで吸盤がくっつかない場合は、強力なテープ(ガムテープなど)を持ち手に折って、代わりにそれでスクリーンを持ち上げてみてください。
-
-
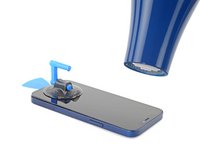
この手順で使用する道具:Clampy - Anti-Clamp$24.95
-
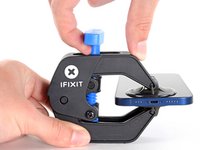
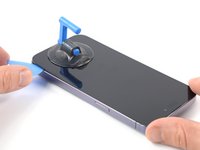
青いハンドルをヒンジ側に引くと、リバースクランのアームを解除します。
-
iPhoneの左もしくは右側端に向けてアームをスライドします。
-
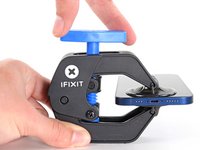
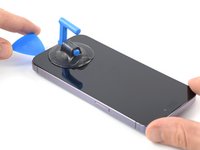
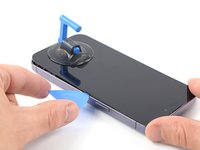
吸盤カップをiPhoneの下端付近に装着します。前面と背面に1つずつ取り付けます。
-
吸盤カップ両側をギュッと締め合わせると、標的の場所にしっかりと装着させることができます。
-
-
-
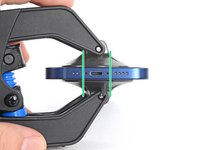
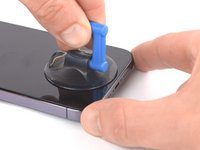
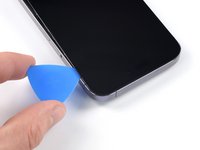
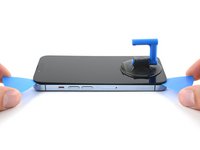
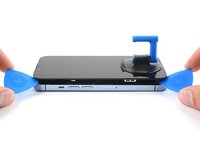
ガラスの一番端を避けながら、スクリーンの下端に吸盤を当てます。
-
吸着カップをしっかりと一定の力で引き上げ、スクリーンとフレームの間にわずかな隙間を作ります。
-
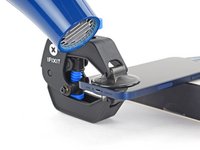
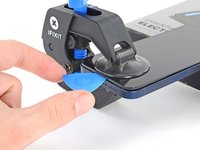
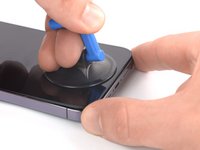
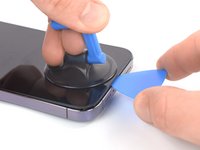
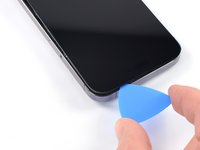
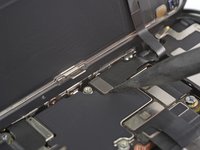
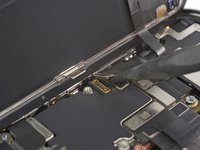
スクリーンのプラスチックベゼルの間の隙間にオープニングピックを差し込みます。
-
-
-
オープニングピックをiPhoneの右下周辺でスライドさせ、接着面を切り離します。
-
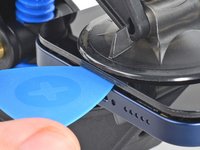
iPhoneの右端に沿ってスライドし、右上コーナーに達したところで止めます。
-
ピックを右上コーナーに残したまま、次の作業に移ってください。
-
-
-
You will need to replace the entire module connected via the damaged ribbon cable, or worse, buying an entirely new screen.
-
-
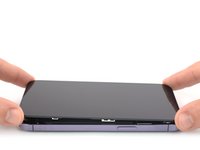
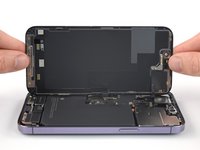
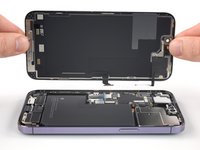
iPhoneを回転させて、右側端が手前に来るように配置します。
-
本の表紙をめくるように、右側からスクリーンを上に持ち上げてiPhoneを開きます。
-
作業中、スクリーンの背面を何かに衝立てて、支えておきます。
-
-
この手順で使用する道具:Magnetic Project Mat$19.95
-
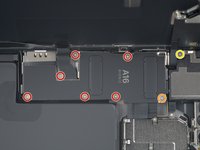
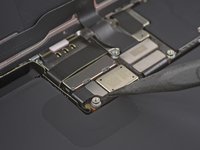
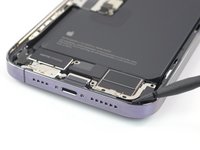
Y000ドライバーを使って、バッテリーコネクターカバーを固定している8本のネジを外します。
-
長さ1.3 mmネジー6本
-
長さ1.6 mmネジー1本
-
長さ1.9 mmネジー1本
You need to correct the guide. Are five 1.3mm-long screws two 1.6mm-long screws and one 1.9mm-long screw.
second 1.6mm-long screw sit a third one counting from left on right side of lcd flex cable
There is a second 1.6 mm-long screw that is placed on the lower standoff screw. The top left (third total from left) is slightly longer to accommodate the standoff screw. Placing this in the wrong spot will cause long screw damage.
The two previous commenters are correct, probably change to notate the two 1.6mm screws.
Nice job, guys!
Matt Lison - 返信
-
-
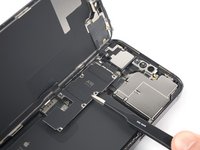
この手順で使用する道具:Tweezers$4.99
-
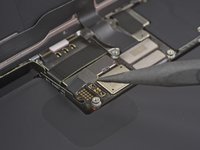
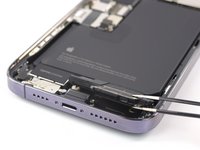
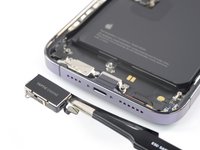
コネクタカバーをピンセットでつかみ、下方向にスライドしながら、フレックスケーブルを外します。
-
コネクタカバーを外します。
-
-
-
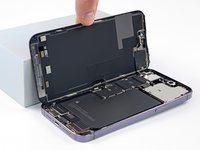
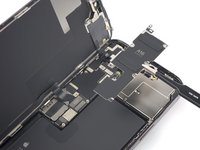
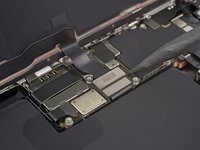
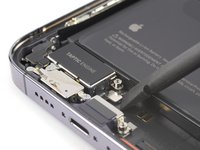
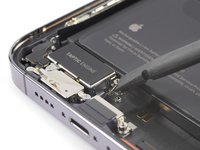
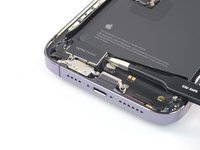
スパッジャーの先端を使い、コネクタをソケットからまっすぐ上にこじ開けて、バッテリーケーブルを外します。
-
コネクタをロジックボードから少し離して曲げ、修理中に誤ってソケットに接触して携帯電話に電源が供給されるのを防ぎます。
-
-
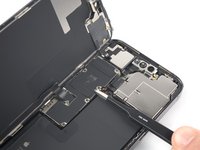
この手順で使用する道具:Tweezers$4.99
-
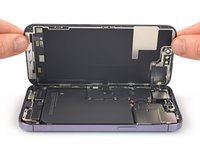
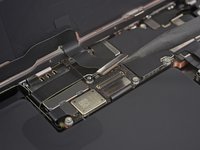
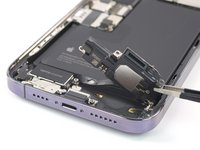
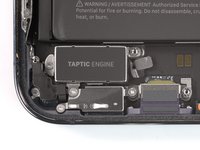
ピンセットを使って、ラウドスピーカーを取り出します。
-
ラウドスピーカーを傾けて、Taptic Engineにつながっている接着ストリップを乖離します。
-
ラウドスピーカーを取り出します。
-
-
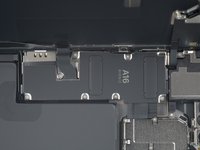
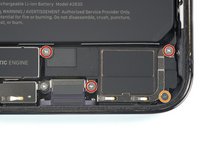
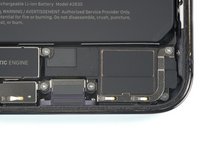
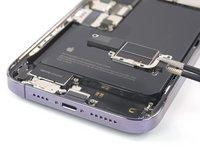
この手順で使用する道具:Standoff Screwdriver for iPhones$5.49
-
プラスドライバーを使って、Taptic Engineを固定している2本のネジを外します。
-
長さ1.8mmネジー1本
-
長さ2.3mmネジー1本
-
Taptic Engineを固定している2.9mmスタンドオフネジは、スタンドオフドライバーを使用して外してください。
-


オリジナルのパーツと交換用パーツをよく見比べてください。交換用パーツに付いていない残りのコンポーネントや接着シールなどは、インストールする前に新パーツに移植する必要があります。
デバイスを再組立する際は、これらのインストラクションを逆の順番に従って作業を進めてください。
e-wasteを処理する場合は、認可済みリサイクルセンターR2を通じて廃棄してください。
修理が上手く進みませんか?トラブルシュートのヘルプには、このモデルのアンサーコミュニティを参照してください。
オリジナルのパーツと交換用パーツをよく見比べてください。交換用パーツに付いていない残りのコンポーネントや接着シールなどは、インストールする前に新パーツに移植する必要があります。
デバイスを再組立する際は、これらのインストラクションを逆の順番に従って作業を進めてください。
e-wasteを処理する場合は、認可済みリサイクルセンターR2を通じて廃棄してください。
修理が上手く進みませんか?トラブルシュートのヘルプには、このモデルのアンサーコミュニティを参照してください。
2 の人々がこのガイドを完成させました。
以下の翻訳者の皆さんにお礼を申し上げます:
100%

Midori Doiさんは世界中で修理する私たちを助けてくれています! あなたも貢献してみませんか?
翻訳を始める ›


2 件のコメント
Dominik, this is one of the best guides I've seen on the Taptic Engine replacement! I was looking on YouTube as well but many of the videos were not as in-detail as this guide. A big thank you! wordle solver