はじめに
本ガイドはiPhone 12の背面カメラの取り外し及び取り付けについて説明しています。全てのカメラモジュールは一体型のユニットとして交換します。
注意:iOS 18以降をお使いの場合は、新しい純正カメラモジュールをAppleの修理アシスタントを使ってキャリブレーションすることができます。
必要な工具と部品
-
-
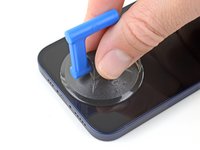
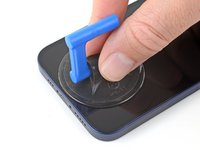
油性ペンでオープニングピックの先端から3mmの位置にマークを入れます。
Got to step 2 and realized the fix kit doesn't include an opening pick! Looks like a guitar pick, and I have those lying around. Is that expected? Looks like the pick is used in many steps below. There's a little blue crowbar that isn't mentioned in the instructions. Perhaps that replaces the opening pick?
Hi! I can't see which guide you were using when writing this comment. Can you reply here with which guide and fix kit you used?
I see you posted this in Meta. I hope it's resolved soon! In the meantime, a guitar pick may work well enough for your repair.
what fix kit?
My fix kit didn't include an opening pick either
My AliExpress refurbished screen came with a pick that has a coin-like circle that pops out, so no modification was necessary
It's not an Ifixit KIT if it doesn't include everything. You'll need to order the opening pic separately. Or head to Walmart like myself and look for guitar pics. Hopefully, this will work just as well.
No pick in mine as well. It’s really not clear that you have to order this separately when ordering an IPhone SE 202/2022 screen repair kit. Is this the case?
Frustrated, I ordered a compact package where everything was encapsulated. Useless suction tools could not separate the screen. If it is unable to decouple the screen, then why sucking suction tools you have provided.
For my kit the triangle pick was stuck inside the box with the screen not with the other tools maybe it's also there for you
Y’all are getting far, FAR too detailed with some of this stuff…. Measuring and marking the pick that you won’t actually use to open the device?!? lol that’s kinda funny. Just heat it up, grab a spudger, and the back just pops right off! The iFixit tech need to stick to the KISS method more often, you know KEEP IT SIMPLE STUPID!!! Like l, for reals, I’ve been doing this stuff for YEARS and using iFixit guides regularly and this is just ridiculous at this point!
Will the phone still work if the sensor assembly on the back of the screen is damaged?
-
-
-
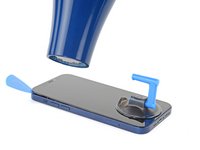
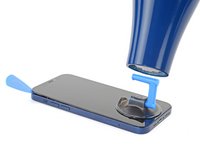
iPhoneの画面の上に、透明な梱包用テープを重ね合わせます。
-
次の数ステップで吸盤がくっつかない場合は、強力なテープ(ガムテープなど)を持ち手に折って、代わりにそれでスクリーンを持ち上げてみてください。
-
-
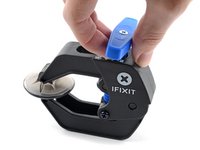
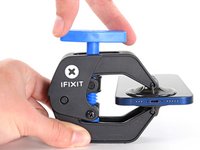
この手順で使用する道具:Clampy - Anti-Clamp$24.95
-
次の3つの手順では、デバイスの開口作業を簡単にするために開発されたツール、リバースクランプの使い方を紹介します。リバースクランプを使用しない場合は、この3つの手順をスキップして別の方法をご覧ください。
-
青いハンドルをヒンジ側に引くと、リバースクランプのアームを解除します。
-
iPhoneの左もしくは右側端に向けてアームをスライドします。
-
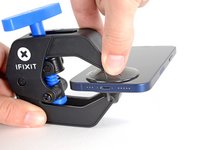
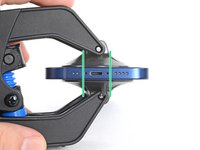
吸盤カップをiPhoneの下端付近に装着します。前面と背面に1つずつ取り付けます。
-
吸盤カップ両側をしっかりと締め合わせると、標的の場所にしっかりと装着させることができます。
-
-
Also: 3D Printer's heated bed set to 70-80 degrees Celcius for a few minutes does the job, as it basically works the same way heating mats used in professional repair shops do.
-
-
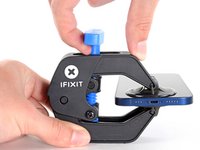
吸盤カップをしっかりと引き上げます。スクリーンとフレームの間に僅かな隙間が生じるまで一定の力で引っ張ります。
-
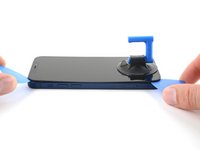
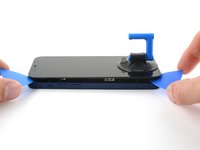
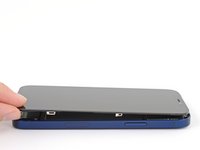
スクリーンのプラスチックベゼルの下にできた隙間にオープニングピックを差し込みます。
This seems impossible. I've been trying for an hour with heat and rocking, and the screen doesn't budge. :(
Don’t give up! Use more heat and a tad more force. I know you may fear breaking it more, but as long as you don’t stick the prying tool too far or tug too hard, you can do it! I have faith that you can do it!
I'm in the same boat, this isn't coming off. I've tried the hair dryer as well as the heating pad from ifixit. Any other ideas?
The suction cup comes off before the screen will
Is there a better tool for this? Just saw a video on YouTube where a kid pryed it open with no heating/etc. in 5 seconds.
I've changed the batteries in probably a half dozen iphones of different models. But 25 minutes of heating and pulling had no effect on iPhone 12
Welp. I finally ended up breaking the screen attempting this. DO NOT ATTEMPT THIS REPAIR! Not worth the broken screen and losing the cost of shipping both ways when you return the battery.
thx, I ll go to an apple repair center
Back (and bad...) experience ! Even if you heat a lot, the screen is hardly sticked. Take care, before sliding the mediator under the screen, this one should be moved up, at least 2 mm. On my side i have slided around 1 mm and .... inserted the mediator between the glass screen and the screen structure ring.... result : glass break and screen to change (my initial exercise was the battery removal !). I feel that next time i will visit a repair center...
Pro tip for anyone having trouble with this. You have to use multiple rounds of heat and pulling. Use a hair dryer and not the iOpener that comes with the fix kit and get it just too hot to touch then quickly start pulling and wiggling it up and down. Once it cools down grab the hair dryer again and repeat it a couple times until you start to get a big enough gap.
I just did this yesterday and it took around 5 rounds of heating and pulling to get it to seperate enough from the body.It's important to insert the pick under the bezel. I just delaminated my screen. The screen was probably fine, but it was glitching, so I wanted to check for a bad connection. Anyway, now I get a new screen.
Under the bezel, eh.
After reading this almost a year later to the day I last commented on it, I now know that the best way I have found to remove a screen, from pretty much any phone, not just this one, is heat (I use a heating pad on 80 degrees celsius) and before putting the phone on the heating pad, I use 91% isopropyl alcohol around the edges that you will be sliding your pry tools in, and I leave it on for 10 min. I then take it off, add more alcohol, and then put it back on the pad for another 5 min. Also, while I am sliding my tools around the screen, I continuously add more alcohol, and if it takes a really long time, then more heat as well. Heat, alcohol, and patience, lots of patience, and you should be good. Hope this helps, good luck!
Can confirm, this does indeed work. Just keep warming it up, lifting up and down, and repeat when phone goes cold. After around 10 rounds it would move enough to where I could see inside the phone when lifted. You can then insert pick
Tip: You can also try to apply heat and lift the other corner, just enough to make it move slightly. This will ease pressure needed to separate the glue on the other side as-well.
No worries guys! it’s completely doable! You just need to be patient and keep trying multiple times
I don't doubt that you folks eventually got this open, but how on earth do you not lose your mind with the suction cup popping off every 5 seconds? Agree with Ryan above, have replaced batteries on several other iPhone generations with nowhere near this much effort. Still working on it going on 1 hr, about 10 rounds of hair dryer heat. Did Apple use a stronger adhesive for the 12?
Success. iOpener doesn't get the phone nearly hot enough. Multiple rounds of hair dryer + isopropyl alcohol dribbled in b/w case and screen while pulling up on suction cup. For me, the bottom left hand corner (volume rocker side) seemed to lift up first, so I moved the suction cup to that corner while doing the heat + alcohol.
When I changed the battery on a 7+ instead of the suction cup/heat method I used an Cacto blade inserted horizontally along the bottom edge to break the seal. Would this work on the 12?
I struggled with this step, but eventually got it. Use LOTS of isopropyl alcohol, and soak the entire perimeter. Let it sit for 30 seconds after application, then heat it up, then pull with the clamp and rock back and forth. Reapply the alcohol and repeat until it works. Took me about 30 mins, but I eventually got it up just enough for the first pick. The iOpener is completely useless, I just used a shrink wrap gun and made sure to hold it 8-12 inches from the phone on the lowest heat setting.
iOpener along the bottom edge, the Anti-Clamp, and three tries about 5 minutes each worked for me. Never popped off, just needed lots of patience and 1.5 screw turns on the clamp. Bottom left corner was first, like another commenter.
Neal Sofge - 返信
-
-
-
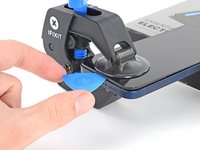
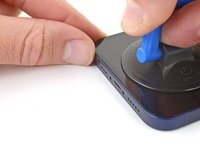
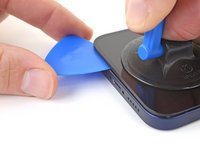
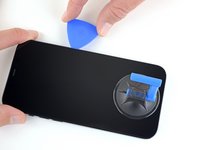
オープニングピックをiPhoneの右下あたりでスライドさせ、接着面を切り離します。
-
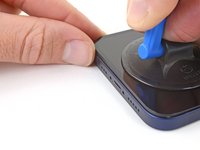
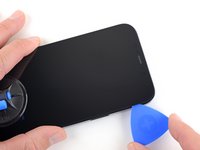
iPhoneの右端に沿ってスライドし、右上コーナーに達したところで止めます。
-
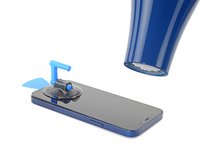
ピックを右上コーナーに残したまま、次の作業に移ってください。
There is a spot on this side where a slight ridge in the iPhone frame makes the pick stick. Eventually I used two, one twisting a bit to open a path for the other. But if you're not expecting it you feel like you're going to break something.
Neal Sofge - 返信
-
-
-
-
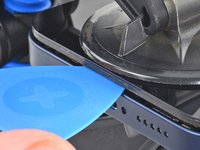
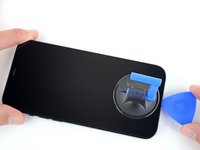
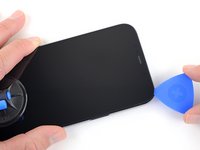
オープニングピックをiPhoneの右上周辺でスライドさせて、上部の接着剤を切り離します。
-
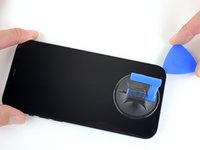
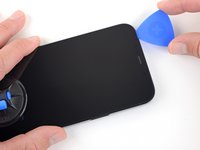
ピックを左上コーナーに残したまま、次の作業に移ってください。
-
-
-
ドライヤーでiPhoneの左端を約90秒間温めます。もしくは画面が少し熱くて触れなくなるまで加熱します。
Also: 3D Printer's heated bed set to 70-80 degrees Celcius does the job - it basically works the same way professional heated mats that are used in phone repair shops.
-
-
I kinda forgot about this step when I opened my first iPhone 12.
For the next one, I'm going to mark that edge of the phone with blue tape roughly where each cable is to help me remember.Also FWIW, I got the 70 cent adhesive cutting tool from Apple with my genuine battery and used that for all my display prying needs after getting the first opening propped with a guitar pick.
It worked great and did not damage anything so no need to sweat inserting something too far and causing damage.
Could you PLEASE move this to step 13?? I tore the front sensor cable. 😭
-
-
iPhoneを回転させて、右側の端が手前にくるように配置します。
-
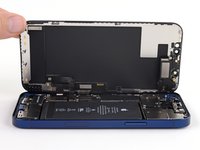
iPhoneのディスプレイを右側から左側に向けて(本のページをめくるように)開きます。
-
ディスプレイの背中に何かボックスを衝立てて、作業をしやすくします。
i did this and the shroud with the earpiece speaker still stuck with the phone so its just wedged in there i cant get it out
lil teslas - 返信
-
-
-
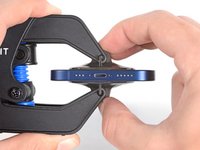
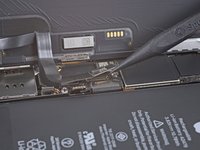
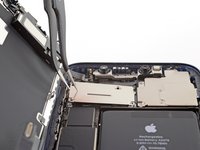
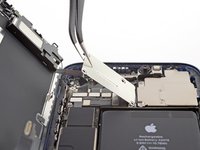
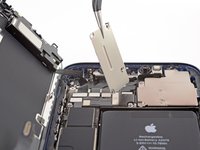
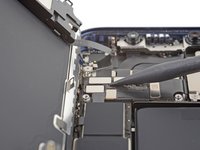
バッテリーとディスプレイコネクタカバーを固定している1.1 mm Y000 長ネジを2本外します。
Ouch, I see a broken flat here…
Can I use a y 0.6 if I don’t have y000
Yep! The measurements for Y000 are 0.6 mm.
-
-
-
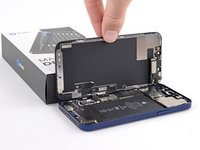
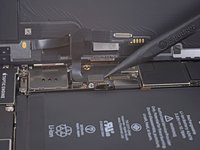
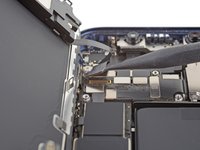
カバーを取り出します。
Hi
On my original display on an iPhone 12, there is no metal hinge as shown here and therefore no place for it when closing the phone. Have double-checked model and the original display - and it is just not there. Is there another model based on serial number?
Hinge marked: https://www.dropbox.com/scl/fi/asztgi60g...
Best regards,
Carsten
-
-
-
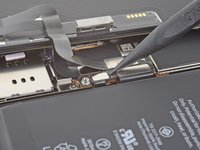
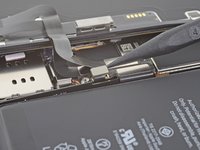
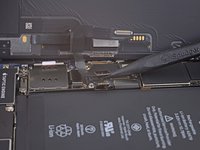
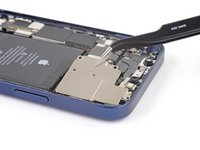
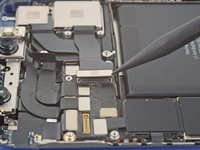
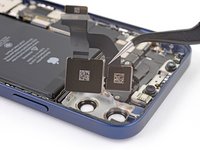
スパッジャーの先端もしくは清潔な爪先を使って、ロジックボード上のソケットからバッテリーコネクタをこじ開けます。
-
コネクタをロジックボードから少し曲げながら離します。修理中にアクシデントでソケットと接触してデバイスの電源が入らないように予防します。
-
-
-
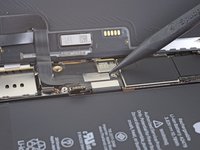
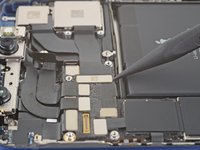
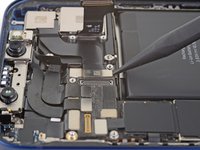
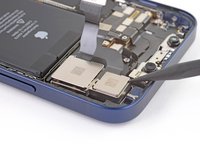
Y000ドライバーを使って、フロントセンサーコネクタカバーを固定している4本のネジを外します。
-
1.1mm長ネジー3本
-
1.4mm長ネジー1本
-


交換用のパーツとオリジナルのパーツを見比べてください。残りのコンポーネントを移植する必要があるか、パーツを装着する前に接着剤の裏張りを取る必要があります。
デバイスを再組み立てする際は、これらのインストラクションを逆の順番に従って作業を進めてください。
修理後、交換部品によってはiOS 18以降で利用可能になったAppleの修理アシスタントを使ってキャリブレーションできる場合があります。デバイスをアップデートし、「設定」→「一般」→「情報」→「部品とサービスの履歴」、「再起動して修理を完了」をタップし、画面の指示に従います。
不要になった電子廃棄物は 認証済みリサイクルセンターで処分してください。
修理が上手くいきませんか?トラブルシュートのヘルプはアンサーコミュニティを参照してください。もしくはiPhone 12 のアンサーコミュニティで検索してみましょう。
24 の人々がこのガイドを完成させました。
以下の翻訳者の皆さんにお礼を申し上げます:
100%

これらの翻訳者の方々は世界を修理する私たちのサポートをしてくれています。 あなたも貢献してみませんか?
翻訳を始める ›

3 件のコメント
I heard that after replacing the camera, this phone won't function well. For example, the power button won't work. Still true to date?
Not true at all
yac -
This youtube video stole your content and you should have them take it down: https://www.youtube.com/watch?v=BEltuGWA...
Do you sell the waterproof seals separately or are they included in the kit?
Heather Furnas - 返信
Do you sell the waterproof seals separately or are they included in the kit? (I would like to know this as well.)
CaliforniaGunner - 返信
I just got my Fix Kit and it includes the seals. Not sure if a "part only" version would, though.
Neal Sofge - 返信