はじめに
iPhone 11 Proのスクリーンがひび割れたり、タッチしても反応しない、もしくは電源が入っているのに画像が表示されないなどの問題がある場合は、このガイドを使って新しいスクリーン(別名、ディスプレイアセンブリ)を交換して回復させましょう。
ディスプレイ背面に搭載されているイヤホンスピーカー + センサアセンブリ両方は各iPhone用にペアで製造されています。そのため、ディスプレイ交換の作業では、必ず古いディスプレイから新しいディスプレイにこれらを移植しなければなりません。その中には、フラッドイルミネーター、すなわち生体認証をもつFace IDセキュリティ機能の一部も含まれます。このフラッドイルミネーターを交換したり、ダメージが入るとFace IDが機能しなくなりますのでご注意ください。この作業ではこれらのコンポーネントにダメージを与えないように特に注意しながら作業を進めてください。ダメージが入ってしまうと、AppleもしくはAppleの正規修理代理店でのみしかFace ID機能を回復できません。
ご注意:この修理ガイドを完成した後、iPhoneディスプレイ上に、”正規品”バッテリーの使用に関する警告が表示されます。 これは正規Appleパーツを使用しても同じです。iPhoneが通常通り機能する場合は、この表示は無視してください。特に問題ありません。
必要な工具と部品
-
-
iPhoneのスクリーンにひび割れが入っている場合は状態が広がらないよう、また修理作業中怪我をしないようにガラス表面にテープを貼ります。
-
iPhoneディスプレイ上に透明の梱包用テープを貼り付けます。ディスプレイ表面全体を覆うようにしてください。
-
ひび割れの程度がひどく、次の手順で使用する吸盤カップがうまく装着できない場合は、3番目の画像のように強力なガムテープを真ん中で折り曲げて、ハンドル代わりに利用します。これで吸盤カップと同じようにディスプレイを持ち上げます。
How to detect my Iphone what screen it is, OLED or LCD?
It’s OLED. You can find the specs here, https://support.apple.com/en-us/HT201296
When you find your phone, at the bottom of the description click on, See the tech specs…
mcr4u2 -
The included suction cups were stiff and worthless. They would not lift the screen. Also, I tried every type of tape on the screen to help the suction cups stick without success. Heavy duty suction cups were for my bathroom also failed. However, I had an old GoPro mount with some preapplied double sided 3M VSB tape and stuck that on the screen near the bottom. Magic! This method had the added bonus of being able to use a GoPro attachment as a handle to lift the screen, and propped up the screen like a kickstand in step 12.
Very cool! Thanks
Antonio -
My screen was pretty stuck… would not budge. Heated, super glued the suction cup, tried gorilla tape. Ended up doing the GoPro mount with 3M VSB tape method mentioned. Worked great. That 3M tape is the bomb.
If you have flat feeler gauges (for adjusting engine valve tappet clearance, ignition points … old school) the .003 thick goes right in. Work your way up until you can get the pick or supplied pry tool in.
where can I buy 3M VSB plis!!
3M VHB tape is at auto stores and other big box stores, or online.
nicO -
-
-
-
iPhoneの画面の上に、透明な梱包用テープを重ね合わせます。
-
次の数ステップで吸盤がくっつかない場合は、強力なテープ(ガムテープなど)を持ち手に折って、代わりにそれでスクリーンを持ち上げてみてください。
-
-
-
青いハンドルをヒンジ側に引くと、リバースクランのアームを解除します。
-
iPhoneの左もしくは右側端に向けてアームをスライドします。
-
吸盤カップをiPhoneの下端付近に装着します。前面と背面に1つずつ取り付けます。
-
吸盤カップ両側をギュッと締め合わせると、標的の場所にしっかりと装着させることができます。
-
-
-
Heat an iOpenerを温めて、リバースクランプのアームの間にこれを通してください。
-
iOpenerを折り曲げて、iPhoneの下側端に当たるようにします。
-
1分ほど待機すると、接着剤が剥がれ始め、デバイスの間に隙間ができます。
-
プラスチックベゼルとスクリーンの間の隙間にオープニングピックを差し込みます。スクリーン自体には差し込まないでください。
-
次の3つの手順はスキップしてください。
-
-
-
ヘアドライヤーもしくはヒートガン、お持ちの方はiOpenerを準備します。iPhone下側の端に載せて、下に付けられた接着剤が柔らかくなるまで約1分間温めます。
I used a regulated heating gun, 180 degree celsius, 60 percent airstream, moving constantly around the edges for two minutes - works great for me.
einhanseat - 返信
-
-
-
しっかりと一定の力で吸盤カップを引き上げ、フロントパネルとリアケースの間にわずかな隙間を作ります。
-
スクリーンとプラスチックベゼルの隙間に開口ピックを差し込みます。スクリーン自体には差し込まないでください。
-
-
-
-
iPhoneのディスプレイを左側から右側に向けて(本のページをめくるように)開きます。
-
作業中、ディスプレイが邪魔にならないよう、ディスプレイを立てかけるための衝立てを準備してください。
-
-
-
バッテリーカバーブラケットに固定されている1.3 mm Y000 長ネジを2本外します。
German translation says "3 screws” but there are only 2.
-
-
-
スパッジャーもしくは清潔な指先で、バッテリーコネクタをロジックボードのソケットからまっすぐ引き抜きます。
-
コネクタをロジックボードから離すように曲げて固定します。アクシデントでロジックボードに接続してしまい、作業中、電源が入らないようにするためです。
-
-
-
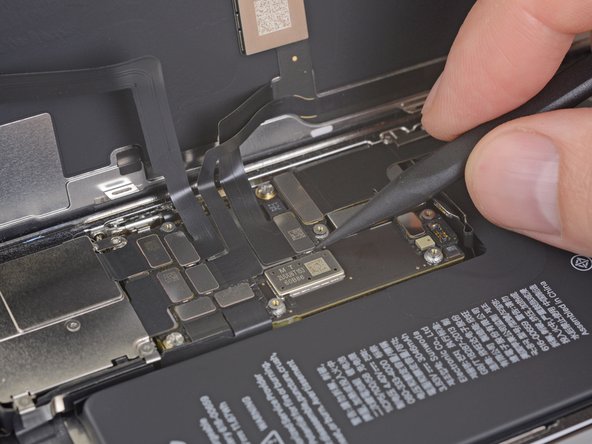
スパッジャーもしくは指先を使って、フロントセンサアセンブリのケーブルコネクタの接続を外します。
-
スパッジャーもしくは指先を使って、デジタイザケーブルコネクタの接続を外します。
-
-
-
ディスプレイアセンブリを取り出します。
-
-
-
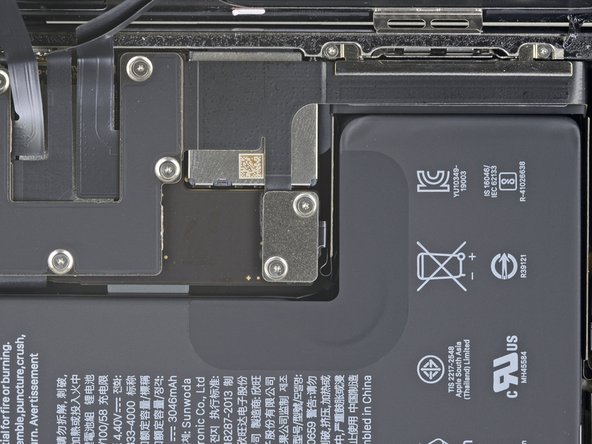
Y000ドライバーを使って、ディスプレイの裏側にスピーカー/センサーアセンブリを固定している次の3本のネジを外します。
-
1.3 mmネジー2本
-
1.9mmネジー1本
Note that the top left screw has a smaller head than the other 3! You’ll learn like I did if they get mixed up & its really hard to get the other 1.3 mm screw to fit.
Thank you Andrew. That saved me!
-
-
-
スパッジャーの先端を使って、スピーカーの上部端を慎重にこじ開けます。
-
スピーカーアセンブリを裏返します。裏向きにして、ディスプレイの上部端から離します。
-
-
-
ヘアドライヤーもしくはヒートガン、iOpenerを準備して、センサーに付けられた接着材を柔らかくするためにディスプレイフロント上部に約1-2分間あてます。
-
-
-
イヤピーススピーカーとフロントセンサーアセンブリを取り出します。
-
近接センサー
-
フラッドイルミネーター
-
モジュールは正しく装着しなければなりません。これらのコンポーネントが接着剤にブロックされないように注意してください。
-


交換用のパーツとオリジナルのパーツを見比べてください。残りのコンポーネントを移植する必要があるか、パーツを取り付ける前に接着剤の裏張りを取る必要があります。
デバイスを再組立する際は、これらのインストラクションを逆の順番に従って作業を進めてください。
e-wasteを処理する場合は、認可済みリサイクルセンターR2を通じて廃棄してください。
修理が上手く進みませんか?トラブルシュートのヘルプには、iPhone 11 Proアンサーコミュニティを参照してください。
交換用のパーツとオリジナルのパーツを見比べてください。残りのコンポーネントを移植する必要があるか、パーツを取り付ける前に接着剤の裏張りを取る必要があります。
デバイスを再組立する際は、これらのインストラクションを逆の順番に従って作業を進めてください。
e-wasteを処理する場合は、認可済みリサイクルセンターR2を通じて廃棄してください。
修理が上手く進みませんか?トラブルシュートのヘルプには、iPhone 11 Proアンサーコミュニティを参照してください。
86 の人々がこのガイドを完成させました。
以下の翻訳者の皆さんにお礼を申し上げます:
100%

Midori Doiさんは世界中で修理する私たちを助けてくれています! あなたも貢献してみませんか?
翻訳を始める ›


8 件のコメント
Scusate ma perche dovrei spendere 1-2 ore di tempo piu il costo del display a “soli” euro 500,00 (ma ti fanno il resto di € 0,05!, ndr) quando la APPLE “UFFICIALE” te lo ripara con 300euro pezzi , attrezzi e tempo di lavoro : TUTTO INCLUSO !!!!!
Comunque guida ben fatta!!!
UMM, Maybe you can tell customers that they will forever have a notification pop up saying “Unknown Part, not an original part installed” so that they can make an informed decision if they want to install or not.
Fixed it. Thank you.
jmcgaughey - 返信
Display Daten für True Tone müssen mit einem Programmer aufs neue Display übertragen werden. Das sollte allgemein bekannt sein. Und dann entferne ich die Ohrhörer/Lautsprecher/Sensor Einheit komplett mit der Kunststoffhalterung vorsichtig vom Display und baue die so auf dem neuen Display wieder ein. Mir ist noch nie was kaputt gegangen. Die Fummelei mit dem Raushebeln tue ich mir nicht an. Viel zu riskant.
On the back of the iFixit iPhone 11 Pro replacement screen, there's a little sticker with a QR code attached to... whatever that connector piece is in the middle. I forgot to remove that before buttoning everything up, but everything seems to work fine. Does anyone know if that could be issue? Only thing I could see is if it's supposed to contact metal-to-metal for heat dissipation.
completed this repair and a month later the screen is black, but working. The glass is damaged so it’s possible that has something to do with it but I’ve also heard it’s an ios16 issue with charging. same thing happened when I replaced an iPhone 13 screen. Any ideas on what’s going on?