
iPad mini 4 LTE スクリーンとデジタイザの交換

はじめに
手順 1 に進むこのガイドの手順に従って、融着されたLCDとデジタイザガラスを含む、iPad mini 4のディスプレイアセンブリを交換します。
この手順では、スクリーンを取り外してから、ホームボタンを新しいアセンブリに移植します。Touch ID機能を引き続き使用するには、元のホームボタンを新しいスクリーンに移植する必要があります。
交換用パーツによっては、Smart Coverに使用するスリープ/解除センサーの移植も必要になることがあり、この作業にはケーブルのはんだ除去が必要です。
本ガイドの一部はWi-Fiモデルで撮影しているため、LTEモデルとは内部が若干異なる場合があります。特に記載のない限り、手順は両機種とも同じです。
必要な工具と部品
修理キット
キットには、修理ガイドを完了するために必要な全ての部品とツールが含まれています。

パーツ


ツール


もっと見る
-
この手順で使用する道具:Safety Glasses$3.19
-
ガラスに亀裂が入った場合は、ガラスをテープで固定することにより、破損箇所の拡大を食い止め、修理時の負傷を防止します。
-
透明な梱包用テープを、iPadのディスプレイの面全体が覆われるように貼り付けます。特に破損が酷い場合は、2枚重ねて貼らなければならないことがあります。
-
このガイドの残りの説明にできるだけ従うようにしてください。ただし一度ガラスが破損すると、作業の進行に従って亀裂が広がりやすくなるため、金属製のヘラでガラスを剥がして除去することが必要になる場合があります。
-
-
-
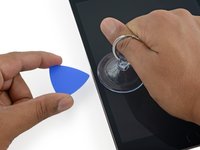
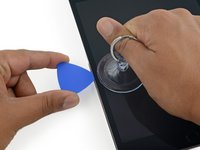
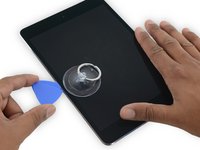
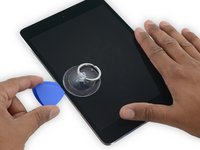
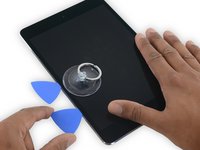
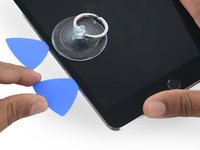
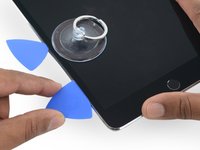
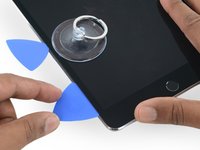
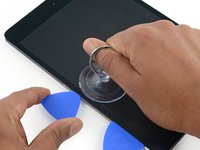
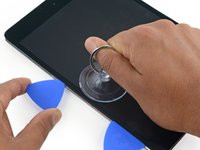
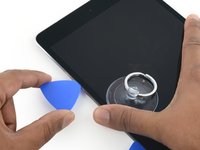
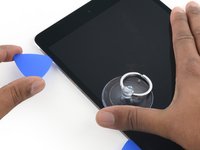
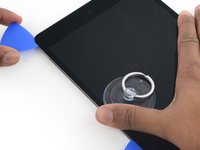
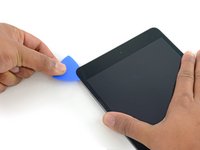
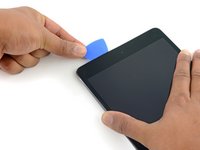
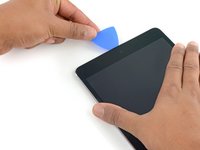
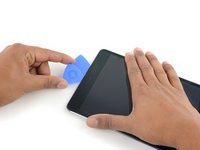
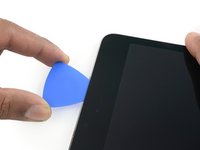
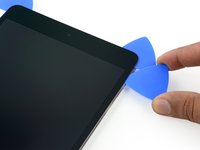
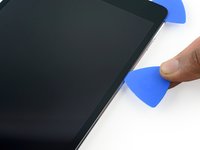
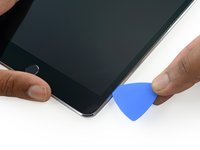
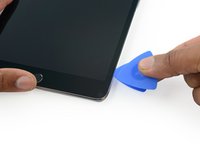
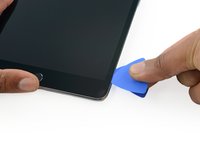
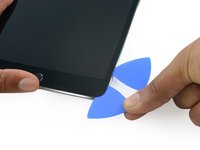
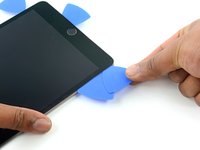
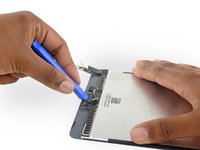
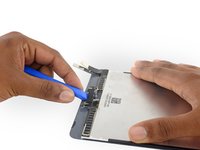
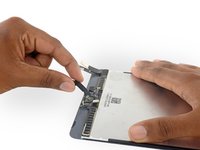
吸盤でガラスを引き上げながら、オープニングピックの先端をガラスとiPad本体の隙間に差し込みます。
“Don't insert the opening pick any deeper than the black bezel on the side of the display. Inserting the pick too far may damage the LCD.”
Unfortunately, you only know you have inserted it too far when you have, and you start seeing little bubble veins form between the glass screen and the LCD.
The adhesive can be very stiff/hard, and if pushing through it can result in the pick plunging into the LCD when the adhesive finally gives way.
Take your time, use alot of heat, and if you need to try and push the pick in, try and do so in a slicing motion along the edge, use the wide edge, or hold the pick so that your finger will hit the edge of the screen before the pick tip will pass the bezel.
Adhesive strips are only 1mm wide on sides. Up to 5mm wide top and bottom. I used the Isclack. Screen seemed ok bending without breaking. Worth looking for a photo of the replacement adhesive strips so you know what you have to separate. Be extra careful at the lower right corner where the cables are.
ian cheong - 返信
This is a failure of a guide as it doesn’t tell you to insert at a downward angle so you don’t potrude into the LCD… Now I have to spend more money to replace the screen as I pushed adhesive between the LCD and the screen even though I went no farther than a millimeter short of the screen...
can you open the right side if the left is too cracked to use a suction cup on?
This guide needs amending urgently.
You MUST NOT put the pick or whatever you are using more than 2mm under the sides of the screen, or you will cut through the adhesive tape securing the backlight assembly to the LCD glass.
This will push adhesive into the viewable area of the LCD and cause the backlight assembly to no longer be secured against the LCD fully.
I now need a new screen.
This line below from the guide is absolutely INCORRECT and will ruin your expensive display:
”Don't insert the opening pick any deeper than the black bezel on the side of the display.”
The black bezel is 5mm to 6mm wide; you MUST NOT insert anything to that depth or you will destroy your display. 2mm maximum!
thanks. will take this into account for my repair
Adab Abu -
I too damaged my display because of this absolute nonsense (The German version, which I used, still had this INCORRECT portion in it). I can't believe how long it took iFixit to update this, even though people have been reporting this for years on end. Sadly iFixit still haven't updated a variety of other things that are still at the very least high risk instructions. I just messaged them the other day, but they don't seem to care about or understand the remaining issues that this guide has. At least they updated one of the most severe things, but they just plainly told me 'I'm wrong' about the rest. I liked iFixit it so far, and I've worked on a variety of (difficult) repairs - but this experience was a very huge let down.
A few thoughts after opening a number of Mini 4’s.
1) if the display is warm enough you can squeeze the digitizer and LCD back together after a minor incursion with the opening pick and it will reseal.
2) I’ve started going in at the top just to the right of the camera (I use an iFlex to get in then switch to a pick). Then I run down either side with my fingers choked up on the pick so there only a mm or 2 sticking out. Usually after running down one side, I can get the display open enough to get the pick in behind the LCD when I do the other side
-
-
-
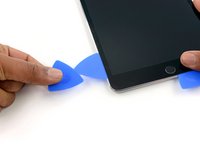
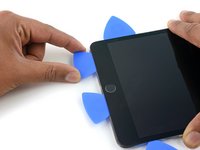
iOpenerを再び温めて、先ほどと同じ位置に約2分間当てます。
If your iPad is cold, consider leaving the iOpener on for longer than 5 minutes. The aluminum housing is a very large thermally dissipating mass and will quickly cool off the glass and make you have to start over and wait the 10 minutes to reheat. There’s a very slim window in which you’re able to insert the pick into the glass adhesive before it solidifies once again. I’ve been fighting with it for like 20 minutes following these instructions and it’s not working. You really need to leave it for longer than just 5 minutes to get the back housing hot too.
Heat is essential. I used a 3d printer’s heated set at 65 degrees. Chris Storer’s stip above saved me as you really need to let it sit for quite a while to soften the adhesive. Since I was doing a battery change, I heated both sides as the aluminum back is a huge heatsink that really sucks up the heat. Don’t try forcing it; if the suction cup isn’t pulling a gap in the screen, leave it on the heater for additional time.
Love the 3d printer idea, I hadn’t thought of that! I have used a heat gun as well but you have to be very careful to not use too much heat. Also watch for inserting the pick too far, it is really easy to delaminate glass from the display!
russ -
-
-
-
-
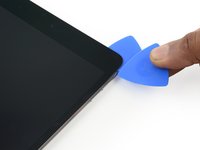
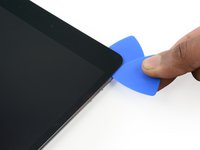
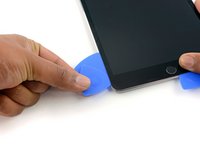
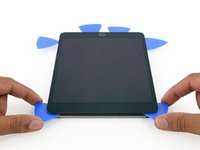
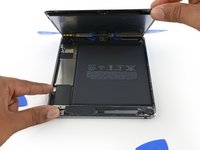
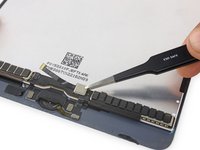
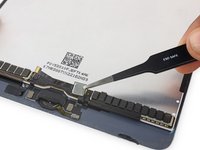
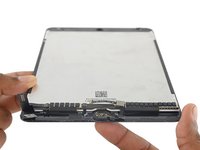
2つの開口ピックをiPad上部で同時に捻り、ディスプレイアセンブリを固定する最後の接着剤を剥がします
-
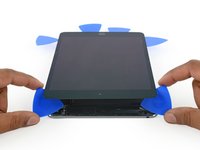
ディスプレイを上端から持ち上げてデバイスを開きます。
"Twist the two picks at the top edge of the iPadTwist the two picks at the top edge of the iPad "
When I did this twisting motion, and I thought I was being gentle, one of the picks cracked nearly in half. That adhesive is very strong! I probably did not cut into it far enough before applying the twisting to open the screen.
-
-
-
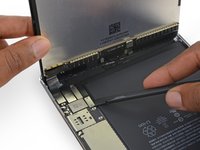
バッテリー/ディスプレイコネクタブラケットに留められた1.2mmプラスネジを4本外します。
-
-
-
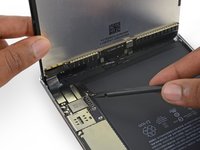
バッテリー/ディスプレイケーブルブラケットを取り外します。
Is it the end of the world if the bracket is not reinstalled, will the device function normally or will it eventually have issues with the connectors coming loose following shock?
-
-
-
スパッジャーの平面側先端を使って、ロジックボード上のソケットからバッテリーコネクタの接続を外します。
When i was starting to disconnect the lcd to the board i hit the black film and it lit and now even the new display wont display anything how to fix it? The black film near the lcd connector.
-
-
-
スパッジャーの鋭利な先端を使って、ロジックボード上のソケットからディスプレイデータコネクタの接続を外します。
-
スパッジャーの鋭利な先端を使って、ロジックボード上のソケットからデジタイザーケーブルコネクタの接続を外します。
-
-
-
ディスプレイアセンブリを取り外します。
-
ディスプレイアセンブリを再装着するには、ディスプレイ接着剤を交換する必要があります。当社のディスプレイ接着剤の装着ガイドを参照して、ディスプレイ用接着剤を再塗布し、デバイスを再封印してください。
Ich habe eine Bücherstütze benutzt um das Display in senkrechter Position zu halten, während ich die vier Schräubchen gelöst habe.. So zieht man nicht so an den Flexkabeln….!
Because the 3-piece adhesive strips shown in the Display Adhesive Application Guide link were different from iPad Mini 4 Adhesive Strips (item code IF316-013-1), it wasn't easy to figure out the exact location of the bottom adhesive. It would be helpful to include a separate application guide or an additional picture showing the exact location of each strip) on the guide.
-
-
-
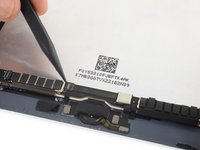
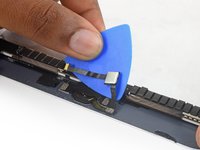
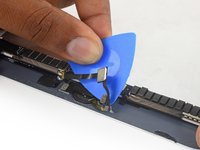
プラスチック製開口ツールを使用して、ホームボタンのブラケットをこじ上げ、ディスプレイアセンブリから剥がします。
The tip about the high-bond tape is great, but high-bond tape is something that should be mentioned at the beginning in the list of supplies we need. Because I have the whole thing taken apart, and now I’m told I need something that I don’t have on hand. So what am I supposed to do, just let everything sit around open, until I get to the store to see if they have some high-bond tape?
-
-
-
ホームボタンアセンブリを取り外します。
-
-
-
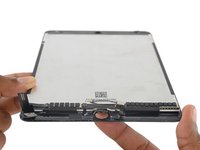
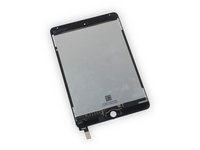
交換用パーツと元のディスプレイを入念に比較して、同じものであることを確認します。
-
Smart Coverの使用に必要なスリープ/復帰センサーが交換用スクリーンにないことがあります。この機能を引き続き使用する場合は、この部品を移植する必要があります。
-
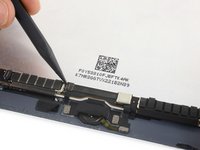
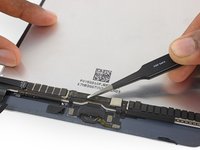
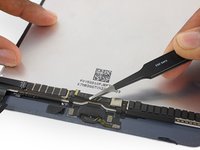
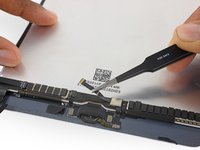
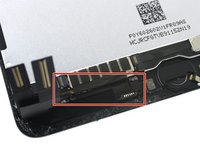
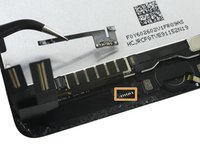
ディスプレイ左下にある6か所のはんだパッドからはんだを除去し、センサーアセンブリケーブルを取り外します。
This is an important step that’s missed by a lot of people resulting in negative reviews on replacement screens. Screen suppliers never mention this step or people would not buy from them. Save yourself a headache and time and buy a screen-digitizer with the sleep/wake sensor already soldered.
Is there any reason to replace this if you won’t use it? If I don’t move over the old sensor, will it still work? I’ve never soldered something this small and expensive before.
hab es ohne gemacht, da es auch keine lötstellen gibt - seither gibt es gar keine Standyby funktion mehr!
LÖSUNG: in den Systemeinstellungen “anzeige und Helligkeit” Sperren/entsperren deaktivieren.
junk -
Was meinst du damit “weil es keine Lötstellen gibt”? Sind auf deinem neuen Display keine Lötstellen gewesen wo du den Sensor hättest dran löten können?
Funktioniert dein Lösungsweg für dich noch: “anzeige und Helligkeit” Sperren/entsperren deaktivieren“ ?
Ich stehe vor der gleichen Herausforderung und will ungern löten und würde mich über eine Antwort freuen :/
I replace my iPad mini 4 screen-digitizer and did not have to replace this sensor because it did not have one, but the new screen-digitizer came with the sleep/wake sensor in place. Small electronics needs careful and tedious work. Thanks iFixit for the instructions to fix my iPad. I have to mention that I am a technician from the old school.
wogriffith - 返信
-


元通りに組み立てるには、これらの手順を逆に実行してください。
元通りに組み立てるには、これらの手順を逆に実行してください。
43 の人々がこのガイドを完成させました。
以下の翻訳者の皆さんにお礼を申し上げます:
100%


これらの翻訳者の方々は世界を修理する私たちのサポートをしてくれています。 あなたも貢献してみませんか?
翻訳を始める ›

3 件のコメント
Please post a caution about the home button ribbon cable. I was removing it from an extremely damaged screen and I accidentally slightly ripped it. Now I’m not sure what to do :( If I had known about the problems associated with changing a touch ID home button I would have been 100x more cautious but I’ve only ever had to fix my Mini 2 before so this wasn’t an issue.
I have an iFixit replacement screen (C-stock) that has some existing adhesive already on it, but there are a few parts of the adhesive that are folded over on itself. I also have replacement adhesive. Two questions:
Should I replace the existing, possibly-worn adhesive with new adhesive, or is it better to stay with the already-applied adhesive?
Should I warm up the adhesive when I’m applying the screen back onto the body? Or should I keep it room-temperature?
Just want to say Thank you for for the guide and what i can only describe as the perfect pctures to go along! Nice1