
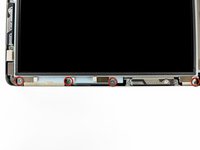
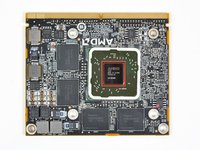
iMac Intel 21.5インチ EMC 2428のGPUカードの交換

はじめに
手順 1 に進むこのガイドを参照して、新しいGPUカードを取り付けましょう。
必要な工具と部品
パーツ

ツール


もっと見る
-
-
iMacのACコードを周辺機器と一緒に抜きます。
-
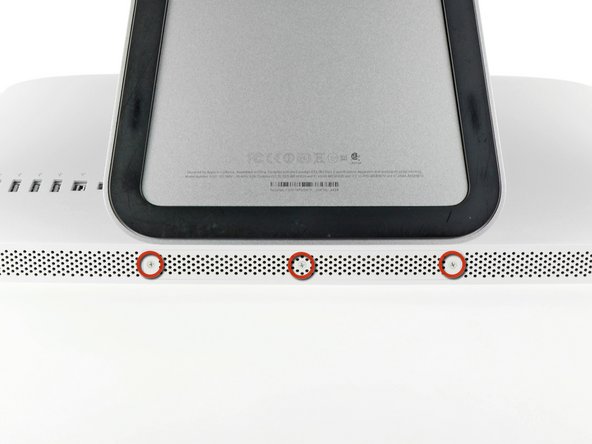
画像のように、iMacを柔らかく清潔な場所に裏返して置きます。
-
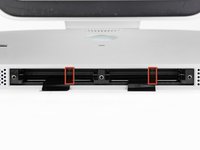
iMacの下側端とアクセスドアを固定している3本のプラスネジを緩めます。
-
アクセスドアを取り出します。
-
-
-
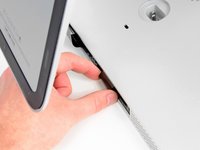
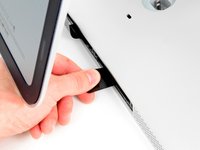
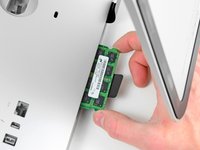
黒いプラスチックのRAM用プルタブをRAMスロットからゆっくりとスライドします。
-
黒いプラスチック製のタブをiMac下端の底から引き離して、RAMベイ側に搭載されているモジュールを取り出します。
It is far harder than I thought you have to pull REALLY hard and then there will be a little click and than you can gently pull out the RAM.
Press really hard, to the point you think you’ll cut your thumb, you’ll hear a slight ‘click’. If it’s not properly installed, the iMac will ‘beep, beep, beep’ In protest upon booting…
Brian -
I found it best to make use of the factory ‘pull tabs’. Much much easier than trying to pull the ram out by hand. It may seem like a good idea but, don’t be tempted to use pliers.
Brian -
Thanks for your Useful guide …. iMac Intel 21.5" EMC 2428 RAM Replacement was performed step by step on my Imac and every thing is perfect right now.
I was able to remove one side of the ram, but the other side would not budge. I was afraid that I was going to rip the plastic tab out of the computer. Any suggestions?
is it completely manditory to take out the ram? why not just keep it in? for some guides for replacing other components you dont have to, but in some you do. why is this the case? does it have to do with not getting shocked because there is power stored in there or some other reason? i was just wondering tho...
-
-
-
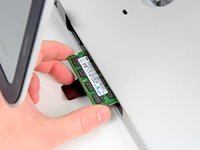
各RAMモジュールに切り込まれた小さなノッチ(1番目の画像で確認できます)がRAMスロットの突起と合わさります。(2番目の画像を参照ください)
When reinstalling RAM in this machine or any iMac with upgradable RAM slots push hard to get them to go in (Apple really did make this one harder than it needed to be). If you don't push hard it won't go in and your computer won't work. (trust me on this learned the hard way)
I am having trouble with bottom 2 slots. As I get beeping sounds when using them. When removed it boots properly. I tried & tried to push the 2 , 2GB ram modules into the bottom slots BUT all get is beeping. Guess I have to settle for 4GB Rather than 8 unless someone has a suggestion.
Try swapping the to the other slots & don’t forget to press really hard until you hear the ‘click’.
Brian -
Is there an expirience to settle 1600 MgH Ram instead 1333 MgH manual required?
Added 16GB for a total of 20GB, runs great, do make sure of the “click”, the beep is disturbing
2x2 GB 1333 MHz RAM were installed as delivered. I couldn’t manage to get those two out of their slots. I don’t want to damage anything. So, I put 2x8 GB RAM 1333 MHz RAM bars in the other two empty spare slots to have 20 GB RAM in total. The iMac runs fine with it. As described above, make sure to push RAM until they ‘click’ in completely.
Why are we taking out the RAM modules just to put them back in on the next step ?
-
-
この手順で使用する道具:Heavy-Duty Suction Cups (Pair)$14.95
-
ガラスパネルの上部コーナーの2箇所に吸盤カップを取り付けます。
-
吸盤カップがうまく装着しない場合は、ガラスパネルと吸盤カップを中性洗剤などで綺麗に拭き取ってください。
Another comment on DATA & LCD Temp. Sensor cables: I had to remove the vertical sync, and the backlight cable, however, if you have an assistant or/can carefully rotate the screen clockwise/and then have it held up about 5" to 6" at a slight angle, you do not need to remove LCD data cable or LCD thermal cable, however - IMPORTANT: you must have a second pair of hands/or way to securely prop up the LCD. Also, don't rotate too much, since then you will pull out LCD data cable, and it renders the whole exercise moot, or can damage the cable or connector.
You don't need suction cups. The screen, held by magnets, can simply be pried off using a very thin blade such as a screw driver and fingers.
That's a bad idea. using a metal tool to pry off glass is likely to end with an expensive broken front glass.
Suction cups are common. Find a couple and do it the safe way. I use some cheap ones that came with iPhone repair kit.
No need for suction cups, I just stuck my nails (short like guys usually have) between the top part of the screen and body, and it came off easily. I've never done it before, so it seems to be very easy.
Just completed the replacement of the optical drive with an SSD using an OWC Data Doubler kit. Attempted to remove the optical drive without disconnecting any cables but found it a bit fiddly to orient the screen for good access. I bit the bullet and disconnected them and found the process less daunting than I imagined. Reconnecting them was similarly straightforward if you're careful.
Tip: you can skip the step for removing the optical drive thermal sensor connector from the motherboard. Still need to remove the sensor from the optical drive but you can leave that hanging and reattach it to the SSD later.
I’ve just successfully installed a 1TB SSD in place of my optical drive thanks to the information here- thank you to everyone who has contributed!
3 comments- the procedure described here seems to vary between HD replacement and dual HD/optical drive replacement. This can be confusing at times.
Expect there to be minor differences between the layout described and what you find when you open up your iMac. There are also, surprisingly, differences between the HD enclosure description, and the article provided by ifixit.
I was able to replace the DVD/HD enclosure single-handedly without fully removing the LCD, or deconnecting any of the cables (steps 5-11). It’s a bit cramped, and fiddly, but I was not happy removing any of the cables despite watching videos, etc., since they all seemed to involve applying more force than I was comfortable with. A more detailed description of how to release them might have helped, but even here, there may be minor variations even within the 2389 model.
Good luck!
ivan birks - 返信
Fingernails are all you need to free the glass from its magnetic hold. If you don’t have them, slip something thin and plastic, like a spudger, at a top corner.
Max Powers - 返信
Minha dúvida é a seguinte: após o técnico trocar o HD do meu iMac de 21,5 polegadas, a câmera parou de funcionar. Seria por causa da troca do HD? Tem solução?
Creio que o cabo da camera não foi plugado ou deu mau contato… ou até danificado.
glecyo@gmail.com
I can’t get my glass to budge. I’m replacing a cracked one and now it’s about to shatter.
I know that I'm replying really late but I advise to use clear tape over any cracks so the cracks don't get bigger
Check for chips in the glass BEFORE you do this step. If there is a chip when you pull up with the suction cups you will wind up with a jagged mess. If you do have a chip I would advise covering the screen near the chip with clear tape of some kind before lifting out. Mine shattered right at the chip and the resulting glass dust cloud got all over. My solution was buying a new glass screen.
-
-
-
ゆっくりとガラスパネルをLCD表面に垂直になるように持ち上げて、スチール製のマウントピン
-
ガラスパネルをiMacの底側端から引き抜き、丁寧に脇に置いてください。
What's the best product to clean the face of the LCD?
Microfiber Cloth
Try your best not touch it in the first place
Brian -
Wearing Nitrile or regular surgical gloves helps prevent finger prints if you accidentally touch the glass.
amiller770 - 返信
I use a Swiffer duster from above at the last moment before I let the magnets grab the glass cover. This has worked so well the last dozen or so times I’ve replaced a glass cover since I never have access to a “clean room” and don’t wear a “bunny suit”.
Also, more dust will shed from your skin if you’ve just taken a shower, so I like to finish these repairs in the morning before a shower.
-
-
-
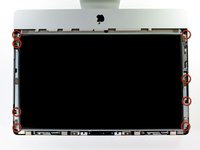
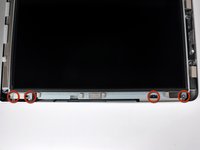
アウターケースにディスプレイを固定している8 mm T10トルクスネジを8本外します。
The metal near the screws is VERY magnetic. Honestly, the hardest and by far most frustrating step was trying to put these screws back in.
I ran into the same problem - easily the most frustrating part of this process. To help deal with it, I took a drinking straw, cut it to be about 2 inches long, and used it as a chute to guide the screw to the hole. Dropping the screw down the straw, it'd still stick to the side due to the magnets, but using my screwdriver, it was easy to push the screw down to where it needed to go, and the straw kept the screw from being pulled out of place by the magnets.
josh -
Hmm… yes, the magnets sucks - literally. But if you use a normal screwdriver or a bit, the screwdriver tip or the bit can be “loaded” by the magnets too. Just move the screwdriver (or bit) over one of the magnets and then “plug” the screw onto the screwdriver’s tip (or bit). It will be held by magnetic force. Just enough to move the screw vertically and very slowly into the whole.
There are some special screwdriver on the market with “claws” to hold screws, but they are hard to find/to buy and expensive. I sometimes use superglue (a LITTLE) to temporary fasten the screw at the screwdrivers tip. This technique can be used with destroyed screw heads too to optimize adhesion.
Replacing these screws was like playing the most difficult game of “Operation” imaginable. I wish I’d seen the tip about using a straw before I started playing!
-
-
-
アウターケースからディスプレイの上部端をわずかに持ち上げます。
The harddisk can be removed WITHOUT the next steps. The opening angle of the partially lifted LCD display gives enough room to untighten the two Torx T9 screws of the hard disk bracket, to unplug the two SATA connectors and to carefully lift out the harddisk. There is absolutely no need to dismantle the whole thing.
All you need is a screwdriver which fits into the room. I’ve used the “Pro Tech Toolkit” from iFixit. The screwdriver with Torx T9 bit fits perfectly.
The other “tool” you need is either someone who holds the LCD plate or the inner leftover of a kitchenroll, a scrunched paper, a small towel or similar which has to be stuffed between the logic boards and the LCD plate to keep the LCD at its lifted place (careful! don’t unplug any of the cables).
I’ve opened and changed the harddisks of those 21,5 iMacs a dozen times with the help of the “Pro Tech Toolkit” and a kitchen roll.
If i want to replace the HD with a SSD, can i still skip the next steps? I think i can’t because i need to change the termal censor, but i would like an other opinion please.
Danois -
“Kitchen Roll” - paper towel core.
kyoder11 -
You can absolutely replace the drive without removing any cables. It's a little tight, you need your torx driver to be short enough to fit in the limited space. Be careful not to put any pressure on the cables (the one nearest the front is a good guide of how much space you have to play with). It's helpful to have another set of hands to hold it up while you remove the drive, but I just did it by holding the display up with one hand and it wasn't that hard to remove and replace the drive.
I wouldn't install any thermal sensor, just use something like Macs Fan Control (free) to adjust the fans so they don't race out of control.
Hia,
thx to IFIXIT and 20+ years of computer repair and building experience (all PC) there was no problem at all to remove a 500 Gb HDD from a mid 2011 iMac and replace it with an 500 Gb SSD Drive (with help from Comtec EDV, where i bought the upgrade kit).
Skip the steps where people are advised to remove the display. Due to my experience it is def better to leave cables and plugs where they are. I lifted the display 12 cm and fixed this position w/ one pencil in each front corner of the case where the other end of the pencil sticked in ascrew hole of the display-frame. Very easy to operate afterwards! No probs w/ the screws of the hdd-frame.
Some care-taking of static electricity is advised - wear a wrist cable. And don’t forget to press start button after having removed power chord. I had an Android Tablet on the right side, where i could watch these ifixit pages :-)
thx to IFIXIT!
w/ regards from cantbtroo from Berlin
Thank you ifixit for the guide. Like so many others I jumped from step 4 to step 10 and left all the cables intact. Felt much safer doing so. Papertowel cores secured the LCD to higher position. There was enough room to remove the old HDD and replace it with a SSD drive.
Cheers!
-
-
-
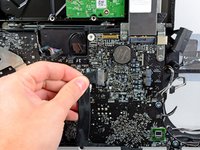
iMacの左上隅付近にあるLEDドライバボードのソケットから垂直同期ケーブルコネクタを引き抜きます。
Tried doing this on my iMac, but this cable would not come out for love or money. No matter what I did, I could not unplug this cable. My iMac is the same 21inch 2011 as this one. Any advice would be greatly appreciated.
louis.barr - 返信
I was tempted to forgo steps 4-10 but found the inside of the case to be very dusty and decided to do the full disassemble. I struggled getting this vertical sync cable connector out. The trick that worked for me was to prop the display up using a pair of toilet paper tubes then using the fingernails of both thumbs, one on each side of the connector and it came out easily.
-
-
-
LEDドライバボードから、LEDバックライトの電源ケーブルの接続を外すため、ディスプレイをアウターケースから回転させて取り出します。
Slip a thumbnail under the “front” (toward the top of the iMac) of the connector to release its clamp from the retaining ridge. Then push toward the “back” (bottom of iMac).
-
-
-
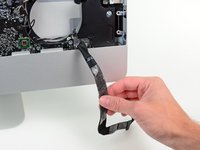
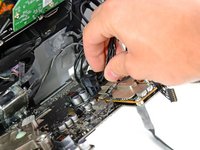
ディスプレイデータケーブルのロックに固定されたプラスチックのプルタブを掴み、上向きに回転させます。
-
ディスプレイデータケーブルを、ロジックボード上のソケットからまっすぐ引き抜きます。
I am having a difficult time reattaching the LCD cable. A better description or any tips would be useful here.
Me too — ditto that.
https://eshop.macsales.com/item/OWC/DIDI... —> abt. 5:30 into the vid. Handle up to slide in, then flip it down to lock the connector in place.
The connector needs to be carefully pushed in parallel to the board with a surprising amount of pressure and the pull tab must be folded back. Not super fragile, but not strong either.
I really wish that the fagility of this connector was mentioned in Step 10 or 11.. When i rotated the screen on step 11.. It pulled this connector out and now I can't get it back in.. I hate computers.. HA!
This is the most painful part of the whole event. Replacing this cable took me around 30 minutes !
I have tried and tried to get this cable back in. How do I know if I have messed it up?
Mine seems to be…upside down? Looks like the little flappy lock thing is on the bottom as opposed to it being in top as pictured?
I agree with everybody that this is the critical step in this fix. Removing it is not that difficult, the description is quite accurate, but I would highlight that the “rotate” part of the step could be detailed: the black plastic tab is attached to the metal lock (golden colored) , which should rotate into the direction of the cable almost 180 degrees to unlock the connector. After doing this you can pull the cable out of the connector, PARALLEL to the board and away from the connector. It travels a very short distance to disconnect. After going through the rest of the steps to remove the display, take some time to examine closely the connector and understand what you have to do to reconnect it on assembly. It helps to fully visualize beforehand, since on reassembly it is difficult to see properly.
Magnifying glasses are needed for this step. Carefully study the cable and how it attaches to the connector. Take a few pictures to help. This is the most difficult step.
-
-
-
ロジックボード上のソケットからLCD温度センサーのケーブルコネクタの接続を外します。
I managed to damage the LCD thermal sensor socket in the logic board. Now the connector won’t stay in place. I know the missing thermal sensor should cause the fans to spin up (they do spin up after a while), but the screen is blank.
I connected an external monitor and it works fine, so it doesn’t seem to be a graphics or logic board issue. I also replaced the LED driver board with one from a working iMac, to no effect.
Can the missing thermal sensor be causing this?
Having the same problem. Black screen, works fine with external display.
Passerby -
-
-
-
慎重にディスプレイをiMac上部端に向けて引き抜き、アウターケースから持ち上げます。ケーブルが巻き込まれないようご注意ください。
Btw, I was pretty safe (& content) with two suction cups - i bought 3 for less than 7 Euros. They were a good help for a glass that hasn’t been removed since 2011. But i am sure fingernails will do a good job, too (of course not mine, cos i have short ones).
At the end of the job it was even possoible to clean the fan that sucks cool air into the iMac (w/ a paintbrush and a controllable vaccuum cleaner). After that, it’s also a good opportunity to clean the air inlet that is part of the aluminium case (behind the stand - it’s always dusty).
w/ regards from cantbtroo, Berlin
-
-
-
次の4本のネジを外します。
-
9.3 mm T10 トルクスネジ(大)ー1本
-
9.3 mm T10トルクスサイズ(通常サイズ)ー3本
In my case the red screw was on the lower left side near the power-data cable!
Same for me.
-
-
-
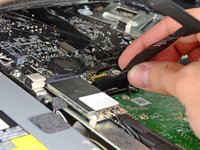
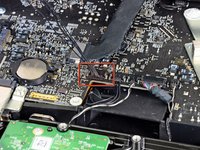
ロジックボード上のソケットから光学ドライブ温度センサのコネクタをまっすぐ引き抜きます。上向きに引くのではなく、ボードに並行になるように抜いてください。
The thermal sensor connector shown in the red box is the one for the hard drive, not the optical drive. The optical drive sensor attaches to motherboard near bottom left of optical drive fan.
The guide was correct in my case that this is the Optical Drive sensor. The board has “ODD Temp” written on it. Original HD has it’s own built in temperature sensor without a separate cable to the Motherboard, which is why OWC sells a special “In-line Thermal Sensor” SATA cable with a Temp. sensor that attaches to any new hard drive itself.
amiller770 - 返信
When I was removing the optical drive cable sensor the connector came loose from the board. Is there any way to repair this?
-
-
-
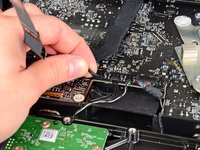
光学ドライブ内側の端を持ち上げて、ロジックボードに付いているGPUフレームのコネクタを絡まないように外してください。
-
光学ドライブをアウターケース右側に付いている固定ピンから慎重に引き抜き、光学ドライブケーブルの接続を外すためにスペースを確保します。
-
GPUヒートシンクの後ろから光学ドライブ温度センサのコネクタを取り外すには、光学ドライブの後ろを通してください。
On the reassembly, I found threading the optical drive cable back under the GPU frame trying. Here’s some advice: Take some dental floss, form a loop, and feed that loop under the GPU frame. Put the cable into the loop of floss, tighten the loop, and pull the loop back through. This is much easier, faster, and far less frustrating.
-
-
-
-
光学ドライブから光学ドライブのコネクタを引き抜いて、光学ドライブケーブルの接続を外します。
-
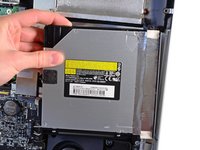
iMacから光学ドライブを取り出します。
I have already installed the second SSD drive, but due to the size of the drive I need to change it with another SSHD 1 TB drive. Am I right that I have to follow the instructions up to Step 18? Because The SSD is already behind the optical drive, so what I need to do is remove it and install the new SSHD drive and put everything back again. Please confirm.
This was my only error on reassembly. The SATA cable must be under the black plastic prong. I did not want to pull to logic board again. I managed to bend the black plastic bits and get the cable in the right place.
-
-
-
ロジックボード上のソケットから光学ドライブのファンコネクタを引き抜きます。
-
iMacから光学ドライブを取り出します。
If you happen to forget to plug the fan in before you re-install the fan, instead of trying to plug it in while it's in there just take the fan back out...I've heard from a friend who did that... :-D
-
-
-
この手順では、次のケーブルの接続を外します。
-
SDボード
-
左右スピーカーとマイク
-
オーディオポート
-
WiFiアンテナ
-
右側の温度センサ、Bluetooth /環境光センサ/カメラ/左側温度とハードドライブファン
-
CPUファン/環境温度と電源ボタン
-
IRセンサ
The cable in the yellow box pulls out parallel to board. The connector looks as if it might be different, but grasp the black tabs and pull parallel to the board
The power button cable is super easy to break, use a small tipped plyer, same goes for the right temperature sensor. I broke both on my imac 2011 20.5 model.
-
-
-
スパッジャーの平面側先端を使って、3つのAirMacアンテナコネクタすべてをAirMacボードのソケットから引き上げます。
same with mine
Same on mine
what does this cables mean?
mine is:
2 bands = CH0
1 bands = CH1
0 bands = CH2
I think my cables were in the opposite order—but I put them in the instruction order and everything is working.
All the 21,5” Mid 2011 that I had repaired (12) had all these cable in the inverse order. I suppose that is correct
dariomella - 返信
-
-
-
電源ボタンコネクタをiMacの左下隅に向かって引き抜き、ロジックボードのソケットから接続を外します。
Please be careful with this step on the power button. Mine disintegrated when I pulled it out and I had to put it back in the socket pieced together and tape it. Just be careful.
-
-
-
親指を使って、IRセンサーコネクタをiMacの上端に向かって押し、ロジックボードのソケットから外します。
-
IRセンサーボードをアウターケースのフロントの裏から上に引き抜きます。
-
IRセンサを取り出して、保管します。
NOTE: Be aware that (especially refurbished iMac’s) may have adhesive that may increase difficulty removing sensor. Possible recommendation; Use your iFixit Jimmy Tool or spudger to assist you in reaching the adhesive strip.
I tried using my thumbnails as shown to push the connector out of its socket, but the individual wires came out instead. Spudger didn’t help. I had to remove the connector after all 4 wires came loose. I don’t know if this is worth the trouble to fix.
had the same experience as James. Will not replace it and see what happens
-
-
-
次の7本のネジを外します。
-
7 mm T10トルクスネジー2本
-
30 mm T10トルクスネジー1本
-
25 mm T10トルクスネジー2本
-
21 mm T10トルクスネジー2本
ALSO on reassembly, check between the board and metal post under the right-hand yellow dot in this picture. Be absolutely sure that the left speaker wire, the SD board cable or the right fan cable aren’t between the board and the post. I shorted out my left speaker by getting it caught in there. Easy fix, but if they’re bent just right they just seem to want to fall between the board and post. Make sure they’re outa’ there!
-
-
-
次のネジを4本外します。
-
9.3 mm T10荒目ネジー1本
-
25 mm T10荒目ネジー1本
-
22 mm細目ネジー2本
-
電源装置の右上と左下のコーナーをリアケースから引き離して、電源装置の角に取り付けらた固定ポストを外します。
SAFETY NOTE: Remember ANY high voltage power supply can cause SERIOUS INJURY and may still hold charge LONG AFTER the device has been unplugged, EVEN IF PROPERLY DISCHARGED!!!
Amen. Having been jolted twice from 2 different spots on the power supply, I would recommend covering the power supply with a small microfiber cloth, handling it by the edges and keeping the cloth in place. Cheap insurance. It will also protect the power supply if it touches something conductive on the hard disc when you flip it over to remove the DC-out cable (next step).
-
-
-
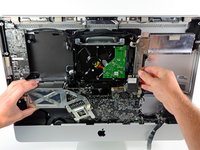
ロジックボードをアウターケースの裏から少し引き離して、それからアウターケース下側のフロントをクリアにするため、ロジックボードを上向きに持ち上げます。
At this point on reassembly, make sure the optical drive SATA cable is under the black plastic wall prong. The connector must be low to reach the optical drive.
YES to Terry above. The optical drive cable actually pretty much floats loose when the connectors are pulled off. It needs to stay below the transverse wall which is right under the person’s right hand in the photo above.
Additionally, it would help to take a picture here to remember where the cables all go. You will have some open sockets at the end and it’s a little confusing. There is a good diagram of their locations here: Screenshot #1 at ++https://drive.google.com/drive/folders... Thanks to Timothy in comment for step 41 for this link. Basically don’t get sockets for SSD and HDD confused!
-
-
-
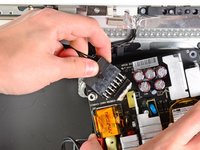
ロック機構を押し込み、DC-Inケーブルをロジックボード裏のソケットから慎重に引き抜きます。
HI,
I just replace the dead GPU Card on an Imac 21.5 Mid 2011,
Got 2x2Gb 1333 sodim in the top of slot.
When i finish the repair, the mac start normally but except the right memory slot ,When looking at the front of the Imac , (The top and bottom Right Slot memory ) (Dimm Ch B )
I search on the net and found that i properly knocked the motherboard when I put it back in.
I think the power Filter, behind the motherboard ,is what cause that.(Because when you fight to put back cable behind the motherboard)
You need to mention that, next time.
I’m not sure about that but I think the part C3230. (I do not disasembly it again to verify (It’s so Fragile)
Can someone confirm that,( And what do i need to do to repair it.??
Or Do someone have the same problem, (Right slot (Top & Bottom ) Not working.??
Mr Desvaux
-
-
-
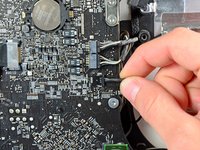
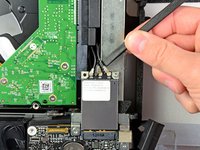
ロジックボードのソケットを傷つけないように注意しながら、ハードドライブのSATAデータケーブルをロジックボードのソケットから慎重に引き抜きます。
I searched all over the internet for photos or diagrams of the back side of the logic board to understand where to connect SATA 1 and 2 data cables. This is a pain to reopen and go back to where you can fix the SATA connection.
I located the schematic for the area. I hope this of use to someone https://drive.google.com/drive/folders/1...
I'm replacing the HDD with an SSD - not sure if I should use the HDD SATA-0 channel or the SSD SATA-1 channel.
Doesn't really matter, but I would suspect the SSD one is for the optional SSD that lives behind the ODD.
-
-
-
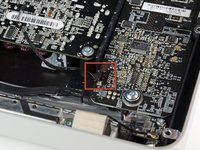
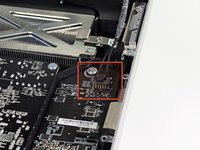
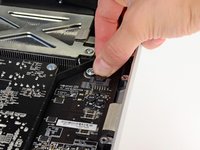
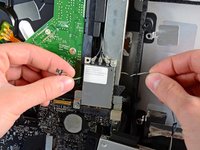
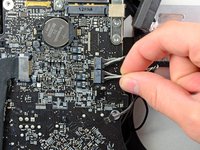
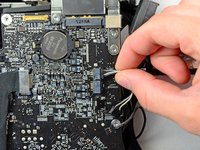
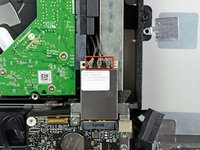
ロジックボードにGPU温度センサケーブルを固定しているテープを剥がします。
The GPU thermal sensor is connected to the LCD TEMP connector on the main board.
-
-
-
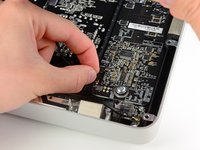
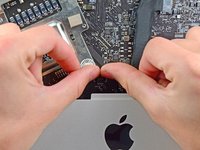
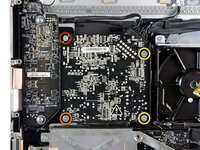
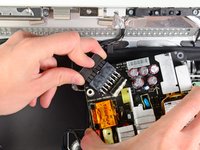
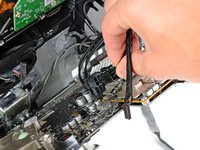
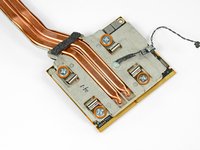
GPUにGPUヒートシンクを固定している6.5 mm T8トルクスネジを4本外します。
-
T8トルクスネジを緩めるときは、必要に応じて#1ドライバを使ってGPUヒートシンクのソケットを動かないよう固定してください。
Yes, T10 for sure.
My replacement card had a clamping bracket with small bushings in the holes which required a smaller screw! Oh fun! I used a T6 screwdriver to carefully and gently push them up from underneath to get the bracket off. It’s lightly glued on, don’t worry about that; you won’t peel off any traces or board. But DO NOT let the card flex when you do this. Then I reused the old bracket and screws. I suppose you could also drill out the bushings. Curtis Gross talks about this in his nice YouTube video.
I didn't have to remove these screws at all and skipped this step entirely.
-
-
-
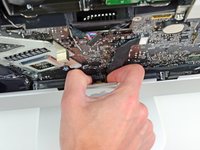
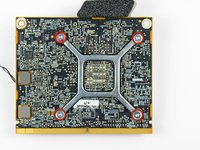
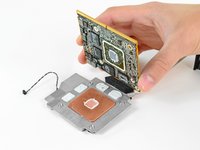
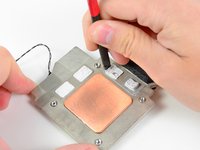
GPUヒートシンクからGPUを取り出します。
Too late.
This image is very misleading : (
Please make this a warning, tell about the pads in the description and/or use a better picture!
My card is probably gone.
Did you find the thickness?
I am using pads with a 1.5mm thickness made by Arctic (color blue).
anyone has measure the gap? for me is 1mm, so the thickness of the pad. I have not tryed yet
Finally I used 1mm thermal pads. they worked well. First I bought 2mm pads and they definitly doesn´t fit, they don´t let the GPU micro not reach the heat sink (very bad). As Dan Packard suggest, I did not test 1.5mm pads, they are very expensive here in Argentina.
going for 1.5mm wish me luck!! also from argentina, and yes, they are expensive
-


デバイスを再度組み立てるには、この説明書の逆の順番で組み立ててください。
デバイスを再度組み立てるには、この説明書の逆の順番で組み立ててください。
85 の人々がこのガイドを完成させました。
以下の翻訳者の皆さんにお礼を申し上げます:
100%

これらの翻訳者の方々は世界を修理する私たちのサポートをしてくれています。 あなたも貢献してみませんか?
翻訳を始める ›

22 件のコメント
hi! please tell me what type of grafic card is usen in i macs? i know AGP PCI standars but i t is not them
tnks
Hi all, I'm new to computer repair, basically I just want to save my mac. It appears that the graphics card has gone out (it's about 5 yrs. old). Where can I find a good replacement and what would be an appropriate price range? Also, do you have any additional tips for physically replacing it. How can I tell if I need the whole piece or just a section of it? I have seen prices range from $4.00 - $500.00.
Please help!
DEE
Hi There, mine is a late 2011 model iMac desktop and I'm having trouble with the display screen. It's coming up with pink and yellow vertical strips. The tech says it could be graphics card. The online spec for my late 2011 model iMac suggests it is - (AMD Radeon HD 6750M graphics processor with 512MB of GDDR5 memory). Can you please tell me if that's right. Thank You.
it is "AMD Radeon HD 6750M 512 MB" you can click the apple logo in the top left then, "About This Mac" then, check under "Graphics:".
Hi! Can you insert a different graphics card? A nvidia mounted in the retina macbook? Something more than the 512 mb of the series card. Thank you.
I combined this tutorial with the “baking the GPU” steps in this video to fix the yellow/pink vertical bars issue: https://m.youtube.com/watch?v=nB172HJeM0...
Yes, sticking the GPU in a 395 degree F oven for 8 minutes worked!
I did the exact same thing and worked for me too, I can’t believe it!
Thank you very much to all of you who did such a clear and easy to follow tutorial =)
Fantastic instruction and pictures. Screw sizes are a big help, even when I used a muffin tin to keep them straight. One thing that caused problems was forgetting to leave all of the cables loose as I put the logic board back in. I had to undo a couple of times because I trapped a connector under it. Ideally there would also be separate steps for re-assembly instead of just going backwards. But that’s a lot of extra work. Great job, team!
Great guide! Thanks so much for taking the time to put it together.
what is that lcd screen panel LM215WF3 (SD) (A1) or LM215WF3 (SD) (B1)????
After i have open my imac his doest show any image on LCD screen but i can hear his startup sounds
Hi Andrew,
Very interesting and usefull guide to replace graphic card on an iMac, thank you very much. One question, do you know if it is possible to replace the GPU by a more recent one. For example one that is metal compatible. You understand, my question is: Is it possible to replace the GPU in order to have an iMac Late 2011 compatible with OSX Mojave ?
Thank you
David
Great tutorial, I just replaced the GPU of my wife’s late 2009 21.5” iMac with it (found a new one for 30$ on ebay). Some screws and connectors on the logic board have different positions than in this instruction (which is for a 2011 model), but it was still very helpful! Just a hint: I also replaced the PRAM battery (that you see in step 32) while I was at it.
Thanks a lot!
Very useful guide! iMac 2011 AMD 6970M 2GB 27” with graphics card problems is now working perfectly again. Baked the card at 200C for 10 minutes and cleaned and reapplied thermal paste.
After doing the whole thing and trying to turn on it didnt…..it gives 3 beeps or tons or sound, stops and then starts over again with tons and keep going
3 beeps/tones means memory isn't seated properly.
Hello, please, what would be the right thickness for GPU thermalpads. In my case, it will need to be replaced, but I don't know what the correct thickness is.
Thank you!
used this guide to re-paste the GPU as well as CPU to prevent it dying from heat as a precautionary measure. THANK YOU! P.S. i used K5-Pro to replace the gpu pad paste, thermal acrtic silver for both gpu and cpu chips
Hi Thanks for , step by step images for mac upgrade.
ola
tenho um A311 21.5" de 2011, que no inicio quando ligava tinha o logo da maçã como cursor e a um 2/3 do fim ficava tudo preto mas tinha som, e com um outro monitor o pc trabalha so no segundo monitor.
Agora quadro preto no ecrã principal o segundo arranco para fazer o login .
Pergunta será placa gráfica K6750m 512mb ou outro possível problema.
Peço ajuda pois estou a começar a trabalhar com o Imac e estou perdido.
grato pela ajuda
José Carlos
jcar002@gmail.com
Before beginning unplug your iMac.
Henry Barnett - 返信
The screws are not phillips #1 as implied above. My phillips#2 bit fit.
John McWilliams - 返信
Yes phillips #2 is the correct Bit
Heath - 返信
Whenever I go this “deep” into any computer that has a motherboard battery, like the CR2032 for this iMac, I’ll add a new battery to my workflow. I’m in the “neighborhood” anyway.
The battery is in a spring-loaded compartment, which requires patience and persistence.
I make sure to test the new battery before installation. (The “3-2-1 Rule” applies: 3 of something means 2, 2 means 1, and 1 means none - I keep spare batteries on hand.)
When I took part in my dual-drive adventure, I also added a thorough dusting (outside/outdoors) - phew!
Carrick - 返信