
はじめに
手順 1 に進むコントローラ内部のパーツを修理する前に、上部基板を外す必要があります。ここでは、ハンダ除去によって上部基板の取り外しを説明します。


-
-
サイドハンドルを外すため、コントローラーをしっかりと握ります。スパッジャーをフロントとハンドルプレートの間にできた隙間に差し込みます。
-
スパッジャーを前後に動かしながら、フロントプレートからサイドプレートを外します。サイドプレートの隙間全体にスパッジャーを動かして作業を進めてください。
One you take it off, is it possible to click it back in?
Aiden Bear - 返信
As long as you don’t exceed the couple tons you need to take it off you should be able to put it back.
Brandon -
I don’t have a squdger
getting those handles back on seems impossible, they just dont fit as well, a gap remains even after snapping into place.
Dont think ill be doing this in the future
edit: wiggled the bo9ttom middlewith the handles off and somethign finally “clicked” into place for that extra 1/4 mm for the down arrow on my D-Pad to click back up into place!.
-
-
-
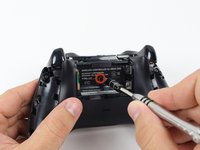
ドライバーを使って、ラベルの中央部分の穴に向けて直接押し込んで穴を開けます。
-
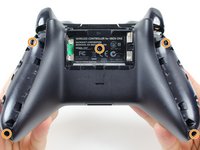
TR8いじり止めトルクスドライバーを使って、コントローラ裏側にある長さ10mmのネジを5本外します。
It's a t8 or t9 security bit btw, I got the top two out with a regular T8, but the bottom two and middle needed a T9 Security bit.
All five faceplate/backplate screws in the controller I disassembled were T8 security fasteners.
The T8 is only good for the middle screw on my One S controller. The others require something bigger
These requires SECURITY Torx bits (they have a cannulated hole in the driver). I don't believe the iFixIt branded driver is cannulated but you can buy a set of bits from DeWalt DWAX200 which is overkill but has what you need.
jhighsmith - 返信
The driver that iFixIt sells is cannulated.
where do you get this dumb ass screw driver
You can bypass it with a 1.5mm flathead.
thank you for this. worked for me
TR9. A $10 kit from Walmart has the bit/driver in it and extra goodies to make life simple.
As weird as it sounds, the top 2 came out for me with a flathead- but the bottom two and the middle one wont
-
-
-
-
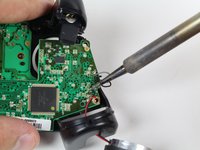
ハンダを除去し、モーターと基板をつないでいる赤と黒の導線を外します。
-
ハンダを除去し、上部基板につながっている黒とグレーの導線を外します。
-
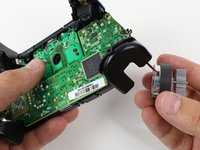
モーターを外します。
Steps 6-8 aren't completely necessary, and are very risky if you aren't good at soldering. It would seem the only reason to remove the motherboard and mess with all this soldering is just so you can reach both screws on the trigger in step 10. However, you can reach them already with a small-bodied screwdriver. Although you might have to rest the screwdriver on the black square processor to reach the bottom screw, it shouldn't damage the processor or motherboard to jimmy that screw out.
Thank you very much. There's no need for soldering.
anguo -
like mentioned by ‘Robert Rapier’ you can skip the de-soldering in most cases,
for example cleaning or changing the buttons is doable, but the grey and black wires are pretty short
and wired through the inner case so it can get a bit fiddly and you have to be careful not to damage them in the process.
If you have a soldering station around i would still recommend using it.
-
-
-
モーターの台座付近にある2本の7mm T6ネジを外します。
Are these just T6 screws or Torx security T6 that is cannulated?
The outer screws are security screws. The ones on the system boards are Torx.
Rongwey -
-
-
-
基板の中央付近をしっかりと握ります。
-
基板を軽く前後に揺すりながら持ち上げて取り外します。
-


再度組み立てる際は、この説明を逆に行ってください。
再度組み立てる際は、この説明を逆に行ってください。
29 の人々がこのガイドを完成させました。
以下の翻訳者の皆さんにお礼を申し上げます:
100%


これらの翻訳者の方々は世界を修理する私たちのサポートをしてくれています。 あなたも貢献してみませんか?
翻訳を始める ›
チーム

Cal Poly, Team 20-15, Maness Winter 2015 Cal Poly, Team 20-15, Maness Winter 2015人のメンバー
CPSU-MANESS-W15S20G15
5 メンバー
54のガイドは作成済み
6 件のコメント
I was only able to unscrew 2 of the Torx screws. They have a pin right in the middle that doesn't allow for the screwdriver to be fully inserted, or at all. The two screws I was able to unscrew must've had a shorter pin than the others.
These points on the head is what we call a security torx screw. You will need the specific T8 or T6 Security Torx Screwdriver to remove these screws.
You can use a small flat blade screwdriver ;-)
If any of the screws are tight, the centre pin may snap, then you can just use a normal Torx bit.