

はじめに
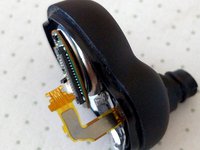
手順 1 に進むこの修理ガイドでは、Sony WF-1000XM4 イヤホンのバッテリーの交換方法を説明します。このガイドでは、左イヤホンのバッテリーを交換します。右イヤホンでもこのガイドに従うことができます。イヤホンは完全に対称なので、手順は同じです。
イヤホンのバッテリーを交換すると、次の問題を解決できます:
- 充電ケースに入れているときにイヤホンが熱くなる
- イヤホンが 100% まで充電されない
- 充電ケースが赤く点滅し、片方のイヤホンが異常に熱くなる
- 少なくとも 1 つのイヤホンのバッテリー寿命が短い このデバイスでイヤホンが爆発する という報告があります。
したがって、このガイドを使って修理を始める前に、作業をするイヤホンが完全に放電されていることを確認してください。
免責事項: iFixit もこのガイドの著者も、このチュートリアルまたはその公開に関連するいかなる損害についても責任を負いません。
必要な工具と部品
パーツ

ツール


もっと見る
-
-
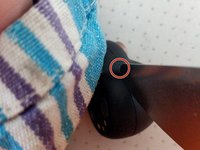
強力なヘアドライヤーまたはヒートガンを使用して、イヤホンを約 10秒間加熱し、イヤホンの両方の部分を接着している接着剤を柔らかくします。
-
これは難しい作業です。イヤホンのシェルのプラスチックを焦がさずに、イヤホン内部の接着剤を柔らかくするのに十分なほどイヤホンを加熱する必要があるからです。
I used a small craft heat tool that has a small narrow opening. This may be easier to use to apply heat in a more focused area than a heat gun.
The model I own is below:
https://www.amazon.com/Mowis-Mini-Heat-G...
This one doesn't appear to be available any longer, but similar ones may still be gotten on amazon or a similar website.
While heating, do not use a tool to hold the bud's ear tip, as it will easily deform since it is quite small and will heat much faster than the rest of the case due to its smaller mass.
I just did this :(
What a pain. I suggest you get an i-opener heat bag up to 180F, wrap the earbud for two minutes, then jab at the corner opposite of the Sony logo with a small electronics flathead screwdriver. After the corner is breached, twist the screwdriver to further separate it, then use a pick to separate the rest. Much easier then trying it with some plastic tool. Minimal damage, and worth it.
I opened mine with a hairdryer that I have from my house that I bought from 2005... I just rotated it uniformally, after 30 seconds I tried opening it with the Flex tool thingy and it didn't budge, did it again for 30 more seconds and was able to open it relatively easily. First time ever doing a repair btw.
MIA -
I used this method with an I-opener wrapped around the earbud for 2 minutes. Was able to get the case to open using the plastic spudger without damage
I used a Remington hair dryer (my girlfriend's) on highest heat and fan setting. I wore an outdoor canvas/suede yard glove to protect my hand/fingers while holding it in place on top of my desk. It took more time than I thought it might, perhaps, because I started out on the lowest fan setting. None of the Fixit tools worked for me, but eventually I tried a Xacto knife and that did the trick. First-timer; about half an hour on this step. Man, I wish this was all of it. :-|
For this step I used a conventional hairdryer and an oven mitt:
Placing the oven mitt on my lap, the spot between the thumb and the rest of the hand works well to provide some resistance so the earbud isn’t blown away from the strong airflow. Use the hairdryer on its highest setting and point it away from you while the oven mitt should prevent your legs from getting too hot. Point the dryer at the earbud for a couple of seconds, then use your free hand to turn it and place it down again. If it feels hot to you, try to proceed with step 4 - if your thin tool of choice can’t slide into the gap between the halves, heat more (don’t forget to turn the earbud so the seam is heated from all sides). For me step 3&4 took about 15min on my first attempt (including a few attempts at step 4 and then re-heating because it wasn’t hot enough to get the tool in). Hope that helps.
If you have access to a hot air soldering station, use it! A temperature of 150°C is more than enough. At medium to high air flow, work your way around the earbud seam with a small to medium nozzle. This loosens just the adhesive and prevents any other parts of the earbud from melting or deforming. Also, you don't have to worry about burning yourself as much. I got mine off in just a few minutes with no problems and without any external scratches, you can barely tell that the earbud was disassembled.
joha_beere - 返信
I initially tried the hair dryer and a stainless steel pryer but wasn't getting anywhere, the only thing I managed was to scratch the casing.
I switched to a utility knife blade and opened it in about 20 seconds.
The second pair I didn't heat and that one opened even quicker.
I don't think there's that much glue to require heating.
melted the earbud part...
If using a heat gun, be very careful with how long you heat the earbud for.
I thought it would be safer to heat it for longer at a lower setting, but this backfired spectacularly.
The longer heating duration gave the heat time to transfer to the battery and it blew up.
The "explosion" did disassemble the rest of the earbud, but also wrecked some of the electronics, so I would not recommend it.Despite all the other comments recommendations the only thing that worked for me when using a hair dryer:
- use the thin nozzle for the hair dryer
- used some kitchen tongs to hold the earbud
- I needed 60 seconds before the glue was hot enough, slowly rotating the earbud, 30 seconds per rotation.
- here’s the key bit: use some grips wrapped in cloth (as to not scratch the earbuds) and squeeze the headphones lengthways from top to bottomin order to slightly bend the case. You may notice the gap widening enough to get your tool in. This was the only way I could get a wide enough gap to stick a Stanley/xacto knife in between the case and Jimmy it around. The first one I got hot enough to squeeze with my hands, but the second was tougher, though it may have needed a bit more heating.
Without this squeeze method I wasted a good hour absolutely scratching up my right earbud.
Pro tip: Protect the bud touch sensitive areas with for example piece of sticky note paper ==> This effectively isolates most hot air blowing to touch areas and therefore touch surface remains without visual damage. Realized this after first earbud change (which was slightly visually damaged but works anyway) and the second one was done without any visual damage when using this method.
-
-
この手順で使用する道具:iFlex Opening Tool$11.99
-
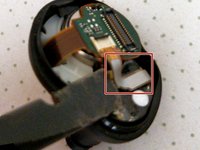
できるだけ細いツールを用意し、イヤホンのシェルの 2 つの部分の間の隙間に差し込みます。
-
次に、図の丸で囲んだ部分で、てこの力で 2 つの半分を分離し始めます。
-
イヤホンのシェルの 2 つの部分が分離し始めたら、シェルの周囲全体をてこで動かして分離を続けます。
I used iFixit's iFlex Opening tool as the author suggested, and it worked quite well.
Gently heat the case, and insert the edge of the tool into the case seam after heat has been applied evenly around. Once you can insert the tool into the seam, gently twist the tool against the inside edges of the seam to pry the bud open. If it doesnt open easily, you need some more heat.
Be patient, and work slowly to not damage the plastic housing.
Be careful to not apply too much heat, as you can quite easily melt the touch pad and deform it.
I used the edge of a small pocket knife to initially pry open then had space for my other prying tools. Again be patient. Glue came apart easy after using hair dryer to heat up for less than a minute and constantly moving
For this step I used a plastic pry tool, anything that is very thin and can work as a lever should do. Try inserting the tool of your choice into the thin gap between the two halves of the shell and wriggle it until it slides in - if you can’t do this, repeat step 3 to make sure your earbud is hot enough. Once you are able to slide your tool in the gap (you should see it widen ever so slightly) work around the seam from that entry point. For me the two halves separated as soon as I had pulled my tool through the entire circumference of the gap.
Before using an opening tool, squeeze the sides of the bud on its widest point (near the top). When enough heat is applied in the previous step, the seam at the top will widen sufficiently to put a pick in the gap. No metal tools needed, surprisingly easy and less risk of damage!
perssing in from the both sides of the earbud really helped me a lot. I used a small clamp to push inwards and it just popped open without any special prying needed. Infact I could use the blue plastic prying toll easily to pry part the sides in just a few moments.
I think using a press/clamp here is a gamechanger and it really makes this repair a walk in the park!Please, please, please! Take attention at this step, my accu exploded from the heat! I was lucky because it only blew the case up and not my fingers ( case was open after that though and not even broken )
My suggestion is 1st you use heat and then use a tool to scrape out the glue on the side by the metal microphone.
Then as others have mentioned, heat again and then apply pressure (1st time i did with fingers, 2nd was with a small glamp) to kind of make the sides sort of pop. Be gentle and slow but firm. that caused enough of a gap that i was able to get the metal tool in to open a bit, making room for a plastic tool to open it slowly.Greg Byrne - 返信
I didn't have much success using a prying tool and caused a lot of damage at the place that is suggested as the starting point. I then saw the comments about simply applying pressure to the shell and this worked wonders. Just heat up the earburd and then put it in a clamp or a small vise. Apply some gentle pressure like cracking a nut and it will open up along the seam. This enables you to slide in a prying tool without damaging the outer surface.
My first try with this resulted in a half-melted / deformed bud, but it still works fine. Attempt #2 (on the other bud, 2 months later) I used a thermal imager to be certain I was bringing the temperature up steadily. Around 160-180F the adhesive was soft enough to pull apart, without deforming the plastic at all.
-
-
-
-
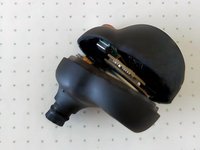
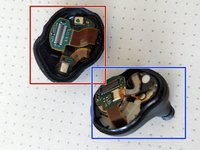
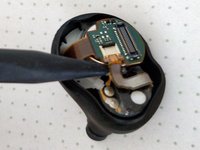
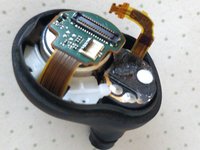
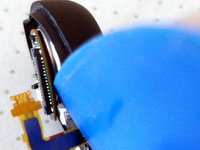
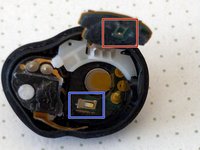
イヤホンを開くと、ボード間コネクタで接続された 2 つの小さな回路基板が見えます。
-
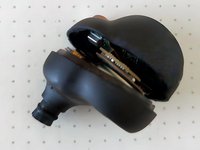
オープニングピックを使用して、2 つの回路基板の間を非常にゆっくりと押し開けて、回路基板を外します。
-
イヤホンシェルの上部は、後で再組み立てできるように取っておきます。
-
3枚目の写真では上部が赤く強調表示されています。
-
3 枚目の写真では、下部が濃い青色で強調表示されています。
Just like step 6, this step may also be skipped.
It makes the battery removal a little bit less convenient because the other part of your earbud may get in the way because it is dangling loose, but you don't have to disconnect and reconnect the small connector.
-
-
-
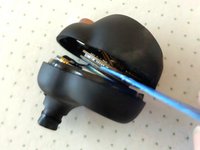
下部の回路基板上の ZIF コネクタを見つけます。
-
オープニングピックまたは他の薄いプラスチックツールを使用して、ZIF コネクタのフラップを持ち上げます。
I ended up using a set of precision tweezers to lift this connector latch. The plastic tool was much too large for my comfort. However, you must also keep in mind NOT to touch ANY metal component with it, as you may accidentally short circuit the bud.
I don't know how advisable it is, but i was able to skip this step. I couldn't get the cable out so i decided to try it. and i was able to get the battery out just fine. It was a bit more difficult, but imo much easier.
Greg Byrne - 返信
After considering trying to get Sony to fix or replace these out-of-warranty earphones I decided to try to replace the batteries myself. I followed the (excellent) instructions above. After step 5 I could see that the wide ribbon cable had been folded in such a way that it was creased. When I disconnected the narrow ribbon cable the wide ribbon cable snapped at the crease. This was already the end of the device but out of curiosity I opened the other earphone. Its ribbon cable was also creased and also broke under slight tension. This is a serious manufacturing fault.
I am reminded that over the years I have owned other Sony products that developed defects soon after the warranty period, e.g., a CD player that wouldn't play past the middle of the disc.
I have also owned Panasonic products over the years and never had such problems with them, e.g., a VCR from the 90s that works to this day.
Fyck Sony. I have purchased the (Panasonic) Technics EAH-AZ80. They are awesome.
I too skipped removing the cable and managed to get the batteries out without trouble.
WARNING ⚠️ when you are pushing the pick in don't push it all the way to the middle.
I bent the metal contact to the side meaning that it wouldn't have made a connection to the battery if I wasn't able to fix it back.
-
-
-
オープニングピックまたはスパッジャーを使用して、接着されたケーブルを慎重に剥がします。
-
次に、このケーブルをゆっくりと抜きます。
Lol... super stuck - broke it. So far I'm 0 for 4 on iFix it repairs.... never buying some piece of crap unserviceable electronic junk like this ever again. It's not worth it. Marketing and Industrial Designers need to get their heads out of the sand.
Same happened to me, the device still works after resembling, but noise cancelling doesn't.
No need to do this, you can move the board away to get to the battery.
That was my first thought too after I realised It's might not come out in one piece,than I saw your comment and it reassured me that it will work.
wooex -
I was able to complete the process without removing this cable too.
This is easily the hardest part. Was successful with right bud but had to use a small tweezer to tug out cable. Got over confident on left bud ripped the cable in two. Be patient!
I broke the cable too. Is there nothing else we can do?
After seeing how delicate the ZIF connector looks and reading the comments on this step, I skipped right to step 8 also.
Ok so the cable is broken. But the audio still works. Apparently the cable is for the mic. I will have to turn off noise cancelling so the audio can still work fine.
For this step I used a pair of needle nose tweezers. I’m no expert on what can cause a short circuit in this step, so I tried to only touch the ribbon cable with my tweezers.
Make sure the black plastic latch from step 6 is as open as it can be. Get a good grip of the cable near the connector and slightly wriggle it left and right while pulling. For me this took more force than anticipated and I double, triple checked that the plastic latch wasn’t securing the cable anymore. If you are more visual and need to see an example of this process, check out this video: https://youtu.be/x2twbzhtLaE?si=bDv_a8Td...
Note that the person here is using plastic tweezers to open the latch, don’t try step 6 with a metal tool. For me step 7 worked out fine with metal tweezers but try to only touch the ribbon cable with them.
I managed to break the ZIF cable in half, but I was able to tape it back together so the noise cancellation works fine thanks to this reddit thread: https://www.reddit.com/r/SonyHeadphones/...
Just skip this step. The ZIF looks and feels very delicate and it stuck quite hard inside its housing. I am able to finish the battery replacement (both sides) without taking the ZIF out. Just don’t need to risk breaking the connector, thus the whole ear buds. If you already done the previous step, undo it by closing that black latch back to its original place.
I also couldn't pull out the cable, so left it connected. As others mention, it's possible to still get the battery out.
Indeed no need to do Steps 6-7 to avoid removing the delicate cable. There is enough space to move the current battery with the cable connection intact.
I broke the cable of the second earbud. At first I thought they were going to the trash but it seems they still work. Is probably for the mic as other comments said above. Don't throw them yet! First impression is that noise cancelling works. Hopefully is just the mic for calls.
-
-
-
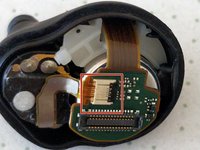
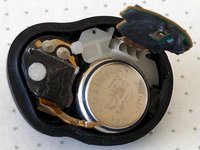
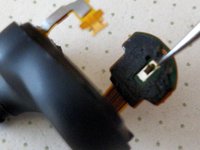
電子回路とそのすぐ下にあるイヤホンのバッテリーの接合部を見つけます。
-
オープニング ピックまたは非常に薄いプラスチック ツールを使用して、オープニング ピックを回路基板とバッテリーの間に挿入し、回路基板をバッテリーから慎重に剥がします。
-
回路基板がバッテリーから外れたら、3 番目の画像に示すように持ち上げて、バッテリーを取り外すのに十分なスペースを確保します。
Easiest step so far. Slowly and carefully inserted an Opening pick between circuit board and battery poking against the adhesive (felt like butter) until they separated. Pretty quick!
I used a plastic pry tool to get some leverage between battery and board, then an opening pick to slide between them.
Note that this is stronger adhesive strip, it will stretch as you try to pull these two components apart so it’s good to have a thin tool (I used the opening pick) to slide between them to push away the black adhesive as it stretches. For me all the adhesive neatly stuck to the back of the board after pushing an opening pick between it and the battery.
Beware of the thin metal connector that sits roughly in the middle of the board (see picture 3), many commenters have damaged this in step 10 so it’s probably good to be more careful here as well. Ideally, work your way around the board with your opening pick instead of pushing it all the way in from one side, to avoid accidentally bending the small connector in the middle.
I damaged the battery connector in this step on the upper board that is held by a cable. Be very careful here and ideally only use a tool on the edges, not going near the battery connector in the middle. I had to make a small solder blob where the broken off connector was to make the earbud work again
Alix Cozmo - 返信
Try to preserve as much of the glue by working really slow here. If you pull too fast, the glue will separate and clump together, which will cause connection issues later (too much space between the battery connector and the battery).
-
-
-
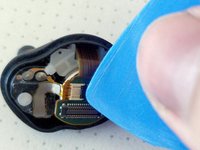
最初の写真に示すように、スパッジャーの先端を使用してバッテリーを持ち上げて取り外します。
This can be very tricky. The glue holding the battery in is quite strong. I ended up breaking the tip of the spudger during this step. To remove the battery, i carefully used a pair of needle nose pliers and gripped the sides of the battery and wiggled it very gently off the adhesive strip.
Be really careful not to crush the battery, or short circuit the side of the battery case to the top of the battery with pliers. You may want to even use some shrink wrap tubing on the pliers ends to ensure you do not have metal to metal contact. If you're careful, and patient, you can get it out.
READ THIS COMMENT! My spudger tip also broke off :(
MIA -
My spludger tip also broke, but it actually made it easier for removing the other battery. 😄
I was a little worried about this step because two people mentioned their Spudger broke. In fact, the tip of mine bent, so I was a bit apprehensive, but I used it to my advantage to lever underneath the battery and just kept working it against the adhesive until it began to give. There wasn't much room to work with because I didn't remove the ZIF connector, but there was enough to work it completely loose and remove the battery. Delicate process; took me about 10min.
I entered as shown in this video and with some wiggling was enough https://youtu.be/x2twbzhtLaE?t=163
Very helpful! Took me about 20 seconds!!!
For this step I used needle nose tweezers.
The adhesive strip used to hold the battery in place is the same strong black strip that held the board and battery together in step 8, you should have gotten a feel for how sticky it is so be prepared to use some (gentle) force for this step.
Remember the ribbon cable we disconnected in step 7? From the corner where it originates you can see the entire side of the battery and have the most access to the bottom. I inserted my needle nose tweezers below the battery and carefully (but firmly) levered it away from the adhesive. You need a thin tool to get below the battery but it needs to be sturdy enough to withstand the force you need to apply against the adhesive - in my case I used very thin metal tweezers and made sure not to touch anything with them but the plastic shell and bottom of the battery.
If you want a visual example of this technique, check out this video: https://youtu.be/x2twbzhtLaE?si=RlkDg2ul...
This method made removing the battery quite easy, thank you 👍
wow, took me 5 seconds after I read your comment, thank you!
I managed to remove battery without breaking anything, but i have one problem when i put back the battery it is not responding. Doesn't it have any reset?
A pair of ceramic tweezers usually found in vape building kits are very useful as to not short the terminals of the battery here
I made it this far. Reading about having to use some force, I though using needle-node pliers (Leatherman wave) would allow me to securely grip the battery and take it out in a controlled fashion.
I slipped and the pliers crushed the connector on the board beyond repair so be warned.
Using a metal pointy object (sharp tweasers, same as @alana48457 ) I was able to get under the battery easily and wiggle it loose. Sure a small risk of shorting though, but I think for this section, it may be okay. -
-
この手順で使用する道具:Tweezers$4.99
-
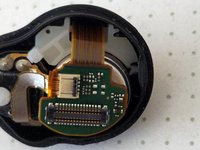
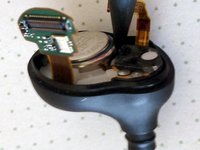
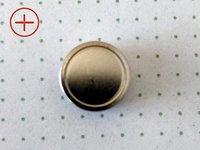
2つの金属接点を見つける。
-
1つは赤で強調表示されています。
-
濃い青で強調表示されたもの。
-
電池の取り外し中に接点が平らになってしまった場合は、イヤホンを組み立て直すときに新しい電池としっかりと接触するように、ピンセットの先で接点を慎重に少し持ち上げてください。
Be really extra careful on this part, I was but not enough and one of my pin broke. I had to fix it with a bit of soldering.
There is a work around for this if you did break off the contact. I broke off the top one connected to the board, so i managed to get some aluminum foil and kind of slide it into the slot of the broken contact and then put very tiny amounts of glue on it to hold it down. Now everything works. did the shake and drop test on the carpet and the bud stays on and intact...as long as it is glued properly.
I broke the upper pin and now the earbud won't work. Be extra careful on this step. You gotta be beyond careful and go waaaay toooo soft on it, and it's a hard thing to do since the glue is way too strong here. I guess I'll have to solder it.
I used a pair of needle nose tweezers for this step, any thin, delicate tool should work.
As other people have noted, the connectors are very thin so you do not need any force to bend them and it’s easy to break them off. I carefully slid my tweezers below the contact and slowly pushed them further under it - that was enough to make the contact bend at a better angle. You really don’t need to grip it with your tweezers and actively pull it up. Pushing slowly from below should give you more control so you can stop immediately when the metal starts to bend a bit.
I have done both side of my buds and the left side I do not need to raise the pin. The right side, however, i need to re-visit it as i do not have any response after I re-assemble it. The glue between the negative side of the battery and the chip board deformed and is too thick, the pin is not touching the battery even I tried to raise it a bit. After removing those glue, and adjusted the positive side pin, it works again.
I followed Alana's advice (comment from Jan 11, 2024. Definitely fragile, also definitely do-able as someone who has never done something like this before. They don't need to be dramatically raised, just make sure they are raised enough that the tip can reach far enough that it will touch the battery when it's sitting on the sticky padding. For mine, I gave it some gentle leverage from the base of the pin until I could see the tip above the sticky pad when looking at it from the side. It seems to have worked, as the earbuds are working correctly after reassembly.
Ok, so if you break the flimsy part of the contact (like I did), here's the jerry-rig that worked for me:
Get a single piece of double-sided tape the size of the circuit board (I used a Scotch Adhesive Dot). Now cut it in half. Now take a piece of aluminum foil the same size. Put one half of the tape on one side of the foil but halfway hanging off the end of the foil. Now put the other half of the tape on the other side of the foil but on the other end of the foil. Now fold the foil twice: once each to adhere the foil to the other side of the tape. Now you have an S-shaped piece of foil but with aluminum exposed on both the top and bottom and also tape to hold it against both the battery and the contact surface. Stick this contraption with the aluminum touching the contact and the other side should neatly adhere to the battery, providing full contact. Also note, if you do this, you want to remove all the pre-existing adhesive.
The contact only needs to move 1mm at the most. When you reassemble the case presses the circuit boards and batteries in place.
I was cautious and didn't bend mine too much and they were fine once reassembled.
-
-
-
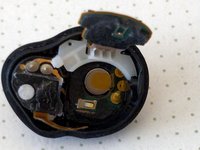
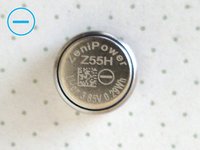
新しい電池を、マイナス端子を上にしてイヤホンに挿入して取り付けます。
-
最初の写真はバッテリーのプラス側を示しています。
-
2番目の写真はバッテリーのマイナス側を示しています。
-
3 枚目の写真は、イヤホン内部に取り付けられた新しいバッテリーを示しています。
For anyone who was a bit confused like me, here are some notes on the re-assembly:
> the black adhesive strips we had to wrestle with before (holding battery, connecting board to battery, holding ribbon cables etc.) should all still be sticky and hold the components fine if you push them together once. You only really need to apply the e-8000 glue at the very end.
> manoeuvring the boards from the top and bottom half of the earbud back together (step 5) can be a bit finicky. I found it easiest to hold the two halves together like an open hinge with one hand, then place the pointer finger from my other hand on top of the board from the upper-shell and guide it until it’s aligned with its bottom counterpart, then gently push the connectors together.
> once both board are connected, before you glue, you can try placing the earbud into the charging case. A red charging light should appear for a few seconds if the battery is properly connected.
> apply the e-8000 glue around the seam on the bottom half, push and hold the two halves together for a few seconds
Done
@alana48457 thank you for the help with re-assembly. I almost took the sticky stuff and threw it away, glad I read your comment first!
halp -
what tools do i need to buy for this?
Merci infiniment !
I forgot to test my work before glue. Can I undo the same way? Just apply heat? Right now my earbuds are dead
Ok, reopened the headsets with heat and found one of the contact points had broke off during the first attempt. Replaced it with a bit of foil and now have working headphones.
Seabird -
How did you implement the foil solution? One of my battery contact points failed as well
Lion -
Perfect. Thanks for sharing. But I failed to fix it. I order the replacement from: Sony WF-1000XM4 Earphones Replacement - Audio Spare
Tony Lopez - 返信
Pretty fine margins getting the heat right. I melted my casing slightly and am now trying to re-shape it back to normal. A note about the cure time on the glue would be a good addition to this. I used the e6000 i had lying around but it looks like this doesn't cure as quickly as the e8000. Thanks for the guide!
Thank you, I followed your instructions carefully and was successful the first attempt. I will admit my heating gun made the earbud shell a little hot, and I pinched the ear canal closed with my finger. I was able to restore it to working condition, but with a little self-inflicted damage.
Très simple à réaliser. Merci à vous pour ce superbe tuto ;)
Jean-Claude
-


イヤホンを再度組み立てるには、手順 8から逆の順序でこれらの手順を実行し、再密封時に E-8000 接着剤を使用してイヤホンの2つの部分を接着します。
E-8000 接着剤は、透明のままで、乾燥による残留物が残らない接着剤です。
イヤホンを再度組み立てるには、手順 8から逆の順序でこれらの手順を実行し、再密封時に E-8000 接着剤を使用してイヤホンの2つの部分を接着します。
E-8000 接着剤は、透明のままで、乾燥による残留物が残らない接着剤です。
221 の人々がこのガイドを完成させました。
以下の翻訳者の皆さんにお礼を申し上げます:
100%

これらの翻訳者の方々は世界を修理する私たちのサポートをしてくれています。 あなたも貢献してみませんか?
翻訳を始める ›

98 件のコメント
I needed to perform the reinitialization procedure to get the headphones to work together after, but apart from that it worked well!
Rasmy Samy - 返信
Good point, thanks, I completely forgot to write a conclusion about this :-)
Hard reset the earbuds will reset battery stats stored inside the earbuds internal memory, it's essential for earbuds to works well with new batteries.
Brendan -
When replacing batteries in the XM4 it is essential to use 3.85v 75mAh batteries.
Unfortunately, some battery sellers are incorrectly indicating that 3.7v batteries can be used.
Thanks for the heads up. I just checked the batteries I got from Ebay and Indeed got sent Z55 instead of Z55H ( even though the listing said I was buying Z55H batteries.
I understand for the voltage but why couldnt you use a battery with more capacity? That seems like it would be an upgrade (if you could find some that fit obviously)
why couldnt you use a battery with more capacity?
These are dumb batteries, not smart batteries that can report remaining capacity, so the firmware in the device has to estimate remaining capacity. It can only do that accurately if it knows the exact battery used. If you substitute a different battery, the firmware will not know the remaining capacity accurately, and won't work properly. Thus it's very important to use the correct Z55H battery.
p.s. This may be why there are so many reported XM4 battery problems. Reports indicate that Sony substituted some different batteries at the beginning of production when it could not get enough Z55H batteries, and the firmware does not work properly with those batteries over the long term, resulting in premature failure, often in only one earbud.
JNavas -
Ugh....ugh..ugh.. should've read this part of the guide multiple times!
"Caution: There is a tiny metal contact under the circuit board that makes contact with the battery. Unstick the circuit board gently to avoid damaging this contact."
The metal contact ended up breaking off. :/
You live and you learn! Hopefully someone else learns from my mistake!
Happen to me too, but you can still save it, I just add a bit of solder on the contact and seems to work good!
I snapped the little ribbon cable that is locked in by the white locking mechanism, it was hard to pull then came right off and snapped, be careful folks
Happened to me too. Surprisingly hard to pull and then releases very suddenly.
Same here. Need more info on a better way to remove this. I guess it is the trash bin for these now.
If that happens don't worry, it's just for the ANC microphone in the front. There is still a second one so it just makes pasthrough and ANC slightly worse. But otherwise they will still work perfectly fine.
So glad this guide exists. My 2 year old buds were only lasting 15 minutes.
Opening the earbud was the longest step for me. Hair dryer on high for like 20 seconds. Work a razor back and forth on the edge and then back to heat alternating for like 7 times until I could wedge something else in the crack to pry open.
I skipped unplugging the ZIF connector and had no issues sliding the batteries in and out.
I struggled to mate the boards back together using tweezers or spudger. A fat thumb pressing down on the upper board worked the best for me.
Can confirm that ZIF unplugging can be skipped. Tried unplugging it at first, it was quite a struggle and it kept firmly in place. I was afraid of damaging it, so I skipped it and there were no issues in the remaining steps. Did not even try unplugging when doing the second bud.
Funcionou perfeitamente, acabei esquentando um pouco um dos fones e ficou marcado com minha digital, agora o lado esquerdo é único. rsrs.
Be EXTREMELY careful doing step 10. The tiny piece broke off and now the headphones are paperweight. Use the lightest amount of force possible when doing that step
Happend to me too, I just soldered some solder into it as a replacement and works perfectly fine :)
Is it recommended to get some form of glue to make sure that they remain water resistant or will the residual glue left over be enough for that?
I personally used a very thin bead of e6000 glue around the edge, then I put it back together and gently clamped them together for a few hours until the glue dried. It holds them together and should keep water out. As long as I didn't miss a tiny spot. I would say that its worth it if you still have them apart, otherwise just leave it as long as they aren't falling open.
Ze-4 -
Thanks for the tip! You saved me from buying new ones.
Regarding the tips: I used a tiny screwdriver and hairdryer to open the earbud and a toothpick for some of the steps. I panicked when I saw it working and then not working (before glueing the earbud). I fixed the contact as described in step 10 and then it worked once again.
I suggest adding the reassembly steps rather than saying "follow these instructions in reverse order from step 8". For example, the spunger is used to remove the ZIF cable in Step 7, but this tool only works for removal. To reinsert the connector I had no success with that tool. I used pointy ended iFixit tweezers for this step. Although there might be a risk of short-circuit, they were the only tool I could think of that could grab and insert in the way I needed.
The E-8000 glue instructions advised leaving the glue to cure for 2-10 minutes - this and some pictures would be nice to elaborate on.
Separating the shell was quite challenging. The first time it was fine, the second time I found it much harder. Do you heat all along the join - or only on one side? Any tips on inserting the insertion tool?
Thanks for the nice instructions, I just fixed mine last weekend. Since Sony wouldnt repair them and said they would just replace the whole unit for just 180€, what a bargain! Now i paid about 25€ for parts and the repair toom roughly an hour!
Did anyone else have a problem where, after completing the replacement, noise cancelling mode had a weird air flowing noise? I don't think its because I didn't seal the shell back together air-tight, because sealed it with plumber's tape too and it still had that noise.
Otherwise, good guide. Would like to reiterate what others were saying about part 10. I wasn't gentle enough and snapped off the little battery connector piece.
Yep same here with my right earbud. I figured that this is because of the noise canceling and has something todo with the ribbon band because it seems that one connects the inner microphone to the board.
I am not sure if I have damaged the ribbon cable or it isn't placed correctly in the connector... Tried it multiple times to refit but I guess the cable is damaged somehow
Used the Varta CP1254 A4 as replacement batteries.
Voltage: 3.7 V, Capacity: 74 mAh
(https://www.conrad.com/en/p/varta-button...)
They work the same as the original batteries. There's no risk of frying the electronics because the voltage is less than the original, but it's enough and they still work properly.
excelente tutorial bien explicado y con sugerencias exactas....saludos y gracias por los aportes
Thank you for the steps. It helped me replace my batteries and now I can use them again. Great resource!
Merci beaucoup, finalement pas si compliqué que ça à l'air. Les étape 6 et 7 ne sont pas utiles (connecteur zif) il y a assez de place pour passer la batterie sans le retirer. A part ça, déçu de mes écouteurs, leurs autonomies est assez limités.
Paul Byfou - 返信
Worked! Though I'd say it's an intermediate difficulty, not a 'difficult' one.
Blow-dryer thing in the beginning worked well. Kitchen knife with a flat blade worked well too. You can use a cloth as a 'glove' to hold onto the tube of the bud that holds the foam pieces that go into the ear. Then work the blow dryer in stages. My buds never got too hot.
With one of the buds the flat ribbon cable would not come out at all. It is possible to leave it in and work the old battery from an angle.
Before you glue the buds shut, again give them a test run.
Managed to change batteries without unplugging the zif-cable, and skipped step 10. Made the process a bit easier and faster. Used a kitchen knife to pry the buds open after have used a hairdryer for about 25 sec. Was holding the buds with a towel, didn't get too hot. Glad it worked! :)
Great instructions, I couldn't get past disconnecting the ZIF cable though. For whatever reason the head wouldn't release and broke the cable. Be careful!!!!
same here broke the zif..is it fixable/
Mrrick -
I successfully changed the batteries. However one bud is no longer making connection or being recognized by the charging case. It works perfectly otherwise. What component controls the charging on the earbuds? I want to open it back up and check. Any idea?
I would skip the heating step, as this lead to some warping on the first earbud I attempted. Sliding a razor blade and prying at room temp worked much better.
Success!
Opening procedure was most tricky, needed to squeeze the buds from the sides to create a gap where jimmy the spudger found his way to the internals.
Skipped Steps 5-7 and directly found a way to remove the platine from the battery. Be careful with the little contact!
used only plastic tools and clean fingers for removals!
The removal of the platine should be done slowly, because the glue is soft and needs some time.
The removal of the battery even slower because you have to use a plastic pin to go under the battery without hurting the contact. I used the side of the case to control the force of the pointed tool i used.
Lifting the contacts very gently is needed to create a safe reassembling for full function.
Function check is recommended before glueing case parts together.
I used Miyagi phone glue, its black and creates sth like rubber which is good to fix the battery in position and reseal the case. Excess glue easy to remove.
Resetted the buds one by one and good.
Good luck and thanks 2 Sony for nothing.
Can I us the battery of wf-1000xm4 for 1000xm3
well written guide! I did this repair twice and it worked flawlessly both times. some notes:
- melting the glue without melting the plastic is hard. On my heat gun, 180C worked best
- youll need glue to seal the earbud, this amazon Z55H listing includes glue
https://www.amazon.com/dp/B0C62CQ2J4
use a lot, the glue is what keeps the earbud water-resistant
-
Does anyone know the type of epoxy that is used to keep the battery in its place? Too much came off when I was doing the swap and the top connector for the battery isn’t staying down / connected.
It is probably the on of the three:
Tesa Tape: Tesa offers a range of high-performance double-sided tapes that are commonly used in electronic devices. Their tapes are known for their strong adhesion and thin profile, making them suitable for securing batteries.
B7000 or E8000 Adhesive: These adhesives are commonly used in electronics repair. They provide a strong bond and are flexible enough to absorb some of the shocks and vibrations that can occur in portable devices.
How long battery life did you get with the new battery?
Is there some more powerful compatible battery that could last longer?
Personally, I recommend only the Z55H battery, these batteries have a 3.85v nominal voltage and are very small form factor.
It is unlikely that better batteries exist in terms of capacity for this nominal voltage, form factor and this exact battery technology (li-ion).
The battery technology is important as the earbuds case is the earbuds charger and it's only made to charge Z55H li-ion batteries. Other batteries may be overcharged by the battery case because of the maximum voltage too low or too hight charge current as these earbuds have a "fast charge" functionality handled by the earbuds case and the circuitry on the earbuds themselves.
Installing an incompatible battery can lead to the earbuds battery explosion, charging errors or thermal runaway.
1 year after this repair, my earbuds have a battery life of about 8 hours with active noise canceling enabled, 12h when ANC is disabled.
Brendan -
Is there anyone who can help me out doing this, im located in the netherland and am willing to pay for it..
Hi David, I contacted Sony support, the told me to send the headphones to their service partner ESR. Mine are outside of the warranty period, but I just got an email confirmation they will be repaired under warranty.
Goedemiddag,
Wij vinden het vervelend om te horen dat uw Sony WF-1000XM4 niet
meer naar behoren blijkt te functioneren, om dit voor u te kunnen herstellen
vragen wij u het product aan te bieden bij ons Service Centrum.
Dit kunt u doen door deze langs te brengen of op te sturen naar ons. Tevens
kunt u het product naar de verkoper brengen en dan zullen zij deze aanmelden
voor een service.
Ons Service adres waar u het product naar toe kunt sturen:
Electronica Service Repair
Faradayweg 6
3208 KS
Spijkenisse
0181 640 607
Graag een duidelijke klacht omschrijving, kopie verkoop bon en u gegevens meesturen svp.
Met alleen een geldig verkoop bon wordt geaccepteerd voor garantie afwikkeling.
Wij hopen u hiermee voldoende geïnformeerd te hebben.
Met vriendelijke groeten,
Sony Service Team.
Managed to get the batteries replaced, but since I opened it the left earbuds in ear detection doesn't work properly. It randomly stops my media thinking I've took out the bud even if I haven't. What could possibly causing this?
Each earbuds have a touch-sensitive surface. Too much heat might damage it.
But there is also a well known problem on these earbuds related to the touch-sensitive surface randomly active, and Sony provided an option to disable this in the earbuds app. Perhaps this could help you :
Brendan -
First attempt, the little flex tore. It tore before it came out of the ZIF. :(
Of note - if you happen to break off the battery contacts, there is enough room for a drop of solder to replace it after removing the sticky padding. Ask me how i found out...
Step 7 required a bit more force to pull the cable out of its connector housing (after unlocking the black clip). It needs to be pulled directly backward which is difficult to do with the cable's 90 degree bend. I found it easier on the second earbud to unstick the battery first so I could manipulate both the angle of the board and the cable at the same time. Your mileage may vary.
To that end, I found that rolling a toothpick backward while pushing forward under the circuit board in step 8 was an effective way to separate the sticky pad from the battery without creating any gummy ripples.
I broke the battery contact on the bottom of the circuit board, but I put a random small piece of metal in its place and both earbuds are working great now
Unplugging the ZIF connector isn't necessary, but it's nice to have the extra space on the first try; I skipped it on the second bud once I was more comfortable with it
I personally used E6000 glue and held the earbud in a clamp overnight until it set
This repair guide is super easy and detailed to follow. My battery problem for earbuds is now gone. I purchased one pair of Z55H battery from Aliexpress ( https://tinyurl.com/26k83wq9 ) at $7-8 and went ahead following the step-by-step guide. It was successful. The hardest part was the step 1 to open the earbuds. I used hair drier more than seven times for 20 seconds each, but ended up using a screwdriver provided by Aliexpress package. There remains a minor scratch on the earbuds, but that's fine. Even after listening one hour long, it is only down to 97%. I am fully satisfied. I am lucky to find this posting. Thanks a lot.
So the instruction is pretty good, but I am posting something on my stupid side here... Forgot to follow step 6 and 7 properly on the first bud. So in the attempt to put back the ZIF tape, I tried too hard and mishandled to break the tape. If I had taken off the glue from the ZIF tape then I might not have broken it. I did not just gave up there, and used the jewelry glue meant for the shell and glued the tape back trying to salvage from the mistake. So the magic thing is the juice still flows! Then the rest is just history, I moved on and got both buds finished. The second one got much smoother as I learned from the first. For most of the part, I'd say it could be a Medium instead of Difficult, as the hard part was to get the glue to melt on the shell. The rest will be to be extra gentle and steady to disassemble the connectors and glued parts. After that, DSEE still sucks juice like Dracula, but using the buds with full options turned on will not drain as fast as 1%/min. DIdn't do step 10, either
Bruce Chen - 返信
I was apprehensive about attempting this, but I was super frustrated that I couldn't use my headphones so went ahead. Thanks so much for a clear guide that allowed me to fix my headphones. I hope the replacement batteries last a good few years!
I found that using a hot air station (Atten ST-862D in my case) set to 118C was just enough heat to separate the ear buds. I started lower and wound up causing a little marring on the first bud trying to separate it, the second with 118C separated very well. The ZIF ribbon did not come out very easily compared to others on different electronics and needed some delicate sideways wiggling and lots of patience. Both batteries seem to be working well so far. Thankfully all went well and both ear buds are working. The guide was a great help, especially the photos. Main thing I would stress is be very careful disconnecting the ZIF ribbon, as many others mentioned, it is stubborn and takes the right amount of persuasion without causing damage.
Any tips on re-gluing this thing back together? It was an easy install!
I’ve seen some people make a good point about wanting to ensure the glue is strong but reversible if you plan on keeping on replacing the battery again down the line, which I do.
I can’t seem to find any useful information about these glues outside of like 1-2 vague anecdotes or replies. Is the E8000 reversible? I’ve seen one random website suggest it could harden up too much after being cured which might break if you drop it, but unfortunately I don’t understand the specs and there doesn’t seem to be much of a guide on these
instead of prying it open with a razer blade or ifixit tool, just wrap it partially in a paper towel (to prevent scratching) and give it a little squeeze with a pair of channel locks or pliers after heating it up. Popped right open and made this repair a breeze. Thanks for the walkthrough!
ws6transam - 返信
I've accidentally torn out zif connector cable on my second repair. Does somebody know where to get this thin ribbon cable? Looks like headphone properly operates without it. What is it responsible for?
Replaced the batteries, but my left bud now constantly loses signal, drops to lower LDAC settings or disconnects altogether. It connects and works more or less reliably only in 1, maybe 2 meter radius from the source. Highly unstable when walking with your phone in jeans/pants pocket. Also, loses connection when you get a palm of your hand close to covering the bud, sometimes making weird quiet high pitch tones, like some kind of polyphonic melody. Tried reassembling them multiple times, with old and new battery, but to no avail. Any suggestions?
P.S.: d@mn you Sony!
This has to be done for both side, i guess? Are both side exactly the same inside?
intro says they're "perfectly symmetrical", so I'd imagine they're mirror images of each other
Like the noob that I am, I broke the battery contact at the top of the battery. I lost the contact. Will a drop of solder conduct electricity from the battery? Or do I need a metal contact of some sort?
Definitely recommend people read all the comments before preceeding.
TIPS
1. I found a utility knife blade without heat was the best way to open the cases.
2. Didn't remove the ZIF cable, there was plenty of working room
3. Broke the tip off my spludger which actually made it better for removing the batteries
4. Only lift the connectors a tiny amount if they are flat, too much and they'll break.
5. Reinitialized the earbuds when you're done.
Hope these tips help.
Thank you very much for this guide, just followed it myself. I echo the comments about skipping steps 6, 7 & 8. As long as you are careful to remove the battery without bending the circuit board, you're fine, I used my fingernails and a few quick blasts with a hair dryer for that part. The bottom of the battery needs more force.
My fix was only 50% successful. I lost the left side as I broke the little contact tip at the top of the battery like illhaveanother did. So be very careful in step #8; don't insert the pick too deep. Try to pry around it instead.
Great guide, worked flawlessly. Also skipped the ZIF part. I would say the difficulty level could be lowered. The hardest part was doing it with aging eyes getting closer to 50 :-D. Thanks a lot
Completed successfully*!
* WARNING: before gluing the halves together after replacement, I popped it back into the case to see if the light responded. When I pulled it out, I only had the top half and the magnet in the case was strong enough to hold down the bottom half and break the ZIF! However, somehow, it still appears to work perfectly fine! This is the left bud. I know others have said theirs continued to work after breaking the ZIF, but I can't tell a difference in function or sound after some initial testing. All's well that ends well?
Also, I found I needed to remove the ZIF in order to grip the batteries with needle nose pliers and wiggle them loose of the stubborn glue. No issues removing/replacing the ZIF connection, just be sure the lock is open.
I read somewhere that the small flex cable that goes into the Zif is for one of the functions like ANC (don't remember exact feature) but it doesn't keep the buds from basic functionality. I tore one of mine trying to pry the battery out and looked around for a replacement, couldn't find one with no part number so I ended up buying just the right side on eBay for $15.00 and used it for parts. The only thing is, the end of the flex that looks like it runs down the side towards the bottom has some hardened clear epoxy on it and there's some black adhesive around there so you can't see where it ends. I ended up applying a few drops of Isopropyl Alcohol around the clear epoxy area and used my spudger and it pried loose. Hope this helps
Around shat temperature should the heat gun be to just barely weaken the adhesive? I attempted this, and distorted the plastic on my original left earbud (awaiting a broken replacement so I can attempt a repair again).
Additionally, would it be wiser to use a fine point air nozzle for this? Or would a wide point nozzle be better in order to evenly distribute heat.
Can use loctite super glue ? Also, I am shocked to see the issue with the battery / buds not charging, or says 70% charge, then use for 2 mins it goes off, start and it says 10%, start again and it says 30% ! Sony failed miserably on this bud and should be replacing them for free. What a con job! Every forum I read it says the exact same thing. 2 years from purchase these issues crop up. Sony will exchange the bud for new ones ONLY if it is 2 yes or less since purchase.
Hi all, did someone noticed difference between sound after replacement? I did it, not glued jet, and right headphone play little bit louder and have more basses. Could it be connected with ZIF or should i try some reset of headphone?
zajochable - 返信
I had exactly the same issue. Did you manage to find a solution? I hope I didn´t overheat the earbud in the process of replacing the battery.
Thanks for the guide!
A tip for opening: I don’t have a heat gun and my hairdryer couldn’t even get the plastic warm, so ended up gently scoring around the glued mid seam with the spudger with the fine tip curve on one end and the hook on the other. You could also use a fine scalpel like the sort used for art & crafts. Just take it very slowly with light pressure because they’re sharp and it’s really easy to scratch the plastic. This got enough of the glue out of the way to use a plastic clamp to gently apply pressure and make a small opening for an opening pick.
Couldn’t find the exact genuine battery in stock in any country anywhere near me & iFixit doesn’t have many spare parts available with shipping to Australia. The replacement I got from eBay says it’s a ZeniPower Z55H XAD CCC Li-ion 3.85V 70 mAh 270 mWh. Same voltage with slightly lower capacity. Works perfectly! Fixed earbud sounds great, charges as it should, and runs cool. I now get 8hrs of battery life with ANC on the AAC codec. A huge improvement.
Bravo,
Instructions très détaillées permettant de mener à bien cette tache délicate. Personnellement j'ai effectivement pu changer la pile sans débrancher le connecteur ZIF (étape 6). pour l'ouverture par crainte d’abîmer l'écouteur, après avoir bien chauffé avec le sèche cheveux à fond plus de 40 secondes, je n'ai pas fait levier mais tenu les deux demi coques très chaudes avec des gants isolant afin d'exercer une traction de quelque secondes pour les séparer. pas d'outil donc et aucune trace de démontage. Écouteurs refermés et chauffés avec la colle restée dessus, ça tiens très bien. Ne pas oublier de réinitialiser les écouteurs afin d'effacer les paramètres de charge des anciens accus. Autonomie d'origine retrouvée .... super !
Merci Ifixit pour cette procédure précise.
Great guide, thanks. However, after step 5 I managed to take off the battery and put a new one in without unplugging anything except the board connector. You must be super careful and take your time, but this works very well; you can bend up toe board sufficiently far once the glue is off the battery, then it works without much danger to break some of the tiny parts. If you put back in the new battery be aware the magnet will attract it, so take care and secure it well.
This guide worked great thanks. The Left earpiece battery was only lasting about 15 minutes before this repair (the Right earpiece is fine).
- Heating with a hair dryer in a series of 10 - 15 second blasts allowed me to get a very thin screwdriver into the entry point, and I used fingernails to separate the shells
- Like others I didn't have to disconnect the tiny ribbon to be able to remove the battery, but it was very delicate to remove the battery without putting too much pressure on the ribbon
- I used a wooden toothpick to gently pry the battery out from the casing, away from the direction of the ribbon. As a result I managed not to damage the battery contacts, and was able to leave the battery adhesive in place when inserting the new battery.
- I tested the earpiece before resealing
- The replacement batteries I ordered included a glue with precision applicator, so I was able to completely seal the case again
The new battery is working perfectly but I won't replace the other earpiece until there's a real need
Thanks for the guide! I have replaced the batteries on both earbuds now, skipping step 7 (disconnecting the ZIF connector cable). The battery can slide through while this is still connected (be careful of course).
Jheronimus - 返信
Thanks for the guide, I've just successfully replaced the batteries in both my earpieces:
- To heat it, I grabbed the earpiece on the pipe end and held it in a thin plastic bag, using it as kind of a glove to keep it dry. Then I submerged it in hot water (~95°C) and wiggled a bit for better heat transfer. Be careful to not burn your fingers. After about 5-10 Seconds the earpiece was nice and warm.
- Then I used @ws6transam's tip, wrapping a small pipe wrench with some bike tube rubber: I set the wrench to almost to the biggest width of the earpiece at the seam and gave it a gentle squeeze while it was warm, re-heating it as needed, until i was able to fit a plastic pick into the case. As you can see in step 4's picture, the seam has a ridge on the "earwards" part of the earpiece, so insert the pick's tip/edge pointing to the top shell...
- I skipped removing the ZIF connector cable and carefully unstuck the battery using a pick to lift and the halberd spudger to unstick the glue.
- Afterwards I did the Re-Init Procedure
I can also confirm that the old battery can be carefully removed without disconnecting the final ribbon cable, but that cable was also glued down and needed to be freed a bit before the battery could slip out.
I also had a relatively brief moment of fear when I tested it with the replacement battery still partially unassembled, when I could hear some quiet(ish) RFI noise. After carefully pushing the cables back to their original place and fully reassembling the questionable earbud, the RFI sounds were fortunately no longer present. I hope they don't come back later!
Broke the little battery connector! Solder tip is brilliant and simple - works. Thanks
smooth and flawless replacement this was. Thanks
i just replaced mine without disconnecting any cables. got it open, got the board away from the battery and put the new one. currently letting them charge so i can test before glueing together
I just swapped mine out Sunday and this guide was super helpful! the only issue I had was how hard to press into the seem to split the case open after heating, i ended up cutting some of the interior "rim" but the E8000 glue helped keep it all back together! when splitting just go slow and really feel it out.
I just changed my batteries. They seem to be working perfectly! I also didn't unplug the ZIF. Does anyone have experience with updating to FW 2.1.0 after changing batteries? Previous updates seem to have caused battery issues, or it could have been a coincidence that my batteries were dying.
The ease of opening the shell was quite inconsistent for me, my left bud opened easily after gentle heating then using a thin metal sheet which was supplied with my battery for this purpose.
My rights shell however refused to open after multiple heating sessions, causing some scratching damage to the shell while I became desperate over an hour worth of repeated attempts.
However, by using some GENTLE pressure from a glue clamp, the shell popped open. Because this immediately causes the pressure to drop, I didn't risk crushing or severely distorting the shell.
After destroying my first left bud connector (battery removal mishap), my second left bud now has a new battery and appears to be fine. (have to give it some longer testing time though).
Mis auriculares, aunque no son Sony, son iguales a estos. Pero el sonido no sale por la oreja, sale por la parte de adelante. ¿Qué puede haber pasado y cómo lo soluciono? Nunca se cayeron, no están golpeados y son cuidados con mucho respeto.
Muchas gracias
been having the dead battery issue for a while now. right hand side battery wouldn't hold charge and would die after 10 minutes of use from full charge. I'm not handy at all but managed to follow the guide and get it replaced within about 40 minutes, brilliant explanation. replaced the battery with no issue at all. thank you.
When performing step 8 the battery contact has been damaged and no longer have a good connection to charge battery, can this be fixed?
what does starting reinitiationzation procedure mean?