
Samsung Galaxy S9 Plus NFCアンテナと充電コイルの交換

はじめに
手順 1 に進むこのガイドを使って、Samsung Galaxy S9 Plus のNFCアンテナと充電コイルを取り出します。
Samsung Galaxy S9 Plusを開口すると、デバイスの防水防塵用シールにダメージを与えてしまいます。接着シールを交換しない場合、デバイスは通常通り機能しますが、防水機能を失っていますのでご注意ください。
デバイスを再組み立てする際は、コンポーネントを再装着するための交換用接着剤が必要です。
必要な工具と部品
ツール


もっと見る
-
-
電話の電源を切ります。
-
iOpenerを使って、リアガラスの下に留められた接着剤を緩めます。温めたiOpenerを約2分間載せます。バックカバーを外すには、数回この手順を繰り返す必要があるかもしれません。
-
-
-
次の手順では、バックカバーに留められた接着剤をスライスして切り込みます。
-
画像に示したように接着剤をスライスしてください。
-
接着剤が厚めに付けられているエリア
-
接着剤が薄く付けられているエリア
-
このエリアをこじ開けたり、接着剤をスライスしないでください。指紋認証フレックスケーブル が搭載されています。
The yellow portion labeled "Avoid prying in this area" is also pretty heavily glued. I had luck using heat to soften it, but I messed up my fingerprint sensor because the image above is mirrored - I sliced through the right side because the image says it's on the left. The fingerprint sensor cable is actually on the right (when viewing the back side of the phone) on the same side as the phone's volume control.
-
-
-
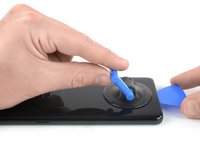
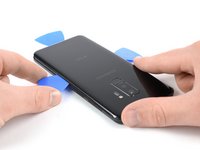
バックカバー上に吸盤カップを押し込んで取り付けます。
-
バックカバーの下側端を吸盤カップで持ち上げて、バックカバーとフレームの間にわずかな隙間を作ります。
-
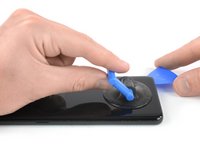
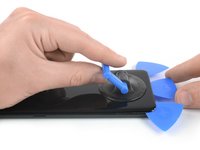
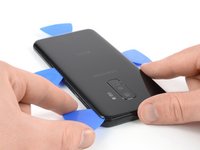
開口ピックを隙間に差し込み、下部の右側コーナーまでスライドします。
This is the most challenging part. The suction cup can barely hold for the amount of force required...but here's a tip, especially for the first-timers like me. It's not obvious in this image, but the back, curved as it is as it attaches to the frame, is curved because the surface under the back is also curved. Therefore, using an angle for the pick that's a bit tilted up will help to get under the back, and get the cutting of the adhesive started.
Don't let that give you too much confidence, though. Sufficient heating of the back, to make the adhesive soft enough to yield to the several picks, is essential. Go slow, if you go too fast, or don't have enough heat, you WILL break the glass...as I did. Replacements, fortunately, are easy to find and not too expensive.
-
-
-
-
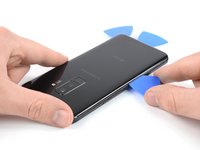
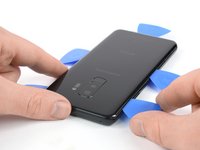
ボリュームボタンが搭載されている側のリアガラスをゆっくりと持ち上げます。
-
スパッジャーの先端を差し込み、指紋認証センサーのフレックスケーブルの接続を外してください。
I also have a G965U model S9+, and its fingerprint read also remained in the back glass.
It's easier to pop the button up than it is to reattach it when reassembling the phone. Well, I sure hope it goes better for you than it did me. (:
-
-
-
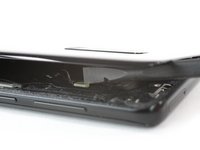
リアガラスを取り出します。
Is it necessary to replace the rear glass adhesive? I have given up on water resistance, just want it to hold in one piece.
Hi Zachary,
in order to assure that the rear glass sticks to the rest of the phone assembly you have to replace the rear glass adhesive once you removed the rear glass. However you can use a narrow and strong double sided tape, tesa tape or our precut adhesive card. All of these will do their job however as you just mentioned you will lose the water protection of your phone. Before installing all of these it is very important to remove the old adhesive backings (for example with high isopropyl alcohol 90% or higher).
Sadly it's not possible to replace the rear glass without new adhesive.
-
-
-
4mm #00プラスネジを9本外します。
Don´t forget to unscrew the two screws on the left side (one near the battery, and one near the edge).
11 screws need to be removed here. Watch the video to confirm the remaining 2.
The 9 screws shown won't let the bracket up unless you finish with the 2 more screws. (near edge and bottom of the bracket).
-
-
-
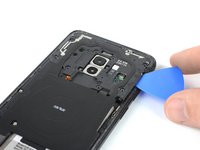
開口ピックをNFCアンテナと充電コイルを含むプラスチックカバーの右側下に差し込みます。
-
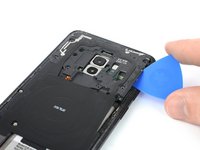
開口ピックをひねりながら、プラスチックのクリップを外してカバーを持ち上げます。
-
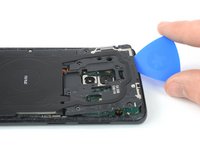
開口ピックをこじ開けながら、プラスチックカバーの周辺に付いている残りのクリップを外します。
I used a pointed metal spudger to pop that piece. The picks were more difficult here. There's an arrow that points the spot that needs to be opened.
-


可能であれば新しい交換用の接着剤を取り付けて、デバイスを密封する前に電源を入れて、修理が上手くいったかどうかテストしてください。
デバイスを再組み立てする際は、これらのインストラクションを逆の順番に従って作業を進めてください。
この修理を完成後、 このガイドに従って 修理がうまくいったかどうかテストしてください。
可能であれば新しい交換用の接着剤を取り付けて、デバイスを密封する前に電源を入れて、修理が上手くいったかどうかテストしてください。
デバイスを再組み立てする際は、これらのインストラクションを逆の順番に従って作業を進めてください。
この修理を完成後、 このガイドに従って 修理がうまくいったかどうかテストしてください。
5 の人々がこのガイドを完成させました。
以下の翻訳者の皆さんにお礼を申し上げます:
100%

これらの翻訳者の方々は世界を修理する私たちのサポートをしてくれています。 あなたも貢献してみませんか?
翻訳を始める ›


2 件のコメント
Be very careful when removing ... I broke my GPS antenna at the upper left at the index finger in the prior photo. Can't find a replacement anywhere.
How do you actually remove and replace the NFC charger..??
I don't know how much longer should I use for the min heat gun.
Hui Chen - 返信
Only heat it up so you can still handle the phone. That depends on your heat gun. Wearing (ESD-)gloves might give you some extra degrees.
Tobias Isakeit -
It is very very hard to remove the back glass due to the adesive… I don't know if it is possibile (at least for everyone) to remove it wothout broking the glass
Luigi - 返信
This is nearly impossible without breaking the glass or risking overheating. I would say apply heat repetitively for 6-8 minutes. The very most adhesive is across the bottom so push the pry stick way in. I generally start on the rear side.
Thomas Hayes - 返信
Whoah NO. It will damage the camera and other sensitive electronics.
D Harlo -
Heating the back is essential, challenging, frustrating and, for first-timers such as myself, seemingly impossble, but I will say don't give up...I'll have another comment later.
cbclistener - 返信
I tried with the iopener but I gave in after three attempts. I then used a hairdryer and a pizza oven infrared thermometer, heating in increments. 60C did the trick and I was able to get the first pick in. Further heating was necessary to ease the rest of the back off, all to 60C.
Chris Harrison - 返信