はじめに
Use this guide to replace the worn-out battery in your Samsung Galaxy Note8.
Before disassembling your Note8, discharge the battery below 25%. A charged battery can catch fire and/or explode if accidentally punctured.
If your battery is swollen, take appropriate precautions. Do not heat your phone. If needed, you can use a dropper or syringe to inject isopropyl alcohol (90+%) around the edges of the back cover to weaken the adhesive. Swollen batteries can be very dangerous, so wear eye protection and exercise due caution, or take it to a professional if you're not sure how to proceed.
Opening the Note8 will damage the waterproof sealing on the device. If you do not replace the adhesive, your phone will function normally, but will lose its water-protection.
This guide involves removing the rear glass cover; you will need replacement adhesive to reattach the back cover when you’re done.
必要な工具と部品
-
-
Switch off your phone.
-
Prepare an iOpener for softening the adhesive on the back of the Note8.
-
Apply the iOpener on the back of the Note8 along the side with the power button.
 FixBotに聞いてみる
-
-
-
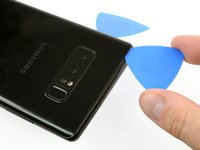
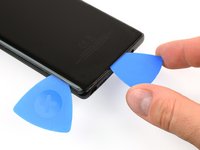
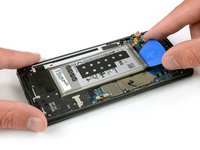
Use a suction handle to lift the back cover and create an opening pick to get in the gap.
-
Start at the middle of the side and cut the adhesive while pulling up with the suction handle.
-
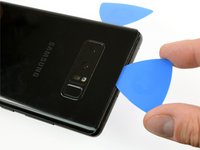
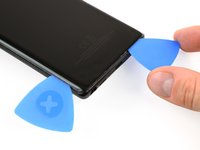
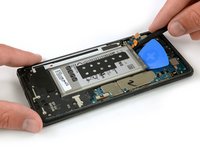
Move the pick towards the bottom corner and leave it there to keep the adhesive from resealing to the case.
-
Use another pick and move it to the top corner.
-
-
-
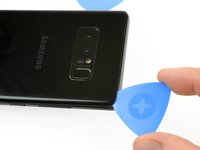
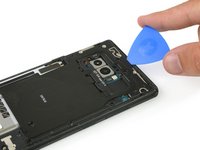
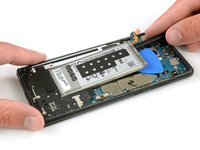
Again take another opening pick and carefully move it around the corner and along the top edge.
-
Reheat with an iOpener if necessary.
-
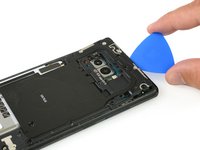
Leave the pick at the top right corner to keep the adhesive from resealing.
-
-
-
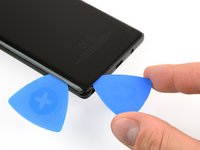
Rotate the device and start to separate the adhesive at the bottom with another opening pick.
-
Leave the pick at the bottom right corner to keep the adhesive from resealing.
-
-
-
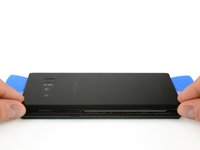
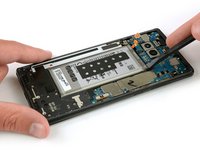
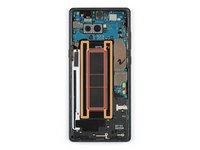
When the adhesive has been separated on all three sides properly you will be able to slowly lift the back cover.
-
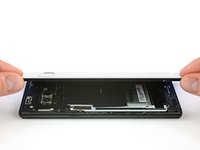
Pay attention to the fingerprint sensor connector when flipping the back cover open. You might need to disconnect it as described in the next step.
-
-
-
この手順で使用する道具:Tweezers$4.99
-
Use a pair of tweezers to disconnect the fingerprint sensor.
-
-
-
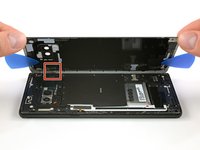
Use an opening pick at the top edge to get between the NFC antenna and charging coil assembly and the case.
-
Lever the top of the assembly out of the case.
-
-
-
Use the flat end of a spudger to disconnect the battery connector.
-
-
-
Prepare an iOpener and apply it to the display for at least two minutes to loosen the adhesive beneath the battery. Reheat and reapply the iOpener as needed.
-
Alternatively or when the battery is blown up, you can apply some isopropyl alcohol under each corner of the battery and allow it to penetrate for several minutes to help weaken the adhesive.
-
-
-
Use the flat end of a spudger to pry up the battery from the top right corner.
-
Use the spudger to pry up the battery until you can insert an opening pick to prevent the adhesive from resealing.
-
-
-
Use the flat end of the spudger to pry up the top left corner of the battery where the flex cable is located.
-
Slide the spudger along the side of the battery to break apart remaining adhesive.
-
-
-
Lift the battery out of the case.
-
Remove any remaining adhesive from the phone, and clean the glued areas with isopropyl alcohol and a lint-free cloth.
-


Secure the new battery with pre-cut adhesive or double-sided adhesive tape. In order to position it correctly, apply the new adhesive into the phone at the places where the old adhesive was located, not directly onto the battery. Press the new battery firmly into place for 5-10 seconds.
To reassemble your device, follow these instructions in reverse order, replacing the adhesive where needed.
If possible, turn on your phone and test your repair before closing and sealing up the phone.
For best results, when your repair is complete, calibrate your newly-installed battery.
77 の人々がこのガイドを完成させました。

チーム

Tobias Isakeit - Repairability Engineer Tobias Isakeit - Repairability Engineer人のメンバー
Business
1 メンバー
1,145のガイドは作成済み
10件のガイドコメント
Awesome fix. Do you have anything for the front glass replacements by chance? I want to do both at the same time
Rick Moore - 返信 共有
For those wondering how to apply the replacement adhesive, there is a video on the iFixit YouTube channel about installing adhesive on Samsung devices. Its a bit generic, but it points you in the right direction.
Hi Christopher,
I’ve edited the last step to include some adhesive guides! Hope that helps!
Arthur Shi - 返信 共有
Thanks!! Very good detail. I was able to get the back cover off and replace the battery - the phone is working like a champ!
Phil Brooks - 返信 共有
Would it be possible to augment the mAh? instead of 3300 mAh giving a little bit more power?