はじめに
ありがたいことに、この新MacBook Proモデルのバッテリーを交換する際は、ロジックボードを交換する必要はありません。
これらのインストラクションを参照して、接着剤で固定されたバッテリーを、接着リムーバー付きiFixitキット使って交換します。接着剤リムーバーを使用すると、古いバッテリーを固定している接着剤が柔らかくなり、外しやすくなります。
iFixitの接着剤リムーバーは可燃性です。 この作業は換気の良い場所で行ってください。 また作業中は、喫煙を控え、火気のある所で作業しないでください。
ダメージを軽減するために、この作業を始める前に、MacBookの電源を入れて、バッテリーを放電してください。 充電されたリチウムイオンバッテリー は引火の原因となったり、アクシデントで穴を開けてしまうと爆発の恐れがあります。バッテリーが膨張している場合は、 適切な方法で処理してください。
必要な工具と部品
-
-
Macを起動し、ターミナルを開きます。
-
以下のコマンドをターミナルにコピー(または正確にタイプ)します。
-
sudo nvram AutoBoot=%00
-
[return]キーを押します。パスワードを求められたら、管理者パスワードを入力し、 [return]キーを再度押します。補足: [return]キーは ⏎ や "enter"として印字されている場合もあります。
-
sudo nvram AutoBoot=%03
-
-
-
P5ペンタローブドライバーを使って、下部ケースを固定している6本のネジを外します。
-
6.2mmネジー2本
-
3.4mmネジー4本
-
-
-
反対側も開口ピックを使って同じ作業を繰り返してください。2番目のクリップを外します。
Recommend being very careful on this step and the following step when using any opening tool to always keep the “pointy end” up when prying, especially about 40mm up the side, to avoid completely destroying the speaker diaphragms.
-
-
-
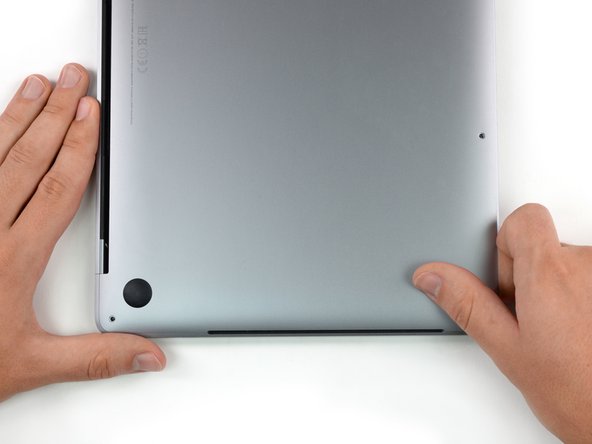
MacBookの前面側に向かって、しっかりと下部ケースを引き抜きます。(ヒンジのエリアを外すように)下部ケースを固定している最後のクリップを外します。
-
最初に片側コーナーから、次に反対側のコーナーを外します。
-
-
-
下部ケースを取り出します。
-
所定の位置に載せて、クリップをディスプレイヒンジの近くに合わせます。 カバーを押し下げて、ヒンジに向かってスライドさせます。 クリップが上手く装着できれば、それ以上スライドできません。
-
クリップが完全にかみ合って、下部ケースが正しく位置合わせができているように見えたら、下部ケースをしっかりと押し込み、下にある4つの隠しクリップをかみ合わせます。 各クリップが装着する感覚があるはずです。
-
-
-
スパッジャーの先端を使って、ケーブルをコネクタに固定している、小さな黒いロッキングタブを持ち上げます。
Be very careful here. It is easy to break the whole connector off the battery board, which is what I did. Luckily the connector is part of the replacement battery, so you just need to remove the connector from the cable. The pictures here should provide more detail so you can see better what is going on.
thanks a lot !!!!! great help :)
-
-
-
バッテリーボードのデータケーブルを、ソケットからスライドして外します。
-
ロジックボードと平行に、ケーブルの方向にスライドさせます。
As simple as this step might seem, the golden leads will disapper the moment you remove it as it has some adhesive under the black strip that covers it. Ensure you peel it back enough to display the golden leads after swapping the batteries out.
Your battery may come with this ribbon cable. In that case, disconnect the other end.
-
-
-
バッテリーボードのデータケーブルを、作業の邪魔にならないサイドで折り曲げます。
-
-
-
スパッジャーを使って、バッテリー電源コネクタを慎重に持ち上げて、バッテリーの接続を外します。
-
コネクタがソケットから離れるように、コネクタを十分に高く持ち上げます。 修理中に誤って接触してしまうと、MacBook Proに損傷を与える可能性があります。
To completely avoid accidental contacts I recommend to wrap this connector in a piece of paper and hold it in place with tape.
Do not put tape directly on the contact underside, as that may leave some glue that would affect the contact conductivity.
I put a piece of tape on the underside of the connector (sticky side up) to insure against accidental battery contact. If you put tape on the logic board side of the connection, some insulating padding material might accidentally stick to the tape when the tape is removed during reassembly.
-
-
-
-
T3トルクスドライバーを使って、トラックパッドケーブルのコネクタブラケットを固定している1.8mmネジを2本外します。
OK gracias Jonny traduzco tu comentario: Los míos son T5 y ciertamente no T3
-
-
-
温めたiOpenerを用意し、トラックパッドリボンケーブルの上に1分ほど置き、トラックパッドリボンケーブルをバッテリー上部に固定している接着剤を柔らかくします。
-
iOpenerをお持ちでない場合は、ドライヤーでケーブルを温めてください。ケーブルが温まる程度で、触っても熱くない程度にします。バッテリーを温め過ぎないように注意してください。
-
-
-
ディスプレイを保護するため、作業中はディスプレイとキーボードの間にアルミフォイルシートを装着してください。
-
さらに、ペンキ用などの剥がしやすいテープをトラックパッドエリアに装着してください。オプションとして、余分な接着剤リムーバーが飛び散らないように、トラックパッドエリアの下に直接紙タオルなどを載せてください。
This is an important point. I had missed. I feel a better image with a towel would better emphasize.
-
-
-
テープの端に沿ってスパッジャーを押して、MacBook Proのアルミニウムケースにしっかりと貼り付け、スピーカーをバッテリーから密閉します。
-
テープを折りまげて、スピーカーに軽く装着して、作業の邪魔にならないようにします。
The speaker membrane is also relatively delicate. You can put a small piece of paper to protect it, to avoid the tape gluing to it directly.
-
-
-
接着剤リムーバーの流れをコントロールするには、MacBook Proの裏側端(ヒンジ側)の下に本やホーム製ブロックなどを置くなどして、5cm程度傾斜させてください。
-
-
-
MacBook Proの作業準備が完了です。次は、あなた自身を安全装備しましょう。
-
接着剤リムーバーを塗布する際は、保護メガネを着用してください。(保護メガネはキットに含まれます。)
-
保護メガネを装着せずにコンタクトレンズの装着はしないでください。
-
保護グローブもキットに含まれています。肌荒れや敏感肌の方は、ここでグローブを装着してください。
-
-
-
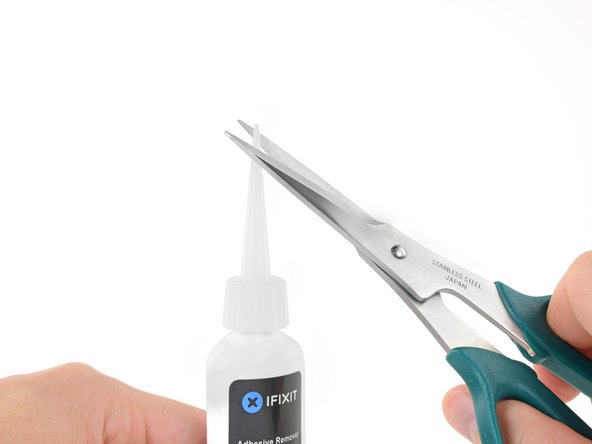
黒いゴム製ストッパーを接着剤リムーバーから引っ張って外します。
-
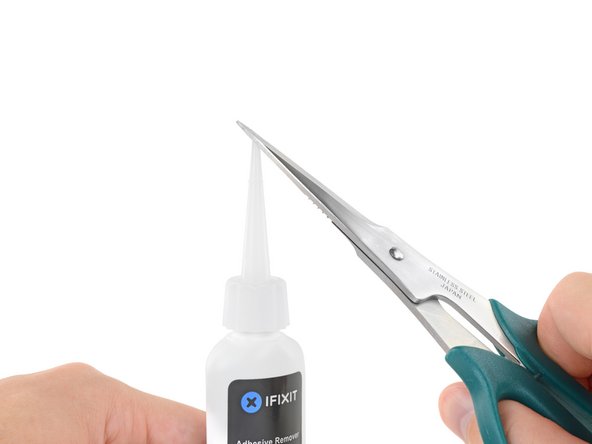
ハサミを使ってアプリケーターのシールされた先端をカットします。
-
先端を細くカットすると、少量のリムーバーをコントールよく塗布できます。
-
-
-
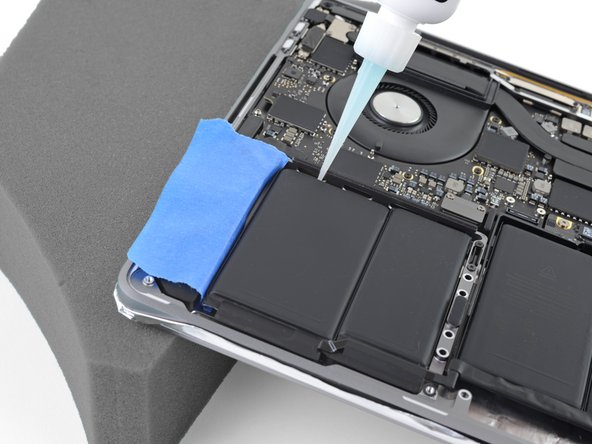
接着剤リムーバーを2つの右側バッテリーセルの下に注入します。
-
液体接着リムーバーが浸透して、接着力が弱まるまで、約2分間待機してください。それから次の作業に進みます。
-
-
-
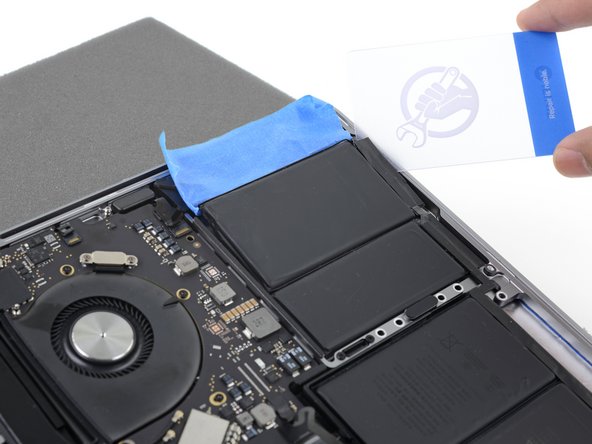
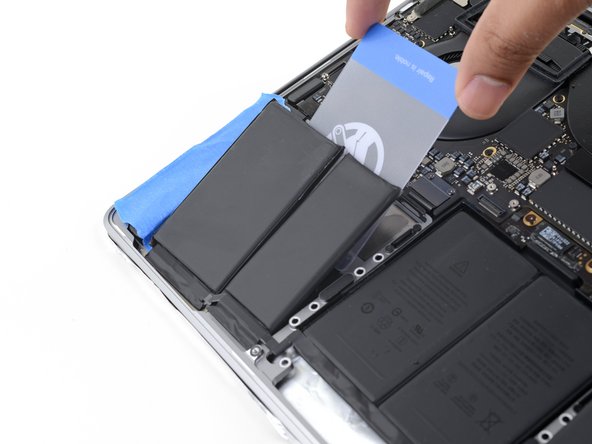
2、3分経過後、プラスチックカードの角をバッテリーの下に差し込みます。一番右側のセルの下側端から作業を初めてください。
-
カードを左右に揺らしながら、2つのバッテリーセルの下全体をスライドします。
-
接着剤を完全に剥がせたら、バッテリーを持ち上げますが、MacBookから完全に取り出さないでください。
-
プラスチックカードを一時的にバッテリーの下に残します。次の作業に進んだ時、接着剤が再装着するのを防ぐためです。
-
-
-
バッテリーセルの下のカードが上手くスライドできない場合、フロスやワイヤを使って、バッテリーセルの下に通し、鋸を引くように交互に左右へ引きます。
-
-
-
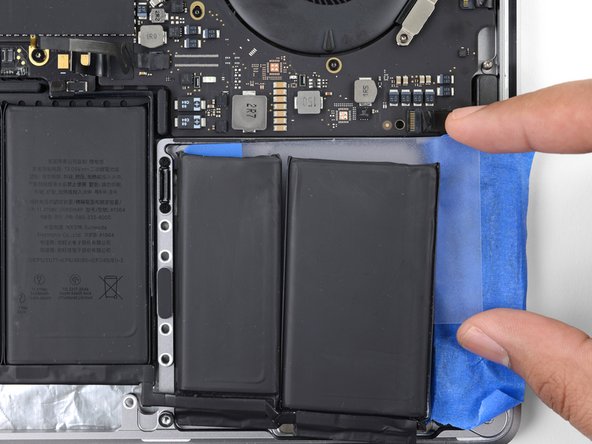
前の2−3の手順を繰り返して、一番左側のバッテリーセルを乖離します。
-
MacBook Proの左側を上げて、接着剤リムーバーがスピーカーに流れこまないようにします。
-
-
-
一番左側バッテリーセルの下に、プラスチックカードの1つのコーナーをスライドして、バッテリーを固定している接着剤を慎重に剥がします。
-
作業中にセルが再接着しないように、プラスチックカードをセルの下に一時的に置いておきます。
-
-
-
残り3つのバッテリーセルの下に、接着剤を数滴落とします。
-
リムーバーの漏れに注意し、必要に応じて次の手順で接着剤リムーバーを追加してください。
-
次の手順に進むまでに、約2分間置いてください。
-
-
-
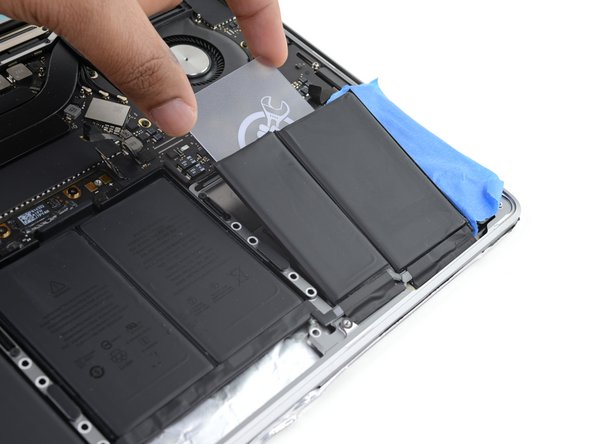
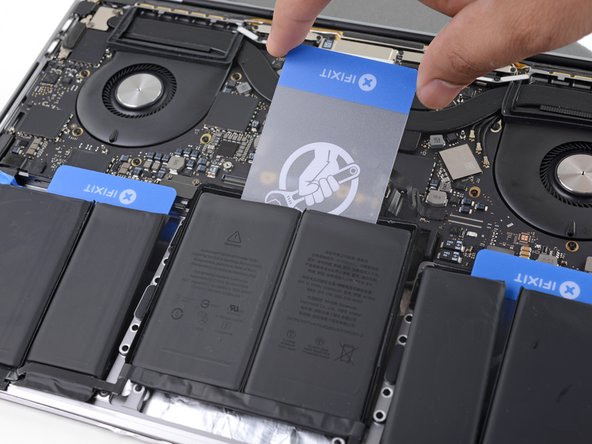
前の手順で既に分離した左端バッテリーセルの下にプラスチックカードを完全にスライドさせ、残り左側のバッテリーセルとMacBook Proのアルミケースの間に慎重に差し込みます。
-
-
-
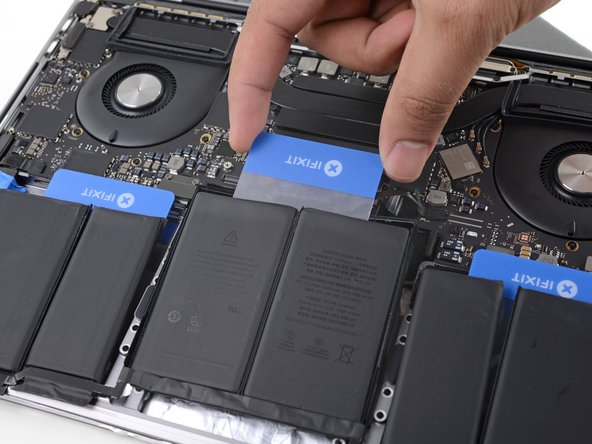
プラスチックカードの一角を、一番大きい中央のバッテリーセル上部の下に差し込みます。
-
カードを左右に揺らしながら、バッテリーセルの下をスライドして、固められた接着剤から完全に乖離します。
-
-
-
バッテリーを持ち上げて取り上げます。
-
手袋をはめた指先もしくはピンセットを使って、接着剤の長いストリップを剥がします。
-
プラスチック製ツールで残りの接着剤の塊を削ぎ取ります。イソプロピルアルコールもしくは接着剤リムーバーを使ってバッテリー下のエリアを綺麗に拭き取ります。前後ではなく、一方向のみに拭いてください。
-
作業終了後は、保護用テープをスピーカーから慎重に剥がします。
-
-
-
旧モデルではバッテリーデータケーブルが、バッテリボードの下に挟まっていないか確認してください。
-
バッテリーの底側にプレインストールされた接着剤が付いている場合は、裏返して、慎重にシールを剥がして、接着面を露出させます。バッテリーに接着シールが付いていない場合は、Tesa 61395のような両面接着テープを使ってバッテリーを固定します。
-
バッテリーの装着位置を確認したら、定位置に取り付けます。
-
バッテリーをしっかりと5−10秒間、下部ケースに押し込んで、固定させます。
Extremely detailed and easy to follow instructions! I ordered all the tools from ifixit and they worked great. I didn’t use the adhesive remover. I was able to carefully work a plastic card behind each battery section. This took a little more effort but I didn’t feel comfortable using acetone on a macbook.
Instead of acetone/alcohol blend adhesive remover I used 91% isopropyl alcohol available at any pharmacy. Acetone will melt many/most plastics, alcohol will not.
91% isopropyl alcohol and a thin plastic card worked fine, took a little more time and patience but worked.
While the acetone is better at loosening/removing adhesive, you also increase the risk of damaging plastics around the battery area or worse if it should leak into the keyboard or other area!
As the instructions note ... DO NOT over apply their adhesive remover!
Thanks iFixit for providing great tutorials, parts and supplies!
Happy Customer
-
オリジナルのパーツと交換用パーツをよく見比べてください。交換用パーツに付いていない残りのコンポーネントや接着シールなどは、インストールする前に新パーツに移植する必要があります。
デバイスを再組み立てする際は、これらの手順を逆の順番に従って作業を進めてください。
***
e-wasteを処理する場合は、認可済みリサイクルセンターR2を通じて廃棄してください。
修理が上手く進みませんか?まずはベーシックなトラブルシューティングを試してみるか、このモデルのアンサーコミュニティに尋ねてみましょう。
オリジナルのパーツと交換用パーツをよく見比べてください。交換用パーツに付いていない残りのコンポーネントや接着シールなどは、インストールする前に新パーツに移植する必要があります。
デバイスを再組み立てする際は、これらの手順を逆の順番に従って作業を進めてください。
***
e-wasteを処理する場合は、認可済みリサイクルセンターR2を通じて廃棄してください。
修理が上手く進みませんか?まずはベーシックなトラブルシューティングを試してみるか、このモデルのアンサーコミュニティに尋ねてみましょう。
34 の人々がこのガイドを完成させました。
以下の翻訳者の皆さんにお礼を申し上げます:
100%
これらの翻訳者の方々は世界を修理する私たちのサポートをしてくれています。 あなたも貢献してみませんか?
翻訳を始める ›
14 件のコメント
When remounting, putting back the trackpad in a nicely centered position can become a lengthy exercise of patience.
I haven’t find guides or tricks to help; the best I came up with was to
* put back just two corner screws, without tightening them, that is enough to keep it in place and not lose the washers
* flip back your macbook keyboard up
* center the trackpad and fix it in place with adhesive tape
* flip it back belly-up, tighten the two corner screws and add the remaining six.
Thanks; everything went well, except at the end I realized that I somehow damaged the battery connector from step 12/13. What is the part number, please?
Der Akkutausch funktioniert auch mit dem Heißluftfön bei max. 100° Celsius…
Einfach die Akku-Sektionen dazu eine Minute etwas erwärmen und dann mit der Karte den Klebstoff lösen!
Der Einbau des Trackpads ist etwas fummelig da es beim Zentrieren keine Arretierung oder ähnliches gibt, dazu am besten einige Schrauben etwas anziehen und dann systematisch festziehen! Ich legte das aufgeklappte MacBook über einen Überhang damit ich von oben das Trackpad immer justieren konnte und mit der anderen Hand schraubte ich von unten die Schrauben fest ;-)
I fixed it! My original battery had swollen badly and had been a fire hazard.
This was my first time fixing a phone / laptop. Instructions were quite clear and easy to follow. I didn't run into any problem.
Very proud of myself at the moment ☺️
Is it possible to remove the battery with heat rather and remover?
After completing this repair, my space bar feels slightly sticky and no longer registers presses, unless they are firm and in the very middle of the key. I think it's very important to let all of the solvent thoroughly dry out while the laptop is still open and before the new battery is installed, or some of the vapors may penetrate the keyboard and result in gunk getting deposited under the key dome, causing this issue. I'm not sure how to resolve this without removing and attempting to disassemble the entire keyboard, which is difficult on this model.
Excellent descriptions and photos. I did this without incident.
Instead of acetone/alcohol blend adhesive remover I used 91% isopropyl alcohol available at any pharmacy. Acetone will melt many/most plastics, alcohol will not.
91% isopropyl alcohol and a thin plastic card worked fine, took a little more time and patience but worked.
While the acetone is better at loosening/removing adhesive, you also increase the risk of damaging plastics around the battery area or worse if it should leak into the keyboard or other area!
As the instructions note ... DO NOT over apply their adhesive remover!
Thanks iFixit for providing great tutorials, parts and supplies!
Happy Customer
How long does your laptop run with battery you placed without connecting power source ? I mean the how is the battery performance? Did you buy from Ifixing ?
Thank you so much Tarun.
Great!!!
Muchas gracias Tarun.
The cable referenced in steps 11 through 13 was different than what was shipped. The battery pack I received had that cable glued in place on the battery side. I. disconnected the original cable from the motherboard and used the cable that was included (attached) to the replacement battery, connecting it on the terminal that the original was attached to. I'm not sure where the difference came from, I am charging the battery as I write this and hope that it charges correctly. I know it boots up, I did that and put the Auto Boot setting back to original.
Super Anleitung, hat alles wie beschrieben funktioniert und mit dem Tool Kit für den Batterie Wechsel waren alle benötigten Werkzeuge dabei. 10 von 10 Punkten !!! DANKE
MacBook Pro 13" Retina 2018














Is this step necessary? I can’t perform this step as I am attempting to repair water damage and need to remove logic board & most likely replace the battery.
Macrepair SF - 返信
@mac_medic You definitely don’t want the power coming on while the board is wet. In your case, I think powering on the machine to disable Auto Boot would do more damage than it prevents. I agree, skip this step and be prepared to disconnect the battery quickly if the laptop automatically powers on. Good luck!
Jeff Suovanen -
Thats right! You don't want power running while working on your logic board.
Dan -
This did not work when running High Sierra.
Kyle B - 返信
Tried this on a 2018 MBP 13” Touchbar (there’s no iFixit guide for this model yet). Need to replace a broken screen.
Luckily I managed to connect to an external screen (Cmd-Down Brightness to switch displays) and enter above command. Seems to work, but there’s another problem with this model - it powers up as soon as any key is pressed……. ffs <gnashes teeth>
Cool_Breeze - 返信
I unscrew the battery first and wrap electrical tape over the logic board battery connector before attempting any repairs to the board. Haven’t had any problems yet and I’ve worked on about 10 of these models already. Also when you open the bottom case use a suction cup at the bottom and pull up then run a plastic spudger along the edges to disconnect the clips. Also only use a plastic spudger on the board. Saw a youtube video from a repair shop and he did not disconnect the power and used all metal tools during the entire process of removing the board. His last step was to disconnect the battery terminal.
Brian - 返信
Is this step necessary if my mac can turn on? Battery fully dead(
Nursat b - 返信
BEFORE YOU START: The included torx head stripped off before I was done (and you might need an additional T4) so stop now and go buy a good one. Also they fail to warn you above to get some blue threadlocker ahead of time.
Jason Sherron - 返信
This command did not work for me and I read that sometime in later 2020 Apple stopped this command from working…any ideas on a work around?
Patrick Machacek - 返信
Not able to do that with damaged screen
richardjgreen - 返信
If you have a damaged screen you can still use a converter from thunderbolt (USB 3) to HDMI and plug your Macbook Pro to your TV as monitor display. Just make sure to chose the right Source (HDMI IN) in your TV. I did it and to make it work I unplug and plug again in my Macbook and so I could disable the Auto boot
Roberto Sanchez Bustos -
Hi. This does not work on 2018 13” MacBook Pro with Touch Bar. I did exactly this to disable auto boot. But when I check by using nvram -p it says: auto-boot true. Am I doing something incorrectly? I did everything step by step. Copied and pasted the sudo command, pressed enter and then entered my password. I have Big Sur 11.1 installed. Is there any other way since I need to replace the screen. Thank you. Adrian
Adrian Vizik - 返信
Hi everyone. This is also a little pointless if you can’t see anything on the screen, and you don’t have a display adapter to USB C to display it. I agree with Brian about removing the back and disconnecting the battery cable before you even think about opening the lid of the MacBook. Applying the insulation tape is also a handy little tip that just makes sure there is no way to discharge from either the board or battery.
Roberto Enrieu - 返信
running `nvram -p | grep 'AutoBoot'` in terminal verifies that it was accepted
result: `AutoBoot %00`
Marek Polák - 返信
Running Big Sur 11.6.7 on a 2019 16" MBP, it's "auto-boot". So it's:
nvram -p | grep 'auto-boot'to display the current state, the default istrue- and then to change it,sudo nvram auto-boot=falsewhich turns it off.Ed Mechem -
This step is completely unnecessary if you follow the guide to disconnect the battery properly. Just put some tape between the battery and logic board connection to prevent it from accidentally touching and therefore powering on the laptop.
Grant Ormsby - 返信
It took me a few tries to make this command work, as I was able to copy and paste the command into Terminal, but could not type in my laptop’s password. I finally typed my password into a text document, copied it (command C), and then pasted it into Terminal and it worked.
tommy404 - 返信
I didn’t do this. Mine never auto-booted before I replaced the battery. Now it does.
hatuxka - 返信
BEFORE YOU DO ANYTHING - CHECK THE BATTERY!
I-fixit sent me a bad battery, which I didn’t realize until it was already install. They sent me a new one, but I wasted hours uninstalling and reinstalled.
Get a volt meter and measure the voltage on the output of the battery pack. If it reads 0 V, SEND IT BACK. It should read over 2 V.
bcardanha - 返信
I've just received my replacement battery and it reads 0,042V between the two main connectors. Do you think it's dead?
peter sussex -
When I did this from Terminal.app within Recovery Mode, the “sudo” was not recognized but I could invoke it without the sudo part. It seems to have been accepted when looking at “nvram -p”
johann beda - 返信
When in Recovery Mode, you already have superuser powers. So you don't need to prefix commands with the sudo command to invoke them with root privileges; you already have them. Do a
pwd(print working directory) after opening Terminal in Recovery Mode, and you'll see that you're in the root user's directory.Ed Mechem -
I received the battery kit for my 2018 MacBook Pro and as per the above comment from bcardanha - Oct 12, 2021, I checked the voltage on the pads marked + and - . It was zero volts so I panicked a bit.
I sent a message on the iFixiT Facebook page and I got no reply. I finally found the customer service email for Ifixit Europe and sent them an email voicing my concern as I was not keen to work for couple of hours just to discover that the battery is faulty. I had an almost instant reply on the email (kudos to them) and they adviced me to go ahead and install the new battery as the voltage measured when battery is not connected is not relevant.
I took a leap of faith and after two hours… the new battery showed 50% charge and everything seems to be working just fine. I am happy it worked.
Mircea Comanici - 返信
After removing the old battery and installing the new battery I powered up the MBP before screwing the bottom on. I discovered the my keyboard would not function. It took a few hours of investigation and frustration that I discovered the track pad power ribbon had become partially dislodged from the trackpad. I was able to see that this through the little machined slot where the battery sat. I had to remove the trackpad to reinsert the power ribbon back into the connector in the trackpad. after reassembling and reinstalling the battery etc the keyboard worked. Just food for thought if your run into the keyboard issue.
Ed Mease - 返信
This should be the default. IMO I tell you to power on - not the lid.
G Sena - 返信
Est ce que cela fonctionne sur un macbook pro 2017 sans touchbar ?
maël muzelet - 返信
Bonjour Maël, oui, ce tutoriel concerne "les MacBook Pro 2016 (et plus récents) et les MacBook Retina 12" 2017 (et plus récents)"
Claire Miesch -
Excellent instructions. I was able to follow and install the new screen. I recommend that you get a good set of tools before you begin. I started with an inexpensive repair kit bought online. The Penta and torx bits failed. I bought an IFIXIT kit with quality bits and I was able to do everything I needed.
Tom Markham - 返信
If you're not running an admin account the sudo command won't work (which honestly, you should not be running admin). Rather than logging in to your admin amount via the OS, in the terminal type "login [admin username]," then the password and you'll be able to do the sudo command as described above. Once you're complete, type "logout [admin username]" and you'll be good to go. Obviously replace [admin username] with whatever the account name for your admin user is.
arichard2401 - 返信
For those unable to complete this step because the screen is too damaged I recommend leaving your macbook on until the battery dies.
Nicholas R Licato - 返信
Just replaced my 2018 15" MBP battery. Running Sonoma.
I found no way to disable AutoBoot (The status can be checked in the Power section of system report).
Anyway, i left my battery completely drain before opening the MBP, and had no issues during the process.
Cédric Bontems - 返信
After sending this command in terminal when I checked what happens if I now open the lid, instead the screen lit slightly up (still black) then a battery symbol showing the charging state showed up.
Now, after replacement of the battery, this is all I get to see.
No reset of NVRAM nor PRAM helped.
Currently the new battery charges (58% atm) and it feels like it‘s mocking me.
webrockers - 返信
I suspected the keyboard or TouchID sensor wouldn’t work, so I went on and checked every connector.
I missed connecting the left TouchID sensor from step 31.
webrockers -
Read the comments section at the bottom of the article before proceeding with the repair. It is unnecessary to remove the logic board. I actually removed the 45mm plastic bar to enable the cables to slip out then in. It is only there to frustrate repairers!
Jack - 返信