この翻訳は、ソースガイドの最新の更新を反映していない可能性があります。 翻訳の更新に協力してください。 または ソースガイドを参照してください。

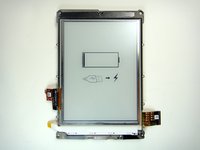
Kindle Whitepaper 第1世代 スクリーンの交換
必要な工具と部品
パーツ

ツール


もっと見る
-
-
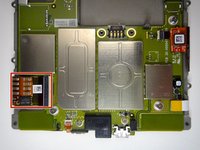
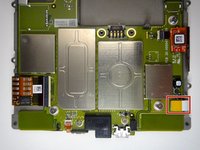
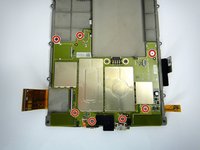
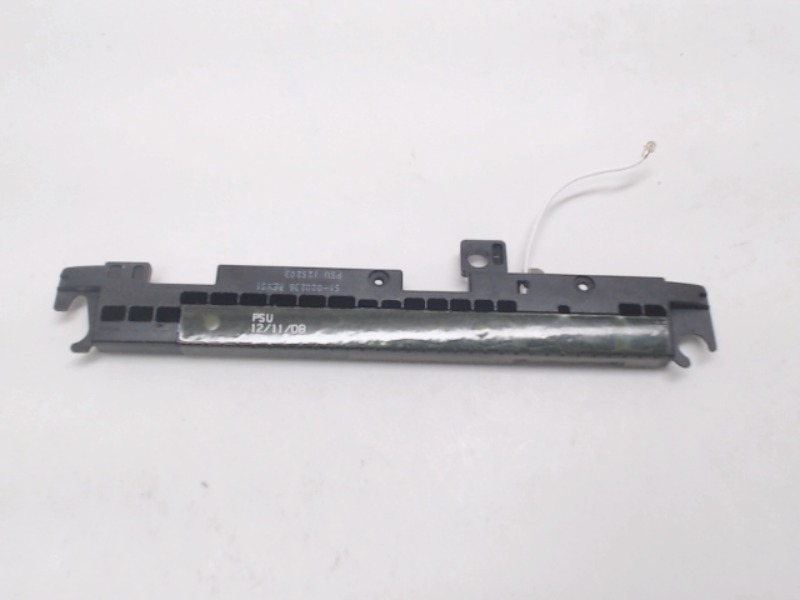
ミッドフレームを固定している3.0mmプラスネジを11本外します。
Hello, the original battery is 1420m Ah and 3.7VDC, but the buttery you offer to sell is 1600mAh, is it right? there is no problem with different mAh? mi kindle is the amazon kindle 1est generation
-
-
-
-
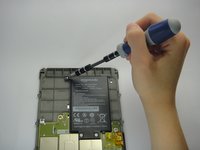
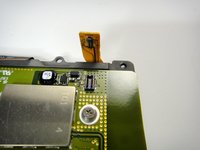
バッテリーの下側から慎重に持ち上げて、ミッドフレームからスライドして取り出します。
Thanks for providing this guide, I would have been lost without it. My old kindle, however, had very stiff and hard rubber/plastic. There was no way I could have slid the glass to the side or gotten the plastic spud under the edge of the glass or the plastic.
What I did was to remove a piece of the plastic next to the glass , about 1/8” square, then insert a putty knife in between the two sides towards the edges. It all popped apart without breaking anything. Perhaps I could have done this without cutting out the little piece.
Thank you for this very user friendly guide.My kindle is now working as new.The screws are small and fiddly and the correct tools are essential. I took roughly about 45 minutes from start to finish and the most difficult part was taking the casing apart without damaging the screen .. A 5 star service.
The bezel sits on a film meant to protect the screen. When lifting the bezel, it is a good idea to slightly push on the screen with cardboard or something elese, to make sure the screen film stays on the screen as you lift the bezel.
-
-
-
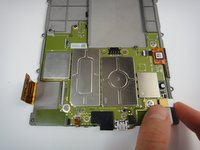
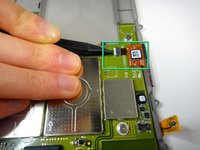
残りのプラスネジを7本外します。
-
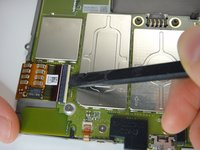
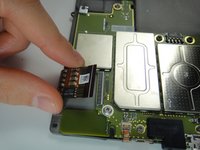
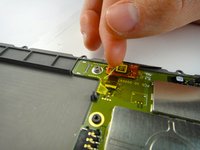
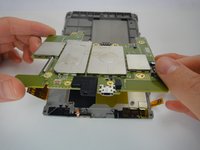
ミッドフレームからマザーボードを持ち上げます。
We should add a link to how to separate the motherboard from the display. I used this guide and had to hunt these steps down! Other than that, my repair worked out great! Kindle Paperwhite 第1世代の交換
-


デバイスを再組立する際は、これらのインストラクションを逆の順番に従って作業を進めてください。
デバイスを再組立する際は、これらのインストラクションを逆の順番に従って作業を進めてください。
25 の人々がこのガイドを完成させました。
以下の翻訳者の皆さんにお礼を申し上げます:
87%

Midori Doiさんは世界中で修理する私たちを助けてくれています! あなたも貢献してみませんか?
翻訳を始める ›
チーム

Cal Poly, Team 3-33, Amido Winter 2013 Cal Poly, Team 3-33, Amido Winter 2013人のメンバー
CPSU-AMIDO-W13S3G33
4 メンバー
17のガイドは作成済み
17 件のコメント
A few points.
1 could be clearer as to which particular model is being used in this dis-assembly (is this the wifi version?).
2 could do with showing the removal of MB from system (not hard but incomplete without it).
3Can you either go further by demonstrating how to remove screen from mid frame and or identify a supplier of the midframe and lcd combined? This would be particularly helpful as the screen appears to be completely glued to the midframe with no obvious way to remove it.
It’s the wifi version. I’ve just fitted a screen to the 3G version.
Difference is that (if you look at the top of the picture in step 8), there’s a populated SIM card slot on the board, above that a modem daughter board you can unscrew, and plugged into this antenna leads that go to an antenna mounted on the top of the main frame.
Only difference in repair would be that you’d have to unscrew the modem and pop off the MMCX connector the antenna uses.
One problem I did have is that on my Kindle there seems to be an antenna-tape-thing at the top of the frame (https://youtu.be/-SEG4NDb2JY?t=58s - on frame directly above the top of the screen).
When I pried off the bezel, (in my case) this stuck to the bezel not the frame, so it ripped. Might be worth heating the top of the bezel before peeling it off - but apart from that don’t see what you could do.
Anyway, my kindle is all back together again and 3G both seem to be working - so not too worried.
Whilst this is a lovely example on how to get to the point when you remove the screen best you all be beware the the original Paperwhite (The one I took apart) screen is bonded glass to metal and is practically impossible to clean off. After a great deal of scraping I got to the point where I could fit my replacement screen. Alas all my work has been wasted so far because the replacement screen is not up to scratch. Personally, after attempting replacing the screen I'd pay the £60 to get someone else to replace it.
My replacement screen didn’t come with a frame, so I had to separate old screen from the frame.
I heated the screen and managed to lever it out, but edges of the screen crumbled to glass dust as I pried the screen.
Shot of contact cleaner seemed to allow me to get the crumbled glass out of the glue layer on the frame.
Pretty sure it’s not possible to remove a screen from a frame and not destroy it.
Maybe you guys can help me:
I have a paperwhite 1st-gen that doesn't charge via usb anymore, but the screen is perfect. At first i wanted to replace the usb jack, buti then I found a paperwhite 2nd-gen with a defect screen.
So I decided to dissasemble both of them and assemble them to one working device. I used the 1st-gen-screen and the 2nd-gen-board. But when I switch it on and do a reset i get the error: "INVALID BATTERY: -22".
Got the same error doing exactly the same thing as u di.
Seems that the screen is not interchangeble between the 2 versions
I found this guide useful. I also found that it takes a LOT of heat to remove the screen from the midframe. When buying a new display unit, it comes with the midframe so you don't have to remove the damaged screen from the original midframe.
I ordered a display unit (including the midframe) from fixit and it was sent pretty fast. Unfortunately, it came with a scratch in the middle of the screen that is very bright when using the Kindle. Maybe, it's a result from 2 tiny screws (those holding the midframe to the back cover) that were packaged with the display unit. I guess they were overlooked when disassembling and packaging the display unit. I'm not that happy with this. Anyway, this guide is useful when replacing the screen of your Kindle.
Btw, I sketched the midframe on a piece of cardboard and taped the screws and things onto it, to be sure to have them on the proper position when reassembling it.
knut3000 -
I just used these instructions to replace the screen on my Gen 2 Kindle Paperwhite Wifi. Thanks for the help. It's nice to spend $40 to fix the Kindle instead of buying a new one.
Tim Diller - 返信
Tim - Can you verify that you installed this in a Gen 2 Paperwhite? The iFixit part listing says it is for first gen. I'm looking at repairing my mother's 2nd gen and want to be sure this screen will work. Thanks.
Bob, my wife is happily using her Gen 2 Kindle Paperwhite Wifi repaired with this method.
Good to hear you repaired it! But did you use Gen1 screen from ifixit?
I’ve just done the 3G version - longer comment above.
No difference in the screen, and process if you’re just replacing the screen (without the assembly).
If your replacement is the screen+assembly, then probably extra steps to remove the modem and unplug the antenna. Also think there’s an extra antenna piece (http://www.powerbookmedic.com/xcart1/ima...) you may have to move across.
Pretty easy repair - 2 bits I found useful in this guide were:
1) How to get into it (removing the glued on bezel)
2) Confirmation on how to release the ribbon connectors (Some lift, some slide, and I’ve broken them before when I didn’t check/look carefully and guessed wrong).
in step 10 “heat” link does not work
A question, the screen of paperwhite 3 is compatible with paperwhite 2. Both are only Wifi. Plis help me :)
I found it easier to start this step off with one of the Opening Picks found in the iOpener pack.
NathanF - 返信
The glue on bezel started to peel the sticky back protective layer off the screen for me - managed to smooth it back down, although now have an unsightly crease. I would try to hold the screen down when you pull the bezel off to stop damaging the screen.
Callum Rogers - 返信
This step is most time consuming. Take you time and try not to scratch the bezel :)
Oleksii - 返信
Couldn't get the plastic spudger under the edge of the bezel. A right-angle X-Acto blade was a satisfactory tool here.
dbrick - 返信
The glue was VERY difficult...I used a trick, from taking apart phones, and used a hair drier to loosen up the glue...worked like a charm.
billkaris - 返信