必要な工具と部品
-
-
解体を始める前に、iPhoneの電源を切ってください。
-
iPhone下側の底から、2本の6.7 mm長さのペンタローブネジを外します。
-
各ペンタローブネジのネジ頭の下に黒いゴム製ガスケットがついています。これは防塵防水性能を最大限に強化するためです。このガスケットのコンディションをチェックしてください。必要であれば、再組立の際にネジを交換してください。
-
-
-
iPhoneのスクリーンにひび割れが入っている場合は状態が広がらないよう、また修理作業中怪我をしないようにガラス表面にテープを貼ります。
-
iPhoneディスプレイ上に透明の梱包用テープを貼り付けます。ディスプレイ表面全体を覆うようにしてください。
-
ひび割れの程度がひどく、次の手順で使用する吸盤カップがうまく装着できない場合は、3番目の画像のように強力なガムテープを真ん中で折り曲げて、ハンドル代わりに利用します。これで吸盤カップと同じようにディスプレイを持ち上げます。
-
-
-
iPhoneの画面全体に、透明な梱包用テープを重ね合わせます。
-
次の手順でうまく吸盤が装着しない場合は、強力なテープ(ガムテープなど)を持ち手に折って、代わりにスクリーンを持ち上げてみてください。
-
-
-
青いハンドルを後方に引き、リバースクランプのアームのロックを解除します。
-
iPhoneの左/右側の端に向けてアームをスライドします。
-
吸盤カップを、ホームボタンすぐ上のiPhoneの下端付近に装着します。上部に一つ、下部に1つずつ取り付けます。
-
両側のカップをしっかりと押し付けて、取り付けたい位置に装着します。
-
-
-
青いハンドルを手前に引くと、アームがロックされます。
-
ハンドルを時計回りに360度回転させ、カップが両側をストレッチするまで回し続けます。
-
吸盤の位置が合っていることを確認してください。装着位置がずれ始めたら、吸盤を少し緩めてアームを装着し直してください。
-
-
-
iOpenerを熱し、リバースクランプのアームに通します。
-
iOpenerをiPhoneの下端に重なるように折ります。
-
1分ほど待つと、粘着剤が剥がれ、隙間ができます。
-
オープニングピックをスクリーンではなく、スクリーンとプラスチック製ベゼルの下の隙間に差し込みます。スクリーンには差し込まないでください。
-
次の3つの手順をスキップします。
-
-
-
吸盤カップをしっかりと引き上げます。リアケースとフロントパネルの間に僅かな隙間が生じるまで一定の力で引っ張ります。
-
隙間に開口ピックをスクリーンとプラスチックベゼルの間の下の隙間に差し込みます。スクリーン自体には差し込まないでください。
-
-
-
-
iPhoneのディスプレイを左側から右側に向けて(本のページをめくるように)開きます。
-
作業中、ディスプレイが邪魔にならないよう、ディスプレイを立てかけるための衝立てを準備してください。
-
-
-
バッテリーコネクタのブラケットを固定している1.2 mm Y000ネジを3本外します。
-
ブラケットを取り出します。
-
-
-
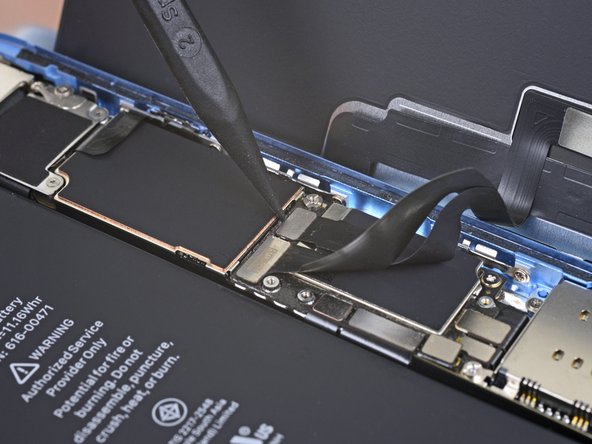
スパッジャーの先端を使って、バッテリーコネクタをソケットからまっすぐ引き抜きます。
-
コネクタをロジックボードから離すように曲げて固定します。アクシデントでロジックボードに接続してしまい、作業中、電源が入らないようにするためです。
-
-
-
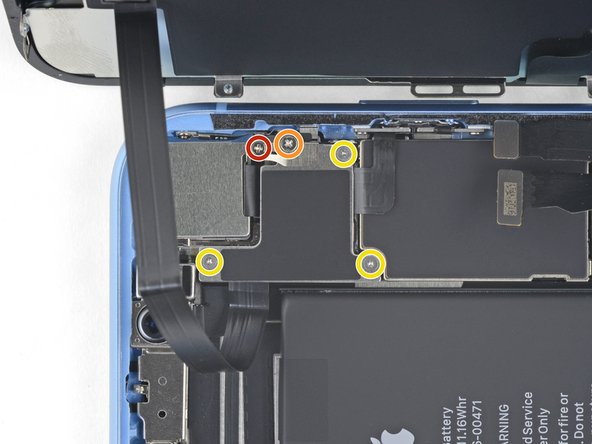
リアケースにロジックボードコネクタのブラケットを固定している5本のネジを外します。
-
1.3 mm #000 プラスネジー1本
-
1.5 mm #000 プラスネジー1本
-
1.2 mm Y000 ネジー3本
-
ブラケットを外します。
-
-
-
残っているフロントパネルのコネクタを取り外します。
-
iSightカメラの近くには5つのコネクタがあります。
-
SIMスロットの近くには5つのコネクタがあります。
-
-
-
次のネジを外します。
-
2.9mmスタンドオフネジ
-
1.5mmプラスネジ(#000)
-
1.6mmプラスネジ(#000)
-
接地ブラケットを外します。
-
SIMスロットアセンブリを引き抜きます。
-


デバイスを再組み立てする際は、これらの手順を逆の順番に従って作業を進めてください。
デバイスを再組み立てする際は、これらの手順を逆の順番に従って作業を進めてください。
59 の人々がこのガイドを完成させました。
以下の翻訳者の皆さんにお礼を申し上げます:
100%


これらの翻訳者の方々は世界を修理する私たちのサポートをしてくれています。 あなたも貢献してみませんか?
翻訳を始める ›

チーム

20 件のコメント
if I replace the logic board will it remove a iCloud lock??????
TL;DR: Yes, it should but…
All of the phone’s memory is stored on the NAND flash memory with is soldered to the logic board. Replacing the iCloud-locked logic board with a logic board from a phone that does not have an iCloud lock will technically remove the lock.
A terrible analogy would be like if you had had a tumor (iCloud lock) in your brain (MLB) so your surgeon (you, the technician) performed a brain transplant. Replacing the brain would indeed get rid of the tumor. However, your body (The phone’s housing) would just become the person of whose brain was transplanted into your body.
The only true way to remove an iCloud lock is to obtain the Apple ID & Apple ID password of the original owner.
You just have to try to find a good logic board and trust that the seller is legit. (Easier said than done)
This guide was more intended for those that are attempting micro-soldering repairs. However, you can use the guide for whatever you need. :-)
If i chanfe the logic board do i also have to swap the facial scan like the fingerprints on the prior iphone or all i gotta do is swap the boards
Great question! From what I’ve experienced, the Face ID hardware is similar to touch ID hardware in that it is tied to the phone’s logic board. However, FaceID does seem a little more forgiving. The phone I’m currently using is an iPhone X that was severely damaged. I bought it off a customer and installed a new screen but Face ID did not work. A couple months later, I was using an app that made use of face ID hardware for facial recognition and mapping. I thought it wouldn’t work since FaceID wasn’t working on my phone. To my surprise, it worked just fine. I then tried setting up FaceID and it was able to activate and capture my face.
If you’re looking to refurbish a phone, assume FaceId won’t work without the original hardware. However, your milage may vary.
Does the camera work even the face I'd doesn't work ?