
iMac Intel 21.5インチ EMC 2308のPRAMバッテリーの交換

はじめに
手順 1 に進むこのガイドを参照して、ロジックボードのBR2032 PRAMバッテリーを交換しましょう。


-
この手順で使用する道具:Heavy-Duty Suction Cups (Pair)$14.95
-
ガラスパネルの上部コーナーの2箇所に吸盤カップを取り付けます。
-
吸盤カップがうまく装着しない場合は、ガラスパネルと吸盤カップを中性洗剤などで綺麗に拭き取ってください。
Another comment on DATA & LCD Temp. Sensor cables: I had to remove the vertical sync, and the backlight cable, however, if you have an assistant or/can carefully rotate the screen clockwise/and then have it held up about 5" to 6" at a slight angle, you do not need to remove LCD data cable or LCD thermal cable, however - IMPORTANT: you must have a second pair of hands/or way to securely prop up the LCD. Also, don't rotate too much, since then you will pull out LCD data cable, and it renders the whole exercise moot, or can damage the cable or connector.
You don't need suction cups. The screen, held by magnets, can simply be pried off using a very thin blade such as a screw driver and fingers.
That's a bad idea. using a metal tool to pry off glass is likely to end with an expensive broken front glass.
Suction cups are common. Find a couple and do it the safe way. I use some cheap ones that came with iPhone repair kit.
No need for suction cups, I just stuck my nails (short like guys usually have) between the top part of the screen and body, and it came off easily. I've never done it before, so it seems to be very easy.
Just completed the replacement of the optical drive with an SSD using an OWC Data Doubler kit. Attempted to remove the optical drive without disconnecting any cables but found it a bit fiddly to orient the screen for good access. I bit the bullet and disconnected them and found the process less daunting than I imagined. Reconnecting them was similarly straightforward if you're careful.
Tip: you can skip the step for removing the optical drive thermal sensor connector from the motherboard. Still need to remove the sensor from the optical drive but you can leave that hanging and reattach it to the SSD later.
I’ve just successfully installed a 1TB SSD in place of my optical drive thanks to the information here- thank you to everyone who has contributed!
3 comments- the procedure described here seems to vary between HD replacement and dual HD/optical drive replacement. This can be confusing at times.
Expect there to be minor differences between the layout described and what you find when you open up your iMac. There are also, surprisingly, differences between the HD enclosure description, and the article provided by ifixit.
I was able to replace the DVD/HD enclosure single-handedly without fully removing the LCD, or deconnecting any of the cables (steps 5-11). It’s a bit cramped, and fiddly, but I was not happy removing any of the cables despite watching videos, etc., since they all seemed to involve applying more force than I was comfortable with. A more detailed description of how to release them might have helped, but even here, there may be minor variations even within the 2389 model.
Good luck!
ivan birks - 返信
Fingernails are all you need to free the glass from its magnetic hold. If you don’t have them, slip something thin and plastic, like a spudger, at a top corner.
Max Powers - 返信
Minha dúvida é a seguinte: após o técnico trocar o HD do meu iMac de 21,5 polegadas, a câmera parou de funcionar. Seria por causa da troca do HD? Tem solução?
Creio que o cabo da camera não foi plugado ou deu mau contato… ou até danificado.
glecyo@gmail.com
I can’t get my glass to budge. I’m replacing a cracked one and now it’s about to shatter.
I know that I'm replying really late but I advise to use clear tape over any cracks so the cracks don't get bigger
Check for chips in the glass BEFORE you do this step. If there is a chip when you pull up with the suction cups you will wind up with a jagged mess. If you do have a chip I would advise covering the screen near the chip with clear tape of some kind before lifting out. Mine shattered right at the chip and the resulting glass dust cloud got all over. My solution was buying a new glass screen.
-
-
-
ゆっくりとガラスパネルをLCD表面に垂直になるように持ち上げて、スチール製のマウントピン
-
ガラスパネルをiMacの底側端から引き抜き、丁寧に脇に置いてください。
What's the best product to clean the face of the LCD?
Microfiber Cloth
Try your best not touch it in the first place
Brian -
Wearing Nitrile or regular surgical gloves helps prevent finger prints if you accidentally touch the glass.
amiller770 - 返信
I use a Swiffer duster from above at the last moment before I let the magnets grab the glass cover. This has worked so well the last dozen or so times I’ve replaced a glass cover since I never have access to a “clean room” and don’t wear a “bunny suit”.
Also, more dust will shed from your skin if you’ve just taken a shower, so I like to finish these repairs in the morning before a shower.
-
-
-
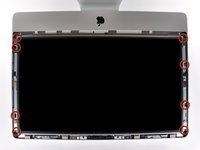
アウターケースからディスプレイを固定している8 mm T10トルクスネジを8本外します。
8 vis, pas 2
On reassembly, it is REALLY HARD to align those screws, because of the field of the strong magnets that hold the glass cover on. I'm sure there's a trick to it, but I'd love to know what it is for future reference.
A short piece of small gauge vinyl tubing that fits tightly over the head of the T-10 driver leaving an 8th of an inch or so in which to insert the screw to engage the head will hold the screw long enough to keep it away from the magnet and get it going in the hole.
I use non magnetic SS curved tip tweezers together with a magnetized #10 torx bit both to remove and reinstall the screws. You can magnetize and demagnetize the bit using the strong magnets on the LCD frame. Don't worry too much during removal, you can recover the screw. But loath the moment you drop the last screw during reassembly. For that reason, reinstall the screws near the magnets and hardest to get to first.
-
-
-
アウターケースからディスプレイ上部端をわずかに持ち上げます。
When putting the display back I have resistance from the foam elements (on the top end where the iSight is) and have to press down really hard. Is that okay?
Well, stupid me put the 3.5" to 2.5" cage the wrong side up. ;)
-
-
-
iMacの左上隅付近にあるLEDドライバボードのソケットから垂直の同期リボンケーブルを引き出します。
Reassembly of this part was the closest I came to disaster on this project. I tried inserting the connector a few times without success, and when I looked it it the leads, which are fragile, were all mangled. I smoothed them out by hand as best I could and and reinserted, very carefully this time. The trick is that the tip of the connector should be pointed somewhat upwards when reconnecting.
I was pretty sure that when I was done, I would reboot but have no display; but fortunately, everything worked.
So let’s say someone wanted to suck some of the dust off the back of the display before reassembly. Let’s just say that. Someone would likely suck this forsaken cable up into the vacuum tube then, wouldn’t they? They might. And if it were to oscillate in a rushing torrent of air, it might get munged? It might.
Here’s how you overcome such a disaster:
1) cut the end fresh, as close to the end as you can while cutting off any frayed end.
2) abrade the end gently, repeatedly, along the connector wire axis. I used emory paper. Your goal is to expose the copper conductors in the last 1/4” of the fragile evil wire.
3) Tape a small stiff cardstock to the back of the end of the connector. This is essential to press the connector wires into the connector.
4) Gently insert, taking special caution to not peel the copper off of the connector.
5) Tape that connector down deftly, without letting it move a millimeter and securing it for all time.
I just leave it connected. After disconnecting the other cables, there is enough slack to lay the display on its backside if you’re working on a flat surface.
I have replaced the hdd in this model about 8-10 times - I have never had to disconnect any cables other than the sata and temp sensor cables on the hdd. I just prop the lcd up with an egg carton (or something about 3 inches high that is soft and light) and access the hdd that way. The only thing I ever have trouble with are is putting the LCD screws back in around the magnets - but I have pretty much perfected that with a sissor/ tweezer tool.
Could you put up some photos of this procedure - egg carton etc…
The LCD screen is super soft on these since they rely on external glass for protection. Since LCD side will be facing down without disconnecting vsync, I'd lay it on a flat surface with soft fabric rather than putting the LCD on a rough surface like egg cartons.
Howard -
Any ideas where to replace this cable?
Danny Shaw - 返信
I followed Suzanne’s comment and also did not disconnect this cable (vertical sync ribbon cable) to avoid damage. I pivoted the screen about 110 degrees after the other cables where detached. On a flat surface, this is easily done and the cable is not tight. Image of my angle if I can drop a link. and cable in this position not in tension.
Where can I buy the replacement for this vertical sync replacement cable?
-
-
-
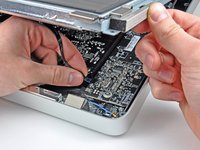
LEDバックライト電源ケーブルをLEDドライバボードから接続を外すため、ディスプレイをアウターケースから外します。
I found it easier to very slightly lift the front edge of the black connector with a small spudger, then gently pulling away towards the bottom of the iMac. Pressing felt a little crude and didn’t work for me.
-
-
-
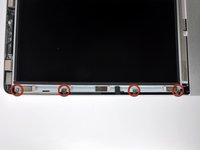
ロジックボード上のソケットからディスプレイデーターケーブルコネクタの接続を外すため、2つのコネクタケーブルのアーム両側を掴みます。
-
ディスプレイデータケーブルのコネクタを、ロジックボードのソケットから引き抜きます。
Aperte as duas exibição do conector do cabo de dados braços juntos para desbloqueá-lo de seu soquete na placa lógica.
Je suis d’accord. C’est plus facile. Merci mon ami
Translation: It is better to disconnect the screen side first (under the black sticker)
ALWAYS ALWAYS ALWAYS REMOVE THIS CABLE!!! Even if you are "only in there for a minute" tearing the connector off the board is EXTREMELY easy.
-
-
-
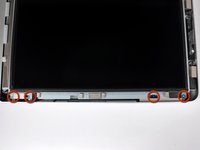
ロジックボード上のソケットからLCDサーマルセンサケーブルのコネクタを外します。
This is important regarding the fan running full speed
Is there a way to test the power supply to see if it's dead?
Achtung! Dieser Stecker kann sehr fest sitzen, hier hilft ein guter Fingernagel um den Stecker abwechselnd rechts und links zu Hebeln
English translation of bluesoundsmusic comment: “Caution! This plug can be very tight, here a good fingernail helps to lever the plug alternately right and left”
-
-
-
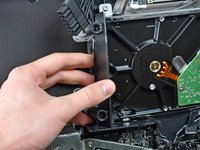
アウターケースに電源ユニットを固定している次のネジを4本外します。
-
22.2 mm T10トルクス細目ネジー2本
-
25 mm T10トルクス並目ネジー1本
-
9 mm T10トルクス並目ネジー1本
fuuuuuuuck shiiiittt dammn that mf hurt like !&&* fucckken shocker here guys this macpos WILL KILL your ass be &&^&^$^ aware
I installed the power supply and nothing happened when I pushed the power on button, has this happened to someone else or should I also replace the power cable?
Okay, is the side with the soldier joints or the side with the capaciters the “face?”
Also, you need to destroy that little hook that keeps the big connector on unless you have three strong little hands. Don’t worry, it’s not going to fall off, you can still cut yourself trying to wiggle that thing off. Especially when you are holding the board by the edges to avoid the “face.”
Gladephone - 返信
I've taken out the logic board on a late 2009 iMac twice in the last two years, and in neither case did I need to remove the power supply. You can do the rest of the steps without removing the power supply, so I would suggest just making things simpler and leaving it in.
-
-
-
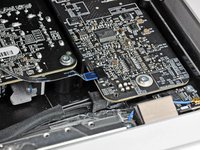
ゆっくりと注意しながら電源ユニットをアウターケースから取り出して、画像のように露出したケーブルロックを回しながら見えるようにします。 DC-OutケーブルはiMacに接続されたままです。
-
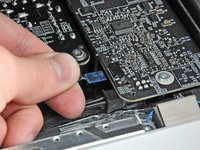
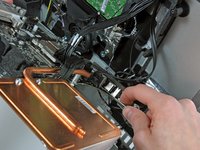
電源上のソケットからコネクタを引き抜きながら、コネクタ上のロック機構を押し下げて、DC-In ケーブルの接続を外します。
-
ロック機構がソケットから解放できたら、DC-In コネクタを電源ユニットから引き抜きます。
I found my DC-In cable VERY difficult to detach. I depressed the locking mechanism, but still needed to use my iFixit Jimmy to carefully, gently, slowly work the cable connector (male) loose and away from the power supply (female).
-
-
-
-
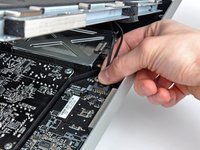
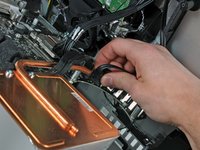
ソケットからコネクタを引き抜きながら、ロック機構を押し下げて、AC-Inケーブルの接続を外します。
-
アウターケースから電源ユニットを取り出します。
This was not easy to disconnect with one hand holding the power supply (being careful while holding just to be cautious against any possible electrical discharge). Note that the connector is not on power supply side but on AC-In cable side. Couldn't quite see well enough from photo shown, but hold on the AC-In side of cable connector (depressing the locking mechanism of the male side) and pull away from the Power Supply (female side) cable.
i’ve gotten away with not removing the PSU at all when removing the motherboard. havent had any issues
-
-
-
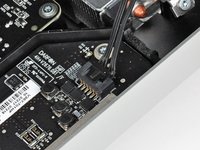
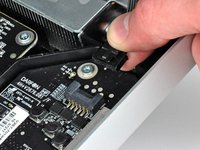
ロジックボード上のソケットから光学ドライブサーマルセンサのコネクタを引き抜きます。
While you’re here, disconnect that SD reader cable and don’t forget to plug it back in on your way back through: it’s not mentioned elsewhere in this guide.
For me this cable was by the hard drive with a grey and a black wire labeled “ODD_TEMP”
-
-
-
スパッジャーの平面側先端を使って、光学ドライブケーブルの接続を外します。
Be sure this cable doesn’t get stuck under the logic board during reassembly. Mine was under it, I was able to get it out but connecting it to the SuperDrive required a bit of force because my cable is so short.
-
-
-
アウターケースに付いているピンから光学ドライブを引き抜きます。
-
-
-
ロジックボードから左右のスピーカーコネクタの接続を外すには、iMac本体右側に向けて、コネクタを跳ね上げてください。
I added a small piece of tape to one of the cables and took a picture to remember where each of them go
I used a paint pen to draw a line across one of the sockets and its connector before removal
-
-
-
ロジックボード上のソケットからAirPortケーブルのコネクタを跳ね上げて接続を外します。
Lift this one directly up towards your cieling. I almost snagged this one off like it was the other cables.
-
-
-
次のケーブルのコネクタをiMac本体の上部端に向かって引っ張り、接続を外します。
-
カメラケーブル
-
ハードドライブサーマルセンサ
-
ハードドライブファン
-
マイク
-
次のケーブルのコネクタをiMac本体の右端に向かって引っ張り、接続を外します。
-
環境光センサ
-
Bluetoothケーブル
You might need a spudger to pull the wires out in order to pull ambient temperature sensor and Bluetooth cable out. For mine, the cables were tucked in so it was really difficult just pull out the wires.
The Bluetooth cable was refusing to disconnect. The cable goes under the logic board pulling the connector down, especially on my iMac it was very tight. What ultimately helped was sliding the flat end of the iFixit Halberd Spudger under the connector, lifting it slightly up. Then I was able to pull it out of the socket.
-
-
-
iMacの左側端に向けてCPUファンとパワーボタンのコネクタを引っ張り、接続を外します。
-
-
-
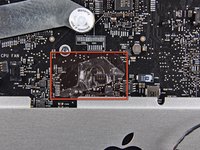
アウターケースにロジックボードを固定している次の6本のネジを外します。
-
25 mm T10トルクスネジー3本
-
21.5 mm T10トルクスネジー2本
-
21.5 mm T10トルクスネジー1本
These photos do not show this iMac's optional configuration that contains a discreet GPU. If a GPU card is present there is another Torx screw that must be removed that holds an additional heat sink to the upper right corner of the enclosure. Note that in this configuration, the optical drive fan has a different configuration with a plastic separator that points towards the top of the iMac. This looks to serve as channel for airflow and is noteworthy because it makes the optical drive's SATA connector much more difficult to remove and quite difficult (for me anyway) to reassemble as it is a very tight fit!
I made it to this step, then carefully removed dust from the back part, not touching any components, then used compressed air to get dust out since getting the whole logic board was a challenge, assembled and when I turn it on it loads normally, white screen with the logo, but then the screen goes black, and then the fans start running at the actual speed (I used SMC fan control) I had before I unplugged it to clean it, what could have happened? thank you =(
-
-
-
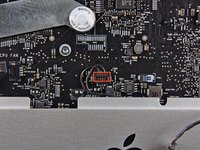
GPUヒートシンクをアウターケースに固定しているアルミ製テープを丁寧に剥がします。
OMG!
I cannot believe it!
Only by attaching one side of the golden GPU sionk with aluminum tape on the case, is it possible to well handle the thermal dissipation from the GPU
bruce ayng - 返信
Whoops, definitely tears easily. I tore it at two spots. At reassembly I was able to get it to adhere to the case nonetheless by rubbing along the aluminium tape using my finger nail.
-
-
Thank you! I don’t understand why it’s not mentioned in the guide
-
-
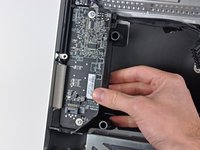
慎重にロジックボードをアウターケースから少し引き離します。
-
ボードをアウターケースから離しながら、ボードを前後に回転させて、アウターケースから持ち上げて外します。
During reassembly make sure all I/O connectors are above the logic board and not under it! I also connected three USB drives to align the logic board.
-
-
-
スパッジャーの先端を使って、ロジックボード上のソケットからPRAMバッテリーを持ち上げます。
-


31 の人々がこのガイドを完成させました。

14 件のコメント
Dank dieser Anleitung hat der Wechsel der Pufferbatterie problemlos funktioniert.
Schaut man selbst in das innere eines iMac, wird einem erst richtig bewußt welche Genialität hinter dieser Erfindung steckt.
Danke Steve
Stupid design. A battery must be accessible from the outside or should last forever!
It was easier than I thougth, my iMac was acting weird with a dead Pram battery, great guide!!...thanks a lot iFixit!
Dang! I guess it won’t be a quick fix. Really stupid design, unless of course they created a battery that’ll last forever. But, great guide - thank you. I contacted Apple for help, and they wouldn’t even confirm there’s a battery in the machine. The only way they would answer that question, would have been for me to bring the machine into their store and let them do the repair. They haven’t made enough money on the sale of their products that they feel the need to leverage their customers into paying for service and repairs?! Really, Apple…? Tsk, tsk…
Andrew, your procedure worked perfectly, thank you very much !!
Took about 6 hours, including two redo’s, because of my own mistakes.
btw, also changed to an SSD HD in the same procedure :-))
Now my late 2009 iMac has (at least) another 5 years lease of life, saving me a bunch!
Moin, habe alle sehr gut beschriebenen Schritte ausgeführt und die Batterie gewechselt. Leider hat es aber das Problem nicht gelöst. Mein iMac startet nicht jedesmal (stochastisch), wobei die Festplatte beim Start einschläft und die Maschine nicht hochfährt. Der Bildschirm zeigt dann einen kleinen Kreis mit einem waagerechten Strich drin. Darüber hinaus habe ich bemerkt, dass, wenn der Einschaltsound nicht deutlich laut ist, auch die Festplatte letztendlich nicht startet.
Bei Nicht-Start drücke ich die Tasten-Kombi zum Rücksitzen des PRAM, was auch nicht immer zum Erfolg führt.
Hat hier jemand noch eine Idee?
beste Grüße
Hardee
English: Moin, Did all the very well described steps and changed the battery. Unfortunately, it didn't solve the problem. My iMac does not start every time (stochastically), and the hard drive falls asleep at startup and the machine does not start up. The screen then shows a small circle with a horizontal line in it. In addition, I noticed that if the switch-on sound is not clearly loud, the hard drive will not start either.
When I don't start, I press the button combination to sit the PRAM, which doesn't always lead to success.
Does anyone have an idea here?
best regards
Hardee
Dan -
The iMac uses a BR2032 battery, however, the parts list shows CR2032. I understand that the BR2032 has a greater acceptable temperature range (can stand the heat better) and a longer life. It's also more expensive and harder to find. Any opinions or better yet informed data on how well the CR2032 holds up versus the BR2032 in iMacs?
There is no perfect answer, if the system only needs to live a few months or even a year or two the CR battery is fine. If you are expecting a much longer life then I would go with the BR. There really is not enough difference from an environmental sense between them as the temp range your system runs at won’t get that hot.
Dan -
In order for the logic board to come out cleanly, one should remove the RAM at the end of this step.
kevmacmills - 返信
Definitely! The author should make this as a step in the description (because not everyone reads Comments)
finnik2d - 返信
Just did this procedure and the RAM must absolutely come out for the logic board to come free later.
matt - 返信