
Nintendo Switch ProコントローラーのDパッドの感度を改善させる方法
はじめに
手順 1 に進むもしあなたの任天堂スイッチProコントローラーのDパッドが敏感で誤反応する場合は、このガイドを参考にしてみてください。


-
-
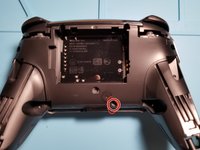
#J00ネジを1つ取り外します。
-
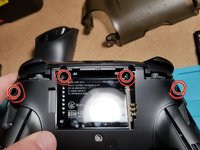
さらに4本の#J00ネジを取り外します。特にバッテリーベイの内側の2本は見つけにくいです。
-
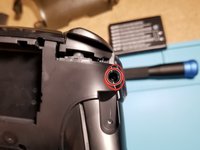
端の方のネジのアップ画像も参照にしてください(これも見落としやすいです)
-
-
-
-
分離ツールや爪を使って、優しくコントローラーを表裏2つに引き離します。繋がってる薄いケーブルに注意してください!
-
コントロールスティックのある基板からケーブルを外します。ZIFコネクタで接続されています。コネクタの黒いタブがまっすぐに飛び出しているので、ケーブルをロックからまっすぐにゆっくりと引き抜きましょう。
-
-
-
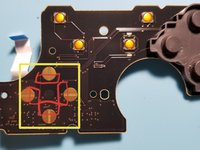
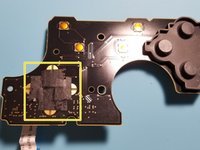
ついに十字ボタンのセンサーが見えました!画像の赤い部分にテープを貼り付けましょう。
-
テープで赤い部分を覆いましょう。(私は絶縁テープをお勧めしますが、セロハンテープなどで効果があった人もいます。)これでボタンの誤反応が減るはずです。
-
何度かテストした後、私は上下のタッチコネクターにテープを貼りました。その結果、最もスムーズに操作ができ、ボタンの誤操作も少なくなりました。再組み立てを完了する前に、良い感触で操作できるか必ず確認してください。
-


あなたの愛用中のコントローラーを再組み立てする際は、この手順を単に逆の順序で従ってください。
あなたの愛用中のコントローラーを再組み立てする際は、この手順を単に逆の順序で従ってください。
17 の人々がこのガイドを完成させました。
以下の翻訳者の皆さんにお礼を申し上げます:
100%

これらの翻訳者の方々は世界を修理する私たちのサポートをしてくれています。 あなたも貢献してみませんか?
翻訳を始める ›
13 件のコメント
Thanks!! I got a bit confused on the 2nd ribbon cable because I wasn’t sure if it was a latch like the first but it worked out. Also reassembling the ribbon cables was a bit difficult and I wasn’t exactly sure how much I had to “plug” them in before closing the latch but I figured it out, thank you! Controller works wonderfully now.
Glad to hear it! Thank you for your comment!
Not to my knowledge (I don’t have any on hand to test with though). May be worth a shot!
It should be noted that the official iFixit kit is recommended for the back screw removal (especially the ones at 11 and 1 o clock by the battery compartment) or you should have a screwdriver that is skinny enough to get it straight on. I barely got it with the iFixit kit and maybe left them a little bit loose because of that. Otherwise, this guide is very good for disassembling and cleaning.
Definitely! I swear by the official iFixit kit! I didn’t think I could get to those screws at first!
This tutorial should be part of the complet tear down. I followed the instructions to clean up some soda residue under the D-Pad.
Removing one of the grip took some times. The sticky substance was also under there. I pry and pull really hard and it work.
Beside that everything went well :)
If I do it again I might put back the larger ZIF connector sooner, it was tricky smooshing both side and trying to slide the connector in.
I had to fight the ZIF connector as well! Glad to hear it went well for you, though!
looking for a fix to the opposite problem. The DPad on mine sometimes wont read repeated inputs on down and left when i do them in quick succession. For example when I play Tertris 99 or navigate through a Fire Emblem Map. I almost exclusively use the DPad to navigate menus so it gets annoying when it wont read left or down. Any pointers help! Thanks!
I haven’t heard of this issue, honestly. My first troubleshooting step would be to disassemble up to the part where I apply the tape to the connectors, then see about cleaning them (VERY gently!) with some 99% alcohol and a microfiber cloth to see if there may be some dirt or impurities in there!
How do I reinsert the (almost tiny) tab connecting the second ribbon cable? If I can’t get it on, could I just tape the ribbon cable on?
Samuel Cox - 返信
@robbies7897 Great job ! I was a bit confused while translating your guide to French by some phrase / photos, it was not very clear to me what was supposed to be done (e.g. on step 5, I'm not sure what is the shoulder board vs the plate) + you should have used iFixit markers instead of placing them on the original image, so I added two tags on this guide to help enhance this guide. No offense, your guide is already very helpful, I would just love to have it even more polished. Since I don't have this controller, I can't help unfortunately. I also took the liberty to remove reference to "guys" for a more inclusive guide.
Oh cool, thank you for the help! No offense taken!
My ifixit J00 bit didn’t fit mine. J000 was closer, but PH0 (Philips) was the best fit.
daprice - 返信
Agreed; this is not a J00 screw. PH0 also worked well for me, but I fully stripped my first screw :(((
Paul Fisher -