メインコンテンツにスキップ

Motorola Droid Turbo 2 Front-Facing Camera Replacement

必要な工具と部品

  1. Motorola Droid Turbo 2 Front-Facing Camera Replacement, Midframe: 手順 1、 3の画像 1 Motorola Droid Turbo 2 Front-Facing Camera Replacement, Midframe: 手順 1、 3の画像 2 Motorola Droid Turbo 2 Front-Facing Camera Replacement, Midframe: 手順 1、 3の画像 3
    • Power off your phone before you begin working.

    • Insert a SIM eject tool, SIM eject bit, or a straightened paperclip into the small hole in the SIM card tray.

    • Press to eject the tray.

    • Remove the SIM card tray assembly from the phone.

  2. Motorola Droid Turbo 2 Front-Facing Camera Replacement: 手順 2、 1の画像 1
    • Heat an iOpener and apply it to the top edge of the phone for a minute.

    • A hair dryer, heat gun, or hot plate may also be used, but be careful not to overheat the phone—the display and internal battery are both susceptible to heat damage.

  3. Motorola Droid Turbo 2 Front-Facing Camera Replacement: 手順 3、 2の画像 1 Motorola Droid Turbo 2 Front-Facing Camera Replacement: 手順 3、 2の画像 2
    • Angle an opening pick and firmly press so that it slips under the back cover.

    • Depending on the age of the phone, this can be difficult. Additional heating with the iOpener may help. You can pry carefully with a metal spudger to create a gap for the opening pick.

  4. Motorola Droid Turbo 2 Front-Facing Camera Replacement: 手順 4、 3の画像 1 Motorola Droid Turbo 2 Front-Facing Camera Replacement: 手順 4、 3の画像 2 Motorola Droid Turbo 2 Front-Facing Camera Replacement: 手順 4、 3の画像 3
    • Slide the opening pick along the top edge of the phone to break up the adhesive.

    • Use the pick to release the deeper areas but avoid slicing through the camera bezel area.

  5. Motorola Droid Turbo 2 Front-Facing Camera Replacement: 手順 5、 3の画像 1 Motorola Droid Turbo 2 Front-Facing Camera Replacement: 手順 5、 3の画像 2 Motorola Droid Turbo 2 Front-Facing Camera Replacement: 手順 5、 3の画像 3
    • Repeat the iOpener heating and slicing procedures for the remaining three sides.

    • Make sure to cut into the deeper areas as the back cover is held on by a large adhesive surface.

  6. Motorola Droid Turbo 2 Front-Facing Camera Replacement: 手順 6、 3の画像 1 Motorola Droid Turbo 2 Front-Facing Camera Replacement: 手順 6、 3の画像 2 Motorola Droid Turbo 2 Front-Facing Camera Replacement: 手順 6、 3の画像 3
    • Once you have cut through the adhesive, slowly peel the back cover away from the frame.

    • Remove the back cover.

    • During reassembly, follow this rear cover adhesive guide to properly apply the pre-cut adhesive strip.

  7. Motorola Droid Turbo 2 Front-Facing Camera Replacement: 手順 7、 3の画像 1 Motorola Droid Turbo 2 Front-Facing Camera Replacement: 手順 7、 3の画像 2 Motorola Droid Turbo 2 Front-Facing Camera Replacement: 手順 7、 3の画像 3
    • Insert an opening pick under the flash connector rubber cover and pry forward to remove it.

    • To reinstall the cover, align the cover and use your finger to push it forward into place.

  8. Motorola Droid Turbo 2 Front-Facing Camera Replacement: 手順 8、 3の画像 1 Motorola Droid Turbo 2 Front-Facing Camera Replacement: 手順 8、 3の画像 2 Motorola Droid Turbo 2 Front-Facing Camera Replacement: 手順 8、 3の画像 3
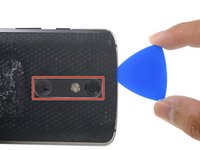
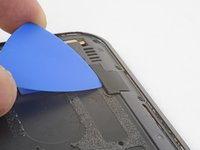
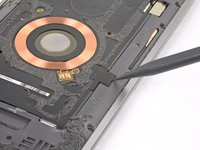
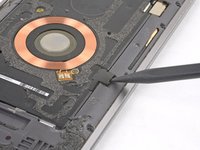
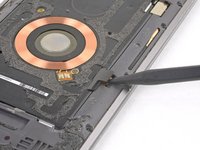
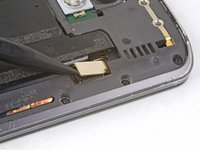
    • Use the point of a spudger to pry up and remove the coil connector rubber cover.

    • To reinstall the cover, align the cover and use your finger to push it forward into place.

  9. Motorola Droid Turbo 2 Front-Facing Camera Replacement: 手順 9、 2の画像 1 Motorola Droid Turbo 2 Front-Facing Camera Replacement: 手順 9、 2の画像 2
    • Use the point of a spudger to pry up and disconnect the flash connector.

    • To re-attach press connectors like this one, carefully align and press down on one side until it clicks into place, then repeat on the other side. Do not press down on the middle. If the connector is misaligned, the pins can bend, causing permanent damage.

  10. Motorola Droid Turbo 2 Front-Facing Camera Replacement: 手順 10、 2の画像 1 Motorola Droid Turbo 2 Front-Facing Camera Replacement: 手順 10、 2の画像 2
    • Use the point of a spudger to pry up and disconnect the wireless charging coil connector.

  11. Motorola Droid Turbo 2 Front-Facing Camera Replacement: 手順 11、 1の画像 1
    • Remove the following T3 screws securing the midframe:

    • Thirteen 3.1 mm black screws

    • Four 4.3 mm silver screws

    • Due to screw and bit variance, you may have better luck with a T4 driver. The proper bit should seat fully in the screwhead and feel slightly loose. The bit should not feel like it's stuck in the screwhead.

  12. Motorola Droid Turbo 2 Front-Facing Camera Replacement: 手順 12、 2の画像 1 Motorola Droid Turbo 2 Front-Facing Camera Replacement: 手順 12、 2の画像 2
    • Insert an opening pick along the frame seam and twist slightly to release the midframe from the phone.

  13. Motorola Droid Turbo 2 Front-Facing Camera Replacement: 手順 13、 2の画像 1 Motorola Droid Turbo 2 Front-Facing Camera Replacement: 手順 13、 2の画像 2
    • Remove the midframe from the phone.

    • You can tape over the side buttons to prevent them from falling out during your repair.

    • If the buttons fall out of the midframe, reinsert them in the orientation as shown before you reinstall the midframe.

  14. Motorola Droid Turbo 2 Front-Facing Camera Replacement, Front-Facing Camera: 手順 14、 1の画像 1
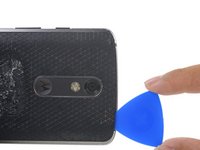
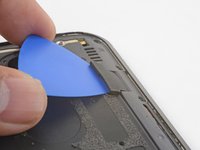
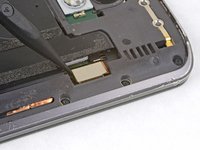
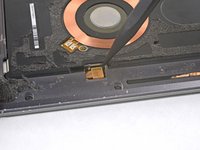
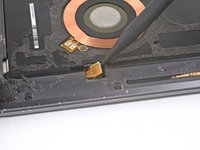
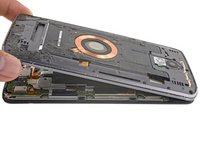
    • Use the spudger to delicately pry up the front-facing camera and remove it from the phone.

終わりに

To reassemble your device, follow these instructions in reverse order.

作成者

4人の作成者と共同で作成されました。

Natalie W

メンバー登録日: 10/26/16

2,022 ポイント

1ガイドが承認済み

チーム

UW Tacoma, Team 1-6, Rose Fall 2016 UW Tacoma, Team 1-6, Rose Fall 2016人のメンバー

UWT-ROSE-F16S1G6

4 メンバー

6のガイドは作成済み

コメント 1 件

Thank you so much. It worked like a charm for me.

vfontanela - 返信

コメントを追加

統計データ:

過去 24時間: 0

過去 7 日: 1

過去 30 日: 1

今までの合計 1,857