はじめに
このガイドを参照して、MacBook Air 13インチ Late 2020のバッテリーを交換します。
ダメージを軽減するために、作業を始める前にMacBookの電源を入れてバッテリーを完全に放電してください。 充電したリチウムイオンバッテリーは、アクシデントで穴を開けてしまうと大変危険です。バッテリーが膨張している場合は、 適切な方法で処理してください。
この手順では両側のスピーカーを外します。再組み立ての際に内部でガタガタを音を立てないためには、新しい接着剤に交換してください。
必要な工具と部品
-
-
MacBookにBig Sur v11.1以降がインストールされている場合、オートブートを無効にできないかもしれません。通常通りに作業を進めることができますが、裏蓋を開けたらすぐにバッテリーを外すようにしてください。
-
P5ドライバーを使って、次のネジを外します。
-
7.9mmネジー2本
-
7.3 mmネジー2本
-
2.6 mmネジー6本
-
-
-
指先をディスプレイと下部ケースの間に挟んで、下部ケースから上向きに引き上げます。
-
下部ケースを取り出します。
-
本体を正しい位置に揃えてしっかりと押し込み、下にある2つの隠しクリップをはめ込みます。カチッと装着音がして固定されます。
-
-
-
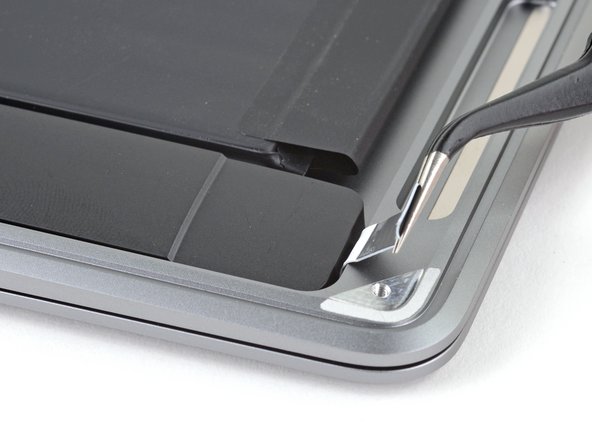
バッテリーコネクタ上のメタル製ロッキングアームを、スパッジャーの平面側先端でこじ上げてラッチを外します。
-
メタル製のロッキングアームを真上に持ち上げて、バッテリーコネクタをロジックボードのソケットから外します。
-
上手く接続できない場合は、コネクタの後ろ側、ケーブルがついている方を先に所定の位置に押し込んでから、コネクタの先端をコネクタが平らになるように押し込んで所定の位置に収めて下さい。
If having difficulty in flipping the bar up, place the machine vertical and not that there is a small “locking nib” that the bar has to clear. You may have to give the bar honest persuasion to clear the nib.
The bar can lock backwards making it very hard to even see let alone move. Great care is needed to shift it. I had to use two thumbnails, one on each side, then once flipped forward it takes more push than I expected to clip it in place. Ensure the plug is fully seated first !
-
-
-
-
T3トルクスドライバを使って、ケースに左側スピーカーを固定している4.2mmネジを外します。
-
T3ビットが少し緩く感じる場合は、代わりにT4ビットを使用することもできます。
-
-
-
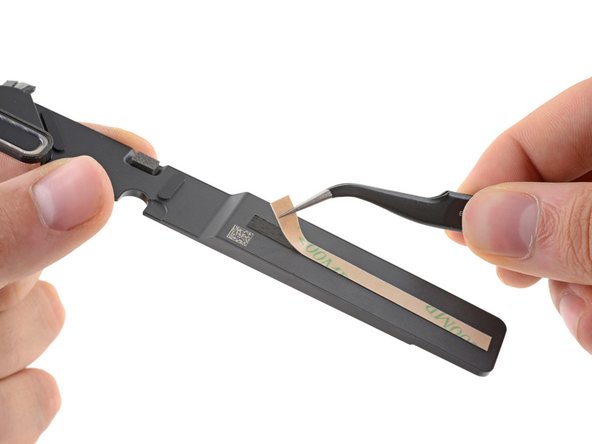
ピンセットを使って、MacBook左側にあるバッテリーの伸縮自在の接着ストリップに付けられた3つの黒いプルタブを、指で掴める長さになるまで剥がします。
-
-
-
接着ストリップのプルタブをつかみ、バッテリーの下からゆっくりと引き抜きます。
-
バッテリー下から接着ストリップが外れるまで引っ張ります。
-
バッテリー左側にある残りの2本の接着ストリップにも同じ作業を行います。
What happens if you don't put this tape back the way it was? Can it cause the battery to have any sort of issue?
Can I replace the strips under the battery with the same suggested adhesive tape (Tesa 61395) as the speakers?
-
-
-
バッテリーアセンブリを取り出します。
-
100%になるまで充電して、さらに少なくとも2時間充電状態にします。
-
コンセントを抜いて、通常通り使用して、バッテリーを放電します。
-
バッテリー残量の警告が表示されたら。作業を保存して、ラップトップを稼働させたままにします。低残量によってスリープ状態にしてください。
-
少なくとも5時間はバッテリー残量0の状態にします。
On boot after reinstallation, the fans go crazy during the Apple logo/progress bar, and the bar is very slow. Machine unuseable. I've reset SMC to no avail. Any other ideas?
Solved my own problem: I didn't have the battery connector pushed in far enough. Its edge really sits flush with the containing latch, though it isn't really obvious from the way it connects.
matt -
Matt, glad to hear you got it sorted! Thanks for giving an update on your comment—connectors can be tricky! Hopefully it helps other users that have the same problem in the future. Happy fixing!
-


オリジナルのパーツと交換用パーツをよく見比べてください。交換用パーツに付いていない残りのコンポーネントや接着シールなどは、インストールする前に新パーツに移植する必要があります。
デバイスを再組み立てする際は、これらの手順を逆の順番に従って作業を進めてください。
修理が完了しても、電源に接続するまでノートパソコンの電源が入らないことがあります。
e-wasteを処理する場合は、認可済みリサイクルセンターR2を通じて廃棄してください。
修理が上手く進みませんか?まずはベーシックなトラブルシューティングを試してみるか、このモデルのアンサーコミュニティに尋ねてみましょう。
オリジナルのパーツと交換用パーツをよく見比べてください。交換用パーツに付いていない残りのコンポーネントや接着シールなどは、インストールする前に新パーツに移植する必要があります。
デバイスを再組み立てする際は、これらの手順を逆の順番に従って作業を進めてください。
修理が完了しても、電源に接続するまでノートパソコンの電源が入らないことがあります。
e-wasteを処理する場合は、認可済みリサイクルセンターR2を通じて廃棄してください。
修理が上手く進みませんか?まずはベーシックなトラブルシューティングを試してみるか、このモデルのアンサーコミュニティに尋ねてみましょう。
45 の人々がこのガイドを完成させました。
以下の翻訳者の皆さんにお礼を申し上げます:
100%

これらの翻訳者の方々は世界を修理する私たちのサポートをしてくれています。 あなたも貢献してみませんか?
翻訳を始める ›


18 件のコメント
You’ve gotta be kidding me…
dotmiracle - 返信
Hard to believe, but true.. this is an improvement from a couple generations ago, when you had to disassemble the entire computer or futz about with isopropyl alcohol and credit cards (or dental floss) to remove swollen but still glued in batteries. If this has you feeling overwhelmed, go look at the 74-step guide for the 2015 15” MacBook Pro Battery Replacement.
I concur with that. Made the fix for a Macbook Pro 13" 2014 some times ago and it looks really more difficult and stressing, especially with potentially destructive steps. I felt a bit lucky that it worked fine after that and since then...
Ok I have the battery out but where do you buy replacement adhesive strips? Everywhere I look they say they are for iphones or generic lcd repair. I had to take the battery out for other reasons and want to put the same battery back in.
Stephen, the linked adhesive is a generic solution & should work just fine. Apple-specific adhesives are sometimes hard to source. You could also cut and adapt stretch-release adhesive strips to fit. Best of luck on your repair!
Might as well go to apple themselves and get the battery replaced for 129...
Does anyone know for sure if the Macbook Air M1 will turn on with the battery disconnected, only with the power connected? Not sure if my motherboard is broken or only battery.
I have the same question. My macbook air won't turn on even with battery disconnected and power connected. would love an answer
Kiradon -
Does the battery capacity show 100% after replacing the battery in System Preferences?
I had Air 2015 and changing battery was as simple as possible. No unscrewing speakers, no adhesive strips removing. Just FIVE easy steps.
дякую! ця інструкція врятувала мені бюджет.
Great guide! Completed in about an hour. The Fix Kit DOES include at card adhesion/tape so there is no need to purchase that separately.
What if you don't use the adhesives when you reassemble?
Would it really be much of an issue?
Had two new MBA 2020 to replace the batteries (leftover machines from an insane phone company discount, still in their original sealed boxes), the 1st was done in 65 min. the 2nd in 30 min.) - thank you very much for this guide !
ESD safe mat, plugged into ground, with a wrist strap, also grounded, are the best best to protect the logic board.
Robin Ray - 返信
Re-Assembly Tip: Before putting the screws back in, snap the lower case on and test to make sure the MacBook powers up. When I first re-assembled, I became very nervous I did something wrong because it would not power on. It turns out I just needed to plug the laptop into a power source for it to power up (despite having a good charge before disassembly). It was the perfect way to test the new USB-C ports!
Austin - 返信
Big points to this one, especially for mentioning needing to plug the laptop in. The bottom case needs to be screwed in and laptop needs to be plugged in before it will boot.
Bayden Yazalina -
Wiha 4PL driver for these screws.
Greg Worrel - 返信
Printing out all the images from this Ifixit guide prior to starting and using duct tape help me keep track of screws.
raju midjdeya - 返信