はじめに
このガイドを参照して、MacBook Air 13インチ Early 2020のバッテリーを交換します。
ダメージを軽減するために、作業を始める前にMacBookの電源を入れてバッテリーを完全に放電してください。 充電したリチウムイオンバッテリーは、アクシデントで穴を開けてしまうと大変危険です。バッテリーが膨張している場合は、 適切な方法で処理してください。
この手順では両側のスピーカーを外します。再組み立ての際に内部でガタガタを音を立てないためには、新しい接着剤に交換してください。
必要な工具と部品
-
-
MacBookにBig Sur v11.1以降がインストールされている場合、自動起動を無効にするとうまくいかないことがあります。通常通りに作業を進めることができますが、開口できたらすぐにバッテリーを外してください。
-
P5ドライバーを使って、次のネジを外します。
-
7.9mmネジー2本
-
7.1mmネジー2本
-
2.6mmネジー6本
-
-
-
指先をディスプレイと下部ケースの間に挟んで、Airから下部ケースを上向きに引き上げます。
-
下部ケースを取り出します。
-
本体を正しい位置に揃えてしっかりと押し込み、下にある2つの隠しクリップをはめ込みます。カチッと装着音がして固定されます。
When reassembling, the “snaps” are in the middle of the laptop (from top to bottom), and just to the left and right of center. I assumed it was near the hinge so it took a bit for me to hear the snaps.
Laurie, the two clips are outlined in the third photo of step two. Hope this helps—happy fixing!
-
-
-
バッテリーコネクタを覆っているテープを剥がして、下のコネクタを露出させます。
This image is incorrect correct for the A2179 EMC 3302 model, also doesn’t match the next image in this guide
There is other guide for the model you reffer to, I was using that one until i realize it was different, this is the one you are looking for: MacBook Air 13" Retina Late 2020
I initially thought the image was incorrect, but I was just looking for the connector in the wrong place. This picture IS correct for the A2179 EMC 3302. Note that the connector is on the left side of the heat sink (the black thing with parallel ridges in the picture and on the computer), and the connector wires gather together towards the left the side of the computer, not the back. Note that "left side" assumes the Air is upside-down, with the hinge on the side farthest away from you (I'm not doing the "right speaker is on the left side because it's upside-down" thing that iFixit does in step 5).
-
-
-
スパッジャーを使って、バッテリーコネクタの下に差し込み、ロジックボードと並行にスライドして、ロジックボード上のソケットからコネクタを外します。
-
-
-
スパッジャーの先端を左側スピーカーケーブルの下に差し込みスライドしながら、ロジックボードよりケーブルをこじ開けて、接続を外します。
-
コネクタを外した状態で、スパッジャーの平らな部分をケーブルの下に滑らせて、ケーブルをロジックボードに固定している接着剤を剥がします。
-
-
-
T3トルクスドライバを使って、ケースに左側スピーカーを固定している4.2mmネジを外します。
-
-
-
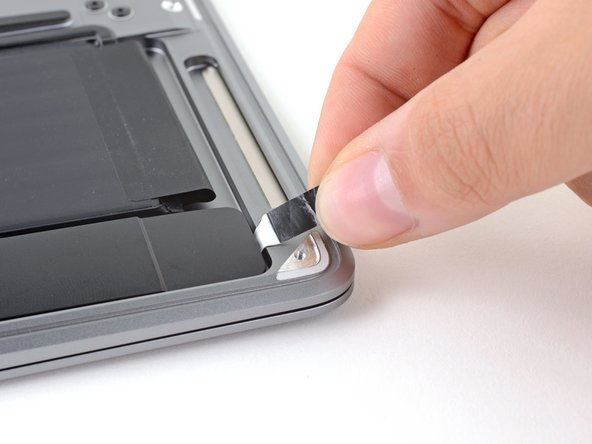
ピンセットを使って、スピーカーのストレッチリリースタイプの接着剤の黒いプルタブを指で掴めるまで剥がします。
-
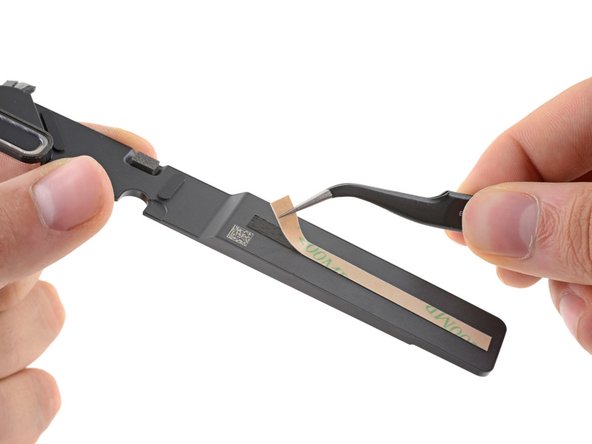
接着ストリップのプルタブをつかみ、ゆっくりと接着ストリップをスピーカーの下から引き抜きます。
-
スピーカーの下から接着ストリップが外れるまで、ストリップを引き抜きます。
-
スピーカーに熱を当てて、この下に留められた接着剤を柔らかくします。
-
スパッジャーまたは開口ピックをスピーカーの下に注意深くスライドさせ、接着剤を剥がします。
TIP: Don't keep pulling from the tab like they show in the picture. The adhesive WILL break, and you'll need to do some serious spudging to get the speakers to disengage from the adhesive.
Instead, start pulling with the tab but stop pulling as soon as it stretches about an inch (2.5cm). Then, grab the white adhesive part close to the speaker and SLOWLY stretch about another inch (so now you have 1 inch stretched from the speaker and another inch dangling past the spot you're holding. Adjust your grip again, back to the speaker side (so you now have 2" dangling) and SLOWLY pull again. Keep doing this, going only an inch before grabbing close to the speaker again. Like the instructions say, go horizontally (parallel to your table) as much as you can.
Eventually the adhesive will break, but this should get as much off as possible so it's easier to pry off the speaker the rest of the way.
-
-
-
-
左側スピーカーを取り出します。
I didn't order the Tesa tape. Instead I used 3M Command Strips I had left over from some outdoor hanging hooks. I cut them down to the right size (for the speakers and the batteries) and left a little tab hanging out in case I need to do this process again. For those that aren't familiar, Command Strips also "stretch removable" like the original adhesive in the MacBook. They're designed for hanging things without leaving a mark on the walls (no, I have no relation to 3M - but more people probably have these in a junk drawer somewhere than have double-sided tape).
Yes, the Command Strips are a little thicker than the original adhesive but the back still went on the MacBook just fine.
-
-
-
T3トルクスドライバーを使って、ケースに右側スピーカーを固定している4.2 mmネジを外します。
In case you get your screws mixed up...the "speaker screws" are longer because they go through the speaker AND the battery. The battery screws are shorter and only go through the battery (the speaker rests on top of the screw).
Yes, the instructions mention the length of the screw but it's not totally obvious. And, you CAN use a long screw as the battery screw - but then the short screw won't be long enough for the threads to "catch" after you put in the speaker. You'll then have to remove the speaker again to switch screws (hope you used removable adhesive!) or you can't affix the battery properly.
Don't ask me how I learned this...
-
-
-
ピンセットを使用して、右側スピーカーの下部にある黒い接着プルタブを指で掴める程度に持ち上げます。
-
接着ストリップのプルタブをつまんで、ゆっくりとストリップをスピーカーの下から引き抜きます。
-
接着ストリップがスピーカーの下から外れるまで引っ張り続けます。
-
スピーカーを温めて、接着剤を柔らかくしてください。
-
慎重にスパッジャーもしくは開口ピックをスピーカーの下でスライドして、接着剤から剥がします。
-
-
-
T3トルクスドライバーを使って、トラックパッドケーブルカバーを固定している1.4 mmネジを2本外します。
These screws are ridiculously tiny. Highly recommend a magnifying glass and maybe an extra light source if you don't have perfect vision or are over 45 years old. Getting them out is easy, putting them back in can be a challenge. Do NOT drop them in a keyboard, on the floor, or in a crevice of the MacBook.
-
-
-
ピンセットを使って、MacBook左側にあるバッテリーの伸縮自在の接着ストリップに付けられた3つの黒いプルタブを、指で掴める長さになるまで剥がします。
-
-
-
バッテリー右側3本の接着ストリップについても同じ作業を繰り返します。
When replacing the battery and using adhesive on the bottom, make ABSOLUTELY SURE the 4 tiny screw holes ("speaker screws" from step 6 and 10 and "battery tray screws" from step 17) line up properly before the adhesive engages. If the battery tray is just slightly askew it's a complete pain to readjust it so the screws will seat correctly.
-
-
-
バッテリーアセンブリを取り出します。
-
新しいバッテリーをインストールする場合、こちらのキャリブレーションの方法を参照してください。
-
100%になるまで充電して、さらに少なくとも2時間充電状態にします。
-
コンセントを抜いて、通常通り使用して、バッテリーを放電します。
-
バッテリー残量の警告が表示されたら。作業を保存して、ラップトップを稼働させたままにします。低残量によってスリープ状態にしてください。
-
少なくとも5時間はバッテリー残量0の状態にします。
-


オリジナルのパーツと交換用パーツをよく見比べてください。交換用パーツに付いていない残りのコンポーネントや接着シールなどは、インストールする前に新パーツに移植する必要があります。
デバイスを再組み立てする際は、これらの手順を逆の順番に従って作業を進めてください。
e-wasteを処理する場合は、認可済みリサイクルセンターR2を通じて廃棄してください。
修理が上手く進みませんか?まずはベーシックなトラブルシューティングを試してみるか、このモデルのアンサーコミュニティに尋ねてみましょう。
オリジナルのパーツと交換用パーツをよく見比べてください。交換用パーツに付いていない残りのコンポーネントや接着シールなどは、インストールする前に新パーツに移植する必要があります。
デバイスを再組み立てする際は、これらの手順を逆の順番に従って作業を進めてください。
e-wasteを処理する場合は、認可済みリサイクルセンターR2を通じて廃棄してください。
修理が上手く進みませんか?まずはベーシックなトラブルシューティングを試してみるか、このモデルのアンサーコミュニティに尋ねてみましょう。
30 の人々がこのガイドを完成させました。
以下の翻訳者の皆さんにお礼を申し上げます:
100%

これらの翻訳者の方々は世界を修理する私たちのサポートをしてくれています。 あなたも貢献してみませんか?
翻訳を始める ›


20 件のコメント
Any users brave enough to try this battery replacement on their own? I’m looking at it to get myself prepared for what is expected in the future. I can see myself keeping this M1 MBA for a long time so replacing the battery is going to be in my future.
Best of luck to anyone out there trying this! It doesn’t look particularly difficult.
These new MacBook Airs definitely have a simpler battery replacement procedure than other MacBook models. Whenever you need the M1 MacBook Air battery replacement guide, you can find it here! Have fun fixing!
This one is pretty easy - easier than other laptop battery replacements I've done. The hardest bit is getting the speakers out, you definitely need a hot air gun or hairdryer.
Try it! What could possibly go wrong?
I have a 2020 MacBook air that got water damage. It was still working until the battery died but then wouldn't charge. I've replaced the screen as it had water marks and the battery looked like it had shorted out (there was blisters on it). So I replaced the battery too. But it's still not turning on after charging it overnight. I've doubled checked everything is connected inside. Is there's anything I need to reset or check to get it to charge up and turn on?
Ryan, you could look into trying a new USB-C board, because if that doesn't function due to liquid damage then the new battery may not charge. Especially because you said:
It was still working until the battery died but then wouldn't charge.
Best of luck in your repair!
Can anyone help??? Have completed the battery replacement but now my MacBook won’t turn on unless plugged into the charger, when it does turn on the battery symbol has an X over it and the fans are working hyper speed and the MacBook itself is running sluggish… HELP!!
bensmith35 - 返信
FYI: I'm not a computer repair guy, nor I claim to know how to do it. However, I have to ask: Are you sure you plugged the battery cable(s) properly? Is the battery brand-new? Have you tried to send that battery back and see if it was the battery's fault? Give a good look at all the cables and check if they're properly connected. Also, make sure the battery is the correct one for the device, sometimes something slips.
Hopefully You have it fixed by now.
Hey @bensmith35, did you manage to fix yours? I've got an i3 MBA 2020 A2179 that's got the x through the battery and the machine dies as soon as you unplug it. The trouble is, the machine is borked. Won't boot at all and even the internet recovery screen is so laggy, it takes seconds for the mouse pointer to move in response to touchpad commands.
I'm wondering if it's worth replacing the battery to see if it fixes things or there's something else going on?
I even tried a DFU FW Revive and Restore but still no dice.
Don't know if you did anything with your MacBook yet, but I have had that issue before on the same model MacBook, without the battery the computer will run super slow for me internet recovery mode wouldn't even load after I connected to the internet.
I installed a new battery and it runs a lot smoother, some known issues for the A2179 with a dead battery is slow boot up, frozen apple logo with loading bar, and high fan speeds. If you put a new battery in it then it will probably run a lot smoother.
swchapti -
Hi. I'm thinking of attempting this repair. If I apply the Tesa 61395 tape to the speakers before reinstalling and the new battery, which width is best? Also, how do I remove this adhesive in the future, if I need to replace the battery again? Thanks.
Diane,
Since you have plenty of surface area to work with on the underside of the speakers, the adhesive width won't matter too much. To remove the speakers in the future after securing them with Tesa 61395, pry each up with medium pressure and let the adhesive slowly release. If you encounter a lot of resistance, a couple drops of >90% isopropyl alcohol can help soften the adhesive. Best of luck!
Thanks for the reply. Looks like I'll need to apply adhesive to the battery, too. I changed the battery in my old unibody Macbook, but this seems more involved. I went to the Apple Store a while ago, and the price they quoted me for this repair was something like $300-400 for parts + labor, plus I wouldn't have my computer for a week. So I've been living with an almost-dead battery. Will let you know if I'm able to do it myself. Thanks again!
Great guide, @carsten. Easy to follow, good pictures, and well written. I just finished and the laptop is charging up now.
Note to anyone about to embark on the repair: Be sure you either buy the Tesa tape linked above or have an alternative you can use. It's not included in the kit but definitely needed for the battery swap or components will rattle around afterwards..
I feel like this guide is incomplete, it needs to specify what kind of glue and how to apply it for it to be a "replacement" guide, this is just a removal guide. Perhaps there is another guide I missed?
In the "what you need" list there is a link to an optional "Tesa 61395 Tape" so maybe that's what is required, or is that to restick the speakers, or both?
There is a warning sign on the battery on the product page that says "Installation adhesive is not included." In any case, details are needed here. Thanks!
I followed to a T and unfortunately upon hooking my computer to the charger, it is showing an X through the battery sign. Not sure if the battery was faulty to start with or what. Pretty disappointing result as now I bought a battery and will need to additionally take it into Apple for repair $$$
To those who have never attempted similar repairs to their personal electronics this battery replacement might seem somewhat intimidating, but as someone who has replaced batteries in a number of iPads, iPhones, and Macbooks I found it to be very easy. The only thing I might suggest to help the less experienced among us would be to show how and where to apply the Tesa tape.
I just completed this repair, and my computer is now charging up. I waited until my old battery was completely dead; there was an X through the battery symbol the last few days, and then my computer wouldn’t start up at all. The repair took me a little over an hour, but that’s because the adhesive on both speakers broke as I was trying to remove it, and I had to apply heat with a hair dryer and pry out the speakers with the spudger at the same time.
If I knew how to manipulate the adhesive, it would have been a much easier repair. By the time I got to the battery, I figured out that you have to pull the adhesive out on a horizontal plane while maintaining constant tension. If you let go of the tension, the adhesive can bunch underneath, and then it won’t come out. Helps to use multiple fingers on both hands to do this.
I used my child’s pop-it toy to keep track of all the screws; it was perfect for this. Used 4mm Tesa tape for the new battery and speakers.
Thanks so much, @carsten, for this guide and the tips.
Anyone notice that between steps 16 and 17 the logic board is magically gone?
I broke the speaker housing/connector on the logic board (technically the audio daughter board). Anyone repair this successfully?
Initially I wanted to drop off my Macbook Air at an Apple store and have them change the battery. However, in this particular model, when the battery is dead, the CPU throttles down to the point where the machine is unusable even when the power adapter is hooked up. Apple was unable to run their diagnostics in the store and wanted to charge me the full refurbishment fee (which is 3x the price of battery replacement and over 40% of the price of a new macbook air).
I decided replace the battery myself. I ordered the replacement from iFixit and followed the instructions and my Macbook air was as good as new in 30 mins. Thanks for the excellent instructions and for the exact replacement part !
Only bit of negative feedback is that iFixit should include the peel-to-release adhesive tap in the replacement kit.
Srikanth M - 返信
P5 is also a PL4 (so confusing) - i like the wiha 26764 thanks to @mayer for this post. P5 pentalobe and 1.2 pentalobe screwdriver
greg - 返信