メインコンテンツにスキップ

Lenovo ThinkPad X1 Yoga 2nd Generation Touch ID Replacement

必要な工具と部品

  1. Lenovo ThinkPad X1 Yoga 2nd Generation Touch ID Replacement, Back Cover: 手順 1、 1の画像 1
    • Ensure the laptop is powered off and the charging cable is disconnected before opening the back cover.

    • Flip over the laptop to access the back cover.

  2. Lenovo ThinkPad X1 Yoga 2nd Generation Touch ID Replacement: 手順 2、 2の画像 1 Lenovo ThinkPad X1 Yoga 2nd Generation Touch ID Replacement: 手順 2、 2の画像 2
    • Use a Phillips #0 screwdriver to remove the eight 8 mm screws.

  3. Lenovo ThinkPad X1 Yoga 2nd Generation Touch ID Replacement: 手順 3、 1の画像 1
    • Remove the back cover.

    • A popping sound may occur when the back cover is removed.

  4. Lenovo ThinkPad X1 Yoga 2nd Generation Touch ID Replacement, Speakers: 手順 4、 2の画像 1 Lenovo ThinkPad X1 Yoga 2nd Generation Touch ID Replacement, Speakers: 手順 4、 2の画像 2
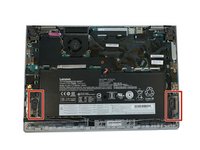
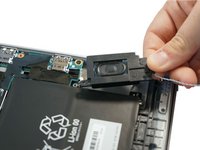
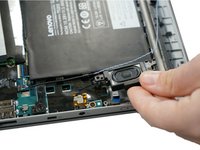
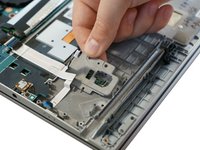
    • Follow the ribbon cable that runs from the left speaker to the motherboard.

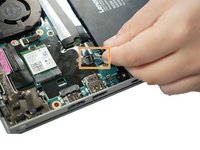
    • Pull the black connector up and release the cable wire by hand.

    • If needed, pull this connector up using the Pro/ESD/Angled tweezers.

  5. Lenovo ThinkPad X1 Yoga 2nd Generation Touch ID Replacement: 手順 5、 2の画像 1 Lenovo ThinkPad X1 Yoga 2nd Generation Touch ID Replacement: 手順 5、 2の画像 2
    • Remove two 6 mm Phillips #0 screws from each speaker.

  6. Lenovo ThinkPad X1 Yoga 2nd Generation Touch ID Replacement: 手順 6、 2の画像 1 Lenovo ThinkPad X1 Yoga 2nd Generation Touch ID Replacement: 手順 6、 2の画像 2
    • Use your fingers to remove the speakers from the device.

  7. Lenovo ThinkPad X1 Yoga 2nd Generation Touch ID Replacement, Battery: 手順 7、 1の画像 1
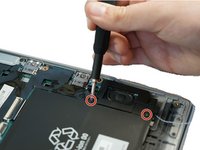
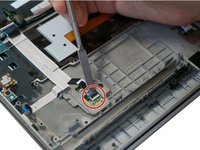
    • Use a spudger to pop the ribbon cable that runs from the upper-middle portion of the battery to the motherboard out of the motherboard.

    • Do not use a metal spudger as indicated in the photos. The metal spudger should only be used for serious prying power. If it's used on the internal components of a device, it may puncture or damage the components in your device.

  8. Lenovo ThinkPad X1 Yoga 2nd Generation Touch ID Replacement: 手順 8、 1の画像 1
    • Use a Phillips #0 screwdriver to remove one 6 mm screw from the bottom-middle portion of the battery.

  9. Lenovo ThinkPad X1 Yoga 2nd Generation Touch ID Replacement: 手順 9、 1の画像 1
    • Remove the battery.

  10. Lenovo ThinkPad X1 Yoga 2nd Generation Touch ID Replacement, Touch ID: 手順 10、 2の画像 1 Lenovo ThinkPad X1 Yoga 2nd Generation Touch ID Replacement, Touch ID: 手順 10、 2の画像 2
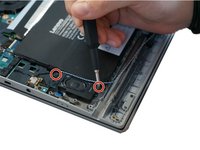
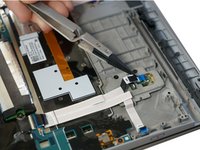
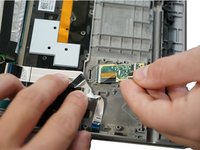
    • Use a metal spudger to lift the tab containing the black ribbon cable.

    • Do not use the metal spudger unless if it's used for serious prying power. The metal spudger may damage or puncture the internal components in the device, so please use the plastic opening tools or the nylon spudger instead.

    • Use nylon-tipped reverse tweezers to slowly pull out the ribbon cable.

  11. Lenovo ThinkPad X1 Yoga 2nd Generation Touch ID Replacement: 手順 11、 1の画像 1
    • Remove two 4 mm screws using the Phillips #0 screwdriver.

  12. Lenovo ThinkPad X1 Yoga 2nd Generation Touch ID Replacement: 手順 12、 2の画像 1 Lenovo ThinkPad X1 Yoga 2nd Generation Touch ID Replacement: 手順 12、 2の画像 2
    • Remove the gray covering from the Touch ID.

    • Remove the Touch ID chip from the device.

終わりに

To reassemble your device, follow these instructions in reverse order.

作成者

4人の作成者と共同で作成されました。

Alex Shacoski

メンバー登録日: 02/10/20

270 ポイント

2のガイドは作成済み

チーム

Cal Poly, Team S22-G3, Regan Winter 2020 Cal Poly, Team S22-G3, Regan Winter 2020人のメンバー

CPSU-REGAN-W20S22G3

5 メンバー

7のガイドは作成済み

0 件のコメント

コメントを追加

統計データ:

過去 24時間: 0

過去 7 日: 1

過去 30 日: 5

今までの合計 424