はじめに
この修理ガイドはiFixitのスタッフによって執筆されたものであり、Googleによって承認されたものではありません。 こちらから修理ガイドの詳細についてご覧ください。
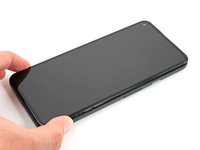
Google Pixel 5aのスクリーンを交換するための修理ガイドです。
安全のため、デバイスの解体を始める前に、バッテリー残量を25%以下に放電してください。この作業をすることで、バッテリーのアクシデントに伴う危険な熱暴走を防ぐことができます。バッテリーが膨張している場合は、 適切な処理を施してください。
必要な工具と部品
-
-
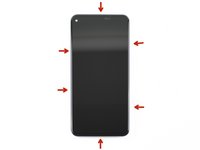
ディスプレイの右端に電子レンジなどで加熱したiOpenerを1分間当て、接着剤を柔らかくします。
I needed about 4 applications of the iOpener before the adhesive was weakened enough to stick the opening pick in.
Do you have to wait 10 minutes between each application?
Joey -
I heated the iopener twice for 30sec (weak microwave) then applied for a couple minutes without success. Then reheated iopener for 30 more sec. Then used the blue tool supplied in kit to help push down on bezzle and that did the trick to separate enough to get the picks in.
While I appreciate that iFixit gives you everything required for the repair in a kit, I gave up on the iOpener after 2 applications and went for the heat gun. I have a Porter Cable heat gun (PC1500HG), kept it on a medium-low heat about an inch away and was able to get around the entire screen edge more quickly. After that, I was able to use the supplied opening picks and suction cup pretty easily.
Has anyone used a hair dryer? How long to safely apply the hair dryer?
I heated the iOpener twice at 30 seconds each and let it sit on the first long edge for 10-15 minutes (while watching TV). This seemed to soften the adhesive and I was able to insert the blue picks without much trouble using the suction cup. Patience is the key. I reheated the iOpener for another 30 seconds and that was enough to soften the top and bottom edge, about 8-10 minutes on each edge. There was enough heat left in the iOpener to soften the last long edge, another 6-8 minutes.
-
-
-
次の手順に進む前に、作業に最適な位置を確認してください。
This may seem like a no-brainer but I held the new screen against my broken phone and used a pencil to mark where each blue pick would go.
This is a great idea! Thanks for posting it!
Eric M -
-
-
-
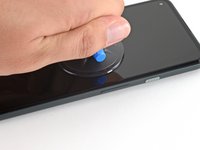
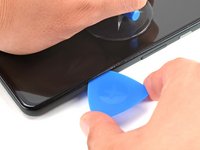
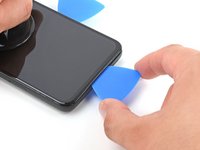
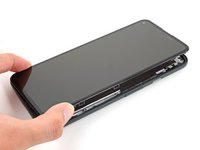
スクリーンのできるだけ右端に近い位置に吸盤カップを装着します。
-
吸盤カップを強く一定の力で持ち上げて、ベゼルとミッドフレームの間に隙間を作ります。
Do we use the suction cup before inserting the picks? After applying the I opener 3 plus times, I am having difficulty removing the broken screen. Any tips?
This was the most difficult part. What really helped was putting a piece of packing tape on the screen. It has to be wider than the suction cup. If there is any hint of a crack where the suction cup is located, it will not stick. I had to warm the right side and the top a couple of times to get the screen to give a little bit. It will only give just a little bit and you have to to slide the pick in with more force than I was comfortable with.. It really would help to have a third hand to hold the phone, pull the suction cup and the other to slide the pick in. I had to use my ring finger to apply force to the suction cup and with the same hand slide the pick between the phone and the screen. After this step it was easy peasy!
Agree this was the hardest part. I heated the right edge of the phone multiple times with the iOpener before the glue was soft enough to flex. My screen only had a crack, was not shattered. I had to wet the suction cup to get it to hold strong enough to pull up to open a gap to insert the pick. Once the first pick was in, heating the other edges and moving around the phone was fairly easy.
The screen itself has a large lip that makes it harder to insert the picks. what worked for me was pulling up the screen just enough to insert the pick slightly. next I rotated the pick towards the phone and pushed it down (the phones chassis has a bezel that will catch the tip so you can use a bit more force). Once the pick is inserted like that you can rotate away from the phone, pulling up the screen easily.
Mason Tate - 返信
Ended up using Gorilla tape on the screen, a more powerful suction cup from a windshield phone mount, moving it back 1/2 inch from the edge so the tape wouldn't peel from the edge when I pulled.
You definitely need a third hand to get the pick in, have someone nearby to help if possible.
This is the step that requires the most energy.
This was by far the most difficult part of the repair hands down. I heated the phone several times before the adhesive softened enough to stick a pick in
I was unable to use the technique shown here to lift up the edge. I used the iOpener and suction cup multiple times without being able to lift the edge even a little (might be a testament to my own physical weakness, though, haha). I ended up running a razor blade along the bezel seam until I was able to wiggle it in and then slowly wedge the picks in.
Mary in CA - 返信
My screen was beyond destroyed. I had it covered with tape and the suction cup wouldn't stick. I just let the iOpener rest on the edge nice and long and between the blue picks and my thumbnails I was able to get in there just fine. I did get a small crack in the bezel at one point but this was a spot where all the glass had come off. It didn't matter since this screen and bezel weren't going back on. If I had needed to keep the screen and bezel in good shape, I could have.
-
-
-
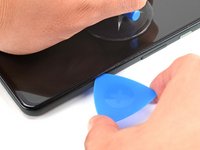
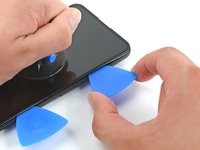
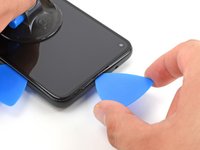
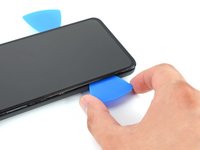
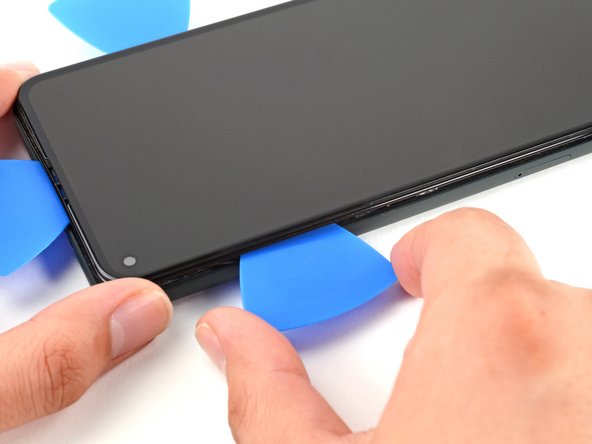
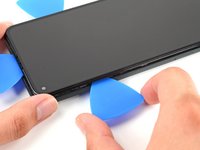
開口ピックの先端をベゼルの継ぎ目に、デバイスの底から4~5cmほど離れた所に差し込みます。
Angling the opening pick downward helped with the initial opening
barely_diy - 返信
Probably easier to just use the opening tool instead of the opening picks. Also you may need to use the iopener (the bag you microwave) in the other 3 sides as well . After these tips it will be a breeze to open. Cheers!
-
-
-
この手順で使用する道具:Magnetic Project Mat$19.95
-
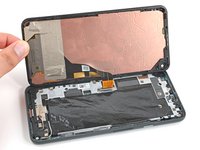
T3トルクスドライバを使用して、スクリーンのコネクタブラケットを固定している長さ4.6mmのネジを取り外します。
One screw - super easy in that regard!
My screw was a T4 not a T3.
-
-
-
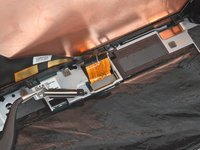
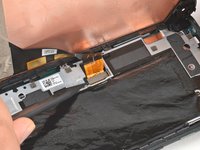
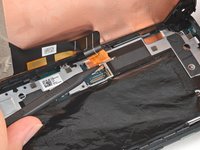
スクリーンのフレックスケーブルをスパッジャーでこじ開けて、接続を外します。
This was the most tedious part for me when reassembling. I used the gold colored corners on the board to line up the connector. Also, I recommend using your finger and not the spudger for pressing down when you reattach (even if you don't have small hands); this helps you feel the slight click when it's in place.
Additionally, you can use the suction cup as a sort of kickstand so you have enough ribbon cable to work with (because there's not a lot.)
Just successfully completed my screen replacement & agree with the comments above. This guide would be improved if there was a close-up picture showing the gold alignment marks. Sorry, I would have posted a picture of this myself, but my phone was being operated on at the time. LoL
Operation success! Had some trouble when disconnecting and removing the old screen because I didn't know how much range I had when opening it up like a book. Ended up bending the connector on the old screen and bent the connector on the motherboard a little. Be very careful when opening up the screen while the screen is still attached to the frame. Only open it up like 30 degrees at first to see what the cable is doing and how much slack you have.
This led to me trying to straighten out the pins on the motherboard connector for like 3 painstaking hours because every time I tried to insert the new connector by clicking down on one side at a time it kept popping up on the opposite end and shifting up/down a little bit. Assumed the pins were still misaligned with the screen connector and eventually got frustrated enough to just push down the connector in the middle, which explicitly contradicts the instructions. The connector still popped off with some light pressure but I just put the bracket on & it all works!
Reattaching the cable was definitely the hardest part. I've only done this once before but that time there was a much more tangible sensation when all was attached. No matter how carefully I lined things up inside the golden corners it just didn't seem to be clicking as expected. I finally thought I got it so I put the metal cover back and hoped for the best.
Bonus fun - the "remove this last" plastic that covered the pre-cut adhesive came up with the blue plastic sheet, so I was working around exposed adhesive. I kept a piece of stiff plastic over that and tried not let the phone get glued back together and in the end it worked.
I wish I'd got a 2nd sheet of adhesive in case once reassembled it turned out the little pins had not connected well enough - I didn't know if it would be ok to start it up again before actually pressing things together. Would that have messed with the calibration? Would be nice to know if I coud have tested the connection and then squeezed it all shut.Yes, the attaching of the cable is the hardest part. Mine never really stayed , so I did what the determined person before me did: Put the metal part on top and hope for the best.
I used my fingers to tell if it was on top and also made sure that the square was aligned with the gold corners on the phone.
You definitely need a second person to hold a light and the screen while you do everything. I couldn’t have finished otherwise.
It works!!!! I’m so happy 😀 Good luck!
-
-
The ribbon connector is a little tricky to attach to the pcb. Just be patient with the spudger and it will connect. The precut adhesive strip is such a nice touch for finishing the project.
I also struggled with the ribbon connector. Be patient. It is hard to see the alignment so is done by feel and some outline guides on the pcb. I plugged in the new screen, tested by powering up the phone, then unplugged the screen to install the pre-cut adhesive. There were no instructions with the pre-cut adhesive sheet. First remove EVERY trace of old adhesive. I used the spudger plus isopropyl alcohol on a lint free wipe. Once the old glue was gone, I aligned the pre-cut adhesive with the clear plastic side down, folded down about 1", confirmed my alignment, then pulled on the clear plastic and secured as I removed the clear liner. Then I removed the large blue plastic liner, then there was a very small blue pull tab that exposed the top sticky side of the adhesive. Carefully pull on that to removed. Be sure to re-install the metal latch and screw over the ribbon connector before snapping the screen back onto the phone. I forgot it and had to re-open the phone. Face-palm!
Custom cut adhesive is great. No instructions.
Do not reattach the ribbon cable before applying the adhesive.
Check the alignment of the adhesive with the clear plastic down.
Carefully remove the clear plastic. This can be done all at once or gradually starting at the bottom of the phone.
Apply the adhesive starting at the bottom of the phone pressing the adhesive in place and rechecking alignment as you go.
Once the adhesive is in place, press the adhesive down again.
Remove the blue plastic using the tabs at the top and down each side.
Reattach the display cable by pressing the connector down from one side and then the other. The alignment of the connector is difficult since it is not visible, but starting at one side makes alignment easier.
Reinstall the connector retaining plate and screw.
Remove lens and connector tape from the top of the new screen
Reinstall the screen and press down firmly on all of the edges making sure there are no gaps around the bezel.
Power on without touching the screen to calibrate.
Precut adhesive is installed in 3 steps:
1. Place adhesive before attaching cable. Remove clear plastic from adhesive and align with phone. Place adhesive onto phone using camera hole as starting point. Make sure blue plastic is properly aligned with edge of phone around entire perimeter
2. Once adhesive is aligned and fully on, remove blue plastic starting from top right corner. A rectangular tab there can be lifted and used to remove blue plastic. Thin blue plastic strip will remain on adhesive after removing blue sheet. Leave it on to prevent damaging adhesive while screen is being installed
3. Attach screen cable and retaining clip. Remove thin blue plastic strip starting from bottom. Two tabs there can be used to get started. Align and attach screen
When attaching cable, hold screen perpendicular to phone with screen facing bottom charging port. This will give the cable more slack to work with. Two corner outlines are printed next to the plug on the phone that can be used to help with cable alignment
barely_diy - 返信
The display connector's snaps are quite weak and will come undone easily. The connector's bracket seems to be the only thing keeps it in place. Try to get the connector to snap in as best you can (as others have said it's about feel) then install the bracket to lock it down. Lastly, the ribbon cable is fragile but it can be gently bent to help with installation. I bent mine outwards around 120 degrees and had no issues.
Mason Tate - 返信
Remember after the cable retainer plate but before the screen is laid down, peel the proximity sensor protective film, and the tiny red tab on the camera peephole protective film.
Then you can start to pull a little bit on the thin blue strip tab so it hangs out, rest the screen clips in position but do not push down.
This will leave enough gap for you to now fully pull out the thin strip. Then click the screen down.
I had a bit of a scare, during 1st power on test screen just showed snow, super long pressed to turn it back off but there was no feedback to tell me it had done so. Un&re-plugged screen and got a bigger scare when it wouldn't turn on. Insanely super long press and it did come on to a normal boot sequence and a beautiful screen.
The process went smoothly for me. The only thing I failed to realize is there is actually two pieces of protection over the camera hole. There was a piece of masking tape AND a clear red cover. I didn't like the idea of my phone taking red pictures so I had to disassemble and remove this red cover. The phone was far too easy to disassemble a second time which made me wonder if the adhesive I applied was doing it's job. I decided to heat the parameter with a hair dryer the second time I put the screen in.
Thank you! This is so important! You saved me a headache.
ccc -
Is there any reason why a screen replacement on a pixel 5a would result in lost encryption keys? Specifically, I am curious about the Titan M security chip. I know that it will not release encryption keys if it detects certain hardware modifications. Would a new screen be one of the hardware modifications flagged by the Titan M?
Attaching the new ribbon connector was an absolute nightmare. After trying for almost an hour, I had to pay a mobile phone repairperson to fix it. Even he struggled with it and asked if I had the correct screen.
I also want to echo what someone else said: make sure you remove the plastic with the red flap from the front facing camera lens on the new screen. There are two temp adhesives to remove for that one.
Very grateful for the comments to remove both camera lens covers before assembly! Luckily the 2nd one being red made me wonder if something was wrong, but it's really not super obvious that the red part should be removed. I had to really get down in the window hole to remove it
There were instructions for the adhesive, they just have a separate link for that.
So the outline is:
1. Use the iopener to loosen the adhesive
2. Using the given tools, pry on the right and remove the old screen with bezel
3. Disconnect the old screen, save the screw and guard
4. Remove the old adhesive
5. Clean
6. Place the custom adhesive ( line it up with the front cam), align and attach
7. Remove the front part of the custom adhesive
8. Connect the new screen ( remove any needless taping) and test.
9. Put the guard and screw back
10. Close project
I didn't spot the protector on the camera. So now I have no selfie camera. I don't even see this step in their guides. 😟
All the tips here were great.
Peeling off the old glue and cleaning was more difficult than expected. I needed to use about 7 q-tips with alcohol and scrubbing.
No issues reconnecting the display after reading the tips here.
One thing: when peeling off the old glue, there was a small part made of plastic that came with it. I think it is part of the phone (but maybe not?).
Anyone know what this is: https://imgur.com/a/PxRaPwa
I had this problem in a different way - after attaching the new screen and trying to put it in place, i found a spot where the new screen refused to get re-seated. Thankfully, I was doing things very gingerly, so I didn't crack the screen trying to force it closed. Turned out this same piece of plastic was in the way, and it just fell out. I suspect its part of one of the screen holding clips that broke while removing the damaged screen. Once I removed it, the new screen seated itself without a problem.
Learning - be careful while seating the new screen - if something isn't going back in, don't try to force it, just check if there is a small piece of plastic in the way.
In general - great guide for fixing the screen.
Only caveat - the iOpener method didn't work for me. Used a hairblower instead. One side at a time - first right side, then top, then bottom (no particular reason for order of top vs bottom), then the left side.
I changed the screen, it seems like it worked for a minute or so - as the "charging battery" icon showed up on the screen upon pressing the power button.
The screen show the icon one more time later as I was checking the charging status - then on the 3rd time looking at the screen, it turned black and started flickering a dew patterns.
Since then, the screen not working anymore (flicker every seconds looking like it almost start up while flashing a few random pixel at the bottom).
I reopened and double checked but everything looks fine, I tried to disconnect and re-attach, it did not help.
It looks like a bigger issue that a dead screen on my side. I read about a similar issue (newly changed screen died almost immediately) a while back when my daughter' Pixel 5a died as well.


デバイスを再組み立てする際は、これらの手順を逆の順番に従って作業を進めてください。
e-wasteを処理する場合は、認可済みリサイクルセンターR2を通じて廃棄してください。
修理がうまく進みませんか?ベーシックなトラブルシューティングを試してみるか、Google Pixel 5aのアンサーコミュニティに尋ねてみましょう。
交換用のパーツとオリジナルのパーツを見比べてください。残りのコンポーネントを移植する必要があるか、パーツを取り付ける前に接着剤の裏張りを取る必要があります。
デバイスを再組み立てする際は、これらの手順を逆の順番に従って作業を進めてください。
e-wasteを処理する場合は、認可済みリサイクルセンターR2を通じて廃棄してください。
修理がうまく進みませんか?ベーシックなトラブルシューティングを試してみるか、Google Pixel 5aのアンサーコミュニティに尋ねてみましょう。
交換用のパーツとオリジナルのパーツを見比べてください。残りのコンポーネントを移植する必要があるか、パーツを取り付ける前に接着剤の裏張りを取る必要があります。
82 の人々がこのガイドを完成させました。
以下の翻訳者の皆さんにお礼を申し上げます:
100%


これらの翻訳者の方々は世界を修理する私たちのサポートをしてくれています。 あなたも貢献してみませんか?
翻訳を始める ›

44 件のコメント
Thank you, this was useful for removing the screen from my device without damaging it further! With the invisible fasteners, a guide like this is invaluable for knowing where the latches are and how to get to them.
As a guide for replacing a screen, there are a few other things worth mentioning:
• Is it necessary to remove the old gasket ("adhesive film")?
• How do you apply the new display adhesive, the one that comes on a blue card? Do you need to do that before re-attaching the new screen cable? Why are there cut-outs in the blue card that mostly match the positions of contacts on my device, but not entirely? Do I remove it before closing the device?
• In addition to a couple pieces of tape, the replacement screen also comes with a small piece of film protecting the camera area. Do pull it out by the small red tab before re-assembly.
• Any other tips for reattaching that press-fit board-to-board connector? Should I really expect it to click into place? It took me many tries to get that aligned and secured!
1. Depends on what you mean by "Necessary," but it is recommended
2. In Step 15, there is a guide linked for custom-cut adhesive; follow that one.
Yes, before you reconnect cable.
I don't know what the cutouts are for, but you will remove the blue card anyway after applying the adhesive to the frame. The important part to line up is the adhesive to the frame; the blue card doesn't matter beyond that.
And yes, you will remove it before closing the device.
3. Didn't see that. I hope my device's camera works. I'll check that now.
4. Reconnecting this was the most tedious part for me. I used the gold colored corners on the board to line up the connector(you can see these in the picture for step 15. Also, I used my finger and not the spudger for pressing down when reattaching (and I don't have small hands); this helps you feel the slight click when it's in place.
Also, you can use the suction cup as a sort of kickstand so you have enough ribbon cable to work with (because there's not a lot of it.)
Lol No -
Literally went step by step by this guide and repaired my own Google pixel 5A phone. If you purchase the entire repair kit for the Google Pixel 5A you have essential every tool you'll need. I will recommend ordering screens for this phone here from this website.
Good guide but agree with keturn that it would be great to have more tips and reminders for replacing the screen.
I mostly figured it out, heres how I did it:
- I removed the old adhesive, and tried to scrape and clear it all.
- next I attached the new adhesive before connecting the screen cable since I figured it would be hard when its attached. I did try to make sure to press all along the adhesive with tweezers to set it. I left the next set of backing on to minimize the time the adhesive is exposed (avoid dust or me touching it)
- then I attached the connector. This was a little difficult, but also not very experienced with this.
- then I removed the adhesive backing and closed it up right after. I used rubber bands (3 across and 1 down the middle) to clamp the screen and put some books on it as much as I could over the next day.
I added instructions in the comments about installing the custom-cut adhesive. Please feel free to edit them and add them to the step-by-step instructions.
This is my first phone repair since the days of removable batteries, but your parts, tools, and guide were fantastic.
It was half the price to replace the screen myself than taking it to Assurion. It is so empowering fixing your own devices, and I got to know my device a bit better too. Thank you iFixit! Bless the Right to Repair movement!
First of all, a very well made tool kit and package by ifixit team; very impressed. I followed the instruction and managed to remove the cracked screen. But when tested the new screen, nothing came up. When pressed the power bottom there was only a short vibrate. I tried to connect the old screen (it was working with cracked glass) and it didn't turn on. Does anyone know the issue here?
This happened to me too, I'm not sure if I should send it back or go ahead and fully seal it ... it seems like a lot of the fixes for the "black screen of death" include pressing on the screen. Does anyone know if the screen only works if fully installed? IE there is no way to verify that the screen works before sealing it with the adhesive, or fully attaching it and then reattaching it with the adhesive (disassemble a second time)?
This guide and the associated parts (screen, adhesive, and tools) work with the pixel 5a 5g as well.
Mason Tate - 返信
Kit had everything needed and instructions covered it well. Other than it being tiny parts to work with, it was actually quite easy and after shipping still saved $60 over having it fixed at a local store. If I'm in need again, I'll definitely buy again. Thanks!
Top-notch equipment and instructions! Only difficulty I had was getting the screen off. Ended up using Gorilla tape on the screen, a more powerful suction cup from a windshield phone mount, moving it back 1/2 inch from the edge so the tape wouldn't peel from the edge when I pulled. I didn't use the adhesive layer cutout as the clips seemed to be enough.
This is a life saving site, I mean it! Can't believe that I could fix my own screen, first time ever trying that.
Thanks iFixit!
Replaced my screen using this guide tonight. Took about 45 minutes, with the most time consuming part being removing the old adhesive. Great guide and great parts from iFixIt!
It works, it really works!!! The screen and the whole device is like new now. The only thing - removing the old screen is a real challenge and the suction cup was not helpful. I had to use very strong tape, as advised there.
This was actually much easier to do than I was expecting until the last step. As soon as I screwed down the screen connector, the new screen turned on & worked perfectly (apparently the phone wasn't completely shut off before doing the repair even though it had been sitting around for nearly 2 weeks -- without access to the screen I couldn't tell). Very stupidly, I panicked about using it before calibration to get all my data off the phone and instead shut it down immediately so I could close the front back up, and it could reboot & do all the steps necessary. At which point I discovered that 1) How you're supposed to reattach the screen without enormous pressure that risks breaking either your new screen or the phone itself isn't at all obvious (to me, at least) and 2) The new screen is also now a dud -- flashing & flickering just like the old one.
Did everyone else just push down easily on the corners and have their screen pop into place??
Laghee McG - 返信
The kit and instructions were amazing. And all the details in the comments were a huge help!
My screen was too cracked to use the suction cup, and I was all out of packing tape. So I heated the screen a couple times and went after it with the blue spudger. This was a big challenge because I had zero leverage -- I had to hold my phone between my knees to keep it from sliding all over the place. But I finally was able to jam the first guitar pick in, and the rest were much easier.
I had no problems with the adhesive thanks to the detailed instructions. The hardest part was lining up the new ribbon cable, but the tip to use the gold marks on the board as a guide helped me get it.
And my case just snapped together easily at the end once I lined up all the tabs. It feels like I got a brand new phone!
PLEASE Remove the adhesive. My inner lcd broke because of the build up of old adhesive just remove it using isopropyl alcohol.
The guide is great! Followed the steps as described and it worked perfectly. The one thing I'd add is that removing the screen is by far the most time-consuming part. The whole repair took me about 35-40 min. 25 of those minutes were working on removing the screen. I had to apply the iopener 5 times before the screen moved sufficiently. I think this could be sped up by using a spudger to pry, but I was taking the cautious route. Since I was doing a screen repair this was probably excessive. But if you're replacing a battery or some other internal component you certainly want to go slow and steady. Just be patient and it will come lose.
Has anybody else had problems with the proximity sensor not working after a screen replacement?
GarageGeek - 返信
Is there any reason why a screen replacement on a pixel 5a would result in lost encryption keys? Specifically, I am curious about the Titan M security chip. I know that it will not release encryption keys if it detects certain hardware modifications. Would a new screen be one of the hardware modifications flagged by the Titan M?
Way easier than I expected. This is my 2nd screen replacement. The other was a moto x pure - LOTS of screws. 5A relies more on glue.
I will put specific comments under specific steps but will say here -
I had a very hard time getting my phone to turn off - the screen was completely smashed so it was hard to be sure. I thought we were good when "where is my android" couldn't make the phone ring. I must have powered it on while working on it since it started ringing halfway through the operation. Eek! I was afraid having the phone on would mess with the calibration at the end. I tried to turn it off again (power/volume down/prayer lol) and in the end it was OK so don't panic if this happens to you.
The colors didn't look right when my phone first started back up but it feels like they've sort of adjusted because 12 hours later it looks just fine.
I wish I'd ordered a second sheet of adhesive in case I had to redo it - luckily it went flawlessly.
My 5A lives again!
I have the same issue where my screen is too smashed to use and the phone is still powered on. I can't find any way to force power down with the buttons alone and I know this thing will take a week to discharge on its own without screen use or calls.
Anyone know a way to discharge the battery that doesn't require accepting anything on the screen? I have it plugged into another phone via usb and that phone says it's charging slowly. I'm hoping that will speed it up.
Does the screen interact with the antennas? It's not showing up on wifi and google doesn't show it connected.
nat -
Success! Using a usb cable from the broken 5a to a pixel 2 with a low battery discharged the 5a enough it powered down in about 6 hours.
Everything seems to be working again with the new screen. The only difficulties were getting the first opening in the bezel and then getting the screen connector back in. Otherwise everything ran smooth and the ifixit kit and this guide gave me everything I needed.
nat -
After replacing the screen, the phone turned on only once. Unfortunately, after I switched it off, it isn't turning on again. Are there any troubleshooting steps I can run?
Have you tried doing a hard reboot? Holding the power button for 30 seconds? Any lights on the screen?
Kason G -
Thanks for this guide and sending me the required parts! Worked like a charm! Thanks for helping me have the power to fix my own device when manufacturers don't want us to and inevitably contribute to the planets worsening E-waste situation. The suggestions above are great help for any additional questions. Saved me hundreds of dollars and I absolutely love my Pixel 5a 5G.
Great guide I just fixed my wife's pixel 5a! With just a fraction of the cost and I gained good experience while doing it. Happy wife .... Thanks in advance
Thank you! Guide was helpful. The only thing that was different was in step 12, my phone had a T4 instead of a T3 holding the clip for the screen connector.
Comprehensive screen kit, and great guide as well!
Personal caveats -
1. The iOpener method didn't work for me. Used a hairblower instead. One side at a time - first right side, then top, then bottom (no particular reason for order of top vs bottom), then the left side.
2. Reattaching the screen connector cable is tricky, needs patience.
3. After attaching the new screen and trying to put it in place, I found a spot where the new screen refused to get re-seated. Thankfully, I was doing things very gingerly, so I didn't crack the screen trying to force it closed. Turned out there was a piece of plastic was in the way, and it just fell out. From its shape, I suspect its part of one of the screen holding clips that broke while removing the original damaged screen. Once I removed the piece of plastic, the new screen seated itself very smoothly indeed.
Learning - be careful while seating the new screen. If something isn't going back in, don't try to force it, double check if there is something in the way.
I think I broke it when I was putting it back together? When I first connected it it was perfect screen view I was gently clicking it clicking it clicking it and then the one final one wouldn't go down all the way and I think because there was another piece of plastic in there? Similar to the one that people talked about before? Anyhow once I click that part a little bit harder the whole screen went black and started flashing at me... 😭
Great guide, one note worth mentioning, make sure your selfie cam is clean, both behind the tape on the screen and the sensor itself Even if you don't think you touched it, you don't wanna end up like me and have a smeary selfie cam lol
Never ever ever force a screen on the frame during replacement, especially an OLED
Well done, thank you and the very helpful commenters! I completed successfully in about an hour. I could not shut off my phone, so it was on the whole time and did not go through screen recalibration. I restarted and it booted as if nothing had happened.
But...my phone is two parts lighter: the connector bracket and screw :P Hopefully the connector is well seated and hopefully I won't drop it again so it won't become dislodged. Re-seating the new screen went way too smoothly for me to bother opening it up again unless I have to.
It took me a long time to figure out that I wouldn't hear or feel the screen "press" connector. Eventually I tried holding the connector in place where it seemed to fit and screwing in the mounting bracket. I turned the phone on before applying the adhesive just to test it and it worked! If you don't hear the click described here, don't panic.
Critical information about reconnecting the screen was left out. The screen cable can be super frustrating to reconnect, especially if you follow this guide's advice of not pressing on the middle of the connector. What I did, was press on one side of the connector until it attaches, then press down the center (not too hard) until the whole thing connects. If you only press one side then the other side, when you press the other side, the first side will come loose. Nearly drove me insane. Onces its connected, I had the problem of a static screen. What you need to do is hold the power button for like 20 seconds until the phone totally turns off, then turn it back on. Then it worked. Took me forever to figure out.
The kit is awesome, and I was able to successfully replace my screen. As others commented before me, be very careful to remove every adhesive from the new screen before assembling it.
As for the last paragraph in the tutorial: "During the boot-up process after reassembly, the screen will go through a calibration sequence", in my case my phone was powered on throughout the whole process, and I didn't see any calibration screens. It still worked though.
I thought that the battery was fully drained because the phone sit waiting for many days, but it was actually on the whole time. I tried to shut it down, but failed to do so. I still don't know if it's possible to power it off without the touch screen working. Nevertheless, the fix worked anyway in the end and I recommend the kit.
How do you actually replace the screen? This isn't a screen replacement guide. This is a disassembly guide. I have it all done, now the new screen connector won't connect to the phone. I can just touch the two connectors together, they don't click, bind, adhere, they may as well both be toothpicks. Forget getting this metal bracket back on. The screen connector is on this bouncy, elastic piece of plastic so there's no way to even hold it in place to wiggle around and try to get it lined up. A guide that actually goes over what the title of this one claims to, would be fantastic.
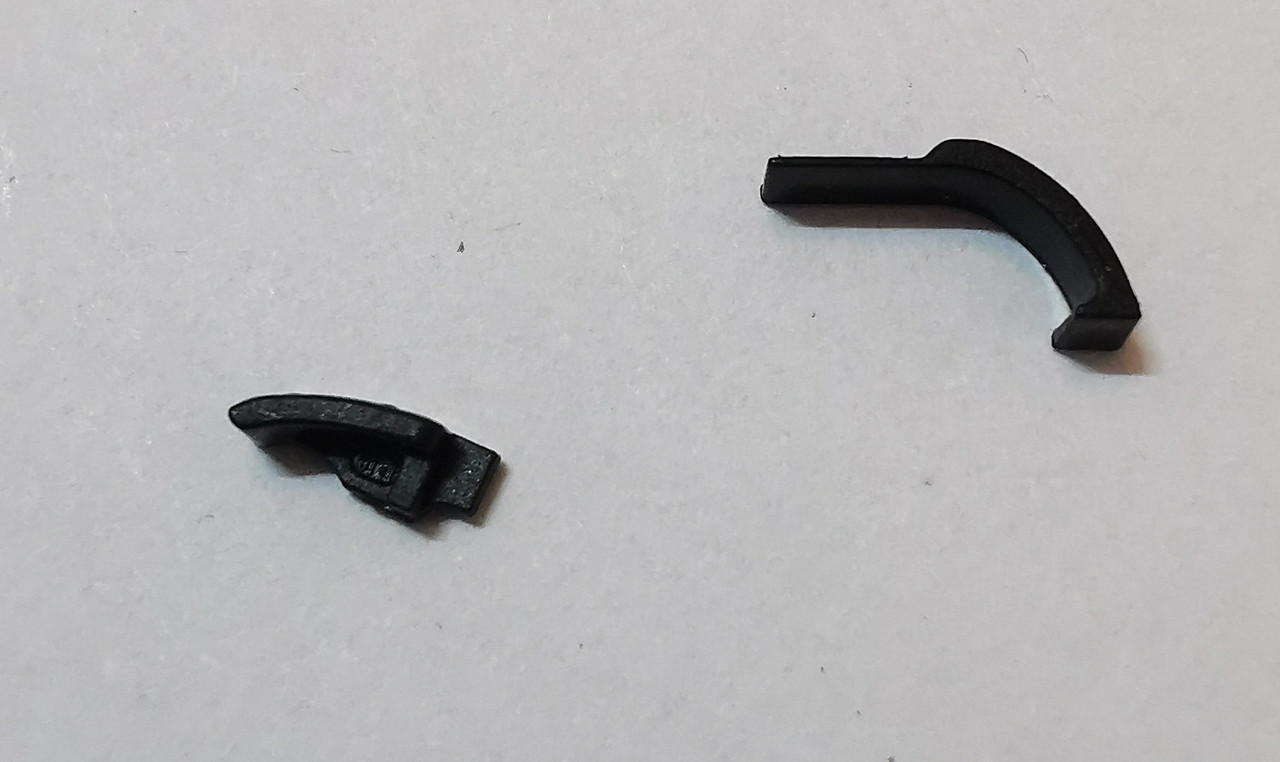
Hi there, everything went well thanks to the kit and the well-made guide until two unexpected little black plastic parts dropped out of nowhere on the table while I was cleaning the edge with ethanol. 1 appr. 5mm in length with a slight arc and the second appr. 8mm in length with a quarter arc and a thin extension on one end. Unfortunately I could not figure out, what those two parts might be. From first an second looks and comparing to the pictures above I could not work out where those might belong and whether the are important. I would appreciate, if someone was able to tell me, whether to ignore those two plastic pieces or what else to do with them before reassembly. Thank You :-)
the parts look like this: https://i.postimg.cc/fL96fC0t/aa44b1a8-6...
and here is another (maybe more enlightening) picture: https://i.postimg.cc/763KLW2V/629cf7d4-c...
csm1103 -
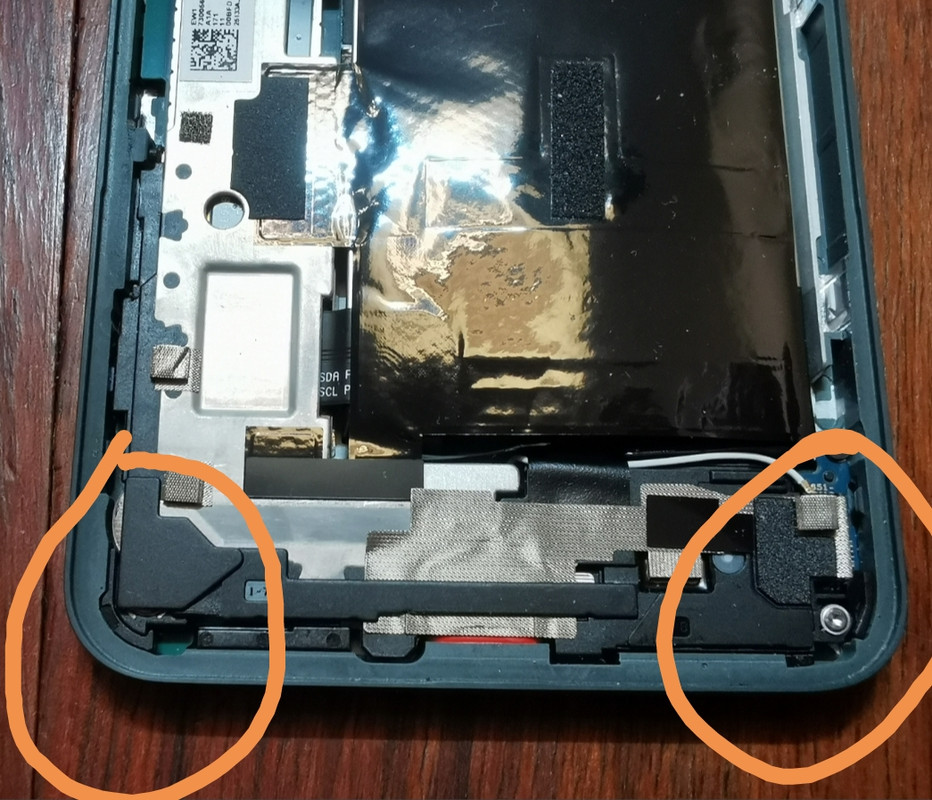
Hi, in case anyone wonders: I solved the topic by looking at the other repair-descriptions for the Pixel 5a. Those two plastic pieces belong in the lower left and right corners (left: larger one - right: smaller one): if You turn the opened phone upside done (I did it while cleaning and talking at the same time), they just fall out. Maybe this can be added to the instructions. After this the repair was pretty straight forward except for the the connector with which I struggled at least 5 minutes before using a second pair of hands to hold the display while I was connecting it. Thank You again.
Here is a picture of the two plastic pieces in place: https://i.postimg.cc/mk0zvDzp/fa1e732e-c...
csm1103 -
This will be clear if you examine your replacement part first.
bcling - 返信
True, but one may be disassembling the device prior to receiving their replacement 😉
Niels Klassen -
I'm not sure why it's recommended to pry at the bezel seam. I followed this guide but the bezel that's held in by clips, provides some additional housing for the front facing camera as well as the ear-speaker grille. I ended up separating the old screen from the bezel and putting the bezel back into the phone first, before installing the replacement screen.
Kevin Kim - 返信
My replacement screen did not come with the bezel, and I had to remove it from the old screen. I didn't notice this until i attempted to replace the screen. Be sure to look at your replacement screen prior to reassembly. It will save you some heartache. All was good though and the phone is working.
jak ll - 返信
1. "Be sure to turn off your device before you begin the repair". Kind of tough to do if you are replacing the screen because it is blank and you can't tell what is going on or select a "Power Off" option.
2. To power off the phone, would be good to have instructions to disconnect the battery once the screen is disconnected from the rest of the phone.
BlueNGray - 返信