はじめに
手順 1 に進むAndis CEC-100 Clippers
Issue: No Power, Non-Functional.
The original owners manual was of little to no use troubleshooting this new set of hair clippers. The initial potential fault was suspected to be in the cable at the plug end.
The owner stated that they purchased this clipper set brand new from a big box store about 6 months ago. They returned home opened the box, plugged the clippers in and the device never started. They placed them back in the original packaging and they have not been touched since. I confirmed this with a visual inspection.


-
-
The owner stated that they purchased this clipper set brand new from a big box store about 6 months ago. They returned home opened the box, plugged the clippers in and the device never started. They placed them back in the original packaging and they have not been touched since. I confirmed this with a visual inspection.
-
-
-
There are 4 non typical Y1 security screws holding the top cover and bottom cover intact.
-
Take notice that the 2 Y1 security screws at the top near the clippers are a different screw then the 2 smaller Y1 security screws at the bottom closest to the cord.
-
-
-
-
It is clear that during either assembly or transit that one of the power leads on the switch has broken loose.
-
As indicated by the green arrow in the image which is the loose power wire. The red arrow shows where this wire should be soldered.
-
-
-
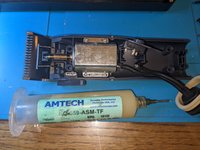
What you will need to repair. Soldering Iron, paste flux and solder.
-
Next you will want to heat up your solder station and apply some flux to both the wire and the connector pin. I prefer to use Amtech flux however any flux is better then no flux.
-
Find a comfortable position that limits the amount of movement of both the wire and then switch.
-
Solder the wire to the pin.
-
-
-
Check that the soldered wire is solid and will not come loose. A good jiggle jiggle and a wiggle wiggle and if its good we let it ride.
-
Reassemble the clippers taking note to make sure that the switch is seated in the correct position and that the bottom cable and cap are also seated properly before replacing the top cover.
-
Replace the 2 Y1 bottom screws. The smaller of the screws.
-
Replace the 2 Y1 top screws the larger of the screws.
-
Test Clippers. Problem Resolved.
-


チーム
