はじめに
このガイドを参照して、iPad Pro 9.7インチのホームボタンを交換したり取り出します。
ご注意:オリジナルのホームボタンアセンブリはiPadのロジックボードとペアで製造されています。そのためホームボタンアセンブリのパーツ(ボタンもしくはケーブル)を交換すると、Touch ID機能を失ってしまいます。
必要な工具と部品
-
-
ディスプレイガラスにヒビが入っている場合は、作業中さらに程度が酷くならないように、ガラスにテープを貼って怪我を防ぎます。
-
透明な梱包用テープをiPadディスプレイ表面に貼ってください。ディスプレイ全体を覆います。
-
このガイドになるべく沿って作業を進めてください。しかしながら、ガラスが壊れている場合は、作業が進むにつれて程度が酷くなる場合があります。その場合は、金属のツールでガラスを綺麗に除去する必要があります。
-
-
-
両側のタブを持って、温めたiOpenerをiPadの上部端に載せます。
-
iOpenerをiPad上に約2分間置きます。iPad全体とフロントパネルを固定している接着剤が柔らかくなります。
I see a lot of videos that show using a heat gun on low to soften the adhesive. I know there is inherent risk with this since you could start delaminating things, but is it something that could be considered (at your own risk)? Or is it something that could have more risks than I am realizing?
Yes, you can definitely use a hair dryer, heat gun, or a heating pad. If you're using a heat gun, be careful not to overheat the display. The surface should feel slightly too hot to the touch.
-
-
-
画像に従って、次のエリアをこじ開けないようにご注意ください。
-
ホームボタン
-
フロント向きカメラ
-
メインカメラ
Verwirrend: Es sollte heissen, dass man an den beschriebenen Stellen eben NICHT hebeln sollte.
Danke! Ich habe den Teil mit dem NICHT hebeln nochmal hervorgehoben.
-
-
-
ここに翻訳を挿入する
-
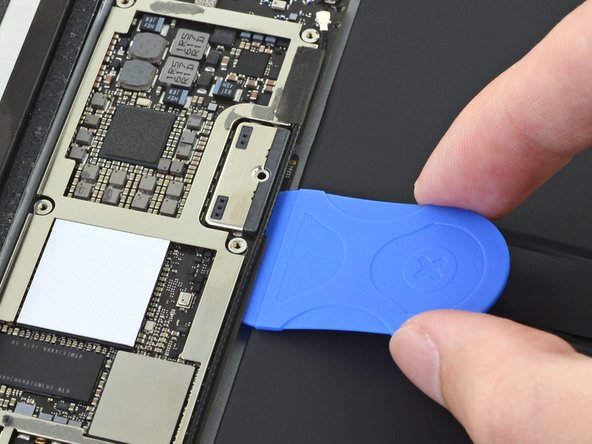
青いハンドルをヒンジ側に引くと、オープニングモードが解除されます。
-
吸盤カップをiPadの上端付近に装着します。上部に一つ、下部に1つずつ取り付けます。
-
カップを押し下げることで、目的の部位に吸引力を加える。
-
-
-
青いハンドルをヒンジから離し、オープニングモードにします。
-
カップが両側を引っ張り始めるまで、ハンドルを時計回りに回してください。
-
1分ほど待つと、粘着剤が剥がれ、隙間ができます。
-
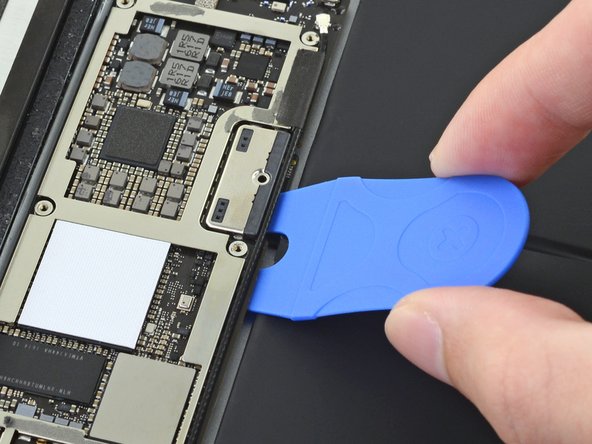
リアカバーとフレームの隙間にオープニングピックを差し込みます。
-
次の2つの手順をスキップします。
Do not use the anti clamp beyond this step. Doing so will run the risk of putting pressure on the screen and cracking it. Only use it for the initial opening of the device.
Playincrzy - 返信
-
-
-
-
iPad上部付近の端側から、ロジックボードのEMIシールドを剥がします。
-
ロジックボードからEMIシールドをゆっくりと剥がして外します。
-
ロジックボードのEMIシールドを取り出します。
Don't peel the cover as shown from a short side. Lift the long side to avoid creasing the cover so much. This way it will lie flat when you reassemble it and not look so ugly. Also, you won't have to straighten so many creases with pliers
Jim Meyers - 返信
-
-
-
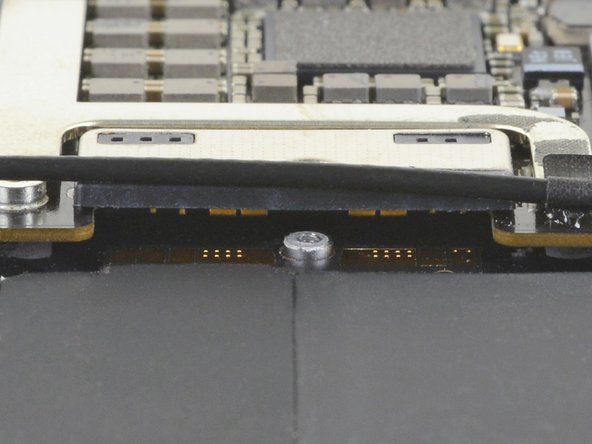
プラスドライバーを使って、バッテリーコネクタを固定している1.7mmネジを1本外します。
What size is this screw?
i get 1.65mm with my calipers but the 1.3s read 1.25 on my calipers too, so probably a 1.7mm
-
-
-
鋭利な突起をペンチの先を使って、平らにします。
-
EMIシールドの端に沿って鋭利な突起があれば全て平らにします。
Don't peel the cover as shown from a short side. Lift the long side to avoid creasing the cover so much. This way it will lie flat when you reassemble it and not look so ugly.
Jim Meyers - 返信
-
-
-
バッテリーブロッカーをロジックボードのバッテリーコネクタ左側に約35度の角度で差し込みます。
-
バッテリーブロッカーはそのままにして作業してください。
-
-
-
90%以上の高濃度イソプロピルアルコールを数滴、ロジックボードのバッテリー接続部の左右に塗布します。
-
イソプロピルアルコールがロジックボードの下に浸透して、接着剤が弱まるまで1分待ちます。
-
バッテリーブロッカーを挿入してみてください。ロジックボードが簡単に持ち上がらない場合は、イソプロピルアルコールをさらに数滴垂らしてください。
-
-
-
プラスドライバーを使って、ディスプレイケーブルブラケットを固定している1.3mm プラスネジを3本外します。
i think we need to talk about the battery situation here. apple change up the style of battery connector on this model as well as some others. if someone can add to this list and add the appropriate photos in the right spot should help someone else. the battery tabs are open towards the battery side and inserting a tool in this area can pry them open further and damage or rip off the tab. some have found that by lifting on either side of the battery tab, they would not even encounter the tabs.
-
-
-
ディスプレイケーブルブラケットを取り外します。
A tab was folded over a connector of some sort on the bottom side. I found it was a better to pull from the top to the bottom to fold the tabs slightly to remove this cover.
Actually it helps to move the cover slightly towards the bottom of the iPad as that disengages to tabs…
-
-
-
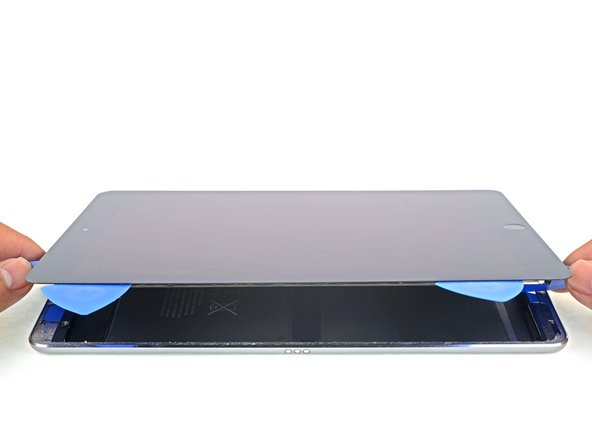
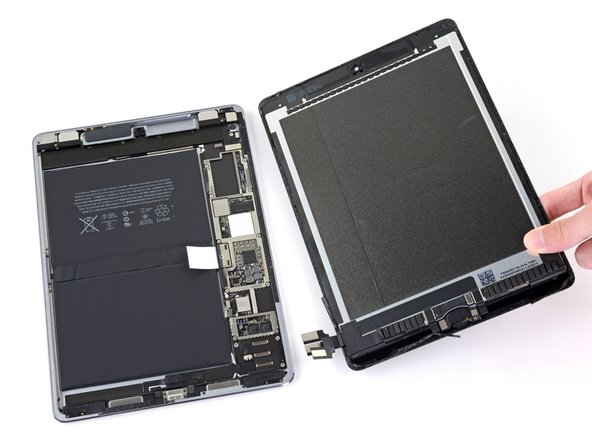
フレームからディスプレイアセンブリを取り出します。
You "CAN" skip steps 41 through 98 and 102-109 if you're confident in your repair abilities and PATIENT. Lots of alcohol around all the edges of the battery, and apply heat to the back cover on one half of the battery, the slowly ease your "card under the edges of the battery. Wiggle it back and forth and add more alcohol under the edges of the battery where your working; DONT PUSH your card to hard or you will sli[p and damage components. Then do the same for the other half. When both halves are loose, fold over one end and slide the flat edge off the spudger under the area of the logic board next to the battery connector, then do the same to the other side; you want just enough of a gap under the logic board to lift the battery tab off of the post then you can remove the battery.
-
-
-
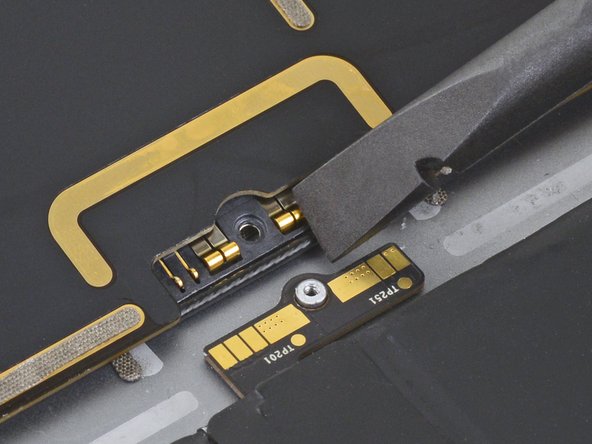
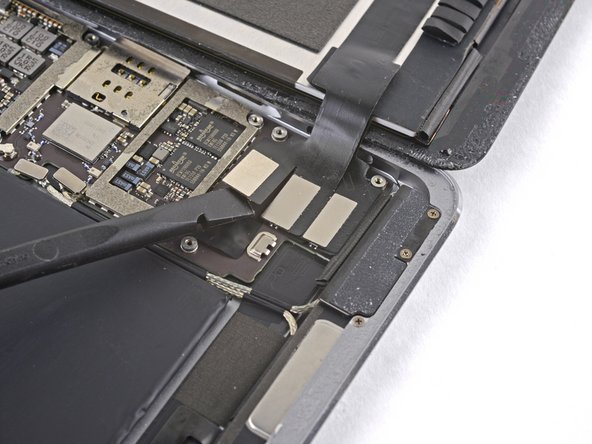
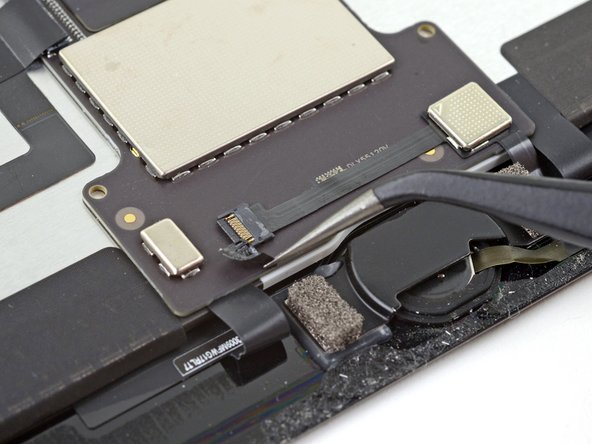
iOpener、ヒートガン、もしくはヘアドライヤーを使って、ケーブルの下に留められた接着剤を温めてから、ケーブルをこじ開けてください。
-
あるいは、ケーブルの下にイソプロピルアルコールを数滴垂らして、数分間待機して、接着剤を柔らかくします。
I used a heat gun on low air, set to 150°C, and very very gentle pressure with the tweezers, and it came out very easily and neatly.
-
-
-
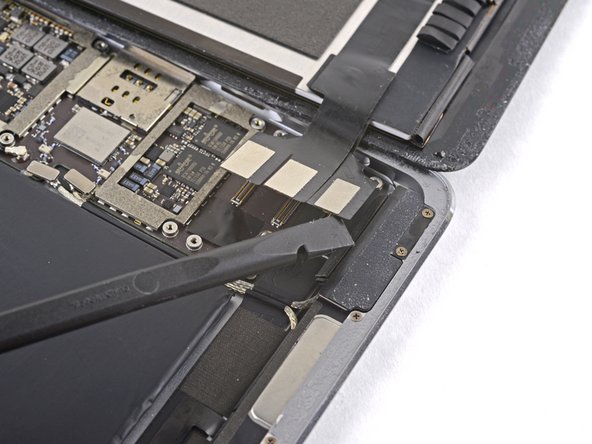
ホームボタンブラケットの底に、イソプロピルアルコールを数滴垂らして、接着剤を弱めます。
-
もしくは温めたiOpenerを使って、接着剤を柔らかくすることもできます。
-
-
-
ホームボタンブラケットを取り出します。
-
できる限り残り接着剤を綺麗に除去してください。高濃度イソプロピルアルコール(90%以上)もしくはアセトンで拭き取ります。
-
ブラケットをE6000の接着剤、ボンドもしくは強力両面テープなどで固定します。接着剤を装着する前に、ブラケットが正しい方向に並んでいるか、ホームボタンはクリックするか点検してください。
Would be really nice if the adhesive strip kit for the screen included the adhesive bits needed to secure the existing home button to the new screen (or a new home button to an existing screen).
One more thing about the bracket: you really need a strong adhesive when you put it back, so that pushing the button doesn’t dislodge it. If it doesn’t hold the button firmly, you can push the button out of its socket during normal use. Getting the bracket in and aligning it without accidentally sticking it in the wrong place or (much worse) sticking it to the fragile ribbon cable takes some very careful work.
This is an excellent guide, but I’d like to see maybe the first two steps of reassembly, showing how to do this correctly.
When replacing the bracket, a very slight difference in the replacement part caused the bracket to make the home button click all the time. The little white washer between the home button and the back of the glass was about 0.3 mm thicker than the original, and i had already superglued those parts together.
Fortunately, the playing card included in the kit is about 0.3 mm thick. I cut 2 small rectangles and superglued them to the feet of the bracket, so it would stand away from the home button. Then superglued the bracket on, and now it clicks perfectly. Hopefully I don't have any issues with the playing card delaminating as the home button wears, because I definitely don't know if i could get this ipad apart again (the first time was easier because the screen was already shattered).
-
-
-
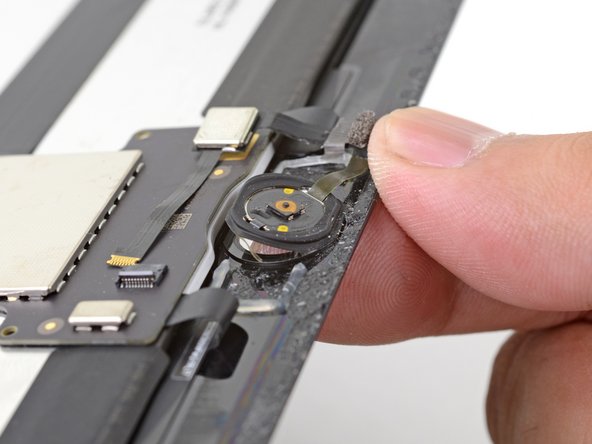
指先を使って、ディスプレイ内側に向けて正面側からホームボタンをゆっくりと押し出します。
-


オリジナルのパーツと交換用パーツをよく見比べてください。交換用パーツに付いていない残りのコンポーネントや接着シールなどは、インストールする前に新パーツに移植する必要があります。
e-wasteを処理する場合は、認可済みリサイクルセンターR2を通じて廃棄してください。
修理が上手く進みませんか?まずはアンサーコミュニティ を参照してみましょう。
オリジナルのパーツと交換用パーツをよく見比べてください。交換用パーツに付いていない残りのコンポーネントや接着シールなどは、インストールする前に新パーツに移植する必要があります。
e-wasteを処理する場合は、認可済みリサイクルセンターR2を通じて廃棄してください。
修理が上手く進みませんか?まずはアンサーコミュニティ を参照してみましょう。
19 の人々がこのガイドを完成させました。
以下の翻訳者の皆さんにお礼を申し上げます:
100%

Midori Doiさんは世界中で修理する私たちを助けてくれています! あなたも貢献してみませんか?
翻訳を始める ›


10 件のコメント
You swapped iPads half way thru. These pictures are all for the 10.5, not the 9.7. The home buttons and connectors are different. Please fix.
Hello bryceschutte,
I took a look at the Home Button for the iPad Pro 9.7”. While it looks slightly different in terms of bracket shape, the steps described (which came from an iPad Pro 12.9” guide) should be almost identical.
I have swapped the home button but i have no function at all from the replacement, i have used 3 different replacements. Is this normal? Have i lost the return to home function? I expected to loose the touch id, but believed the return to home would still work.
Hi Alan,
The return to home should still work with a replacement button. I would suggest checking and re-seating all the connectors that are related to the Home button.
If I have an iPad Pro 9.7” with cell phone capability, but the home button and screen are broken. Could I replace screen and home button of a working iPad Pro 9.7” with no cell phone ability, and still retain my ability to unlock with fingerprints ?
Thanks please help,
Much love
–Drew
Hi Drew,
While the screens are compatible between the two models, the fingerprint capability only works with the original fingerprint sensor.
hello! I run a repair shop in NW Florida. I need to know how to get the ORIGINAL button to click. the Touch ID works wonderfully but the main issue is that the nipple on the back plate of the home button won’t click the switch on the home button. any useful tips to make them connect? are there any jerryrigged stuff that you all have tried? i’m open to all ideas
Abe Arslan - 返信
Hi Abe,
When you press the Home button, the switch on the back plate pushes against the button cover. This cover was originally glued in place, so it’s likely you’ll need to securely re-glue the cover in place in order for the button to have a solid surface to push against. If the switch doesn’t reliably reach the button cover when you push on the button, you can try putting a few layers of tape on the button cover to narrow the gap.
When replacing the button, would the fingerprinting work when I change the little metall piece with the 3D barcode?
Covering the screen with tape proved an essential safety step with the ipad display/lcd I just replaced. The screen was so badly broken that a part of it was almost powder, but the combination of the tape and sticky adhesive residue kept most of that together, and cleanup was pretty easy as a result. One caveat, though, is that the tape will probably make the suction cup useless for pulling up on the display. It did for me, anyway.
John Lasseter - 返信