はじめに
この修理ガイドを使ってiPad Pro 12.9インチ 第4世代 スクリーンの交換をします。
スクリーンを修理する一般的な理由としては、スクリーン表面にひびが入った場合、タッチしても反応しない場合、ある部分のピクセルが機能しない場合などがあります。
スクリーンはディスプレイと上部のセンサーアセンブリで構成されています。上部のセンサーアセンブリを移植しないと、Face IDとTrue Toneが使えなくなります。センサーアセンブリはスクリーンに強く接着されているため、破損しやすくなっています。 そのため、上部センサーアセンブリをこじ開ける際は、ゆっくりと慎重に作業してください。
この修理を完了するには、薄い両面テープや接着剤などの交換用接着剤が必要です。
バッテリーコネクターを2枚のカードで塞いでいる画像もあります。これはオプションの方法ですが、バッテリーを完全に放電させる方が確実です。この見た目の違いは無視してください。
必要な工具と部品
-
-
青いハンドルを後方に引き、アンチクランプのアームのロックを解除します。
-
iPadの下に物を置き、吸盤の間が水平になるように配置します。
-
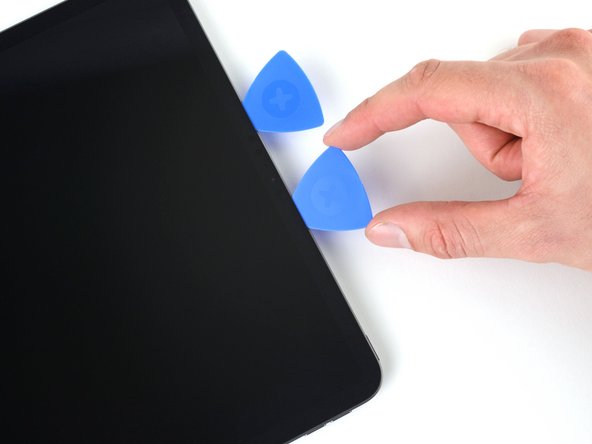
吸盤を右端中央付近に置き、1つは上に、もう1つは下に置きます
-
アンチクランプの下部をしっかりと固定し、上部のカップをしっかりと押し下げて吸着させます。
-
-
-
吸盤ハンドルを、できるだけスクリーン右端の中央に近づけて装着します。
-
フレームとスクリーンの間にわずかな隙間ができるように、吸着ハンドルを安定した強い力で引き上げます。
-
隙間にオープニングピックを差し込みます。
-
-
-
上部の切り込みは、上端から4cmのところから始まり、2.5cmの長さです。
-
真ん中の切り込みは、ちょうどフレームの真ん中にあり、2.5cmの長さです。
-
下側の切り込みは、下端から4cmのところから始まり、2.5cmの長さです。
-
-
-
-
上部端の接着剤を柔らかくしている間、次の注意点を読んでおきましょう。
-
コーナー付近には2つの環境光センサーがあります。ここにピックの先端を差し込んで、傷つけないようにしてください。
-
熱分散テープが3本あります。ここをスライスするように、ピックを上に向けて角度をつけます。
-
前面カメラのアセンブリは、上端中央にあります。破損を避けるため、ここにピックを差し込まないでください。
-
-
-
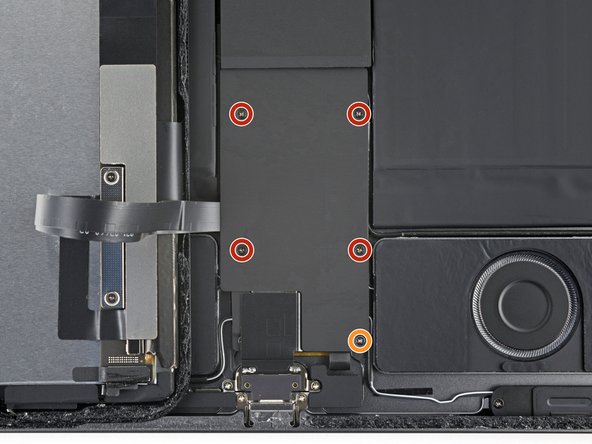
プラスドライバーを使い、上部ケーブルシールドを固定している2本のネジを外します:
-
長さ1.8 mmネジ-1本
-
長さ2.0 mmネジ-1本
-
-
-
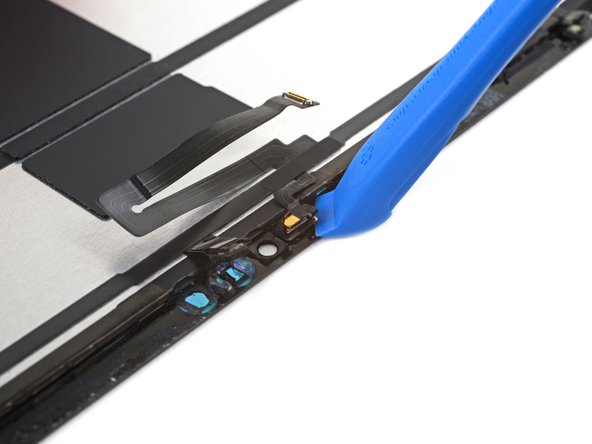
スパッジャーを使い、スクリーン上のディスプレイケーブル下部のプレスコネクタをこじ上げて外します。
-
ピンセットを使って底部のプレスコネクタを曲げ、スクリーンから離し、上部のプレスコネクタを露出させます。
-
-
-
つる首タイプのピンセットの片側を環境光センサーとスクリーンの間に差し込みます。
-
センサーをスクリーンからこじ開けて外します。
-
この手順を繰り返して、他の環境光センサーも外します。
-
-
-
角度のついたピンセットの片方の腕を近接センサーケーブルとスクリーンの間に挿入します。
-
こじ開けるようにしながらピンセットをスクリーンの方にスライドさせ、センサーをスクリーンから切り離します。
-
-


オリジナルのパーツと交換用パーツをよく見比べてください。交換用パーツに付いていない残りのコンポーネントや接着シールなどは、インストールする前に新パーツに移植する必要があります。
デバイスを再組み立てするには、これらのインストラクションを逆の順番に従って作業を進めてください。
e-wasteを処理する場合は、認可済みリサイクルセンターR2を通じて廃棄してください。
修理がうまく進みませんか?ベーシックなトラブルシューティングを試してみるか、iPad Pro 12.9インチ 第4世代のアンサーコミュニティを参照してください。
オリジナルのパーツと交換用パーツをよく見比べてください。交換用パーツに付いていない残りのコンポーネントや接着シールなどは、インストールする前に新パーツに移植する必要があります。
デバイスを再組み立てするには、これらのインストラクションを逆の順番に従って作業を進めてください。
e-wasteを処理する場合は、認可済みリサイクルセンターR2を通じて廃棄してください。
修理がうまく進みませんか?ベーシックなトラブルシューティングを試してみるか、iPad Pro 12.9インチ 第4世代のアンサーコミュニティを参照してください。
8 の人々がこのガイドを完成させました。
以下の翻訳者の皆さんにお礼を申し上げます:
100%

Midori Doiさんは世界中で修理する私たちを助けてくれています! あなたも貢献してみませんか?
翻訳を始める ›


6 件のコメント
I completed this process today. I had a cracked screen on a 2020 12.9" iPad. Great guide but a couple of things I think should be mentioned.
1. Screen magnets along the right edge are not included on the replacement screen I got from iFixit, which I should have noticed but didn't. So don't forget to transfer these over. I did not realize this until I had sealed it up again, unfortunately, and I don't want to damage the adhesive or risk damaging the new screen just to have my case magnetize properly. Luckily my case has a latch piece that comes up around the Apple pencil and then attaches to the screen cover so these magnets are not necessary for me.
2. The description of the reattachment of the press connectors could use some clarification. "One side" refers to the short edges of the rectangular connector which could be nice to clarify, as I first assumed it meant the rows of pins. Though once you see how it works it is fairly obvious.
Overall I am happy with the result! No more cracks and fully functional!
I would also add that if you have a cracked screen be very careful with the opening process, the suction cup will only pull up larger shards individually, even with a lot of packing tape. Wear safety goggles because the shards can spring out when tension is suddenly released by cracking! I ended up having to remove a lot of smaller pieces with tweezers and eventually, I was able to finish cutting the adhesive and remove the old screen.
Will -
Follow up to this 4 months later - the screen is not good. It becomes completely unresponsive and randomly taps things on screen sometimes. It’s totally random when it does this which is stressful if I am trying to use the ipad for sheet music. I wouldn’t recommend the ifixit screen unfortunately. It also has a bright spot that is visible when scrolling on a page toward the bottom left of the screen. I didn’t notice at first - not nearly as much of a problem as the screen responsiveness issues that have appeared.
I know these issues are with the screen because when I use an external keyboard/trackpad the ipad is fully responsive, only the touch input is very spotty. I wish I could say it has to do with how I repaired it but all of the cables were securely attached and the top sensors (including FaceID) function perfectly. The screen looks great otherwise, it’s just intermittently unusable. I have tried restarting the ipad, restoring, etc. It doesn’t matter. It’s not an OS thing.
Will -
I'm sorry to hear your replacement screen isn't working as expected, Will. You may have some luck getting in touch with our customer service: https://help.ifixit.com/article/136-emai...
Thanks for all the extra tips (I'm sure I would have missed the magnets if it wasn't for your remark!), it helped me get through the steps! I got the full repair kit, but the iOpener never got hot enough (it was always just warm to the touch in the middle, never hot, and when I heated it some more, it exploded. While it was "warm" it never managed to loosen any glue). However the hair dryer worked like a charm.
It took a lot of effort to remove all small glass pieces, but it was worth it, everything works as before again! All in all I think I spent 5 hours.
I hope my replacement screen will last longer than yours!
My replacement screen already had sticky tape on it, so I didn't use the extra installation adhesive that was provided.
Claude -