はじめに
このガイドを使って、iPad 5 LTEのバッテリーを交換します。
デバイスを解体する前に、バッテリーの残量を25%以下まで放電してください。充電されたリチウムイオンバッテリー は引火の原因となったり、アクシデントで穴を開けてしまうと爆発の恐れがあります。
リチウムイオンバッテリーは危険な化学物質を含んでいるため、穴を開けてしまったり、変形すると、引火する恐れがあります。ご注意ください。
このガイドではWi-Fiモデルのパーツを使用しています。内部はLETモデルと若干異なりますが、両モデルで同じ作業を行います。
警告: このガイドに記載されているバッテリーの絶縁方法は時代遅れであり、ロジックボードのバッテリーピンに永続的な損傷を与える可能性があります。この方法でバッテリーを分離する場合は、すべての警告に注意し、非常に作業を進めてください。バッテリーを分離せずに修理する場合は、バッテリーをショートさせたり、デリケートな回路パーツを損傷することがあります。不可欠な場合(ネジを外すときなど)を除いて、メタル製の工具の使用は避けてください。
必要な工具と部品
-
-
鍋を十分な量のお湯で満たして、iOpener を完全に沈めます。
-
お湯を沸かして熱くなったら火を止めます。
-
iOpenerを熱湯の中に約2−3分間沈めます。iOpener全体が完全に浸かっているか確認してください。
-
トングなどを浸かって、温まったiOpenerをお湯から取り出します。
-
タオルでiOpener全体を拭き取ります。
-
iOpenerの準備は整いました。iOpenerを再度温める必要がある場合は、お湯を沸騰させて、火を止めてからiOpenerを2-3分間浸してください。
-
-
-
ディスプレイガラスにひびが入ってしまった場合、割れてしまった部分が広がらないようにガラス表面上にクリアテープを貼るなどして、怪我がないようご注意ください。
-
iPadディスプレイ上にクリアタイプのテープを何重にも貼り、全体を覆います。
-
ここに書かれている手順にできるだけ従ってください。しかしながら、ガラスが一旦割れてしまうと、作業を続けていくにつれてひびが広がってしまう可能性があります。この場合、ガラスを取り出すためにはメタル製工具を使用する必要があります。
-
-
-
青いハンドルを後方に引き、リバースクランプのアームのロックを解除します。
-
青いハンドルをヒンジ側に引くと、オープニングモードが解除されます。
-
吸盤を左端の中央付近に配置し、上下に1つずつ装着します。
-
リバースクランプの下部をしっかりと固定し、上部カップをしっかりと押し下げて吸盤を装着ます。
-
-
-
温めた側の真ん中から少し上辺りに、吸盤カップを取り付けます。
-
しっかりと吸盤がスクリーンに装着されるにはカップがスクリーン上に完全に平らに付いているか確認してください。
-
iPadを片手で押さえながら、背面ケースをフロントパネルのガラスから離すために吸盤カップを上部に向けて引っ張りあげます。
-
iPadのスクリーンの破損がひどい場合は、透明なパッキングテープで表面を覆うと、吸盤がうまく接着します。 または、強力なテープ(ダクトテープなど)を使用して、ハンドルに折りたたんでください。
-
-
-
-
スパッジャーの平面側先端を使って、液晶ディスプレイを指で掴めるぐらいまで押し上げてます。
-
本のページをめくるように、iPadの液晶ディスプレイを背面ケースのホームボタン側にひっくり返して、開きます。
-
液晶ディスプレイケーブルにアクセスできるように、ディスプレイを開いたままで置きます。
Pictures that better indicate the difference between the remaining adhesive and the two mylar cables (the very cables you are trying to avoid damaging!) would be much appreciated. On my unit the two were very hard to distinguish
dlcatftwin - 返信
-
-
-
ロジックボードに留められたバッテリーコネクターから2.3 mmプラスネジを1本、取り外します。
-
バッテリーを乖離したオープニングピックをロジックボードのバッテリーコネクターの下に差し込み、そのままの位置に残しておいてください。
The could recommend me since I did not put the wedge first in the connection of the battery and it heated the logic card a couple of minutes, q´l recommend to solve it since it does not turn on
The battery isolation pick didn’t come with my kit. I made my own using one of the regular picks and a pair of scissors.
Would it not be important to note that you are not really “disconnecting” the conduit of the battery from the logic board, but rather isolating the connection?
dlcatftwin - 返信
@dlcatftwin I’m not sure I understand the distinction you’re making. You are fully disconnecting the battery, by opening the circuit and wedging a big insulator in there to keep it from closing again accidentally.
Hello Jeff,
Thank you for responding. one may regard “disconnecting” as actually unplugging or unsocketing a cable connection as actually disconnecting, like in step 37. I could picture a person tugging on the pick thinking that the battery connector actually had to be lifted away from the board.
Probably over-thinking it! ;-)
Regards,
DLC
@dlcatftwin 100% on point. That’s exactly why I’m reading this comment right now. I’ve never heard of a “Battery Isolation Pick” and I was trying to get the connector loose, before realizing it wasn’t coming easy and therefore reading the comments for more info.
Ergo, there is some confusion here that should be noted in the primary instructions.
-
-
-
ディスプレイケーブルのブラケットから1.4 mmのプラスネジを3本取り外します。
-
-
-
スパッジャーの平面側先端を使って、丁寧にロジックボードからディスプレイケーブルのブラケットをまっすぐ引き上げます。
My iPad Air2 is configured differently from that in these photos. The battery connector is next to the display cable connection, and the LCD/glass panel are integral, so that they lift out of the frame together.
-
-
-
スパッジャーの平面側の先端を使って、ホームボタンリボンケーブルのZIFコネクターのタブを上向きに外します。
-
ZIFコネクターからまっすぐにホームボタンのリボンケーブルを丁寧に引っ張ります。
On reassembly take note of the flap lock on that connection. Sadly I failed to operate it correctly and now have a defunct home button.
Mussollini - 返信
-
-
-
スパッジャーの平面側先端や指の爪を使って、2本のデジタイザーケーブルコネクターを、ソケットからまっすぐ引き上げます。
When reversing with the new screen , this was the hardest part for me.
The cables needs to fit under the LCD screen, and they kept going out of place when I tried to close the screen in the end.
That meant that I had to remove the LCD again with one hand while holding the digitizer/glass with the other - all while I had already exposed the adhesives.
for me the cables of the new screen were longer that the old one. So even if i put everithing under the lcd, the digitizer didnt close properly. After everything was put back togheter, this side of the digitizer keep popping out.
Félix Naud - 返信
I do have the same problem.
Anne -
In step 41 - what is the name of the connector in the first picture which he is trying to open
It is a ZIF socket. (Zero insertion force)
Zach -
-
-
-
フロントパネルアセンブリを取り外します。
After removing the glass, I'd suggest scraping off any remaining black adhesive off of the iPad's frame. Get every speck. This may be time consuming if you have lost glass integrity and have sticky, splintered shards around the edge of the frame, but you need the frame completely clean of adhesive before you put the new front panel down or else it won't lay correctly in the frame.
This was not as hard as I expected it. I think I was lucky since the adhesive wasn’t properly working anymore, and my display wasn’t too shattered. Took me a about 40 minutes to remove the display. Unfortunately I noticed that my battery had expanded so ordered a new one, waiting for it to arrive before I put it all back together.
-
-
-
上部コンポーネントケーブルブラケットに留められた次のネジを取り外します。
-
2.0 mmプラスネジー2本
-
1.4 mmプラスネジー3本
-
-
-
スパッジャーの平面側先端を使って、丁寧にヘッドホンジャッキのリボンケーブルをロジックボードのソケットから外します。
-
再度、丁寧にこの2番目のリボンケーブルを作業の邪魔にならない位置に移動させて、さらに下に装着されているコネクターを取り出します。
-
-
-
スパッジャーの平面側先端を使って、ロジックボードのソケットからセルラーアンテナの相互接続ケーブルを外します。
I accidentally broke the 's' interconnector. where can I buy the replace? Or can i use something similar ? F.e. old antenna in other iphone ? Thank you !
Niwre Wolf - 返信
-
-
-
スパッジャーの平面側先端を使って、丁寧にセルラーアンテナの相互接続ケーブルのブラケットを引き上げて、作業の邪魔にならない位置に固定します。
I accidentally broke the 's' interconnector. where can I buy the replace? Or can i use something similar ? F.e. old antenna in other iphone ? Thank you !
Niwre Wolf - 返信
-
-
-
背面ケースの角からLightningコネクターをまっすぐ引きます。
Remove the two screws from the inside of the connector first!
Hi George, thanks for pointing that out. I believe the screws you’re talking about are removed in step 70, is that correct? Let us know if we missed some screws!
-
-
-
この手順では、バッテリーを固定している接着剤を温めて柔らかくします。より安全な代用方法は、iFixit接着剤リムーバーなどの溶剤を、バッテリーとリアケースの間に注入することです。
-
iOpenerを電子レンジで約30秒間温めます。
-
温めた iOpenerをiPad裏側の中心に載せます。バッテリーの接着剤が柔らかくなるまで、そのまま90秒間置きます。
-
iOpenerを少し右側に移して(背面カメラから外します) iOpenerをさらに90秒間置きます。
-
最後に、 iOpenerを右側の端に移して、その位置でも90秒間置いてください。
-
-
Did you skip Step 46 through 100, then this is for you: Because the logic board is still in, you will have less space to loosen the battery pack. Be extra careful not to bend it. Work from the sides that are more accessible like in Step 113 and slowly work your way underneath the battery pack to loosen it all over. As I was loosening the battery I had the heated iOpener underneath the part I was working on. This really helped a lot. And be patient. You do not want to force it.
First of all, thanks @marcelflueeler and everyone else who gave advice on skipping ahead. This is definitely the way to go if you're just changing a battery! Once you've unstuck the battery you'll find you can't pull it out because it's stuck at the terminal though. Don't try and force it here! You'll need to return to step 88 and soften the logic board adhesive so you can pry it up about a cm, then you can lift the battery terminal up and over the locking post that's holding it in place. I didn't realise this and broke a piece of plastic off the old battery terminal, which got lodged under the logic board and prevented a good battery contact until I realised and retrieved it.
-
-
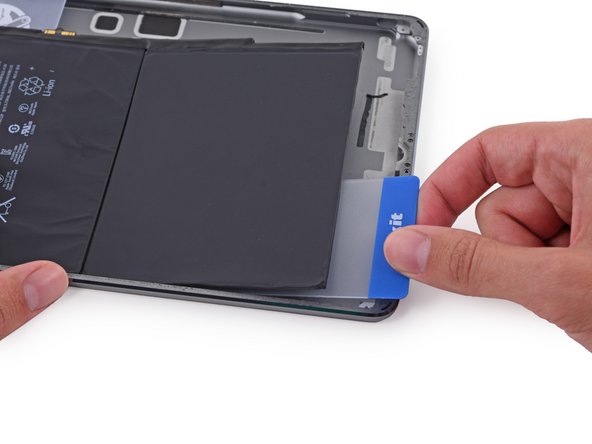
両側のカードをしっかり持ち、背面ケースからバッテリーを取り出すため、ひねりながら押し出していきます。
-
背面ケースからバッテリーを取り出します。
Finally done !
It took me nearly 3hrs, but i finally made it. Thanks for the great instructions
REASSEMBLY TIPS:
The adhesive strips that come with the iFixit battery have no labels to say which goes where. Look at them carefully and one side has a blue protective cover that runs the length of each strip. This faces up and is to be removed at the last moment when you’re ready to stick the screen down permanently. One strip has a narrowed section in the long length to clear the glass touch screen cables, so stick this one down first to avoid mistakes.
Before removing the protective strips, close the touch screen and boot the iPad. Test both cameras, wifi and speakers. (I found the rear facing camera connector hadn’t bedded properly which was easily fixed). Clean the screen and remove dust from LCD before bedding in touch screen.
The iFixit site has updated battery calibration instructions which differ from the card packed with the battery:
Charge it to 100% and keep charging it for at least 2 more hours.
Then use your device until it shuts off due to low battery.
Finally, charge it uninterrupted to 100%.
Great tip to boot the iPad before removing the adhesive from the battery. There are quite a few comments here about faulty batteries. Fortunately, mine worked just fine.
The iFixit battery replacement kit worked great! The repair guide is very good also. So glad I didn’t just try buying the battery. While testing everything after finishing the battery replacement, the digitizer, volume controls and the sleep button did not work. I was very happy when I went back in and found the cable connections had just come loose. My wife couldn’t believe I fixed her iPad.
The guide was pretty good but a few comments:
I didn’t liked the iOpener that much. I used an heat gun with good temperature control instead.
Any advice on how to remove the old glue residu would have been welcome. I used a combination of physical scraping and cleaning afterward with isopropyl alcohol.
An extra guide on how to apply the new adhesive strips would also be nice.
Fixed!....The guide is very clear and well laid out. I also had issues with the iOpener not working, I needed more heat, used heat gun with temp control. Also used floss to remove the logic board. Would have appreciated more clearer instructions on adding the adhesive strips.....Thanks
The iOpener is really bad. It isnt hot enough to keep the iPad that cools down to roomtemperature in a few seconds. I used an hair dryer which was also not warm enough but at least made it warm enough to create a gap where I was able to fit my pics under. Unfortunately my Digitizer still died. Battery works but I cannot turn off my iPad now lol
Very good guide to a very tedious project! Thank you for the detailed description of the digitizer separation. I didn’t sever any cables. The iOpener isn’t bad; it’s just too small. This project really requires the Anti-clamp, the acetone/isopropanol adhesive softener, and a heat gun that can be used at a low heat setting. I didn’t try a hair dryer, but I think that it might be too windy. Like other fixers,I skipped steps 47 thru 100 something and took my chances manhandling the battery. I opted to insulate the digitizer with Kapton tape. I only have a wide roll of Kapton, so I stuck it to the stiff plastic backing for the battery, then cut narrow strips and peeled them off the backing. Finally, I’d like to see a show of hands of the people who forgot to put in the four corner screws for the display. Maybe I’m the only one …
Laetiporus - 返信
I successfully replaced the battery in my A1954. But I stopped at step 40 and then I just pried the old battery with the plastic cards that came with the new battery and some isopropyl alcohol. Next step I pried the logic board upwards with a blue pick around the screw area. The board needs to flex upwards more than you're comfortable with in order to make room for the new battery connector to slide underneath the pick but over the screw hole underneath the logic board. I dint't really feel like gutting the entire housing of all the parts but I was risking damaging both the logic board and the new battery. So do it at your own risk.
-


デバイスを再組立する際は、これらのインストラクションを逆の順番に従って作業を進めてください。
デバイスを再組立する際は、これらのインストラクションを逆の順番に従って作業を進めてください。
10 の人々がこのガイドを完成させました。
以下の翻訳者の皆さんにお礼を申し上げます:
100%

Midori Doiさんは世界中で修理する私たちを助けてくれています! あなたも貢献してみませんか?
翻訳を始める ›


2 件のコメント
The battery replacement went off without a hitch, I’ll be honest, at step 50 I started to look at things with a real tech eye. I stopped disconnecting and removing components and took my hairdryer to the back, the battery came up quite easily so I stopped, popped in the new battery right then. After reconnecting everything, using iso to clean the lcd and inside glass, I “dry fit” everything back together, powered it up… nice. Completed new adhesive install and all is good.
Great tutorial, but if you have a good tech background, you can knock off an hour and do it in just over an hour. PS - Hair dryer is a must - take your time on this, once you get past the initial opening of the left side, the rest is a breeze.