
Xbox Oneワイヤレスコントローラーのサムスティックの交換
はじめに
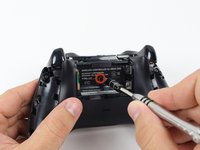
手順 1 に進むこのガイドはあなたのサムスティックを交換するのを助けます。 壊れたサムスティックを持っているなら、このガイドはまさにあなたのためにあります。


-
-
サイドハンドルを外すため、コントローラーをしっかりと握ります。スパッジャーをフロントとハンドルプレートの間にできた隙間に差し込みます。
-
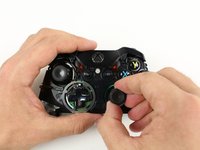
スパッジャーを前後に動かしながら、フロントプレートからサイドプレートを外します。サイドプレートの隙間全体にスパッジャーを動かして作業を進めてください。
-
-


デバイスを組み立て直すには、これらの手順を逆の順序で実行してください。
デバイスを組み立て直すには、これらの手順を逆の順序で実行してください。
192 の人々がこのガイドを完成させました。
以下の翻訳者の皆さんにお礼を申し上げます:
100%


これらの翻訳者の方々は世界を修理する私たちのサポートをしてくれています。 あなたも貢献してみませんか?
翻訳を始める ›
チーム

Cal Poly, Team 20-15, Maness Winter 2015 Cal Poly, Team 20-15, Maness Winter 2015人のメンバー
CPSU-MANESS-W15S20G15
5 メンバー
54のガイドは作成済み
31 件のコメント
Is there any advice for a controller that has had this repair, but continues to drift? I have done this repair successfully many times, and now i have a controller that (with 2 different replacement parts) continues to drift.
Is there a reset or config I can do?
Drift issues are a different problem you would need to solder a new joystick box to fix that this is for loose or damaged thumb sticks
I used a cotton ball on my Xbox one Elite to fix drifting issues.
ajcroyle -
Does anyone know the correct SKU for the joystick box for the Model 1537 in particular? And any link to purchase it. Thanks
ZuYao -
Can i apply 2 thumbsticks off the xbox 360 controller when i removed them?