メインコンテンツにスキップ

Samsung Galaxy S22+ Battery Replacement

必要な工具と部品

  1. Samsung Galaxy S22+ Battery Replacement, Heat the bottom edge: 手順 1、 1の画像 1
    • Prepare an iOpener and apply it to the bottom edge of the back cover for three minutes to loosen the adhesive underneath.

    • A hair dryer, heat gun, or hot plate may also be used, but be careful not to overheat the phone—the display and internal battery are both susceptible to heat damage.

  2. Samsung Galaxy S22+ Battery Replacement, Insert an opening pick: 手順 2、 3の画像 1 Samsung Galaxy S22+ Battery Replacement, Insert an opening pick: 手順 2、 3の画像 2 Samsung Galaxy S22+ Battery Replacement, Insert an opening pick: 手順 2、 3の画像 3
    • Secure a suction handle to the bottom edge of the back cover, as close to the edge as possible.

    • If the back cover is cracked, the suction handle may not stick. Try lifting it with strong tape, or superglue the suction handle in place and allow it to dry so you can proceed.

    • Lift the back cover with the suction handle to create a small gap between the back cover and the frame.

    • If you have trouble creating a gap, apply more heat to further soften the adhesive. Follow the iOpener instructions to avoid overheating.

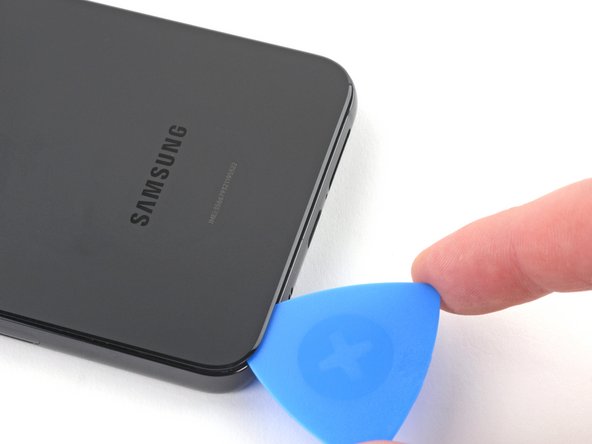
    • Insert an opening pick into the gap you created.

  3. Samsung Galaxy S22+ Battery Replacement, Slice the bottom adhesive: 手順 3、 3の画像 1 Samsung Galaxy S22+ Battery Replacement, Slice the bottom adhesive: 手順 3、 3の画像 2 Samsung Galaxy S22+ Battery Replacement, Slice the bottom adhesive: 手順 3、 3の画像 3
    • Remove the suction handle.

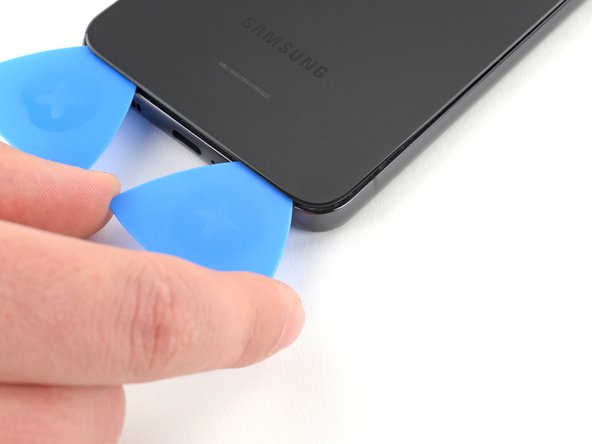
    • Slide the opening pick along the bottom edge to slice the adhesive.

    • If the adhesive becomes hard to cut, it has most likely cooled down. Use your iOpener for two to three minutes to reheat it.

    • Leave the opening pick inserted near the bottom left corner to prevent the adhesive from resealing.

  4. Samsung Galaxy S22+ Battery Replacement, Heat the left edge: 手順 4、 1の画像 1
    • Apply the heated iOpener to the left edge of the phone for 3 minutes to soften the adhesive.

    • Reheat your iOpener for 30 seconds if necessary.

    • Be careful not to overheat the iOpener. Overheating may cause the iOpener to burst.

    • A properly heated iOpener should stay warm for up to 10 minutes.

  5. Samsung Galaxy S22+ Battery Replacement, Slice the left adhesive: 手順 5、 3の画像 1 Samsung Galaxy S22+ Battery Replacement, Slice the left adhesive: 手順 5、 3の画像 2 Samsung Galaxy S22+ Battery Replacement, Slice the left adhesive: 手順 5、 3の画像 3
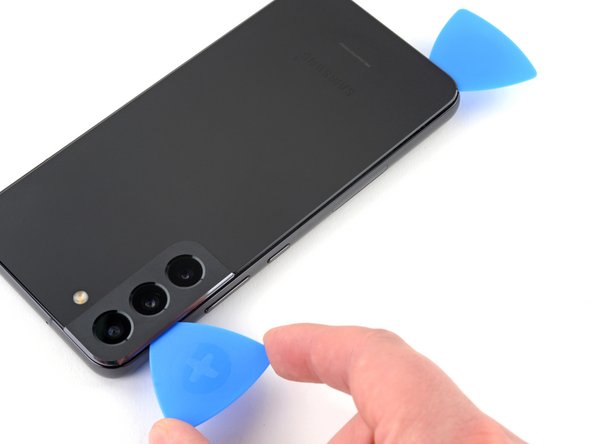
    • Insert a second opening pick into the gap created near the bottom left corner.

    • Don't insert the opening pick more than 5 mm, or you risk damaging cables near the camera module.

    • Slide the opening pick along the left edge to slice the adhesive.

    • Leave the opening pick inserted near the top left corner to prevent the adhesive from resealing.

  6. Samsung Galaxy S22+ Battery Replacement: 手順 6、 1の画像 1
    • Apply your heated iOpener to the right edge of the phone for 3 minutes to soften the adhesive.

    • Reheat your iOpener for 30 seconds if necessary.

    • Be careful not to overheat the iOpener. Overheating may cause the iOpener to burst.

    • A properly heated iOpener should stay warm for up to 10 minutes.

  7. Samsung Galaxy S22+ Battery Replacement: 手順 7、 3の画像 1 Samsung Galaxy S22+ Battery Replacement: 手順 7、 3の画像 2 Samsung Galaxy S22+ Battery Replacement: 手順 7、 3の画像 3
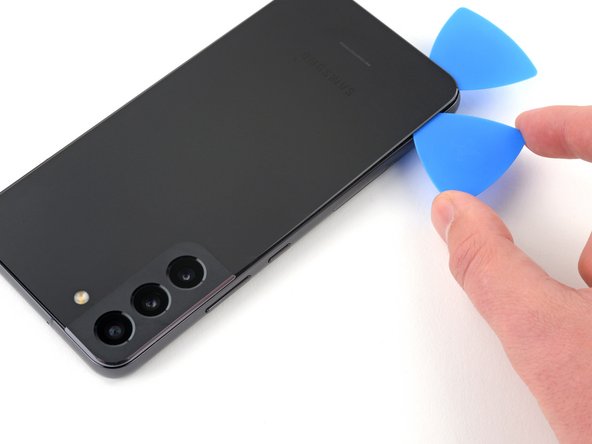
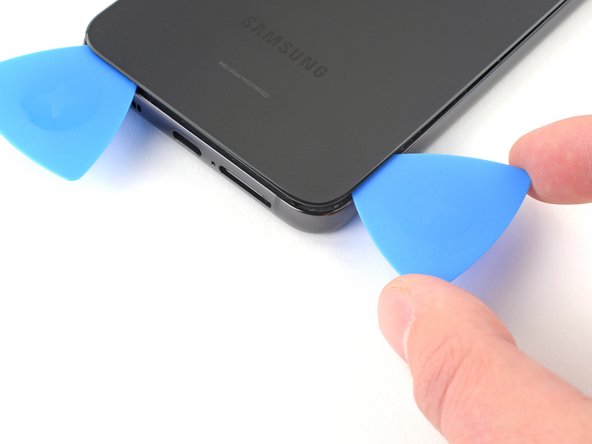
    • Insert a third opening pick into the gap created along the bottom edge.

    • Slide the opening pick around the bottom right corner of the back cover to slice the adhesive.

  8. Samsung Galaxy S22+ Battery Replacement: 手順 8、 2の画像 1 Samsung Galaxy S22+ Battery Replacement: 手順 8、 2の画像 2
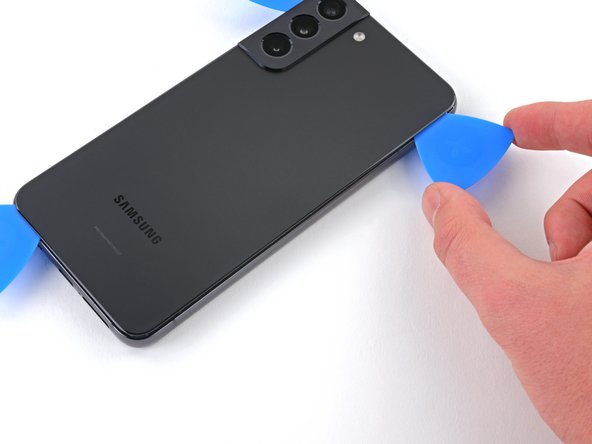
    • Continue sliding the opening pick up along the right edge of the back cover to slice the adhesive.

    • Don't insert the opening pick more than 5 mm to avoid damaging any internal components.

    • Leave the opening pick inserted near the top right corner to prevent the adhesive from resealing.

  9. Samsung Galaxy S22+ Battery Replacement: 手順 9、 1の画像 1
    • Apply your heated iOpener to the top edge of the phone for 3 minutes to soften the adhesive.

    • Reheat your iOpener for 30 seconds if necessary.

    • Be careful not to overheat the iOpener. Overheating may cause the iOpener to burst.

    • A properly heated iOpener should stay warm for up to 10 minutes.

  10. Samsung Galaxy S22+ Battery Replacement: 手順 10、 3の画像 1 Samsung Galaxy S22+ Battery Replacement: 手順 10、 3の画像 2 Samsung Galaxy S22+ Battery Replacement: 手順 10、 3の画像 3
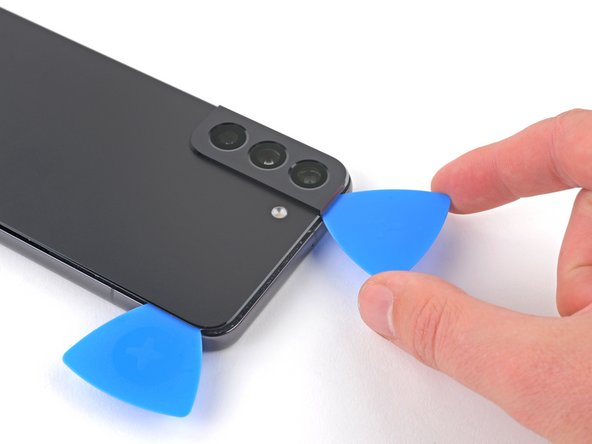
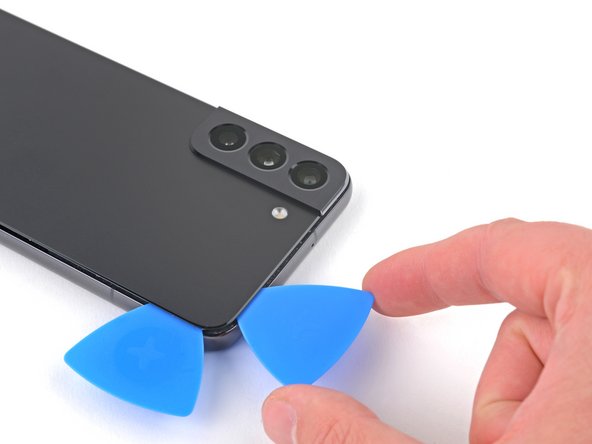
    • Slide the opening pick in the top left corner across the top edge to separate the remaining adhesive.

    • Don't insert the pick more than 5 mm to avoid damaging or smearing the rear cameras and flash.

  11. Samsung Galaxy S22+ Battery Replacement: 手順 11、 2の画像 1 Samsung Galaxy S22+ Battery Replacement: 手順 11、 2の画像 2
    • Remove the back cover.

    • During reassembly:

    • This is a good point to power on your phone and test all functions before sealing it up. Be sure to power your phone back down completely before you continue working.

    • Remove any adhesive chunks with a pair of tweezers or your fingers. Apply heat if you're having trouble separating the adhesive.

    • If you're using Samsung custom-cut adhesives, follow this guide.

    • If you're using double-sided tape, follow this guide.

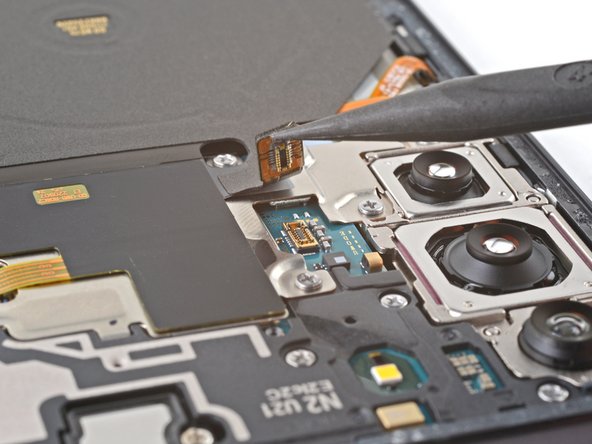
  12. Samsung Galaxy S22+ Battery Replacement, Disconnect the wireless charging coil: 手順 12、 2の画像 1 Samsung Galaxy S22+ Battery Replacement, Disconnect the wireless charging coil: 手順 12、 2の画像 2
    • Use the pointed end of your spudger to pry up and disconnect the charging coil's press connector from the motherboard.

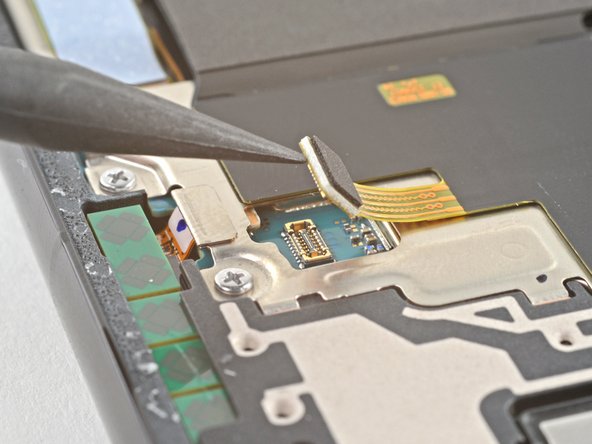
  13. Samsung Galaxy S22+ Battery Replacement, Disconnect the NFC antenna: 手順 13、 2の画像 1 Samsung Galaxy S22+ Battery Replacement, Disconnect the NFC antenna: 手順 13、 2の画像 2
    • Use the pointed end of your spudger to pry up and disconnect the NFC antenna cable from the motherboard.

  14. Samsung Galaxy S22+ Battery Replacement, Identify your screws: 手順 14、 1の画像 1
    • If you're using the Samsung Self Repair Kit, take a moment to identify your screws and label them accordingly:

    • Label the bag with the most screws and the colored bag #3428.

    • Label the clear bag with two screws #3229.

  15. Samsung Galaxy S22+ Battery Replacement, Unscrew the charging coil: 手順 15、 1の画像 1
    • Use your Phillips screwdriver to remove the six 3.5 mm screws securing the charging coil.

    • If you're reassembling with the Samsung Self-Repair kit, be sure to replace the screws with new ones labeled #3428.

  16. Samsung Galaxy S22+ Battery Replacement, Unscrew the loudspeaker: 手順 16、 1の画像 1
    • Use your Phillips screwdriver to remove the seven 3.5 mm screws securing the loudspeaker.

    • If you're reassembling with the Samsung Self-Repair kit, be sure to replace the screws with new ones labeled #3428.

  17. Samsung Galaxy S22+ Battery Replacement, Free the loudspeaker: 手順 17、 2の画像 1 Samsung Galaxy S22+ Battery Replacement, Free the loudspeaker: 手順 17、 2の画像 2
    • Insert your spudger in between the left edge of the loudspeaker and the frame.

    • Pry up to disconnect the clips securing the loudspeaker.

    • Be careful to not separate the loudspeaker from the charging coil.

    • During reassembly, press the loudspeaker into the frame until the clips engage.

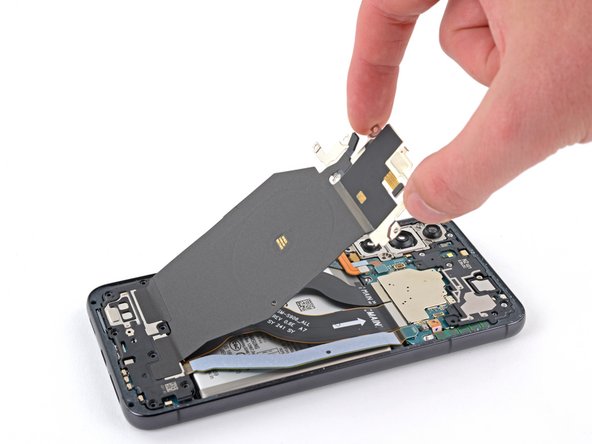
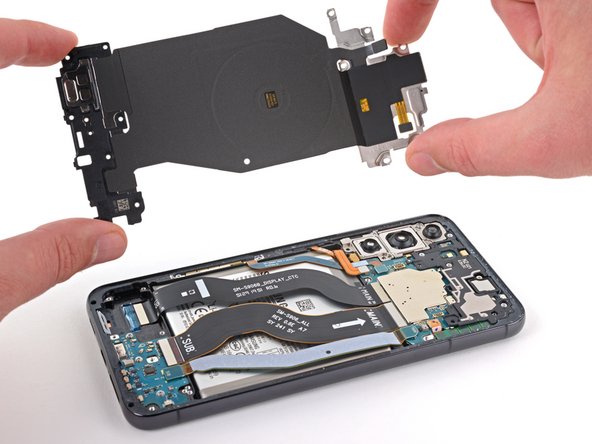
  18. Samsung Galaxy S22+ Battery Replacement, Remove the charging coil & NFC antenna assembly: 手順 18、 3の画像 1 Samsung Galaxy S22+ Battery Replacement, Remove the charging coil & NFC antenna assembly: 手順 18、 3の画像 2 Samsung Galaxy S22+ Battery Replacement, Remove the charging coil & NFC antenna assembly: 手順 18、 3の画像 3
    • Gently remove the charging coil & NFC antenna assembly.

    • Do not separate the charging coil from the loudspeaker.

  19. Samsung Galaxy S22+ Battery Replacement, Disconnect the battery: 手順 19、 2の画像 1 Samsung Galaxy S22+ Battery Replacement, Disconnect the battery: 手順 19、 2の画像 2
    • Use the pointed end of your spudger to pry up and disconnect the battery press connector.

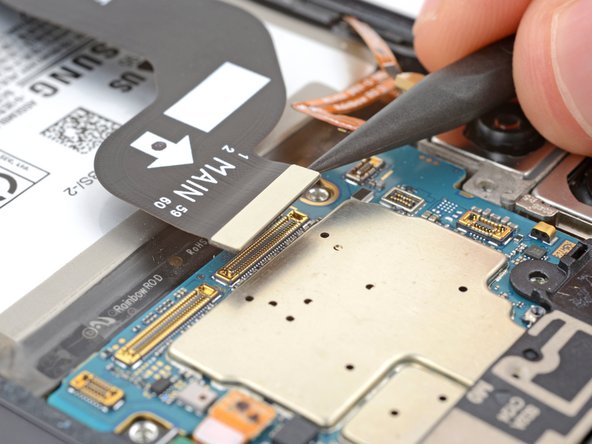
  20. Samsung Galaxy S22+ Battery Replacement, Disconnect the interconnect cables: 手順 20、 3の画像 1 Samsung Galaxy S22+ Battery Replacement, Disconnect the interconnect cables: 手順 20、 3の画像 2 Samsung Galaxy S22+ Battery Replacement, Disconnect the interconnect cables: 手順 20、 3の画像 3
    • Use the pointed end of your spudger to pry up and disconnect both interconnect cables from the motherboard.

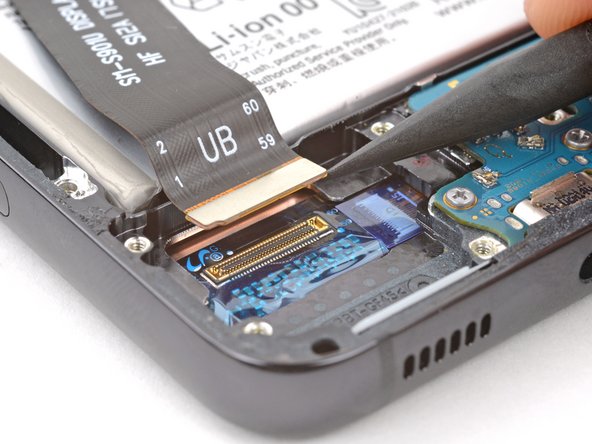
  21. Samsung Galaxy S22+ Battery Replacement: 手順 21、 3の画像 1 Samsung Galaxy S22+ Battery Replacement: 手順 21、 3の画像 2 Samsung Galaxy S22+ Battery Replacement: 手順 21、 3の画像 3
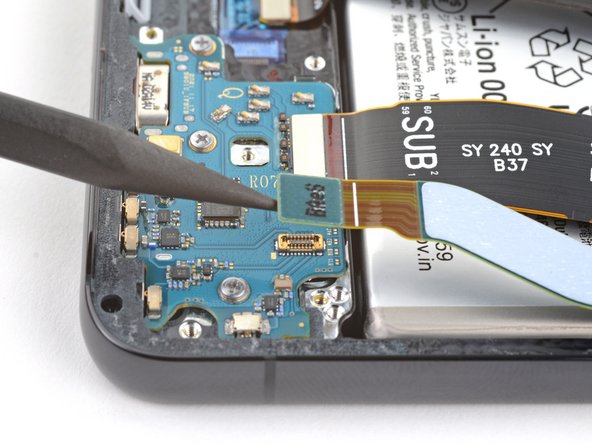
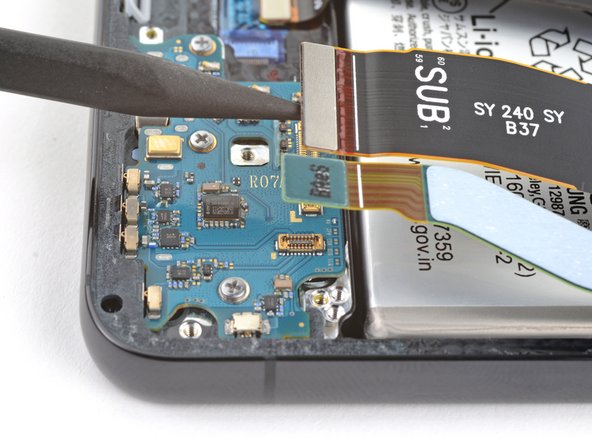
    • Use the pointed end of your spudger to pry up and disconnect both interconnect cables from the charging board.

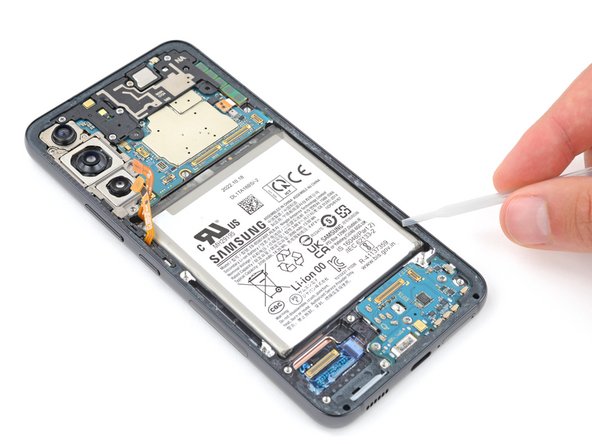
  22. Samsung Galaxy S22+ Battery Replacement, Remove the interconnect cables: 手順 22、 3の画像 1 Samsung Galaxy S22+ Battery Replacement, Remove the interconnect cables: 手順 22、 3の画像 2 Samsung Galaxy S22+ Battery Replacement, Remove the interconnect cables: 手順 22、 3の画像 3
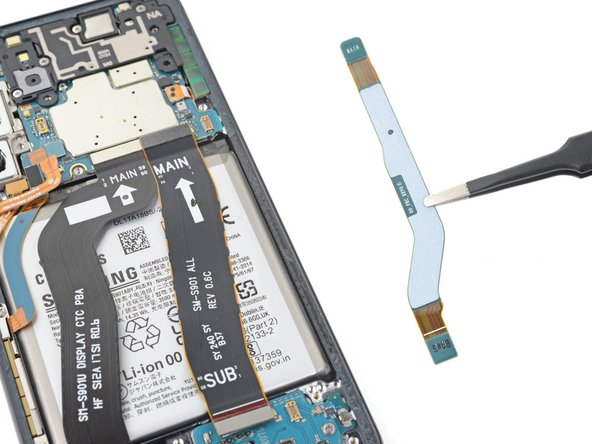
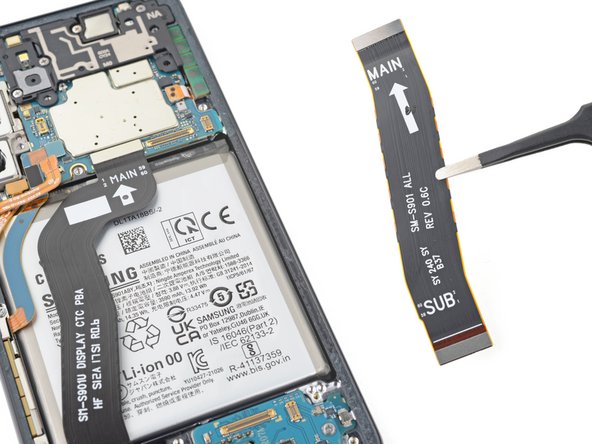
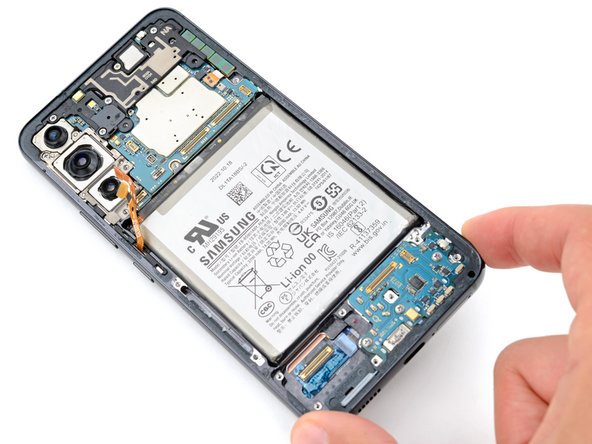
    • Grab and remove the two interconnect cables from the frame.

    • During reassembly, orient the cables so the "main" ends are toward the top of the phone and the "sub" ends are toward the bottom.

  23. Samsung Galaxy S22+ Battery Replacement, Disconnect the power and volume buttons: 手順 23、 2の画像 1 Samsung Galaxy S22+ Battery Replacement, Disconnect the power and volume buttons: 手順 23、 2の画像 2
    • Use the pointed end of your spudger to pry up and disconnect the power and volume button press connector.

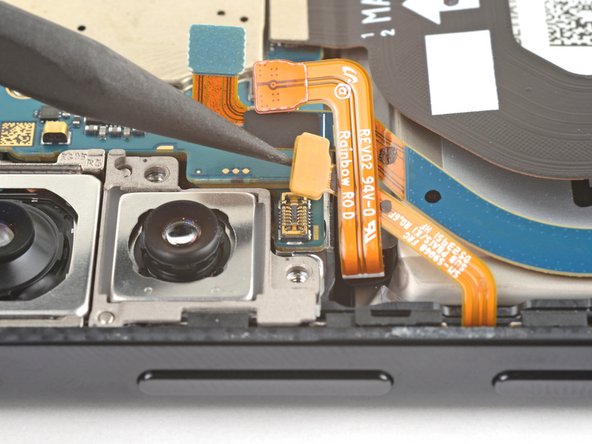
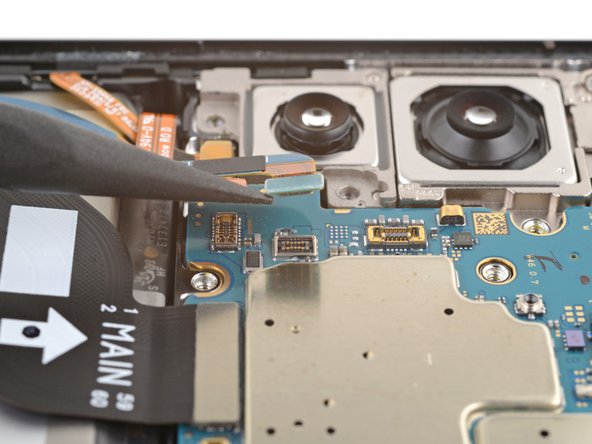
  24. Samsung Galaxy S22+ Battery Replacement, Disconnect the left 5G mmWave antenna: 手順 24、 2の画像 1 Samsung Galaxy S22+ Battery Replacement, Disconnect the left 5G mmWave antenna: 手順 24、 2の画像 2
    • Use the pointed end of your spudger to pry up and disconnect the left 5G mmWave antenna press connector.

    • During reassembly, make sure this cable and the power and volume button cable are under the battery cable.

  25. Samsung Galaxy S22+ Battery Replacement, Unfasten the antenna: 手順 25、 1の画像 1
    • Use your Phillips screwdriver to remove the two 3.5 mm‑long screws securing the left 5G mmWave antenna.

  26. Samsung Galaxy S22+ Battery Replacement, Remove the antenna: 手順 26、 3の画像 1 Samsung Galaxy S22+ Battery Replacement, Remove the antenna: 手順 26、 3の画像 2 Samsung Galaxy S22+ Battery Replacement, Remove the antenna: 手順 26、 3の画像 3
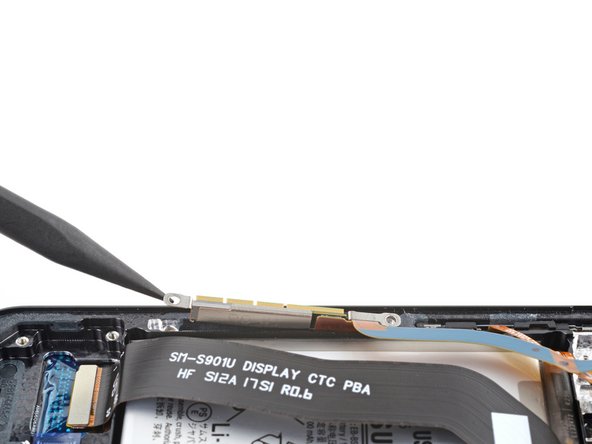
    • Insert the pointed end of your spudger between the lower screw mount of the antenna bracket and the frame.

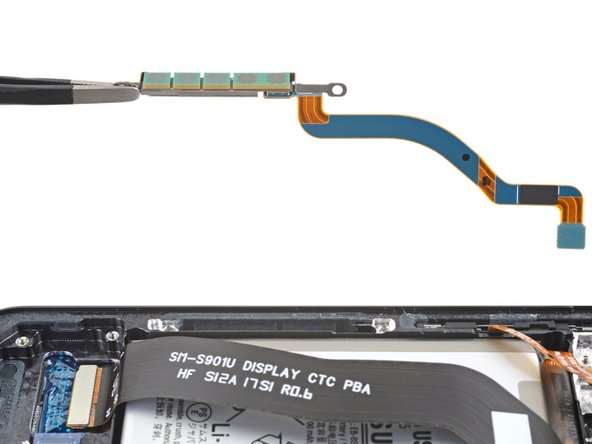
    • Pry up on the bracket until you can grab it with blunt nose tweezers or your fingers.

    • Remove the left 5G mmWave antenna.

  27. Samsung Galaxy S22+ Battery Replacement, Disconnect the screen cable: 手順 27、 2の画像 1 Samsung Galaxy S22+ Battery Replacement, Disconnect the screen cable: 手順 27、 2の画像 2
    • Use the pointed end of your spudger to pry up and disconnect the screen press connector from the motherboard.

  28. Samsung Galaxy S22+ Battery Replacement: 手順 28、 2の画像 1 Samsung Galaxy S22+ Battery Replacement: 手順 28、 2の画像 2
    • Use the pointed end of your spudger to pry up and disconnect the screen press connector from the bottom left corner of the phone.

  29. Samsung Galaxy S22+ Battery Replacement, Remove the screen cable: 手順 29、 1の画像 1
    • Remove the screen cable.

  30. Samsung Galaxy S22+ Battery Replacement, Apply isopropyl alcohol: 手順 30、 3の画像 1 Samsung Galaxy S22+ Battery Replacement, Apply isopropyl alcohol: 手順 30、 3の画像 2 Samsung Galaxy S22+ Battery Replacement, Apply isopropyl alcohol: 手順 30、 3の画像 3
    • Strong adhesive secures the battery to the frame.

    • Use a pipette or syringe to apply a few drops of highly-concentrated isopropyl alcohol (greater than 90%) between the right edge of the battery and frame.

    • Elevate the right edge of the phone for one minute to allow the isopropyl alcohol to flow under the battery and soften the adhesive.

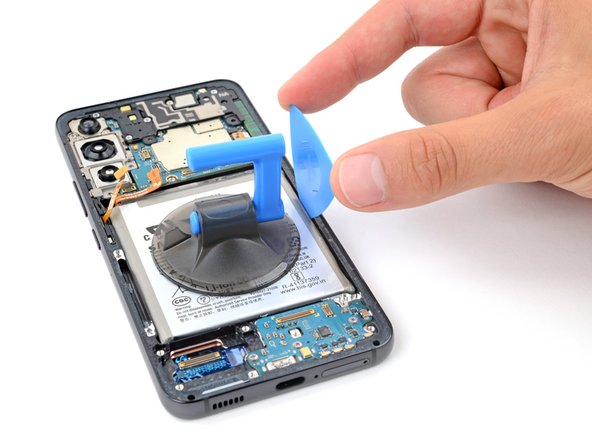
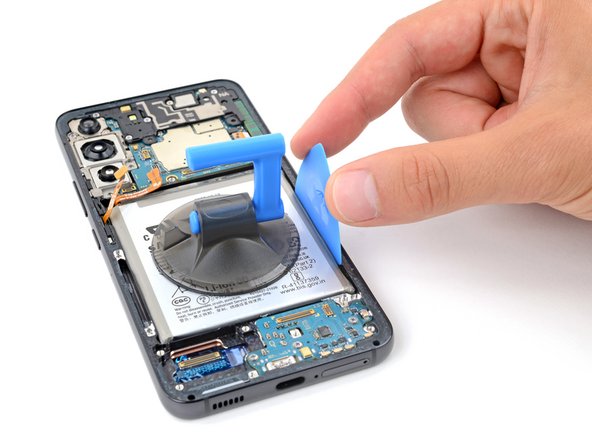
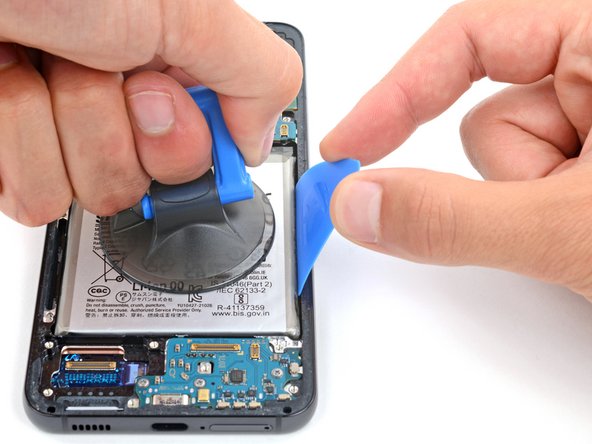
  31. Samsung Galaxy S22+ Battery Replacement, Separate the battery adhesive: 手順 31、 3の画像 1 Samsung Galaxy S22+ Battery Replacement, Separate the battery adhesive: 手順 31、 3の画像 2 Samsung Galaxy S22+ Battery Replacement, Separate the battery adhesive: 手順 31、 3の画像 3
    • Take care not to puncture the battery—it can leak dangerous chemicals and/or catch fire.

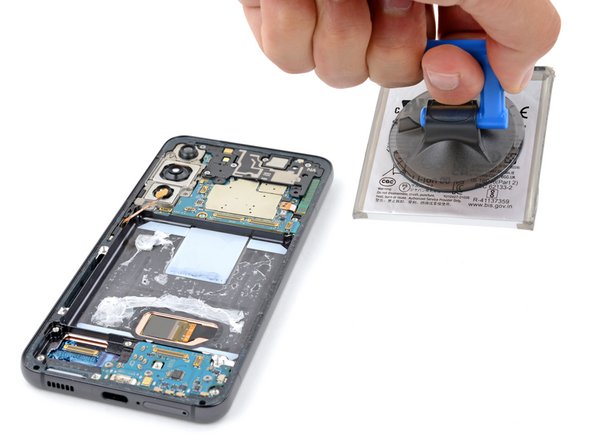
    • Apply a suction cup to the battery, as close to the center of the right edge as possible.

    • Insert the tip of an opening pick between the right edge of the battery and frame.

    • Push the opening pick down and rotate it so the long end is between the battery and frame.

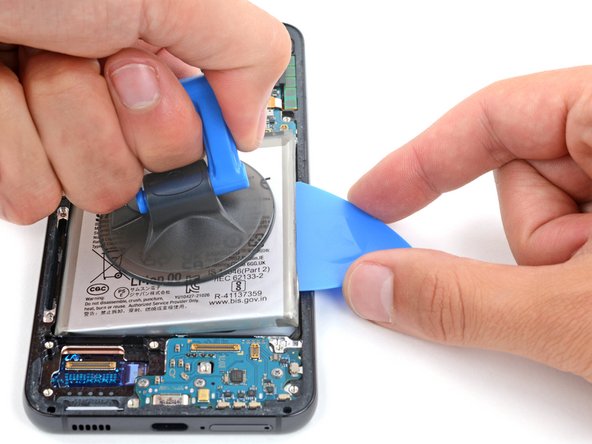
  32. Samsung Galaxy S22+ Battery Replacement: 手順 32、 3の画像 1 Samsung Galaxy S22+ Battery Replacement: 手順 32、 3の画像 2 Samsung Galaxy S22+ Battery Replacement: 手順 32、 3の画像 3
    • Take care not to crease or bend the battery—it can leak dangerous chemicals and/or catch fire.

    • Pull up on the suction cup with strong, steady force while prying the battery up with the opening pick.

    • Maintain constant pressure on the pick and suction cup until the battery separates from the frame.

    • Be patient and allow time for the adhesive to separate. If the battery doesn't budge, apply a few more drops of isopropyl alcohol and try again.

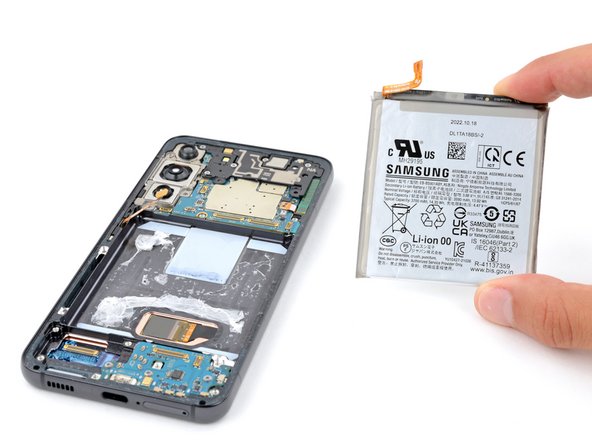
  33. Samsung Galaxy S22+ Battery Replacement, Remove the battery: 手順 33、 3の画像 1 Samsung Galaxy S22+ Battery Replacement, Remove the battery: 手順 33、 3の画像 2 Samsung Galaxy S22+ Battery Replacement, Remove the battery: 手順 33、 3の画像 3
終わりに

To reassemble your device, follow these instructions in reverse order.

For optimal performance, calibrate your newly installed battery after completing this guide.

Take your e-waste to an R2 or e-Stewards certified recycler.

Repair didn’t go as planned? Try some basic troubleshooting, or ask our Answers community for help.

作成者

1人の作成者と共同作成されました。

Spencer Day

メンバー登録日: 09/14/22

53,280 ポイント

389のガイドは作成済み

チーム

iFixit iFixit人のメンバー

Staff

135 メンバー

17,146のガイドは作成済み

0 件のコメント

コメントを追加

統計データ:

過去 24時間: 14

過去 7 日: 87

過去 30 日: 415

今までの合計 2,241