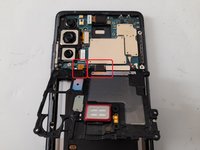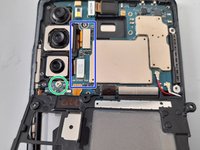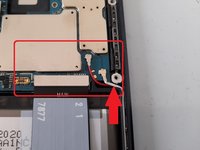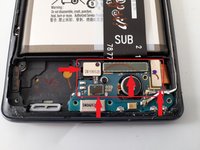
Samsung Galaxy S20 FE (SM-G780F) Display Assembly Replacement
はじめに
手順 1 に進むUse this guide to replace a cracked or broken screen on a Samsung Galaxy S20 FE.
Note: In this guide we will be transferring components to a new screen and frame assembly. If your screen does not come with the frame preinstalled then this procedure will not work.
Note: For this repair we will be removing the battery and transferring it to the new screen assembly. If your battery is swollen, take appropriate precautions. Before opening your phone, discharge your battery to 25% or lower. The battery could catch fire and/or explode if punctured.
Please also refer to the video provided below. It is helpful if the photos aren’t enough.
必要な工具と部品
修理キット
キットには、修理ガイドを完了するために必要な全ての部品とツールが含まれています。
パーツ
ツール
もっと見る
ビデオの概要
-
-
Remove the SIM Tray before attempting to remove the internal components.
-
-
-
Heat up the back cover with a heat gun
-
Slide a thin plastic tool between the back cover and mid frame to work the adhesive loose. Work around the whole frame to release the back cover.
-
-
-
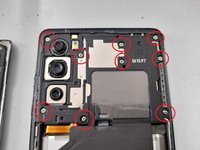
Remove the 9 screws holding the antenna module in place, but do not try to remove the module itself yet.
-
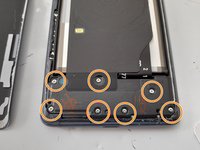
Remove the 7 screws holding the lower portion of the plastic protective cover in place on the bottom of the phone
-
-
-
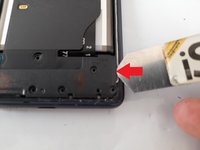
Insert a thin pry tool in the side of the lower plastic cover to release it.
-
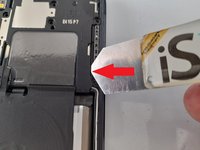
Insert a thin tool in the side of the antenna module to loosen it, but do not pull it off yet.
-
Fold the antenna module over towards the battery.
-
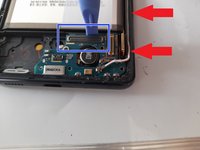
Underneath there is the battery connector and a connector for the antenna module. Use a spudger to pry both of these off and remove the antenna module.
-
-
-
-
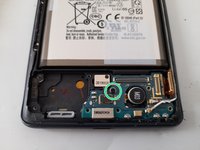
Use a spudger to release the rear camera and remove it from its housing.
-
Using a Philips screwdriver, remove the retaining screw for the mainboard.
-
Use a spudger to release the cable connecting the mainboard and sub-board.
-
The red and white cables can also be pried free, without needing to remove the connectors from the mainboard itself.
-
-
-
Use a spudger to remover the connectors for the display, fingerprint sensor and main-sub board. Pry the fingerprint sensor from the side to release and remove it.
-
Remove the retaining screw for the sub-board.
-
Use a spudger to pry the sub-board loose. Once loose, pry the cables up to release them from the channel going up the side of the frame.
-
-
-
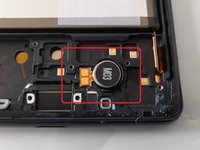
Use a heat gun on the front side of the display to loosen the adhesive holding the vibrator motor in place.
-
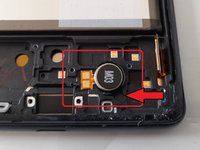
Once heated, insert a small flat tool at the five o'clock position to pry the motor loose.
-
-
-
Remove the two screws holding this part in place.
-
Transfer this to the new frame.
-
-
-
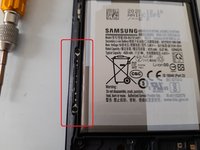
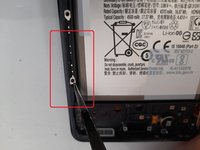
Use a heat gun and heat up the front side of the display to loosen the adhesive holding the battery in place.
-
Insert a thin, flat, flexible tool to release the adhesive between the battery and frame. Work along the side of the battery and eventually it will start to come loose.
-
Once one side is free, you can do the same on the other side and should be able to life the battery up and out.
-
Before sealing everything back up, test the phone to see if it's working. If it's in good shape, congratulations!
Need some more help? Try the answers forum.
Before sealing everything back up, test the phone to see if it's working. If it's in good shape, congratulations!
Need some more help? Try the answers forum.
42 の人々がこのガイドを完成させました。
10ガイドコメント
how to remove screen lol?
This guide is for replacing the screen ASSEMBLY. If you want to replace just the OLED, you came to the wrong place. And if you have to ask this question, you should probably not attempt to do it.
NebukadV -
It wos amezing thanks
Thank you for this guide, very helpful. However after swapping screens the phone runs slower and less responsive with the new screen, any ideas?
set motion refresh to high in display settings, it probably reverted to 60hz when it detected a new screen
Tommy -


