
Nintendo Wii の外付けケースの交換

はじめに
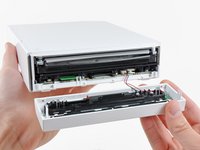
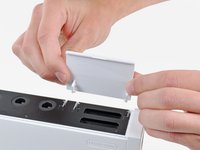
手順 1 に進むこのガイドを使ってWiiの内部システムを保護している白色のプラスチック製外付けケースを取り外します。外付けケースを取り外す際は、トライウイングネジ用のドライバーが必要です。


-
-
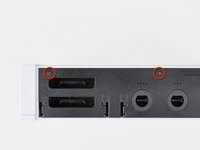
取り外したケースの下に隠れている、8.3 mm トライポイントネジを2本外します。
1/16 x 1 craftsman Phillips mini screwdriver works for this if you don’t have the tri-wing driver
I am using a 18ct empty egg carton to hold the screws/parts removed in the steps.
Larry’s idea about the bins was great and helpful.
Robots is right- you NEED a Y1. Just buy the thing with the drive. I didn’t, tried many other options, none worked. Had to order the thing separately with shipping. Mistake….
David Ryan - 返信
My two screws hidden are on the backend of the Wii. This picture shows them on the front.
I had to hold the tri point driver in a vice-grip to get the leverage to get these screws out
-
-
-
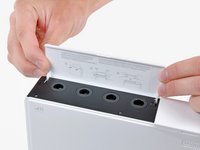
フェイスプレート付近のコントローラーポートドア下に付けられた5.9 mm プラスネジを1本外します。
-
-
-
メタル製スパッジャーを使って、DVDドライブ挿入口付近の下側にあるゴム足を外します。
All of the rubber feet on my very old Wii had literally melted into a gooey mess and just needed to be scraper off and cleaned with alcohol.
Bob Robins - 返信
-
-
-
今取り出したゴム足の下に隠れた、5.9 mmプラスネジを1本外します。
please help! my lil sis got a disc stuck in my wii while it was off!!! please help fast!!!
Leah Vegan - 返信
does it turn on?
-
-
-
この手順で使用する道具:Tweezers$4.99
-
Wiiの正面からフェイスプレートを丁寧に引き離します。
-
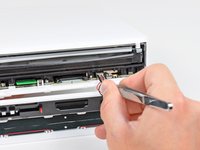
ピンセットを使ってLEDケーブルのプラスチックコネクターを基板から外します。
-
フェイスプレートを取り外します。
surprisingly, this was the trickiest step for me. I almost completely mangled the wires when my tweezers slipped as I was attempting to remove the connector.
I removed it with a spudger, gently lift from each side until it pops out.
For those reassembling
line up the pins push it in with your spudger gently until it's in. Then line up the front plate, push gently, confirm everything is where it should be and push firmly, I found it needed a strong push to sit flush with the other body panels.
I ended up using needle nose pliars on this step.
Awesome detailed guide made this very easy, thank you author!
Can someone direct me to what I need to do? My tweezers slipped and I cut one of the wires on the connector. Where can I find a new Y plug for the wii?
This was the hardest part for me. I tried using my fingernails, two different tweezers, and needle nose pliers, but I ended up cutting both the wires. Anyway, I put some electric tape over the exposed wires and just reassembled the system. Funny thing is that the LED still works and I have not noticed any difference. I'm not sure what those wires did, but they seem to not be important.
For people still wondering after all these years, :), The connector is for the blue leds around the dvd when loading and unloading a disk.
Niels -
I also broke off the flimsy wires at the connector. To NOT break the wires, alternate pressing on the right and left sides of the connector with a small flathead screwdriver. Be patient, it will eventually work itself free. There isn't enough to grab onto with the tweezers and you'll only succeed in having them slip off, grab the wires, and yank the wires out.
Good news is that if you do rip out the wires, no worries... I didn't reconnect them and the unit works just fine. I have no idea what those wires are even for. Power LED continues to work no problem.
This guide is really marvellous - works a treat. But I would definitely recommend needle nose pliers for this step rather than tweezers. It's really easy if you use pliers and potentially damaging if not, and you get it wrong. I had one sniff at it with tweezers then immediate nipped out to the garage for my pliers!
Needlenose pliers did the trick for us!
Needlenose pliers did it for us!
You can save yourself some trouble at this point and skip the rest of the disassembly: See that green tab to the left of the sd card slot? THAT’S the wifi board (and that green tab, in hindsight, seems designed to make it accessible without taking apart the whole device, don’t you think?) A little careful spudging, and you’ve got it out, ready to replace! (There’s a guy who shows the process on youtube, if you want to review first)
I got the connector out ok thanks to the suggestions here, but I couldn’t figure out how to reattach it. In the end, I just kind of threw it in and it worked fine.
Very clear instructions - thanks! Faceplate needed replacing after one of my son’s friends accidentally kicked it across the room. $10 bucks to fix, thanks to ebay and these instructions. I’d never heard of a “tri-wing” screw before.
I just left the connector alone and kept it connected while working on it. There is enough wire to allow you to do what you need if you are just careful not to snag it on anything.
I, too, left the connector attached and just took care that the loose faceplate did not stretch the (not crucial) wire when moving rest of the Wii.
This was the trickiest part, I almost broke the wires using tweezers and pliers, so instead use a flat end screwdriver to pry it out, when putting it back in use needlenose pliers to start it then use your fingernail to go the rest of the way.
Anyone know of a method to replace the connector if you end up breaking the wires? Bits of wire are stuck in the white plastic connector, so I'm wondering if I can buy a connector online somewhere without replacing the whole face plate. Thanks :)
Bronze Owl - 返信
I severed both wires. If you want to avoid removing the connector, you can lengthen the two wires by unserpentining them from the wire holder that's in the cover.
Make sure there is no SD card in your unit before pulling this off, otherwise it'll get stuck and you could snap your sd card in half!
-
-
-
コントローラーのポートカバーが黒色コントローラーのポートベゼルに対して垂直になるように開きます。
-
コントローラーのポートカバーを外付けケースから外すため、真っ直ぐ引き上げます。
I wasn't able to reassemble the socket covers when I reversed this step..
While disassembling, I did as instructed pulling the covers upwards when they where perpendicular to the black cover plate but Nintendos instructions says to open the covers (so that they are perpendicular to the black cover plate) and then gently push the covers towards the console with your fingers on the outside of the cover opposite side of the hinges so that the cover hinges will pop out and then lift it up..
I'm not sure, but I think ignoring Nintendos instructions caused the hinge sockets to break for me, so replacing the controller/memory card socket covers will not work.
When reassembling, the cover can be placed perpendicular to the black cover plate and rest on the plastic hinge with a few millimeters between the cover and the console, and then they can be pushed down to click in place. But in my case they keep falling all the way down since there's no resistance and nothing to click into.
-
-
-
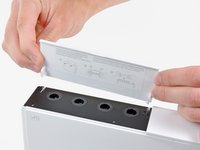
黒色プラスチック製コントローラーのポートベゼルの上部端に沿って留められた、4.1 mm プラスネジを2本外します。
-
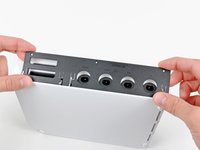
ベゼルをコントローラーポートから反対側の長い先端から持ち上げます。そしてベゼルをWiiから取り外します。
The 3rd hole is in step 3.
The bezel is the flat black plate. Removing the three screws that secure it allows you to remove it. If your cube is like mine, this plate likes where it lives and, even with the screws removed, managed to stay in situ without anything holding it.
Beware. The edge of the bezel, opposite these screws, has clips. Lift the bezel from the top edge, where the the screws are, to avoid breaking these clips.
-
-
-
次のネジを外します。
-
5 mmプラスネジー2本
-
8.2 mmトライポイントネジー1本
Instead of the Phillips screw on the left I had a very small one under a cover to the left of that!
-
-
-
先ほど取り出したゴム足の下に隠れている8.2 mmトライポイントネジを2本外します。
had a little trouble with theses screws. they were just barely too deep for my 54pies bit driver kit to reach. I ended up inserting a small wad of paper into the shaft of my driver so the tri-wing bit stuck out far enough to engage the screw. (I used the tweezers to remove the paper when I was done) :)
I can confirm, this works fantasticly!
Thank you
When putting the screws back in hold the tip still with the screw and carefully drop it in.
When i tried it didn't work. But i did get it to work with blu tack instead as it holds better. It was alot harder to remove though.
Thank you rbelknap, this is excellent advice for those using the ifixit branded driver.
You could also use the 4mm nut driver in the iFixit kit to turn the tri-wing driver. This will give you a little more reach.
How is no one talking about the included 4mm nut driver trick at Edward Tucker mentioned?! That is genius! Thanks mate!
Zabuza -
That's the idea that I needed. Agree with Zabuza.
cwdick -
Bingo. All of the other comments were unnecessary.
Because it doesn't come with the screw driver in the kit. Only has the tri wing and the cross tips.
This paper wad trick totally worked for me too!
Standard Tri-Wing bits will NOT fit into the holes. Make sure that you get one of the tool kits from iFixit (I just ordered the Mako Driver/Bit kit with 64 bits ) - the Tri-Wing bits in this kit have a narrow shaft that allows it to reach deep into narrow holes like these on the Wii . (Disclaimer - I have no association with iFixit).
dave whale - 返信
I just sawed off a bit of the shank holder from the iFixit tool, in order for the bit to go deep enough into the case.
The tool still works fine.
The 4mm driver was the exact fix for this problem, no mods necessary
put a little gorilla tap around the shaft of the driver, that was the trick for me to get it to reach down
SmokeyBare - 返信
-
-
-
Wii本体から外付けケースを真っ直ぐ持ち上げて外します。
This step could use at least another picture from the backside so it's clearer what comes up and what stays down.
I used a spudger around the edges of the outer case to gently ease it upward since I could not lift it out with my fingers. Then it came right out.
Good tip. Having, in the past, broken pieces that required a little persuasion, I attempted to "lift" the outer case, but it wouldn't budge. Using the spudger to persuade it worked like a charm. Also added this suggestion to Step 18 "Lift the drive shield."
hey marko that really helped me thanks\. als if you need help figuring which side is up, its the one with the nintendo engraving on it
Aryan Garg - 返信
A fan filter fell out at this step how do you put it back?
Edit: I figured it out it was from the side intake vent. Just line up the two notches with the pegs in the case to hold it in place
This is an awful guide
Yeah. I don't know why most of the official ifixit guides suck.
-


デバイスを再組み立てする際は、これらのインストラクションを逆の順番に従って作業を進めてください。
デバイスを再組み立てする際は、これらのインストラクションを逆の順番に従って作業を進めてください。
39 の人々がこのガイドを完成させました。
以下の翻訳者の皆さんにお礼を申し上げます:
100%

Midori Doiさんは世界中で修理する私たちを助けてくれています! あなたも貢献してみませんか?
翻訳を始める ›

4 件のコメント
Ugh, I went and purchased an iFixit Essential Electronics Toolkit and the Tri-wing screwdriver is too small! Y000 is what it says on the box, time to return this purchase.
Unfortunately this guide stops half way through and doesn’t include the other side of the case, which involves quite a few screws as the motherboard is screwed down in quite a few places, and the cpu heatsink has to come up, it’s much more complicated than this.
yes i would love if the poster edited the guide and made it so it could be used as a "reshell" guide because i am considering purchaseing a lower condition wii and reshelling it in another color
Sqwerks -
Die Abdeckungen sind geklebt, stecken also nicht.
Ludger - 返信
Don’t mistakenly remove the rubber case feet
Bob Trout - 返信
I just did. That picture could be better.
B G -
Thanks I almost removed the rubber feet
Lushane - 返信
If you’re wondering what to use for this, the main blade of a pocket knife from the corner of the plastic works well.
Cameron Holman - 返信
As you remove the hardware in each step, place them together on a sheet of paper and circle them with the step number.
Tom J - 返信
Very helpful suggestion, thanks!
Christopher Reese -
Caution: Before you begin disassembly. If possible, power on your Wii, and attempt to eject whatever disk you may have in the drive.
Steve - 返信
1:
I'd recommend removing the RTC Battery before starting to completely remove all power. You can see how in step 15.
2:
When removing the screw covers I'd recommend inserting tweezers in the bottom corners facing away from the rubber feet.
When the tweezers are inserted you should push them down to grab on to the cover and pull it off.
Macro Man - 返信