はじめに
Moto Z2 Playのバッテリー容量が急速に低下する状態が続く場合は、バッテリーが破損している可能性があります。 バッテリーが充電器に長時間置かれたままになっていたり、または古くなって消耗したため、バッテリーの寿命が近づいています。 このガイドでは、Moto Z2 Playのバッテリーの交換方法について詳しく説明しています。 バッテリーを交換するには、ヒートガン(またはヘアードライヤー)、プラスチックの開口ツール、吸盤カップ、プラスチックカード、およびピンセットが必要です。
バッテリーが膨張している場合は、適切な方法で処理してください。
必要な工具と部品
-
-
-
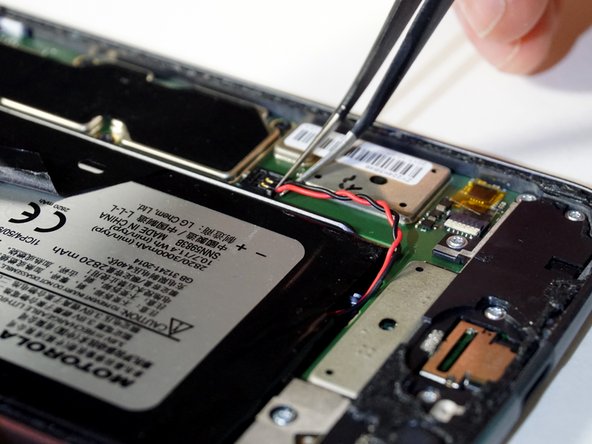
赤色と黒色のバッテリーワイヤを、ピンセットで持ち上げて外します。
-
-
-
デバイスから完全にバッテリーを持ち上げて取り出します。
Why can't they just go back to the phones where you can snap off the back and simply replace the battery? I'm afraid to do it myself and Verizon won't do it for me. Now I have to find someone whom I will have to pay to replace a battery. This is ridiculous. It should not be so difficult to replace a battery and I should not have to jeopardize my phone to replace a battery. Why? Sorry, I just needed to vent. I miss simplicity.
I agree
I agree with both of you guys, but it’s the breaking point between performance, convenience, and safety. Older phones had batteries with hard protective casings that wouldn’t leave them vulnerable to pocket-fire if your keys jammed the battery.
Unfortunately, with phones getting more powerful(requiring a higher-capacity battery), AND slimmer, the protective casing for the battery is literally the casing on the phone. Look at the battery above; it could easily be pierced and dangerously vent.
I’m with you in wishing I could just pop a spare in, but those days have passed. =/
Mike Ponce - 返信
I suggest NOT to do this. Followed the directions exactly, with the slight deviation of my cable into the battery crumbling so I carefully pulled out the lose pieces with the tweezers and had NO problem putting it back together. My phone was WORKING with the exploded, puffy battery with NO deficits. Now? No charging (but checked it with the multi-meter so I know it is not the fault of the new battery). Only reaction I get is the phone making a vibrating sound when I plug it in to charge. Will NOT turn on. Will NOT react. F*CKED.
Without knowing what I was getting into I ordered a replacement battery, toolkit, and screen adhesive. Thanks to this guide I was actually able to remove the screen, replace the battery, and get it sealed back up relatively easily. Definitely nerve-wracking as I haven’t attempted anything like this before, but my phone was at the end of the battery life so I figured why not give it a shot.
Thank you for the easy instructions!
i followed the guide step by step, but unfortunately i touched the lcd in one place ... with the result that the screen went KO can i fix it somehow?
erryedelia - 返信
-


以下の翻訳者の皆さんにお礼を申し上げます:
100%

Midori Doiさんは世界中で修理する私たちを助けてくれています! あなたも貢献してみませんか?
翻訳を始める ›

チーム

Cal Poly, Team S19-G5, Livingston Winter 2018 Cal Poly, Team S19-G5, Livingston Winter 2018人のメンバー
CPSU-LIVINGSTON-W18S19G5
4 メンバー
30のガイドは作成済み
11 件のコメント
Great instructions, clear and concise.
thank you
so now that I've heated the adhesive to get the screen off do I need to apply new adhesive? or simply reheat it?
Hi Eli,
The most ideal option would be to replace the adhesive. This ensures the best chance for your phone to stay sealed. You can re-use the existing adhesive and it may work well enough for awhile.
Pretty good guide altogether. The only thing I’d add is some more detail on the heating phase, as far as temperature, adhesive depth, strength etc. Don’t want someone putting a heatgun on max temp and using it on their screen for 3 mins, ya know?
Thanks for making it really straightforward though.
Total fail. Used an iOpener but could not judge how hot it needed to be to soften the adhesive nor how firmly it can be pried/pulled without damage. Ended up with multiple internal cracks in the screen. Tried finishing the repair anyway, couldn’t tell how far the flat-flex cables needed to be inserted into their sockets to make a good connection. Pix in the guide are not clear enough to tell, and I neglected to take my own photos.
Oh well, so much for repair. Kid got a new phone out of the deal, the Z2P is headed for the landfill.
Finished the guide , battery works well, only problem I encoutered was my own hastines with prying the screen out. On the right side near the fingerprint sensor i went too deep with the pryer and tore the flex cable. Now I am waiting for the new one. So I’ll update when it comes and I change it.
Can the battery be replaced with a larger one or is it too tight.
Great guide - thank you 😊
Andrew Lea - 返信