はじめに
Motorola Moto Z2 Force の消耗したバッテリーを交換するには、これらの修理ガイドを参照してください。
作業を始める前に、デバイスをバックアップして問題にソフトウェアもしくはハードウェアにあるのかを判断するために、Rescue and Smart Assistantをインストールしてください。
安全のため、ラップトップを解体する前にバッテリー残量を25%以下に放電してください。これにより、修理中に誤ってバッテリーを損傷した場合、熱に伴う危険な事故の発生リスクを軽減することができます。バッテリーが膨張している場合は、 適切な方法で処理を行ってください。
警告: このデバイスのスクリーンアセンブリは、分解中に分割する可能性がある頑丈なミッドフレームと柔軟なプラスチックディスプレイで構成されています。また、ディスプレイに過度の熱が加わると、気泡が生じたり、ゆがんだりすることがあります。スクリーンアセンブリを再利用する場合は、すべての警告に注意し、ディスプレイに熱を加えないでください。
必要な工具と部品
-
-
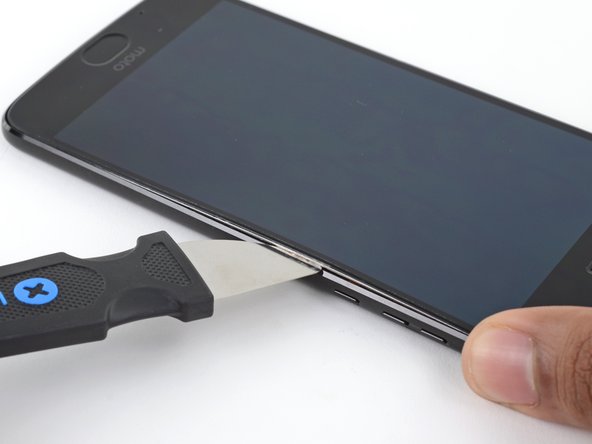
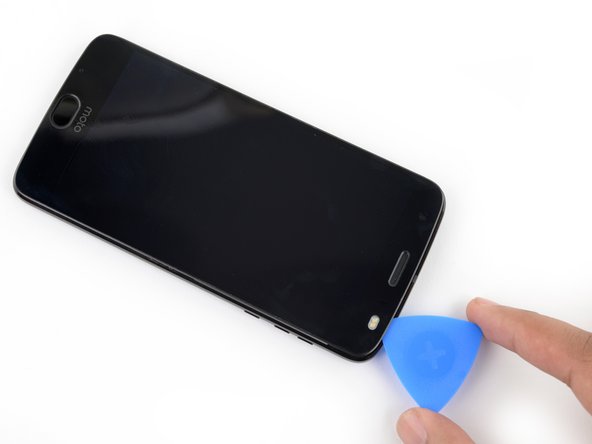
スクリーンアセンブリの側面をデバイスのフレームから切り離す際、それを固定している5つの金属クリップを外す必要があります。
-
これらのクリップのうち3つはデバイスの左側に、2つは右側に配置されています。
-
クリップを完全に外すには、オープニング・ピックを使ってこれらのクリップを外してください。
-
このクリップの周囲にオープニングピックを慎重に滑らせるか、クリップの片側にピックを置いたまま、反対側を別のピックでこじ開けます。
-
-
-
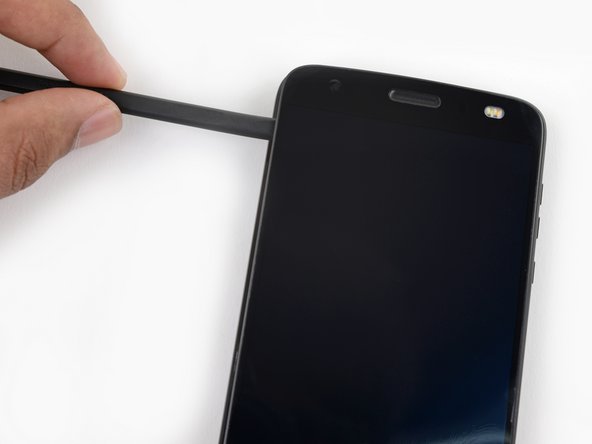
プラスチック製ディスプレイの右側と金属製フレームの間、電話のサイドボタンの近くに、Jimmyなどの金属製の道具を差し込みます。
-
ジムニーを下方に傾けながら、隙間に深く押し込み続け、スクリーンアセンブリの右側をこじ開けます。
No — *slaps wrist* No. Bad steps! Don’t use the suction cup at all, ever. It causes the two layers to separate immediately, long before the frame clips give way to let the screen come off.
I’m being super ultra very careful with this second attempt on a new device (that was in pretty pristine condition, if I can keep it that way!), and right when I tried pulling as instructed, the screen layers started to pull apart. Use a blade shoved into the edge of the phone and pry it apart, releasing the latches in the process!
I have to agree with Matt above. At the smallest bit of pressure on the suction cup, the screen de-laminated from the metal base. It still “works”, but….
None of the tools in the kit is terribly suited for getting in there and prying that clip apart without splitting the screen.
lease Read the Comments poste on “STEP 2”, When you apply the heat, the screen becomes unglued from the metal fram that it is attached to. I ended up damaging my screen. You need to make sure that what is coming unglued is the metal, and not just the plastic screen. I found out when I saw another video, where they do not apply heat, they just use a tool to pry the frame-display assembly… But apparently it was too late… You should be more specific about the warning…
A jimmy does not come with the kit. Buy one before beginning this procedure. It is the best way to lift the screen assembly without damaging the assembly.
This whole guide has been rewritten since my last comment, and I super appreciate it. The steps are now much more appropriate and less likely to cause damage. Jamming your Jimmy (huehue) into the edge of the screen is actually quite a good idea, not likely to hit anything as there’s nothing but body underneath it.
-
-
-
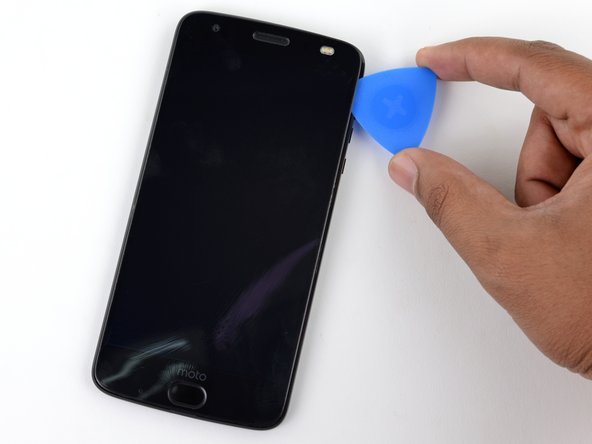
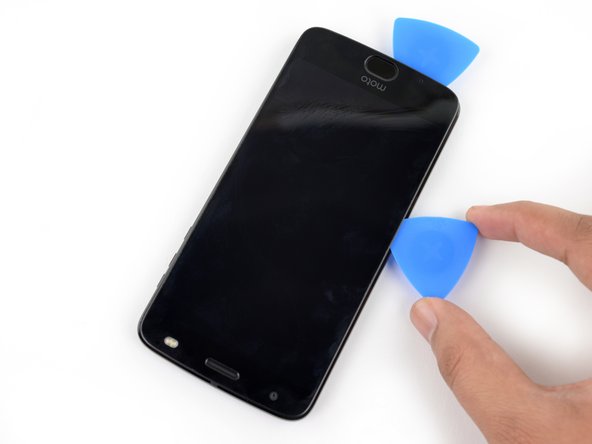
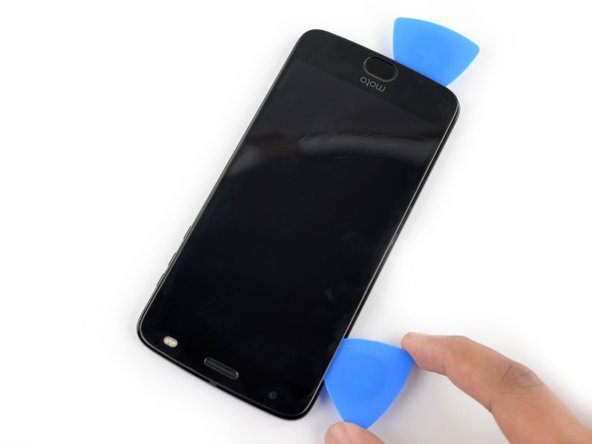
オープニングピックをデバイスの右側全体に沿ってスライドさせ、スクリーンアセンブリを固定しているクリップと接着剤を外します。
this is really for the digitizer and screen replacement. there are still more steps for just the screen.
There is an enormous amount of adhesive sticking this thing together. As the adhesive is not essential (it holds together with clips, mostly), you really need to focus on *removing* the adhesive, so that it doesn’t stretch and bunch-up, preventing clean reassembly. Leave behind the adhesive that you can prevent from bunching-up (by cleanly breaking it, in turn by holding down one edge to the phone or screen), so you have some sticky left, but just make sure it’s not bunched-up.
Revisiting this comment a year later: there’s now replacement adhesive available (or maybe there always was - wish I knew!) for this model in the iFixit store. So, it would be best to remove the adhesive whereever you see it, cleaning everything up and preparing for the new adhesive. That darn adhesive in step 9 below, though… ugh. Work slow, don’t expect it to all be apart by this point.
-
-
-
-
スクリーン・アセンブリを固定する2つの大きな粘着パッドが上端近くにありますが、すでに切開した箇所から4mmよりさらに先にはあります。
-
正面を向きセンサーアレイとケーブルは、右の粘着パッチを上と右から取り囲んでいるため、上端や右端からこじったり切ったりするとケーブルを損傷する恐れがあります。次の手順では、左端から接着剤を切り離す方法を説明します。
This is a tricky part. See the biggest red-squared section in the photo above? That part always wants to detach — the adhesive to the screen is stronger than the molding that holds the metal into the plastic. The metal will detach from the plastic pretty easily, and there’s no way to get that metal back into the plastic frame (as it seems to have been molded as a single part). So, the adhesive is a booby-trap.
To defuse the booby-trap, heat the heck out of it, insert one end of tweezers (or perhaps a spudger) from the right side, hold the metal plate down, and verrry slooowwly convince the adhesive to separate. At some point, it’ll start cascading and snap free.
The metal finger area, between the two red squared sections above, also is a problem area — it’s latched into a frame above the battery, and those latches can get pulled up on top of the frame, preventing the phone from reassembling clean and flat. Make sure to re-insert those tabs so that little edge with the metal fingers sits flat and proper.
-
-
-
スクリーン・アセンブリの左上隅の下にできるだけ深くオープニングピックを挿入し、接着剤の左側のパッチを切開します。
I found that a plastic card inserted from the left side, and worked with a sawing motion, between the screen and the adhesive worked great after the adhesive was softened by the alcohol.
-
-
-
スクリーンアセンブリの左端の下に、スパッジャーの平面側先端をゆっくりと注意深く滑らせる。徐々に深く挿入し、アセンブリの上端をこじあけ、接着剤の右側のパッチを剥がします。
Again, pay careful attention to the strong block of adhesive sticking the display to a metal shield that’s molded into the plastic frame - the adhesive strength is quite likely to pull out the metal shield from the plastic frame and there’s no going back from that. Not as catastrophic as ripping a ribbon cable, but still pretty bad. See my comment a couple photos up about that.
I added some alcohol directly to the adhesive patches on this side of the phone and waited a couple of minutes before continuing with this step.
-
-
-
スクリーンアセンブリを右側端から持ち上げて、本をめくるように開きます。左下端のシャーシとまだ接続していますので、完全に外さないでください。
-
スクリーンアセンブリがまだ接着剤で固定されていて、うまく外れない場合は、必要に応じて接着剤を切開してください。
Do this only after slicing all the little ribbons of adhesive that hang around - and clean up any gummed-up, bunched-up strands of adhesive after removing it. I worked at detaching adhesive until the screen was totally free, only held by the ribbon cable, before moving on from this step.
-
-
-
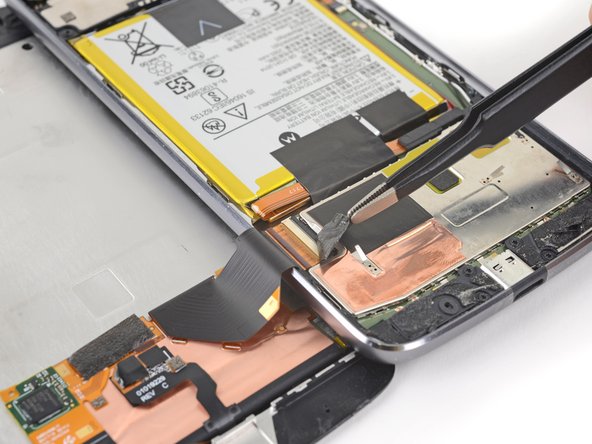
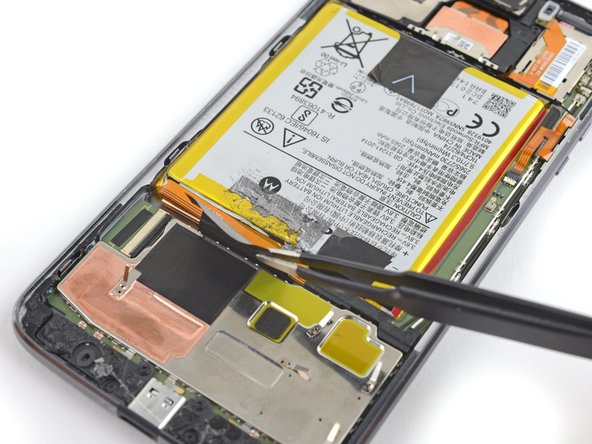
ピンセットを使って、バッテリーコネクタを覆っているテープの黒い部分を外します。
-
-
-
スクリーンアセンブリを外します。
When reconnecting the display ribbon I found it much easier if you straighten out major 45/90 degree bend that is in the middle of the ribbon until the entire ribbon is all unbent and in parallel with the display face. You will then have a straight shot into the connector without having to hold the display at a 90 degree angle to the chassis and then having to look around, over or through the display to (and if luck is with you) find, lineup and insert the ribbon into the connector. You have to do a little in 3 dimensional thinking to re-bend the ribbon and line the display back up with the chassis but if you’ve made it that far then you should have no problems. Don’t bend the ribbon back and forth too many times.
-
-
-
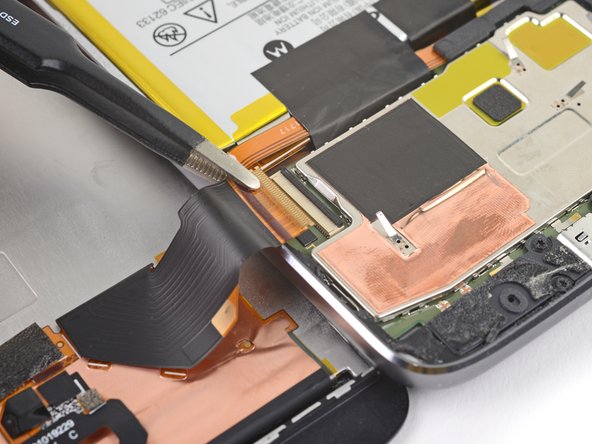
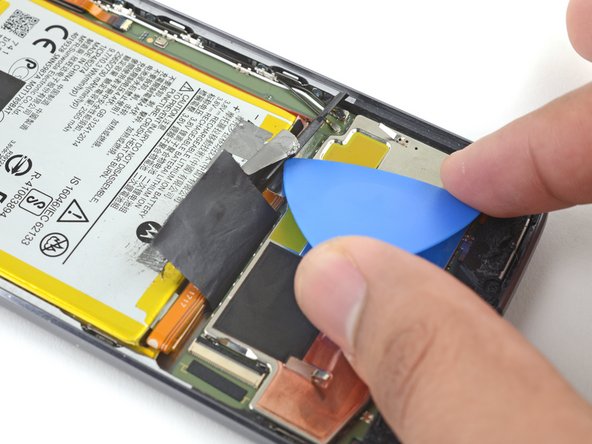
バッテリーコネクターを覆っている小さな黒いブラケットを、オープニングピックでこじ開けます。少量の接着剤で固定されています。
-
ピンセットもしくは指でブラケットを外します。
-
-
-
加熱したてのiOpenerをバッテリーの裏側に2分間当てて、接着剤を柔らかくします。必要に応じてiOpenerを再加熱し、再度温めてください。
-
または、バッテリーの縁の下に高濃度(90%以上)のイソプロピルアルコールを塗布し、下の接着剤を弱めます。
-
-
-
バッテリー左端にプラスチックのオープニングピックを差し込みます。トランプカードでも利用できます。
-
バッテリーをゆっくりと一定の力でこじ開けます。
-
バッテリーを変形さないように、ゆっくりとバッテリーの接着剤を剥がすようにしてください。バッテリーが変形し始めたら、もっとゆっくりこじ開けるか、さらい熱もしくはイソプロピルアルコールを加えます。何度か熱やアルコールを加える必要があるかもしれません。
-
ゆっくりとピックをバッテリーの下に入れ、バッテリーが接着剤から完全に外れるまでこじ開けます。
-


オリジナルのパーツと交換用パーツをよく見比べてください。交換用パーツに付いていない残りのコンポーネントや接着シールなどは、インストールする前に新パーツに移植する必要があります。
デバイスを再組み立てするには、これらのインストラクションを逆の順番に従って作業を進めてください。
パフォマンスの最適化のために、この修理ガイドを完了した後、新しくインストールしたバッテリーのキャリブレーションを行なってください。
e-wasteを処理する場合は、認可済みリサイクルセンターR2を通じて廃棄してください。
修理がうまく進みませんか?このモデルのアンサーフォーラムを参照してください。
オリジナルのパーツと交換用パーツをよく見比べてください。交換用パーツに付いていない残りのコンポーネントや接着シールなどは、インストールする前に新パーツに移植する必要があります。
デバイスを再組み立てするには、これらのインストラクションを逆の順番に従って作業を進めてください。
パフォマンスの最適化のために、この修理ガイドを完了した後、新しくインストールしたバッテリーのキャリブレーションを行なってください。
e-wasteを処理する場合は、認可済みリサイクルセンターR2を通じて廃棄してください。
修理がうまく進みませんか?このモデルのアンサーフォーラムを参照してください。
16 の人々がこのガイドを完成させました。
以下の翻訳者の皆さんにお礼を申し上げます:
100%

Midori Doiさんは世界中で修理する私たちを助けてくれています! あなたも貢献してみませんか?
翻訳を始める ›

14 件のコメント
Anyone knows where to get the lcd glue/tape/adhesive?
I got everything out, got a new battery, the screen works but the touchscreen doesn’t, anyone had the same problem?
Wow! This guide is way, way improved vs last week’s version! Nice work, Tarun! I picked up a “bad IMEI” copy of my Z2 Force on eBay to replace the damaged screen, and I’ll step my way through this when transplanting the screen. Thanks!
Please Read the Comments poste on “STEP 2”, When you apply the heat, the screen becomes unglued from the metal fram that it is attached to. I ended up damaging my screen. You need to make sure that what is coming unglued is the metal, and not just the plastic screen. I found out when I saw another video, where they do not apply heat, they just use a tool to pry the frame-display assembly… But apparently it was too late… You should be more specific about the warning…
I saw that video (i think it’s the same) on youtube too and it is misleading. It looks like they already removed the screen and did a second take for the video. There is no way the screen can be removed without heat. My phone was bulging and separated on the left side which gave me room to put the pick in but the adhesive was too strong to continue removing the entire screen. Once I used the iopener the pick was able to separate the screen without issue. I just moved slowly and didn’t use too much force.
jon -
Worked great! Thanks for the instructions. One must be patient and work slowly to separate the screen from the frame and since the screen is plastic it’ll take the iopener longer for heat to conduct through to the adhesive. I initially used the 90 minute rule on the iopener instructions but that wasn’t enough. I reread the OP’s instructions and used the two minute rule which worked great.
Add to Instructions: Remove all adhesive, especially around the perimeter, using the spudger or tip prior to reassembly. It’s very thin so be diligent. If you’re not careful, you’ll end up doubling up tape and the screen won’t sit flush. The precut display adhesive pattern only applies to the perimeter so make sure to cut additional adhesive for the areas at the top and bottom. Compare the screen adhesive pattern and you can see what areas that need the additional adhesive.
I used aluminum foil tape to re-adhere the conductive tape to the new battery. This tape is used to seal ventilation ducts for furnaces and AC systems.
Worked but almost damaged my screen. I have just a small black spot on one edge, that does not affect usability. I didn't had to remove the main board to remove the battery. When the camera was disassembled, I had enough space to go under the battery carefully with the spudger step by step and removed it without bending the battery.
I agree that the plastic card is the best tool to use for lifting the battery. It worked great with 2 minutes of the iOpener and a little alcohol. I used a gentle blower to dry the alcohol before reassembly. I found the entire process took about 40 minutes from start until I had books sitting on the phone to anchor the display and the charger plugged in to bring the battery up for the calibration.
Thanks for this guide….everything appears to bee working after putting it all back together. Now to see if replacing the battery fixes the random “where’s the battery?” screens I was getting. Note: I have an iOpener but never used it. Used 99% alcohol a few times to loosen the adhesive and that did the trick. Thoroughly cleaned the old adhesive round the edges and tried to preserve the adhesive patches at the top. With the replacement adhesive in the battery kit…phone looks like it was never taken apart.
Old phone gets new battery and it is working fine. Everything went as described. Tip: be sure to read the extra comments for each step to make things even easier. The hardest part for me was breaking the adhesive grip tape that seals and secures the perimeter between the case and display. Suggest you take your time, working slowly as eventually they do separate with damaging anything.
Ive done the screen and battery. Have you guys encountered boot looping with replacing them?
And if so how did you fix the bootloop. Using oem battery. I do not want to hard wipe it
Abe Arslan - 返信