メインコンテンツにスキップ
Magellan RoadMate 5236T-LM Battery Replacement

Magellan RoadMate 5236T-LM Battery Replacement

Felix Muwanguzi

Felix Muwanguzi とその他 2 人の作成者

最終更新日: December 22, 2016

15 - 20 分
中レベル
おすすめの学生による修理ガイド

In this replacement guide you're going to learn how to replace a faulty battery. It's important to go to the trouble shooting page first in order to know that you need to replace the battery and it's not some other issue that you actually need to solve first.

必要な工具と部品

ツール

もっと見る

  1. Magellan RoadMate 5236T-LM Battery Replacement, Back Cover: 手順 1、 3の画像 1 Magellan RoadMate 5236T-LM Battery Replacement, Back Cover: 手順 1、 3の画像 2 Magellan RoadMate 5236T-LM Battery Replacement, Back Cover: 手順 1、 3の画像 3
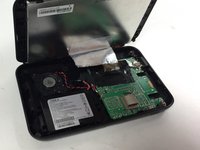
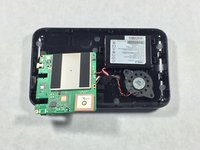
    • Place the device face down on a flat surface.

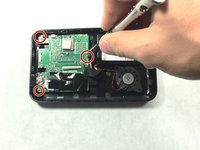
    • Remove the four 5mm screws at each corner using a #000 Phillips head screwdriver.

  2. Magellan RoadMate 5236T-LM Battery Replacement: 手順 2、 3の画像 1 Magellan RoadMate 5236T-LM Battery Replacement: 手順 2、 3の画像 2 Magellan RoadMate 5236T-LM Battery Replacement: 手順 2、 3の画像 3
    • Gently wedge a plastic opening tool into the seam along the side of the device.

    • Slide the tool along the seam to pry apart the front and back covers.

  3. Magellan RoadMate 5236T-LM Battery Replacement: 手順 3、 2の画像 1 Magellan RoadMate 5236T-LM Battery Replacement: 手順 3、 2の画像 2
    この手順で使用する道具:
    Tweezers
    $4.99
    • A ribbon cable attaches the display screen and the motherboard via a ZIF connector. Remove the tape covering where the ZIF connector connects to the mother board.

    • Use tweezers to disconnect the ZIF connector from the motherboard.

    • The ZIF connector may disconnect itself from the motherboard when removing the tape.

  4. Magellan RoadMate 5236T-LM Battery Replacement, Battery: 手順 4、 2の画像 1 Magellan RoadMate 5236T-LM Battery Replacement, Battery: 手順 4、 2の画像 2
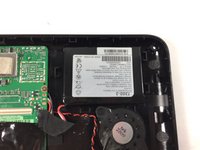
    • Lay the back panel on a flat surface with the battery, motherboard, and speaker facing up.

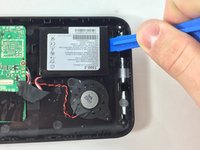
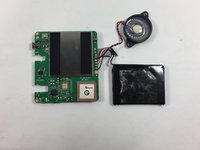
    • Use a plastic opening tool to gently pull the battery away from the back panel in order to remove the adhesive that helps the battery stick to the panel.

  5. Magellan RoadMate 5236T-LM Battery Replacement: 手順 5、 1の画像 1
    • Unscrew the two 5mm screws using a Phillips #000 screwdriver.

  6. Magellan RoadMate 5236T-LM Battery Replacement: 手順 6、 3の画像 1 Magellan RoadMate 5236T-LM Battery Replacement: 手順 6、 3の画像 2 Magellan RoadMate 5236T-LM Battery Replacement: 手順 6、 3の画像 3
    • Use a Phillips #000 screwdriver to remove three 5mm screws that hold the motherboard down to the the back panel.

    • Remove the battery, speaker and motherboard. Place them on a flat surface upside down.

  7. Magellan RoadMate 5236T-LM Battery Replacement: 手順 7、 1の画像 1
終わりに

To reassemble your device, follow these instructions in reverse order.

作成者

2人の作成者と共同で作成されました。

Felix Muwanguzi

メンバー登録日: 10/24/16

199 ポイント

2のガイドは作成済み

チーム

UMass Dartmouth, Team 4-7, Catania Fall 2016 UMass Dartmouth, Team 4-7, Catania Fall 2016人のメンバー

UMASSD-CATANIA-F16S4G7

3 メンバー

5のガイドは作成済み

2 件のコメント

Please describe what voltage to expect on the batterie’s (cell) black, white, and red wires. Also if possible what their individual functions are?

William Nelson - 返信

where can i buy the battery?

jjt39378 - 返信

コメントを追加

統計データ:

過去 24時間: 0

過去 7 日: 0

過去 30 日: 0

今までの合計 2,106