
Logitech Spotlight Battery Replacement
はじめに
手順 1 に進むWhen your Logitech Spotlight is not charging, the battery might be the problem.
必要な工具と部品

-
-
-
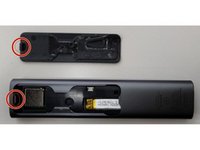
Remove the top cover. Watch out for the glue.
-
-
-
Remove the back plate.
-
Be careful not to break the plastic latch indicated in the image and watch out for glue.
-
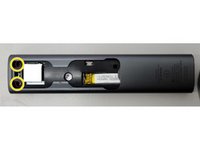
Undo the screws near the top of the case. Then carefully slide the internal plastic case upward to remove it.
-
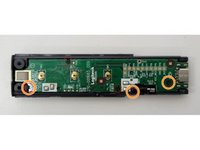
On the board underneath, remove 3 screws.
-
Watch out for the plastic latch.
-
-
-
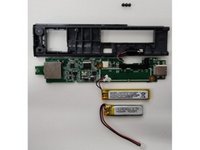
Carefully remove the board to gain access to the battery.
-
Remove and replace the battery.
-
Once reassembled, the device should be working again.
Hi the original battery has the designation »AHB390836«.
This means that the thickness is 3.9 mm, the width 8 mm and the length 36 mm.
I‘m not quite sure where I bought mine but if you copy the designation number and just paste it into your search engine you should be able to find some good results.
I could only paste local sellers from Germany here, but I’ve seen that Amazon also sells the batteries or AliExpress if you’re feeling lucky.
On my original battery is printed: Model AHB390836TPS 3.7Vdc 90mAh, 533-000134 0.3Wh L/N:1908 1ICP 4/9/36... I ordered a AHB390836 in Germany at https://cellphone.de. I can confirm the measurements given above.
Hi Volker. Did you fix the presenter with the AHB390836 from cellphone.de (obviously not the original ...TPS)? The battery seems to come without the connector/plug.
frank -
I ordered a battery through AliExpress. I was able to remove the bottom mostly intact, gently levering under the edges and then pulling up from two sides. One comment - it is far easier to connect the battery and leave it hanging through the plastic assembly while you reassemble the board and plastic frame, then stick the battery to the board. There isn't much room to do it the other way around.
-


To reassemble your device, follow the steps in reverse order.
To reassemble your device, follow the steps in reverse order.
5 の人々がこのガイドを完成させました。
10 件のコメント
I dont't think this is an easy iFixit instruction. It's rather mid or hard especially since you have to break plastic parts to even access the screws. It might make sense to change the difficulty on this one :D @mariaparker
@fixnils you are completely right, that was a mistake on my part! Thanks for noticing :)
@mariaparker could we maybe add the specifications of the Lithium battery to the repair manual?
I could provide an image from my logitech spotlight to help with that.
Users are coming back again and again to ask the same question about the battery specification and the battery size.
nils -
At step 1, I was able to twist and push a strong but thin screwdriver (Philips 000) through the plastic parts which would otherwise block access to the screws. By angling the screwdriver slightly the screws can be released without breaking the plastic completely, so you still have the retention of the usb dongle - although obviously this isn't essential.
If you have to heat-shrink connection of the original plug and new battery wires they may be too bulky for the board to go back properly in the carrier. I had to cut away small bits of ribs on the carrier
Thanks for the useful instructions
Stephen
Hi,
please what are the dimensions of the 90mAh battery? Would Like to prchavé the battery before opening of the device. Thanks, Peter
Hi @peter76810 the original battery has the designation »AHB390836«.
This means that the thickness is 3.9 mm, the width 8 mm and the length 36 mm.
I did not find an exact replica of the original, if I remember correctly my battery was a millimetre longer than the original one.
I hope this helps!
— Nils
nils -
@fixnils Of course, feel free to edit the guide! Good idea. Your changes will be reviewed by staff and should be visible after a few days.
@mariaparker I sadly do not have enough reputation to edit the current guide :(
nils -
There is an easier way to fix this device without destroying it completely:
- buy spare battery from AliExpress (e. g. this one)
- remove back cover as shown in step 4
- cut off the wires from the original battery and remove it
- cut off the connector from the spare battery and solder its wires the original ones
If you need more space inside the device, you can remove the original battery first (!) and then use a "Dremel" device to gently remove the small piece of plastic between the original battery and its connector (see picture here).
Das geht auch ohne Beschädigung. Am besten das untere Ende des Gehäuses mit einem Föhn erwärmen (etwas mehr als handwarm reicht) und dann mit einem flachen Messer die schmalen Seiten wechselseitig nach oben hebeln. Bei mir war das Teil nicht verklebt, sondern hielt sich mit einer Metallfeder fest. Siehe auch Logitech Spotlight Teardown.
Volker - 返信
Hervorragender Fund! Ich habe Dennis den Autor des Teardowns gebeten seine Anleitung der Logitech Spotlight Device Page hinzuzufügen!
nils -
These are the best ways to replace the battery for the logitech spotlight presentation remote:
https://youtu.be/LPXwT0-lgHE
https://youtu.be/Vdo676DsAW8
https://youtu.be/Vy1lL44d5iM
Scarliot - 返信