メインコンテンツにスキップ

Lenovo Yoga Book X90F Bottom Screen Camera Replacement

必要な工具と部品

  1. Lenovo Yoga Book X90F Bottom Screen Camera Replacement, Bottom Screen/Keyboard: 手順 1、 1の画像 1
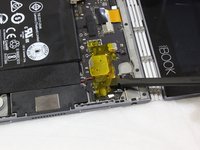
    • Turn off and power down the device before beginning this process. A heat gun or hair dryer will be suitable to heat the adhesive that holds down the screen. Apply heat to the entire surface area of the bottom screen.

    • New adhesive will be required when completing the steps in reverse order.

  2. Lenovo Yoga Book X90F Bottom Screen Camera Replacement: 手順 2、 2の画像 1 Lenovo Yoga Book X90F Bottom Screen Camera Replacement: 手順 2、 2の画像 2
    • Once the adhesive has been heated up, take the iFixIt suction cup and lift in a corner. The screen should be separating from the adhesive here.

    • While the screen is lifted, insert the ifixit opening pick to help pry off the screen.

    • The screen may crack easily as it is thin and fragile.

  3. Lenovo Yoga Book X90F Bottom Screen Camera Replacement: 手順 3、 1の画像 1
    • While the screen has been lifted, insert the plastic opening picks. Heat the adhesive and follow with the screen removal tool to ensure that you are not prying it apart with excessive force.

  4. Lenovo Yoga Book X90F Bottom Screen Camera Replacement: 手順 4、 3の画像 1 Lenovo Yoga Book X90F Bottom Screen Camera Replacement: 手順 4、 3の画像 2 Lenovo Yoga Book X90F Bottom Screen Camera Replacement: 手順 4、 3の画像 3
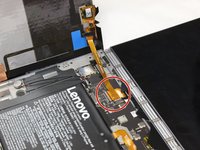
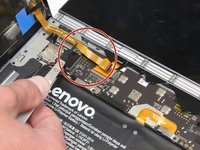
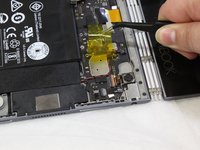
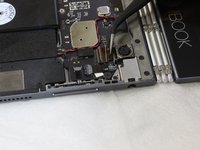
    • After the screen has been opened, disconnect the ribbon connecting the bottom screen to the motherboard by gently pulling the ribbon with tweezers.

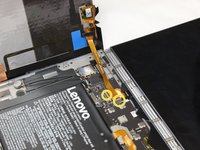
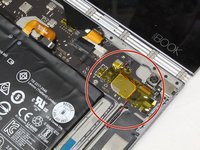
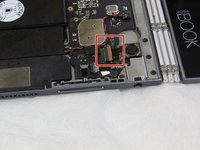
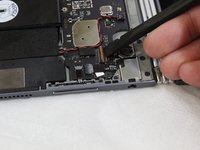
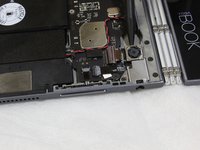
    • If there are black coverings on the tabs as shown in the second image, carefully remove them using a pair of tweezers.

    • You can find more information on Zero Insertion Force (ZIF) connectors on this guide.

  5. Lenovo Yoga Book X90F Bottom Screen Camera Replacement: 手順 5、 1の画像 1
    • Separate and remove the bottom screen from the device.

  6. Lenovo Yoga Book X90F Bottom Screen Camera Replacement, Bottom Screen Camera: 手順 6、 3の画像 1 Lenovo Yoga Book X90F Bottom Screen Camera Replacement, Bottom Screen Camera: 手順 6、 3の画像 2 Lenovo Yoga Book X90F Bottom Screen Camera Replacement, Bottom Screen Camera: 手順 6、 3の画像 3
    • Use the spudger to remove the yellow sticker from the motherboard.

  7. Lenovo Yoga Book X90F Bottom Screen Camera Replacement: 手順 7、 3の画像 1 Lenovo Yoga Book X90F Bottom Screen Camera Replacement: 手順 7、 3の画像 2 Lenovo Yoga Book X90F Bottom Screen Camera Replacement: 手順 7、 3の画像 3
    • Remove the camera's orange ribbon connector tab.

    • Use the spudger to get under the orange tab and lightly pull upwards.

    • This lets the ribbon disconnect easily from the motherboard.

    • Use the a pair of tweezers to remove the ribbon.

  8. Lenovo Yoga Book X90F Bottom Screen Camera Replacement: 手順 8、 2の画像 1 Lenovo Yoga Book X90F Bottom Screen Camera Replacement: 手順 8、 2の画像 2
    • Use the pointed end of the spudger to pry out the camera.

    • There is a line of double sided adhesive that holds the camera down. This may take some force to remove.

    • Pull out the camera with tweezers.

    • Add a new adhesive strip to hold the camera down when installing.

終わりに

To reassemble your device, follow these instructions in reverse order.

作成者

3人の作成者と共同で作成されました。

Tim Freund

メンバー登録日: 09/28/21

97 ポイント

1ガイドが承認済み

チーム

Clemson, Team 5-2, Hunter Fall 2021 Clemson, Team 5-2, Hunter Fall 2021人のメンバー

CLEM-HUNTER-F21S5G2

5 メンバー

6のガイドは作成済み

0 件のコメント

コメントを追加

統計データ:

過去 24時間: 0

過去 7 日: 1

過去 30 日: 3

今までの合計 164