メインコンテンツにスキップ
Lenovo IdeaPad S340-15IWL RAM Replacement

Lenovo IdeaPad S340-15IWL RAM Replacement

Kristen Gismondi

Kristen Gismondi とその他 人の作成者

最終更新日: March 20, 2024

見積もりなし
中レベル
より良い紹介部分
詳細が不足

必要な工具と部品

パーツ

ツール

もっと見る

  1. Lenovo IdeaPad S340-15IWL RAM Replacement, Back Panel: 手順 1、 2の画像 1 Lenovo IdeaPad S340-15IWL RAM Replacement, Back Panel: 手順 1、 2の画像 2
    • Power off the laptop and place it face-down on a non-scratching surface.

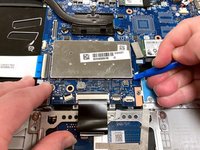
    • Using a Torx T5 screwdriver head, remove all ten 6 mm screws holding the back panel in place.
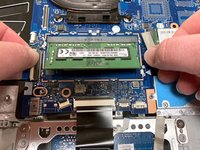
  2. Lenovo IdeaPad S340-15IWL RAM Replacement: 手順 2、 1の画像 1
    • Slide a plastic opening tool underneath the back case near the screen hinges.

    • Gently pry up on either side of the case.

    • You may hear popping sounds as you pry up the back case. This is normal. If the case does not open, try prying at a different angle/position.

  3. Lenovo IdeaPad S340-15IWL RAM Replacement, RAM: 手順 3、 2の画像 1 Lenovo IdeaPad S340-15IWL RAM Replacement, RAM: 手順 3、 2の画像 2
    • Using the opening tool, gently pop off the metal cover for the RAM stick.

  4. Lenovo IdeaPad S340-15IWL RAM Replacement: 手順 4、 2の画像 1 Lenovo IdeaPad S340-15IWL RAM Replacement: 手順 4、 2の画像 2
    • Using your thumbs, gently pull the two metal prongs that secure the RAM outwards.

    • The RAM will pop up at an angle.

    • Remove the RAM from the laptop.

終わりに

To reassemble your device, follow these instructions in reverse order.
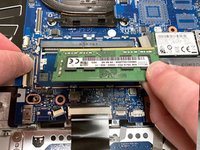
ある他の人がこのガイドを完成しました。

作成者

1人の作成者と共同作成されました。

Kristen Gismondi

メンバー登録日: 11/12/14

92,261 ポイント

241のガイドは作成済み

チーム

iFixit iFixit人のメンバー

Staff

118 メンバー

19,527のガイドは作成済み

0 件のコメント

コメントを追加

統計データ:

過去 24時間: 1

過去 7 日: 9

過去 30 日: 51

今までの合計 1,787