メインコンテンツにスキップ

Karcher Pressure Washers 15209900 2018 Motor Replacement

必要な工具と部品

  1. Karcher Pressure Washers 15209900 2018 Motor Replacement, Safety precautions: 手順 1、 3の画像 1 Karcher Pressure Washers 15209900 2018 Motor Replacement, Safety precautions: 手順 1、 3の画像 2 Karcher Pressure Washers 15209900 2018 Motor Replacement, Safety precautions: 手順 1、 3の画像 3
    • Before you begin, make sure to power off and unplug the device from the outlet.

    • Unscrew the output hose from the pressure washer.

  2. Karcher Pressure Washers 15209900 2018 Motor Replacement, Remove the rubber strap: 手順 2、 3の画像 1 Karcher Pressure Washers 15209900 2018 Motor Replacement, Remove the rubber strap: 手順 2、 3の画像 2 Karcher Pressure Washers 15209900 2018 Motor Replacement, Remove the rubber strap: 手順 2、 3の画像 3
    • Unlatch and remove the yellow rubber strap.

  3. Karcher Pressure Washers 15209900 2018 Motor Replacement, Unscrew the hand grip: 手順 3、 1の画像 1
    • Use a T20 driver to remove the two 55mm-long screws securing the hand grip.

  4. Karcher Pressure Washers 15209900 2018 Motor Replacement, Remove the hand grip: 手順 4、 2の画像 1 Karcher Pressure Washers 15209900 2018 Motor Replacement, Remove the hand grip: 手順 4、 2の画像 2
    • Remove the hand grip from the extension bars.

  5. Karcher Pressure Washers 15209900 2018 Motor Replacement, Unscrew the top panels: 手順 5、 2の画像 1 Karcher Pressure Washers 15209900 2018 Motor Replacement, Unscrew the top panels: 手順 5、 2の画像 2
    • Use a T15 driver to remove the six screws securing the top black plastic panels on either side of the device.

  6. Karcher Pressure Washers 15209900 2018 Motor Replacement, Remove the top panels: 手順 6、 3の画像 1 Karcher Pressure Washers 15209900 2018 Motor Replacement, Remove the top panels: 手順 6、 3の画像 2 Karcher Pressure Washers 15209900 2018 Motor Replacement, Remove the top panels: 手順 6、 3の画像 3
    • Remove the two plastic panels.

  7. Karcher Pressure Washers 15209900 2018 Motor Replacement, Unscrew the plastic feet: 手順 7、 2の画像 1 Karcher Pressure Washers 15209900 2018 Motor Replacement, Unscrew the plastic feet: 手順 7、 2の画像 2
    • Remove the two T15 screws securing the plastic feet—one screw on either side.

  8. Karcher Pressure Washers 15209900 2018 Motor Replacement, Remove the plastic feet: 手順 8、 3の画像 1 Karcher Pressure Washers 15209900 2018 Motor Replacement, Remove the plastic feet: 手順 8、 3の画像 2 Karcher Pressure Washers 15209900 2018 Motor Replacement, Remove the plastic feet: 手順 8、 3の画像 3
    • Unclip and remove the plastic feet.

  9. Karcher Pressure Washers 15209900 2018 Motor Replacement, Unscrew the housing: 手順 9、 2の画像 1 Karcher Pressure Washers 15209900 2018 Motor Replacement, Unscrew the housing: 手順 9、 2の画像 2
    • Use a T15 driver to remove the ten screws securing the housing halves together.

    • Remove the T15 screw underneath the wheel axle.

  10. Karcher Pressure Washers 15209900 2018 Motor Replacement, Remove the housing: 手順 10、 2の画像 1 Karcher Pressure Washers 15209900 2018 Motor Replacement, Remove the housing: 手順 10、 2の画像 2
    • Set the device on its side.

    • Lift the housing half away from the body.

    • If the housing half does not separate, check to make sure you removed all the body screws.

    • Remove the housing.

    • Screws may get stuck inside the plastic housing. Be careful not to lose any screws.

  11. Karcher Pressure Washers 15209900 2018 Motor Replacement, Release the cord strain relief: 手順 11、 2の画像 1 Karcher Pressure Washers 15209900 2018 Motor Replacement, Release the cord strain relief: 手順 11、 2の画像 2
    • Slide the power cord strain relief out its notch on the plastic housing.

  12. Karcher Pressure Washers 15209900 2018 Motor Replacement, Remove the motor: 手順 12、 2の画像 1 Karcher Pressure Washers 15209900 2018 Motor Replacement, Remove the motor: 手順 12、 2の画像 2
    • Lift the motor assembly out of the plastic housing and set it aside.

  13. Karcher Pressure Washers 15209900 2018 Motor Replacement, Reassembly tip: 手順 13、 3の画像 1 Karcher Pressure Washers 15209900 2018 Motor Replacement, Reassembly tip: 手順 13、 3の画像 2 Karcher Pressure Washers 15209900 2018 Motor Replacement, Reassembly tip: 手順 13、 3の画像 3
    • Reassembly tip: Use these images to help reassemble the housing back around the motor.

    • Make sure that all five bushings are in place.

    • In order for the housing to fit properly, the bushings must fit in their respective mounts.

    • Make sure that the yellow tube is properly notched onto the housing.

    • Make sure that the power cord strain relief sits correctly in the housing notch.

  14. Karcher Pressure Washers 15209900 2018 Motor Replacement, Unscrew the electrical box cover: 手順 14、 1の画像 1
    • Use a T20 driver to remove the four screws securing the electrical box cover.

  15. Karcher Pressure Washers 15209900 2018 Motor Replacement, Remove the electrical box cover: 手順 15、 2の画像 1 Karcher Pressure Washers 15209900 2018 Motor Replacement, Remove the electrical box cover: 手順 15、 2の画像 2
    • Lift the cover off of the electrical box.

  16. Karcher Pressure Washers 15209900 2018 Motor Replacement, Loosen the capacitor: 手順 16、 2の画像 1 Karcher Pressure Washers 15209900 2018 Motor Replacement, Loosen the capacitor: 手順 16、 2の画像 2
    • Tilt the capacitor upward slightly to gain access to the connectors.

  17. Karcher Pressure Washers 15209900 2018 Motor Replacement, Unplug the capacitor: 手順 17、 3の画像 1 Karcher Pressure Washers 15209900 2018 Motor Replacement, Unplug the capacitor: 手順 17、 3の画像 2 Karcher Pressure Washers 15209900 2018 Motor Replacement, Unplug the capacitor: 手順 17、 3の画像 3
    • Use your fingers to pull each capacitor connector directly off of their spade plug.

  18. Karcher Pressure Washers 15209900 2018 Motor Replacement, Remove the capacitor: 手順 18、 1の画像 1
    • Remove the capacitor.

    • Reassembly note: The wires are non-polarized and can connect into either plug on the capacitor.

  19. Karcher Pressure Washers 15209900 2018 Motor Replacement, Remove the plate spring: 手順 19、 2の画像 1 Karcher Pressure Washers 15209900 2018 Motor Replacement, Remove the plate spring: 手順 19、 2の画像 2
    • Remove the plate spring from the electrical box.

  20. Karcher Pressure Washers 15209900 2018 Motor Replacement: 手順 20、 2の画像 1 Karcher Pressure Washers 15209900 2018 Motor Replacement: 手順 20、 2の画像 2
    • Pull the switch out of the electrical box.

    • Disconnect the four spade connectors from the the switch.

  21. Karcher Pressure Washers 15209900 2018 Motor Replacement, Remove the switch: 手順 21、 2の画像 1 Karcher Pressure Washers 15209900 2018 Motor Replacement, Remove the switch: 手順 21、 2の画像 2
    • Remove the switch.

    • Reassembly tip: Use the second photo as a reference to help you properly re-wire the switch.

  22. Karcher Pressure Washers 15209900 2018 Motor Replacement, Remove the grounding screw: 手順 22、 1の画像 1
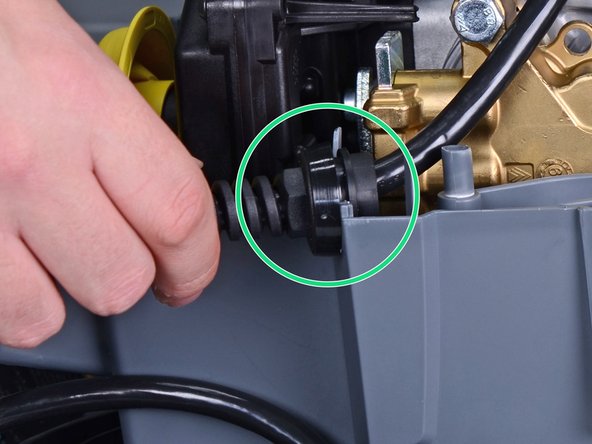
    • Use a flat head screwdriver to remove the screw securing the ground wire in the electrical box.

  23. Karcher Pressure Washers 15209900 2018 Motor Replacement, Unscrew the electrical box: 手順 23、 1の画像 1
    • Use a T30 driver to remove the two bolts securing the electrical box to the motor assembly.

  24. Karcher Pressure Washers 15209900 2018 Motor Replacement, Remove the electrical box: 手順 24、 3の画像 1 Karcher Pressure Washers 15209900 2018 Motor Replacement, Remove the electrical box: 手順 24、 3の画像 2 Karcher Pressure Washers 15209900 2018 Motor Replacement, Remove the electrical box: 手順 24、 3の画像 3
    • Lift the electrical box away from the motor assembly, taking care to feed the wires through the cutout.

    • Remove the electrical box.

  25. Karcher Pressure Washers 15209900 2018 Motor Replacement, Set the motor upright: 手順 25、 1の画像 1
    • Set the motor assembly upright with the pump assembly on the top.

    • The pump assembly is filled with oil. This step prevents the oil from spilling out when you remove the pump.

  26. Karcher Pressure Washers 15209900 2018 Motor Replacement, Loosen the pump assembly: 手順 26、 1の画像 1
    • Use a 13mm socket to remove the four long bolts holding the pump assembly to the motor.

    • Re-assembly tip: The bolts hold the pump under pressure against the motor assembly. During reassembly, gradually tighten the bolts in a cross pattern.

  27. Karcher Pressure Washers 15209900 2018 Motor Replacement, Remove the pump assembly: 手順 27、 2の画像 1 Karcher Pressure Washers 15209900 2018 Motor Replacement, Remove the pump assembly: 手順 27、 2の画像 2
    • Lift the pump assembly off of the motor.

  28. Karcher Pressure Washers 15209900 2018 Motor Replacement, Remove the pump oil: 手順 28、 1の画像 1
    • Pour the pump oil out of the motor housing. If the oil looks serviceable, save it for reassembly.

    • Reassembly tip: The piston assembly is sealed with oil, and the motor housing acts as an oil pan. Before you attach the pump to the motor, fill the piston well with oil, up to the bearing plate.

  29. Karcher Pressure Washers 15209900 2018 Motor Replacement, Remove the bearing plate: 手順 29、 1の画像 1
    • Remove the bearing plate from the motor assembly.

    • Reassembly tip: The side of the plate with the ringed groove should face the bearings.

  30. Karcher Pressure Washers 15209900 2018 Motor Replacement, Remove the bearing ring: 手順 30、 1の画像 1
    • Remove the bearing ring.

  31. Karcher Pressure Washers 15209900 2018 Motor Replacement, Remove the motor bushings: 手順 31、 3の画像 1 Karcher Pressure Washers 15209900 2018 Motor Replacement, Remove the motor bushings: 手順 31、 3の画像 2 Karcher Pressure Washers 15209900 2018 Motor Replacement, Remove the motor bushings: 手順 31、 3の画像 3
    • Pull the two rubber bushings off of each side of the motor.

  32. Karcher Pressure Washers 15209900 2018 Motor Replacement, Remove the motor cover: 手順 32、 3の画像 1 Karcher Pressure Washers 15209900 2018 Motor Replacement, Remove the motor cover: 手順 32、 3の画像 2 Karcher Pressure Washers 15209900 2018 Motor Replacement, Remove the motor cover: 手順 32、 3の画像 3
    • Pull the black motor cover off of the motor assembly.

  33. Karcher Pressure Washers 15209900 2018 Motor Replacement, Remove the blower wheel: 手順 33、 3の画像 1 Karcher Pressure Washers 15209900 2018 Motor Replacement, Remove the blower wheel: 手順 33、 3の画像 2 Karcher Pressure Washers 15209900 2018 Motor Replacement, Remove the blower wheel: 手順 33、 3の画像 3
    • Insert a pry bar or a flat head screwdriver between the blower wheel and the motor assembly.

    • Pry to loosen the blower wheel from the motor.

    • Slide the blower wheel off of the motor assembly.

  34. Karcher Pressure Washers 15209900 2018 Motor Replacement: 手順 34、 1の画像 1
    • Only the motor assembly remains.

終わりに

To reassemble your device, follow these instructions in reverse order.

3 の人々がこのガイドを完成させました。

Arthur Shi

メンバー登録日: 01/03/18

254,609 ポイント

529のガイドは作成済み

チーム

iFixit iFixit人のメンバー

Staff

136 メンバー

17,430のガイドは作成済み

0 件のコメント

コメントを追加

統計データ:

過去 24時間: 7

過去 7 日: 20

過去 30 日: 86

今までの合計 2,931