メインコンテンツにスキップ
Dell XPS 15 9575 Speaker Replacement

Dell XPS 15 9575 Speaker Replacement

Luke Rice

Luke Rice とその他 人の作成者

最終更新日: June 24, 2024

35 - 55 分
中レベル

If you're experiencing issues with sound quality or no audio output from the speakers of your Dell XPS 15 9575 2-in-1 laptop, this guide will assist you in replacing the speakers.

The pair of speakers in your Dell XPS 15 9575 are responsible for producing audio output. Over time, they can degrade due to wear and tear or suffer damage from various factors, leading to distorted audio, crackling sounds, or complete silence.

Before proceeding with the replacement, it's important to diagnose the problem causing the audio issue accurately. If you're unsure about the root cause of the issue, it may be useful to download the Realtek High Definition Audio Driver on the Dell website before attempting to replace the hardware.

By following this guide, you'll be able to restore the audio functionality of your Dell XPS 15 9575 2-in-1 laptop and enjoy an optimal media experience once again.

Before you begin this repair, turn off your laptop and unplug it from the charging adapter.

必要な工具と部品

修理キット

キットには、修理ガイドを完了するために必要な全ての部品とツールが含まれています。

パーツ

ツール

もっと見る

  1. Dell XPS 15 9575 Speaker Replacement, Bottom Cover: 手順 1、 3の画像 1 Dell XPS 15 9575 Speaker Replacement, Bottom Cover: 手順 1、 3の画像 2 Dell XPS 15 9575 Speaker Replacement, Bottom Cover: 手順 1、 3の画像 3
    • For your safety, please make sure the device is powered off and the A/C adapter is unplugged.

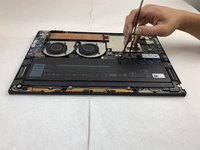
    • Use your T5 Torx driver to remove all eight 3.2 mm screws holding down the back panel.

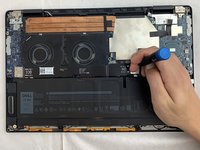
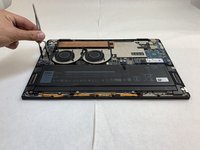
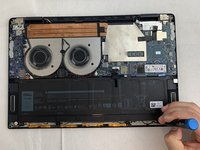
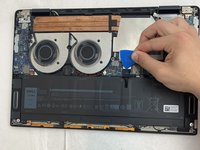
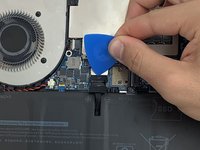
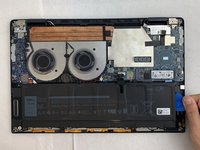
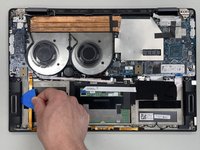
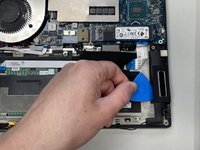
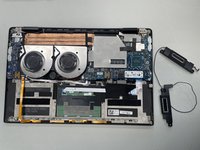
    • Wedge an opening pick between the back cover and the base of the board, then slightly lift the tool to pop the clips on the back cover off.

  2. Dell XPS 15 9575 Speaker Replacement: 手順 2、 1の画像 1
    • Make sure all screws are removed before you lift the panel to prevent any damage from occurring.

    • Remove the bottom cover from the device when all sides are free.

  3. Dell XPS 15 9575 Speaker Replacement, Interconnect Cable: 手順 3、 2の画像 1 Dell XPS 15 9575 Speaker Replacement, Interconnect Cable: 手順 3、 2の画像 2
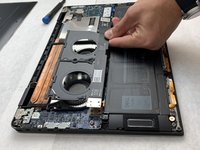
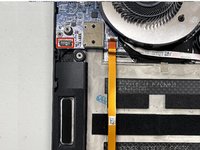
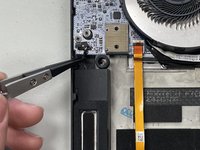
    • Use the Phillips #0 screwdriver to remove all four silver 3.2 mm screws fastening the interconnect cable.

  4. Dell XPS 15 9575 Speaker Replacement: 手順 4、 2の画像 1 Dell XPS 15 9575 Speaker Replacement: 手順 4、 2の画像 2
    • Carefully wedge the plastic opening pick between the fan and the interconnect cable.

    • If this position does not release the interconnect cable, slide the opening pick along the edge until it is completely free.

    • Remove the interconnect cable.

  5. Dell XPS 15 9575 Speaker Replacement: 手順 5、 2の画像 1 Dell XPS 15 9575 Speaker Replacement: 手順 5、 2の画像 2
    • Use the nylon tweezers to remove the interconnect pins from each of the circuit boards.

  6. Dell XPS 15 9575 Speaker Replacement, Battery: 手順 6、 2の画像 1 Dell XPS 15 9575 Speaker Replacement, Battery: 手順 6、 2の画像 2
    • Use the Phillips #0 screwdriver to remove all eight 6.4 mm screws from the battery.

  7. Dell XPS 15 9575 Speaker Replacement: 手順 7、 2の画像 1 Dell XPS 15 9575 Speaker Replacement: 手順 7、 2の画像 2
    • Use a plastic opening pick to pry the black battery cable away from its silver adapter.

    • Hold the pick at 35 degrees from the computer and push towards the battery to remove the cable from its socket.

    • Do not push straight into the battery cable as this could damage the adapter.

    • When you disconnect connectors like these, be careful not to dislodge the small surface-mounted components surrounding the socket.

  8. Dell XPS 15 9575 Speaker Replacement: 手順 8、 2の画像 1 Dell XPS 15 9575 Speaker Replacement: 手順 8、 2の画像 2
    • Use a plastic opening pick to separate the battery from the device.

    • Lift the battery straight up and remove it when it is completely separated.

  9. Dell XPS 15 9575 Speaker Replacement, Speakers: 手順 9、 1の画像 1
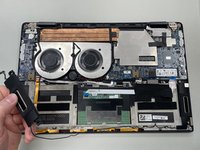
    • Use the Phillips #0 screwdriver to remove a single 1.7 mm screw securing each speaker.

  10. Dell XPS 15 9575 Speaker Replacement: 手順 10、 2の画像 1 Dell XPS 15 9575 Speaker Replacement: 手順 10、 2の画像 2
    • Use the point of a spudger to push on alternating sides of the connector to "walk" it out of its socket and disconnect the speaker cable from the I/O board (also known as the daughterboard)..

    • Don't pull on the cables.

    • It may take a lot of alternating before the connector comes out.

    • To reconnect the cable, align the connector and use a spudger or clean fingernail to push it fully into the socket.

    • Don't push on the cables themselves, or you may damage the connector.

  11. Dell XPS 15 9575 Speaker Replacement: 手順 11、 2の画像 1 Dell XPS 15 9575 Speaker Replacement: 手順 11、 2の画像 2
    • Lift the the speaker away from the laptop.

    • Detach the cable from the holders along the bottom of the case near the orange ribbon cable.

  12. Dell XPS 15 9575 Speaker Replacement: 手順 12、 2の画像 1 Dell XPS 15 9575 Speaker Replacement: 手順 12、 2の画像 2
    • Remove the other speaker and the remaining cable that connects it to the first speaker from the laptop.

終わりに

To reassemble your device, follow these instructions in reverse order. Take your e-waste to an R2 or e-Stewards certified recycler.

作成者

1人の作成者と共同作成されました。

Luke Rice

メンバー登録日: 02/08/24

109 ポイント

1ガイドが承認済み

チーム

University of North Texas, Team 1-5, Coppersmith Spring 2024 University of North Texas, Team 1-5, Coppersmith Spring 2024人のメンバー

UNT-COPPERSMITH-S24S1G5

4 メンバー

4のガイドは作成済み

0 件のコメント

コメントを追加

統計データ:

過去 24時間: 1

過去 7 日: 5

過去 30 日: 8

今までの合計 145