
Dell XPS 15 9510 Battery Replacement
はじめに
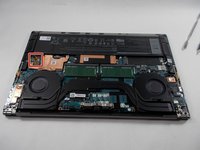
手順 1 に進むReplacing the battery of a Dell XPS 15 9510 laptop is a straightforward task requiring only a few tools. The new battery constitutes nearly all of the cost of this repair, so if you are planning to order a replacement battery for this or any other laptop, it may be wise to remove the back panel of the laptop to ensure that the one you are ordering matches the existing one.
If the battery you are replacing is swollen, be sure to take appropriate precautions.
必要な工具と部品
修理キット
キットには、修理ガイドを完了するために必要な全ての部品とツールが含まれています。

パーツ

ツール


もっと見る
-
-
Remove eight 3 mm screws from the underside of the case using a T5 Torx screwdriver.
-
-
-
-
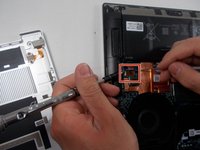
Using the small battery pull tab, disconnect the battery connector from the motherboard.
-


To reassemble your device, follow these instructions in reverse order.
To reassemble your device, follow these instructions in reverse order.
5 の人々がこのガイドを完成させました。
チーム

UMass Dartmouth, Team 1-3, Mellen Spring 2022 UMass Dartmouth, Team 1-3, Mellen Spring 2022人のメンバー
UMASSD-MELLEN-S22S1G3
3 メンバー
5のガイドは作成済み
1件のガイドコメント
XPS 15 9510 states the battery (purchased from ifixit) is FAKE and the battery will not charge.