メインコンテンツにスキップ
Dell Chromebook 3100 2-in-1 Input Output Board Replacement

Dell Chromebook 3100 2-in-1 Input Output Board Replacement

Muhammad Ali

Muhammad Ali とその他 3 人の作成者

最終更新日: December 27, 2021

5分
簡単

If your Dell Chromebook 3100 2-in-1 fails to turn on, please refer to our troubleshooting guide.

If your laptop is plugged into an outlet with a working adapter, but the device will neither charge nor power on, this is a sign that the charging port is damaged and needs to be replaced. For this configuration, the charging port is on the left when the bottom cover is facing up. Another way to identify the charging port is to look for a Type C port with a lightning bolt symbol on top.

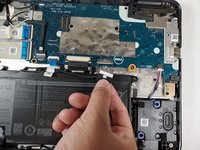
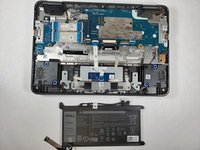
To complete this guide, it is not necessary to remove the battery; instead, the battery connecter can be disconnected to isolate power to the system during the process.

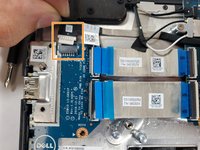
NOTE: The input and output board depends on the configuration ordered. Not all system configurations come with the input and output board.

必要な工具と部品

ツール

  1. Dell Chromebook 3100 2-in-1 Input Output Board Replacement, Back Cover: 手順 1、 2の画像 1 Dell Chromebook 3100 2-in-1 Input Output Board Replacement, Back Cover: 手順 1、 2の画像 2
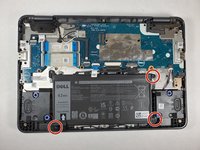
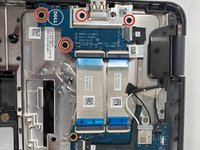
    • Using a Phillips #1 screwdriver, remove all nine of the 5 mm screws from the back cover.

  2. Dell Chromebook 3100 2-in-1 Input Output Board Replacement: 手順 2、 2の画像 1 Dell Chromebook 3100 2-in-1 Input Output Board Replacement: 手順 2、 2の画像 2
    • Use the opening tool to pry the back cover off of the device.

  3. Dell Chromebook 3100 2-in-1 Input Output Board Replacement, Battery: 手順 3、 2の画像 1 Dell Chromebook 3100 2-in-1 Input Output Board Replacement, Battery: 手順 3、 2の画像 2
    • Disconnect the battery cable from the connector on the system board.

  4. Dell Chromebook 3100 2-in-1 Input Output Board Replacement: 手順 4、 3の画像 1 Dell Chromebook 3100 2-in-1 Input Output Board Replacement: 手順 4、 3の画像 2 Dell Chromebook 3100 2-in-1 Input Output Board Replacement: 手順 4、 3の画像 3
    • Using a Phillips #1 screwdriver, remove the three 4 mm screws that secure the battery.

    • Remove the adhesive tape that secures the battery in place.

  5. Dell Chromebook 3100 2-in-1 Input Output Board Replacement: 手順 5、 2の画像 1 Dell Chromebook 3100 2-in-1 Input Output Board Replacement: 手順 5、 2の画像 2
    • Carefully remove the battery from the device.

  6. Dell Chromebook 3100 2-in-1 Input Output Board Replacement, Input/Output Board: 手順 6、 2の画像 1 Dell Chromebook 3100 2-in-1 Input Output Board Replacement, Input/Output Board: 手順 6、 2の画像 2
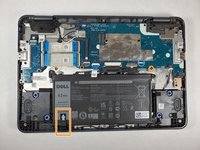
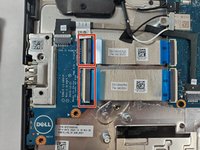
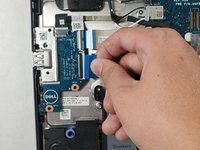
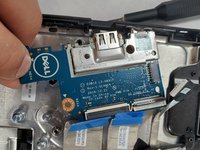
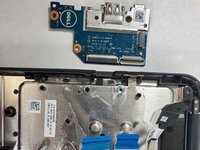
    • Remove all four 4 mm screws that secure the IO bracket and IO board using a Phillips #1 screwdriver.

  7. Dell Chromebook 3100 2-in-1 Input Output Board Replacement: 手順 7、 3の画像 1 Dell Chromebook 3100 2-in-1 Input Output Board Replacement: 手順 7、 3の画像 2 Dell Chromebook 3100 2-in-1 Input Output Board Replacement: 手順 7、 3の画像 3
    • Flip open the retaining flaps on the two cable connectors in the IO board.

    • Disconnect the 30-pin and 40-pin IO board cables from their connectors on the motherboard.

    • Disconnect the IO cable from the system board by pulling it out of its socket.

  8. Dell Chromebook 3100 2-in-1 Input Output Board Replacement: 手順 8、 2の画像 1 Dell Chromebook 3100 2-in-1 Input Output Board Replacement: 手順 8、 2の画像 2
    • Slowly pull out the input/output board from the laptop.

終わりに

To reassemble your device, follow these instructions in reverse order.

作成者

3人の作成者と共同で作成されました。

Muhammad Ali

メンバー登録日: 09/02/21

352 ポイント

2のガイドは作成済み

チーム

Gateway, Team 1-1, Pee Fall 2021 Gateway, Team 1-1, Pee Fall 2021人のメンバー

GCC-PEE-F21S1G1

5 メンバー

5のガイドは作成済み

0 件のコメント

コメントを追加

統計データ:

過去 24時間: 0

過去 7 日: 10

過去 30 日: 29

今までの合計 931