
Dell Chromebook 11 CB1C13 Fan Replacement
はじめに
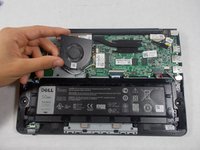
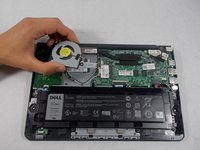
手順 1 に進むThis guide will show you how to replace the fan. It is very common for a fan to collect dust, and without proper cooling, a device may overheat and suffer permanent internal damage. Knowing how to remove a fan for proper cleaning can be beneficial for the condition and longevity of a laptop.


-
-
Remove all seven 8 mm Philips #0 screws from the back case with a Philips #0 screwdriver.
-
Once all seven screws are removed, you can pry the case off using your fingers or a plastic opening tool.
-
-


To reassemble your device, follow these instructions in reverse order.
To reassemble your device, follow these instructions in reverse order.
チーム

UMass Dartmouth, Team S3-G6, Bailey Fall 2017 UMass Dartmouth, Team S3-G6, Bailey Fall 2017人のメンバー
UMASSD-BAILEY-F17S3G6
3 メンバー
7のガイドは作成済み